

In our day to day tasks of web development it is necessary for us to work with both client and server-side code. We write the business logic using PHP and generate the HTML to be displayed in the users’ browsers. Then we use frameworks such as jQuery or Prototype to provide client-side interactivity.
Now think about how you can change and manipulate the generated HTML using server-side PHP code. phpQuery is the ultimate solution that will come to your mind. If you haven’t heard about phpQuery, you may be interested in this article since I am going to give you a brief introduction to phpQuery and explain how you can use it in real-world projects.
Key Takeaways
- phpQuery is a server-side, chainable, CSS3 selector driven Document Object Model (DOM) API based on the jQuery JavaScript Library. It simplifies tasks requiring DOM manipulation, providing similar functionalities to jQuery and eliminating the need for untidy HTML code generation using echo statements and similar methods.
- The functionality of phpQuery includes creating DOM elements, selecting and manipulating elements, iterating through the DOM, and printing the output to the browser. It also provides features such as selectors, attributes, traversing, manipulation, Ajax, events, and utilities.
- phpQuery allows developers to change and manipulate the generated HTML using server-side PHP code. This can improve the performance and security of web applications, as tasks traditionally done on the client-side can now be handled on the server-side.
- phpQuery provides better code quality and extendibility compared to pure PHP code. It allows for code to be open for extension but closed for modification, adhering to the Open-Closed Principle. This means that new functionality can be added without modifying existing code, improving the robustness and maintainability of the code.
What is phpQuery
phpQuery is a server-side, chainable, CSS3 selector driven Document Object Model (DOM) API based on jQuery JavaScript Library.
This is the definition given on the official phpQuery project page. If you have used jQuery, then you will have an idea of how it can simplify many tasks requiring DOM manipulation. phpQuery provides exactly the same functionalities to be used inside your server-side PHP code. You can say good bye to untidy HTML code generation using echo statements and similar methods.
You will have access to most of the functionality provided by jQuery in phpQuery, which can broadly be divided into the 4 tasks mentioned below:
- Creating DOM elements
- Selecting and Manipulating elements
- Iterating through the DOM
- Printing the output to the browser
You can execute the tasks using the features provided by phpQuery which is known as “ported jQuery sections.” Let’s see the features first:
- Selectors – find elements based on given condition.
- Attributes – work with attributes of DOM elements.
- Traversing – travel through list of selected elements.
- Manipulation – add and remove content on selected elements.
- Ajax – create server side ajax requests.
- Events – bind DOM events on selected elements.
- Utilities – generic functions to support other features.
You can download the phpQuery library from the project page at code.google.com/p/phpquery. Copy the folder to your web server and you are ready to go. Installation is simple as that, and you can execute the demo.php file to get started.
How to Use phpQuery
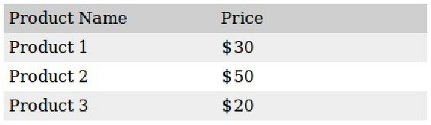
I’m going to show you how to create a two-column unordered list with headers and different row colors for odd and even rows, as shown in the image below:
First, let’s create an HTML document using phpQuery:
<?php

require("phpQuery/phpQuery.php");

$doc = phpQuery::newDocument("<div/>");
The above code will create a basic HTML document with a
div tag. The library provides various methods of creating documents; I have used the simplest one, but you can find others in demo.php and the documentation.
Now we need to create an unordered list and add it to our HTML document.
<?php

...

$doc["div"]->append("<ul><li>Product Name</li><li>Price</li></ul>");

$products = array(

    array("Product 1","$30"),

    array("Product 2","$50"),

    array("Product 3","$20"));
foreach($products as $key=>$product) {

    $doc["div ul"]->append("<li>$product[0]</li><li>$product[1]</li>");

}

print $doc;
You can see that we have the unordered list now. But all the elements are in a single column, which is the default. We have to move the even elements of the list into a second column.
<?php

...

$doc["div ul"]->attr("style", "width:420px;");

$doc["div ul"]->find("li:even")->attr("style","width:200px; float:left; padding:5px; list-style:none;");

$doc["div ul"]->find("li:odd")->attr("style","width:200px; float:left; padding:5px; list-style:none;");
I’m using the style attribute to define the CSS styles required for our example here, but it’s not recommended to use inline styles unless it’s really needed. Always use CSS classes to add styles.
Now, let’s highlight the header and even numbered rows using phpQuery methods.
<?php

...

$doc["div ul"]->find("li:nth-child(4n)")->attr("style","background:#EEE; width:200px; float:left; padding:5px; list-style:none;");

$doc["div ul"]->find("li:nth-child(4n-1)")->attr("style","background:#EEE; width:200px; float:left; padding:5px; list-style:none;");

$doc["div ul"]->find("li:lt(1)")->attr("style","background:#CFCFCF; width:200px; float:left; padding:5px; list-style:none;");
We have completed our simple example, and you should now have an idea of how phpQuery can be used to simplify HTML generation server-side. Everything we did is almost the same as would be done with jQuery, except we did all the actions against the
$doc object.
Importance of phpQuery
Even though I explained the functionality of phpQuery, you must be wondering why we need the library when we have jQuery on the client-side. I’ll show the importance of phpQuery using a practical scenario.
Consider the following situation: assume we have a table like the following, which has all the information about web developers who went to an interview.
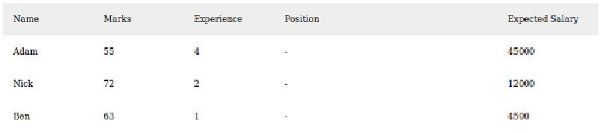
Now here’s the list of requirements we have to develop in this scenario:
- Applicants who got a mark over 60 for the exam should be highlighted in blue.
- Applicants with more than 3 years working experience should have a link in front labeled “Apply for Senior Software Engineer” and other applicants should have the link “Apply for Software Engineer”.
- The company has a salary structure based on experience:
- 1 year – $5,000
- 2 years – $10,000
- 3 years – $20,000
- more than 3 years – $50,000
The salary column should be highlighted in green for applicants who match the criteria.
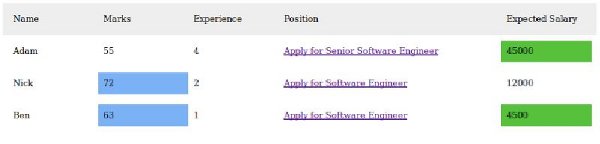
This is how the output should look:
A developer might provide the following solution to meet the requirements using pure PHP code.
<?php

// retrieve applicants from database

//...
echo <<<ENDHTML

<div id="main">

 <div class="row_head">

  <div>Name</div>

  <div>Marks</div>

  <div>Experience</div>

  <div>Position</div>

  <div>Expected Salary</div>

 </div>

ENDHTML;

foreach ($applicants as $applicant) {

    echo '<div class="row">';

    echo "<div>" . $applicant["name"] . "</div>";

    echo '<div class="' . marksClass($applicant["marks"]) . '">' . $applicant["marks"] . "</div>";

    echo "<div>" . $applicant["experience"] . "</div>";

    echo "<div>" . positionLink($applicant["experience"]) . "</div>";

    echo '<div class="' . salaryClass($applicant["experience"], $applicant["salary"]) . '">' . $applicant["salary"] . "</div>";

    echo "</div>";

}

echo "</div>";
function marksClass($info) {

    return ($info > 60) ? "pass" : "fail";

}
function positionLink($experience) {

    return ($experience > 3)

        ? '<a href="#">Apply for Senior Software Engineer</a>'

        : '<a href="#">Apply for Software Engineer</a>';

}
function salaryClass($experience, $salary) {

    switch ($experience) {

        case 1:

            return ($salary < 5000) ? "accept" : "reject";

        case 2:

            return ($salary < 10000) ? "accept" : "reject";

        case 3:

            return ($salary < 20000) ? "accept" : "reject";

        default:

            return ($salary < 50000) ? "accept" : "reject";

    }

}
Now let’s do it using phpQuery and compare the code and advantages.
<?php

require("phpQuery/phpQuery.php");

$doc = phpQuery::newDocument('<div id="main"></div>');

phpQuery::selectDocument($doc);
// retrieve applicants from database

//...
$doc["#main"]->append('

<div id="main">

 <div class="row_head">

  <div>Name</div>

  <div>Marks</div>

  <div>Experience</div>

  <div>Position</div>

  <div>Expected Salary</div>

 </div>');
foreach ($applicants as $key => $applicant) {

    $doc["#main"]->append('<div class="row" id="app_' . $key . '"></div>');

    foreach ($applicant as $field => $info) {

        $doc["#main"]->find("#app_" . $key)->append('<div class="_' . $field . '">' . $info . "</div>");

        if ($field == "experience") {

            $doc["#main"]->find("#app_" . $key)->append('<div style="width:400px" class="_position">-</div>');

        }

    }

}
addMarksClass($doc);

addSalaryClass($doc);

addPositionLink($doc);
print $doc;
function addMarksClass(&$doc) {

    $marks = pq("._marks");

    foreach ($marks as $appMark) {

        if (pq($appMark)->html() > 60) {

            pq($appMark)->addClass("pass");

        }

        else {

            pq($appMark)->addClass("fail");

        }

    }

}
function addSalaryClass(&$doc) {

    $marks = pq("._salary");

    foreach ($marks as $appMark) {

        $experience = pq($appMark)->parent()->find("._experience" )->html();

        $salary = pq($appMark)->html();
        switch ($experience) {

            case 1:

                pq($appMark)->addClass(

                    ($salary < 5000) ? "accept" : "reject"

                );

                break;

            case 2:

                pq($appMark)->addClass(

                    ($salary < 10000) ? "accept" : "reject"

                );

                break;

            case 3:

                pq($appMark)->addClass(

                    ($salary < 20000) ? "accept" : "reject"

                );

                break;

            default:

                pq($appMark)->addClass(

                    ($salary < 50000) ? "accept" : "reject"

                );

        }

    }

}
function addPositionLink(&$doc) {

    $experience = pq("._experience");

    foreach ($experiece as $appExp) {

        if (pq($appExp)->html() > 3) {

            pq($appExp)->parent()->find("._position")->html('<a href="#">Apply for Senior Software Engineer</a>');

        }

        else{

            pq($appExp)->parent()->find("._position")->html('<a href="#">Apply for Software Engineer</a>');

        }

    }

}
phpQuery is easy if you have the knowledge of working with jQuery already. Most of the above code will be self-explanatory. I want to mention though that
pq() refers to the current document. All the others are jQuery functions.
And even though both look similar, the code which uses phpQuery provides better quality and extendibility. Think how brittle the original code can be if you have to add extra functionality later. Let’s assume we want to add additional validation on marks based on the working experience. In that scenario you’d have to add another method and assign the returned result inside the foreach loop. That means you have to change already written code, violating the Open-Closed Principle:
Software entities (classes, modules, functions, etc.) should be open for extension, but closed for modification.
With the second example which uses phpQuery, the code is first generated without any validation, and then we pass the table into each function and the changes are placed into the original table. Each function does not affect the other functions, so we can write a new function for any new requirements and use it outside the loop with the other functions. We don’t modify already existing code, which sounds good, right? This is called decoration:
Decorator pattern is a design pattern that allows behavior to be added to an existing object dynamically.
Summary
We started this tutorial by introducing phpQuery features and its importance. After learning how to use phpQuery using a simple example, we moved to practical example where it became much more important in improving the quality of code. phpQuery has provided us with a new perspective to working with HTML in server side, and I hope you will use phpQuery in different ways and share your personal experiences in the comments below.
Frequently Asked Questions about Server-Side HTML Handling Using phpQuery
What is phpQuery and why is it important for server-side HTML handling?
phpQuery is a server-side, chainable, CSS3 selector driven Document Object Model (DOM) API based on jQuery JavaScript Library. It is written in PHP5 and provides an easy way to handle HTML elements on the server side. It allows developers to perform tasks such as HTML document traversal and manipulation, event handling, and animation, which were traditionally done on the client side. This can significantly improve the performance and security of web applications.
How does phpQuery compare to other DOM manipulation libraries?
phpQuery stands out for its simplicity and ease of use, especially for developers already familiar with jQuery. It supports most of the jQuery syntax, making it easy to select, manipulate, and traverse HTML elements. Unlike some other libraries, phpQuery is chainable, meaning you can link together multiple actions in a single statement.
How do I install phpQuery?
phpQuery can be installed using Composer, a dependency management tool for PHP. You can add phpQuery to your project by running the command composer require phpquery/phpquery. This will download and install the latest stable version of phpQuery and its dependencies.
How do I select elements using phpQuery?
phpQuery uses CSS3 selectors to select elements, similar to jQuery. For example, to select all paragraphs in a document, you would use $doc['p']. You can also use more complex selectors, such as $doc['div.content > p'] to select all paragraphs that are direct children of a div with the class “content”.
How do I manipulate elements using phpQuery?
phpQuery provides several methods for manipulating elements. For example, you can use the append(), prepend(), after(), and before() methods to insert content. You can also use the attr() method to get or set the value of an attribute, and the addClass(), removeClass(), and toggleClass() methods to manipulate classes.
How do I handle events using phpQuery?
phpQuery supports event handling through the bind() method. You can use this method to attach event handlers to elements. For example, $doc['p']->bind('click', function() { echo 'Paragraph clicked!'; }); would echo “Paragraph clicked!” whenever a paragraph is clicked.
Can I use phpQuery with AJAX?
Yes, phpQuery supports AJAX through the ajax() method. This method allows you to send asynchronous HTTP requests to the server and manipulate the response using phpQuery.
How do I perform animations using phpQuery?
phpQuery supports animations through the animate() method. This method allows you to create custom animations by changing CSS properties over time.
How do I traverse the DOM using phpQuery?
phpQuery provides several methods for traversing the DOM, such as children(), parent(), next(), prev(), find(), and closest(). These methods allow you to navigate through the elements in a document.
Can I use phpQuery with other PHP libraries?
Yes, phpQuery can be used alongside other PHP libraries. It is designed to be flexible and interoperable, making it a great tool for any PHP developer’s toolkit.

