


The following is a short extract from our book, Jump Start Adobe XD, written by Daniel Schwarz, a highly practical tutorial on this fantastic prototyping tool. SitePoint Premium members get access with their membership, or you can buy a copy in stores worldwide.
Key Takeaways
- Adobe XD is a powerful tool for prototyping interactions, allowing designers to create user flows and transition settings, visually demonstrating the user experience without needing to write any code.
- Adobe XD offers a variety of transition options including slide, push, dissolve, etc., with adjustable speed and duration settings. It also allows for the creation of complex interactions like overlays, scrollable areas, and fixed elements.
- Adobe XD stands out from other design apps by offering a unified design and prototyping experience, allowing for seamless switching between the Design and Prototype workspaces. It also supports real-time collaboration and offers features for sharing prototypes for feedback and managing different versions of a prototype.
Prototyping Interactions
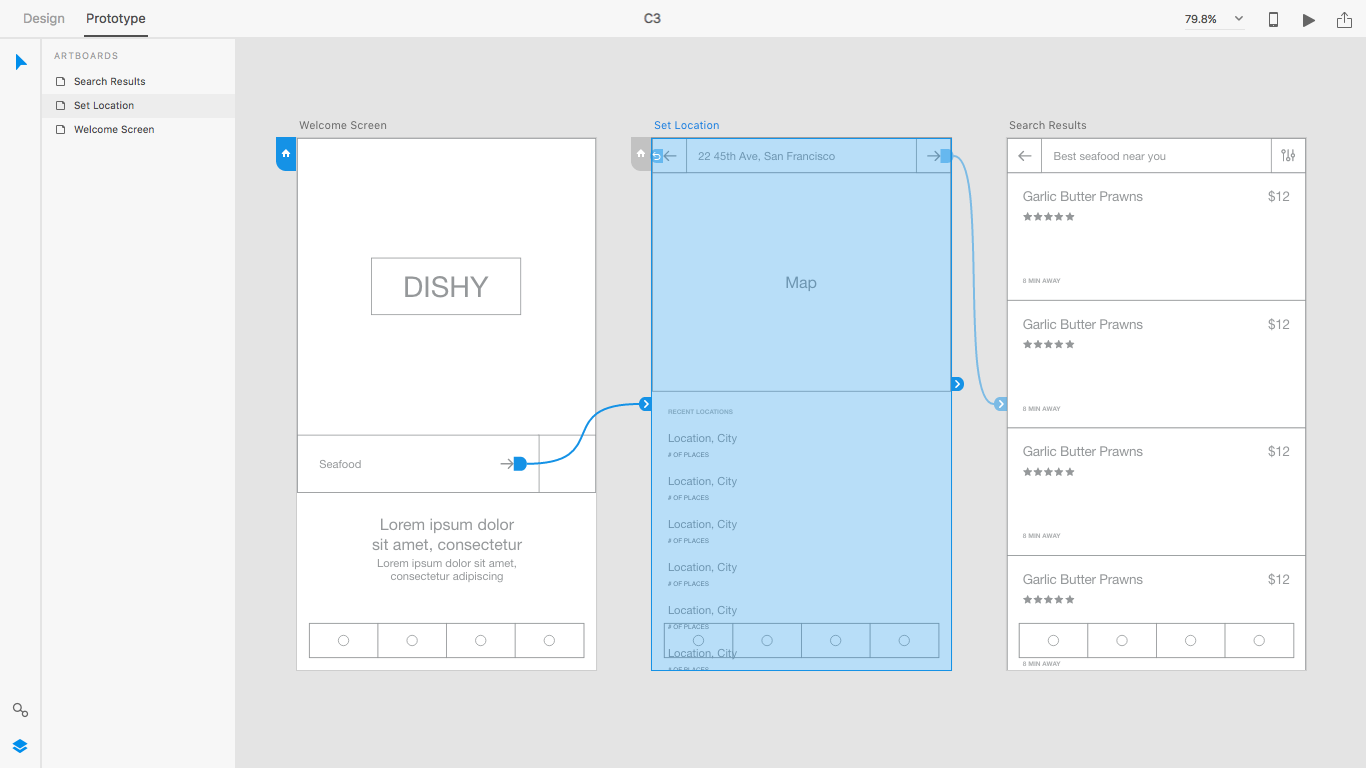
Let’s start by linking the welcome screen to the location filter screen, effectively demonstrating a user flow where the user searches for a type of cuisine, and is then asked to specify where they’d like to eat in the location filter screen. Click on the right arrow icon (inside the input field on the welcome screen), where a blue arrow-tab will appear alongside it.
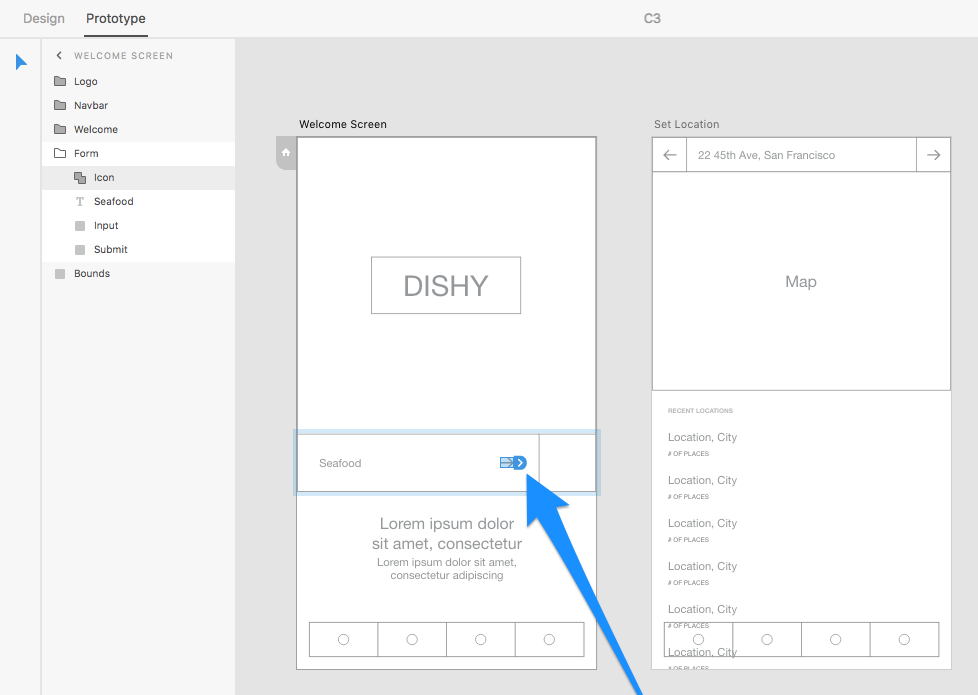
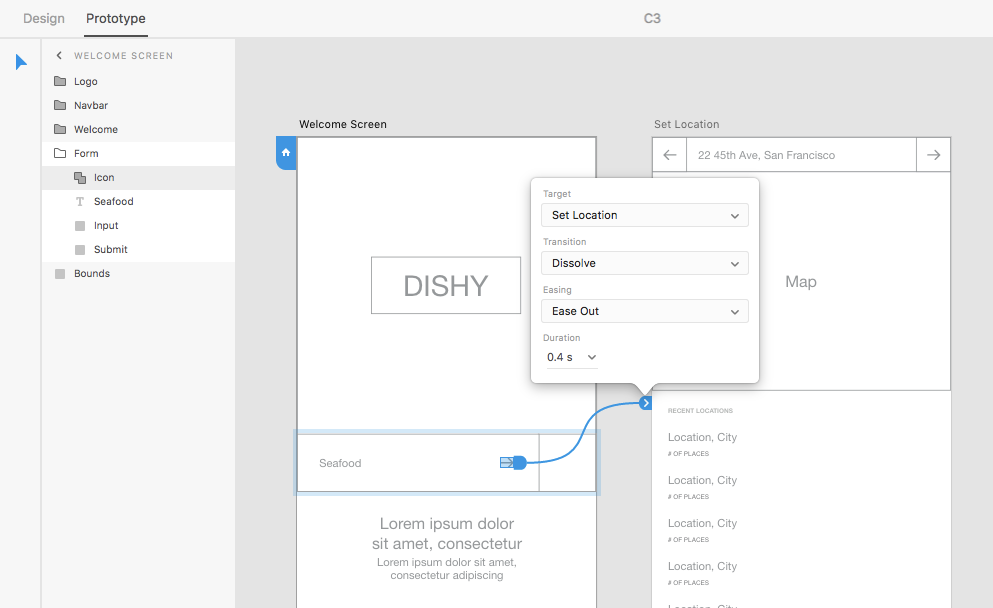
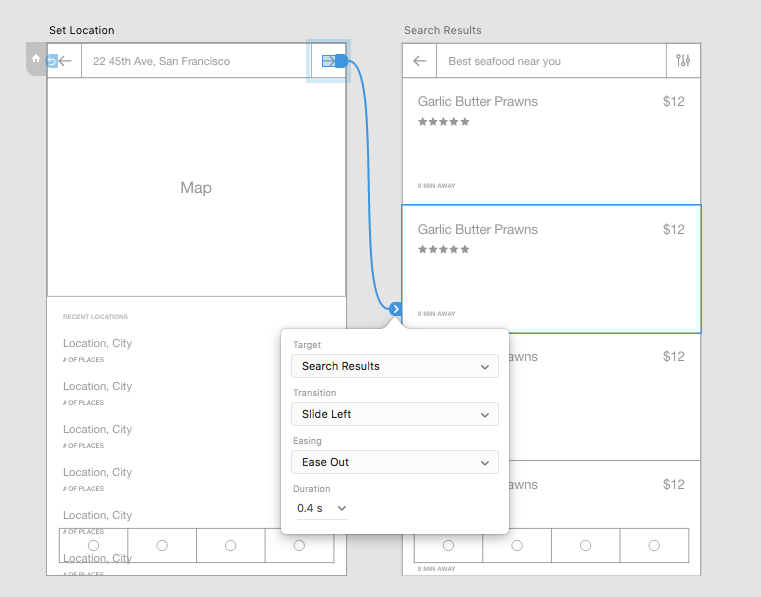
Drag and drop this blue tab into the location filter screen. A user flow will have been created, and a small modal will appear where you can specify transition settings for this user flow – that is, how the screen will transition into the next one (the type of animation effect, the duration of that animation, etc).
Later on (when we learn how to preview/test our prototypes), we’ll be able to literally click on this icon and be taken to the next screen, as if we were using a real app — this is how we (and our developers, and maybe even our clients) use the prototype workspace to test our concept before committing to it.
Next, we’ll specify the transition settings for this user flow.
Designing Transitions
Animation comes with its own set of UX challenges. A slow transition can make the user feel like your app is taking too long, whereas a transition that’s too fast can leave the user wondering what even happened. And then there’s the style of the transition itself. You don’t need to do a fade-flip-slide combo to wow the user, a subtle motion is enough to illustrate the result of the user interaction. Let’s explore some of the transitions and transition settings that we can use in Adobe XD.
- Target (what the screen transitions into):
- None: Essentially removes the flow
- Previous Artboard: Returns to previous screen
- [Artboard Name]: Links to another screen
- Transition (the visual effect):
- None: No transition
- Dissolve: Simple fade transition
- Slide Left: Slides over from the left
- Slide Right: Slides over from the right
- Slide Up: Slides over from the top
- Slide Down: Slides over from the bottom
- Push ←/→/↑/↓: Same as slide transition, except the screen sliding in pushes the current screen out
- Easing (the speed of each interval of the transition):
- Ease-Out: Transition will start at full speed/finish slowly
- Ease-In: Transition will start slowly/finish at full speed
- Ease-In-Out: Start slow, full-speed at middle, finish slow
- None: The transition will not accelerate/decelerate (linear)
- Duration: Overall time it takes for the transition to complete
For further reading on easings (notably, the different types of easings and their effect on user experience), check out my article on micro-interactions and easings on SitePoint.
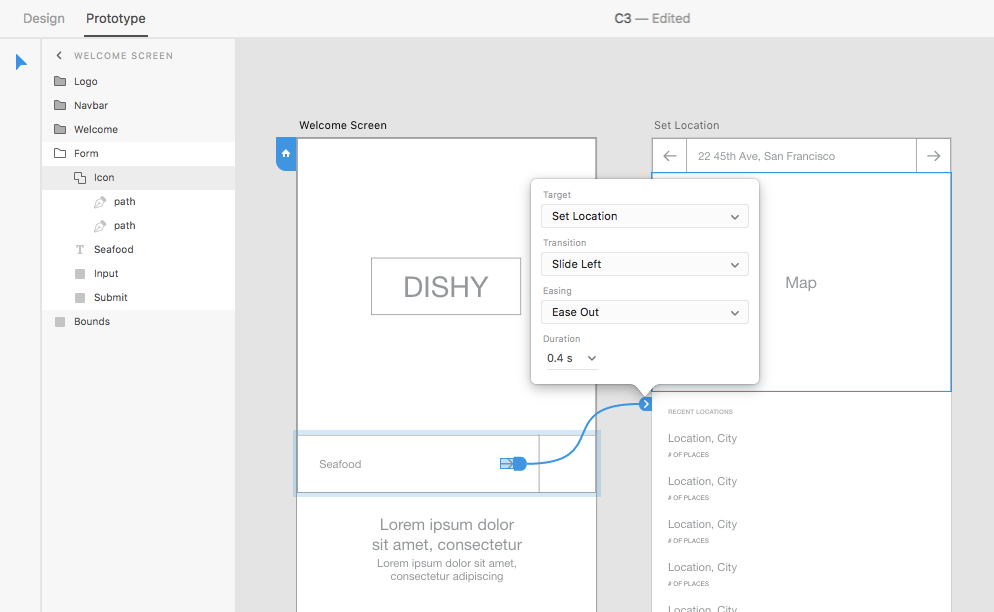
Because we linked the welcome screen to the set location screen, the Target setting has already been defined. Slide Left is a suitable option for the Transition setting because it creates motion (the destination screen slides in from the right, implying that it was the next screen in a series of screens — this is the default setting on iOS and some areas of Android).
Ease-out is a suitable easing for this user flow because it forces the animation to be faster at the beginning, creating a seemingly swift transition that doesn’t delay the user too much, then gracefully slows down so the user has a little extra time to understand what’s happened. In most cases, the default Duration setting of 0.4 seconds is more than optimal.
Let’s roll with these settings.
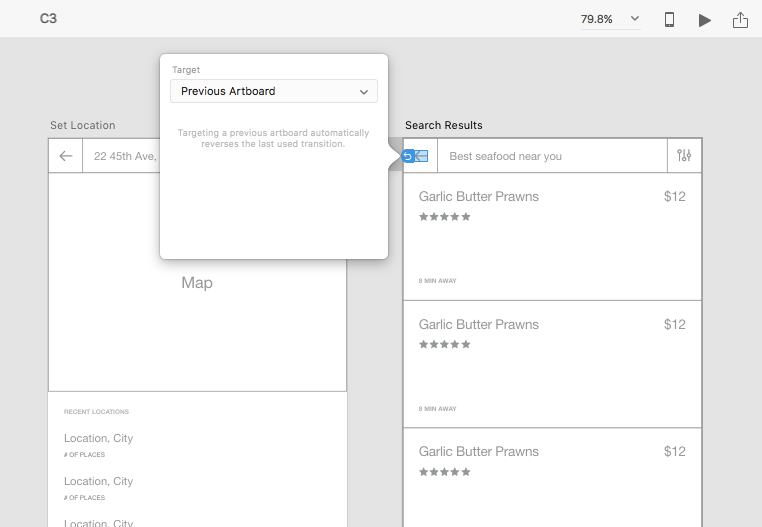
From the Set Location screen, create a user flow back to the Welcome Screen. Select Previous Artboard as the Target, which will automatically reverse the transition last used. For example, if you used Slide Left to enter the screen, Slide Right will be used as you return to the previous screen.
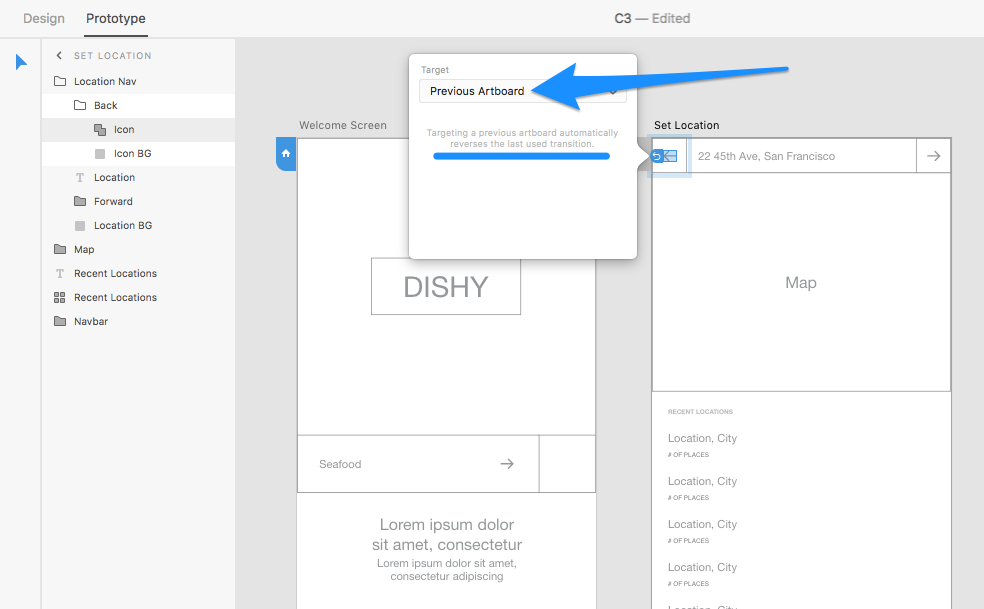
Repeat these steps, linking Set Location to Search Results.
And vice-versa.
At any moment you can click on an artboard to see an overview of which screens link to it, and which screens it links to. Prototyping is wonderfully visual in Adobe XD!
While apps like Marvel, Framer, Origami and InVision are certainly more powerful when it comes to prototyping (functionality like fixed elements, dynamic input fields and embeddable web content has existed in these apps for a while now), Adobe XD releases feature updates on a monthly basis. It’s catching up fast, and each version is reasonably stable.
Besides that, Adobe XD offers something that no other design app does: a unified design + prototyping experience. XD is not a companion to a design app like Photoshop or Sketch, it is the design app, and the prototyping app. Being able to seamlessly switch between the Design and Prototype workspaces makes designing and prototyping with Adobe XD silky smooth.
Frequently Asked Questions about Prototyping Interactions with Adobe XD
What is the main purpose of Adobe XD in prototyping interactions?
Adobe XD is a powerful tool used for designing and prototyping user experiences for web and mobile applications. It allows designers to create interactive prototypes with ease, demonstrating the flow and feel of the app without needing to write any code. This helps in visualizing the final product and making necessary changes before the development stage. It also facilitates collaboration among team members, making it easier to share designs and gather feedback.
How can I start prototyping interactions in Adobe XD?
To start prototyping interactions in Adobe XD, you first need to create or import your design. Once your design is ready, switch to the ‘Prototype’ mode. Here, you can select any object and create an interaction by linking it to another artboard. You can define the type of interaction, animation, easing, and duration according to your requirements.
What types of interactions can I prototype with Adobe XD?
Adobe XD allows you to prototype a variety of interactions. This includes basic transitions like slide, push, dissolve, and more. You can also create more complex interactions like overlays, scrollable areas, and fixed elements. Adobe XD also supports voice interactions and gamepad and keyboard triggers, allowing you to design for a wide range of user experiences.
How can I share my Adobe XD prototypes for feedback?
Adobe XD provides an easy way to share your prototypes. You can create a shareable link that can be sent to your team members or stakeholders. They can view the prototype in their browser and leave comments directly on the design. You can also embed the prototype on a webpage or in a Behance project.
Can I test my Adobe XD prototypes on mobile devices?
Yes, Adobe XD allows you to preview and test your prototypes on actual iOS and Android devices. This helps in understanding how the design and interactions will look and feel on a real device. You can connect your device to your computer and the changes you make in XD will be reflected in real-time on the device.
How can I manage different versions of my Adobe XD prototype?
Adobe XD offers a feature called ‘Design Specs’ that allows you to manage different versions of your prototype. You can create and share a link to the design specs, which provides developers with the information they need to start coding.
Can I animate individual objects in Adobe XD?
Yes, with Adobe XD’s ‘Auto-Animate’ feature, you can animate individual objects. You can animate changes in size, position, rotation, and more. This allows you to create more engaging and realistic interactions.
Can I use Adobe XD for user testing?
Yes, Adobe XD can be used for user testing. You can record the interactions in your prototype and use this for user testing. This can provide valuable insights into how users interact with your design and where improvements can be made.
Can I import my designs from other tools into Adobe XD?
Yes, Adobe XD allows you to import your designs from other tools like Photoshop and Illustrator. This makes it easier to transition your designs into interactive prototypes.
Can I collaborate with my team in Adobe XD?
Yes, Adobe XD supports real-time collaboration. You and your team can work together on the same document, making changes and seeing updates in real-time. This makes it easier to collaborate and iterate on designs.