Build a JavaScript Command Line Interface (CLI) with Node.js


As great as Node.js is for “traditional” web applications, its potential uses are far broader. Microservices, REST APIs, tooling, working with the Internet of Things and even desktop applications: it’s got your back.
Another area where Node.js is really useful is for building command-line applications — and that’s what we’re going to be doing in this article. We’re going to start by looking at a number of third-party packages designed to help work with the command line, then build a real-world example from scratch.
What we’re going to build is a tool for initializing a Git repository. Sure, it’ll run git init under the hood, but it’ll do more than just that. It will also create a remote repository on GitHub right from the command line, allow the user to interactively create a .gitignore file, and finally perform an initial commit and push.
As ever, the code accompanying this tutorial can be found on our GitHub repo.

This article was updated in 2020. For more in-depth JavaScript knowledge, read our book, JavaScript: Novice to Ninja, 2nd Edition.
Key Takeaways
- Utilize Node.js for building command-line applications due to its extensive package ecosystem and familiarity for JavaScript developers.
- The `ginit` CLI tool automates the process of initializing a Git repository, creating a remote GitHub repository, generating a `.gitignore` file, and performing initial commits and pushes.
- Key dependencies include `chalk`, `clear`, `clui`, `figlet`, `inquirer`, `minimist`, `configstore`, `@octokit/rest`, and `simple-git` for enhanced CLI functionality and GitHub integration.
- Use `Inquirer.js` for interactive user prompts and `configstore` for storing GitHub tokens to avoid re-authentication.
- Handle GitHub authentication using personal access tokens with `@octokit/auth-basic` and manage two-factor authentication during login.
- Implement functionality to create remote repositories, configure `.gitignore` files interactively, and set up local repositories with initial commits and remote links.
- Make the CLI tool executable globally by adding a shebang line and configuring the `bin` property in `package.json`, allowing installation via npm and usage across different systems.
Why Build a Command-line Tool with Node.js?
Before we dive in and start building, it’s worth looking at why we might choose Node.js to build a command-line application.
The most obvious advantage is that, if you’re reading this, you’re probably already familiar with it — and, indeed, with JavaScript.
Another key advantage, as we’ll see as we go along, is that the strong Node.js ecosystem means that among the hundreds of thousands of packages available for all manner of purposes, there are a number which are specifically designed to help build powerful command-line tools.
Finally, we can use npm to manage any dependencies, rather than have to worry about OS-specific package managers such as Aptitude, Yum or Homebrew.
Tip: that isn’t necessarily true, in that your command-line tool may have other external dependencies.
What We’re Going to Build: ginit
For this tutorial, we’re going to create a command-line utility which I’m calling ginit. It’s git init, but on steroids.
You’re probably wondering what on earth that means.
As you no doubt already know, git init initializes a Git repository in the current folder. However, that’s usually only one of a number of repetitive steps involved in the process of hooking up a new or existing project to Git. For example, as part of a typical workflow, you may well:
- initialize the local repository by running
git init - create a remote repository, for example on GitHub or Bitbucket — typically by leaving the command line and firing up a web browser
- add the remote
- create a
.gitignorefile - add your project files
- commit the initial set of files
- push up to the remote repository.
There are often more steps involved, but we’ll stick to those for the purposes of our app. Nevertheless, these steps are pretty repetitive. Wouldn’t it be better if we could do all this from the command line, with no copy-pasting of Git URLs and such like?
So what ginit will do is create a Git repository in the current folder, create a remote repository — we’ll be using GitHub for this — and then add it as a remote. Then it will provide a simple interactive “wizard” for creating a .gitignore file, add the contents of the folder and push it up to the remote repository. It might not save you hours, but it’ll remove some of the initial friction when starting a new project.
With that in mind, let’s get started.
The Application Dependencies
One thing is for certain: in terms of appearance, the console will never have the sophistication of a graphical user interface. Nevertheless, that doesn’t mean it has to be plain, ugly, monochrome text. You might be surprised by just how much you can do visually, while at the same time keeping it functional. We’ll be looking at a couple of libraries for enhancing the display: chalk for colorizing the output and clui to add some additional visual components. Just for fun, we’ll use figlet to create a fancy ASCII-based banner, and we’ll also use clear to clear the console.
In terms of input and output, the low-level Readline Node.js module could be used to prompt the user and request input, and in simple cases is more than adequate. But we’re going to take advantage of a third-party package which adds a greater degree of sophistication — Inquirer. As well as providing a mechanism for asking questions, it also implements simple input controls: think radio buttons and checkboxes, but in the console.
We’ll also be using minimist to parse command-line arguments.
Here’s a complete list of the packages we’ll use specifically for developing on the command line:
- chalk — colorizes the output
- clear — clears the terminal screen
- clui — draws command-line tables, gauges and spinners
- figlet — creates ASCII art from text
- inquirer — creates interactive command-line user interface
- minimist — parses argument options
- configstore — easily loads and saves config without you having to think about where and how.
Additionally, we’ll also be using the following:
- @octokit/rest — a GitHub REST API client for Node.js
- @octokit/auth-basic — an implementation of one of GitHub’s authentication strategies
- lodash — a JavaScript utility library
- simple-git — a tool for running Git commands in a Node.js application
- touch — a tool for implementing the Unix touch command.
Getting Started
Although we’re going to create the application from scratch, don’t forget that you can also grab a copy of the code from the repository which accompanies this article.
Create a new directory for the project. You don’t have to call it ginit, of course:
mkdir ginit
cd ginit
Create a new package.json file:
npm init -y
And edit it to look like so:
{
  "name": "ginit",
  "version": "1.0.0",
  "description": "'git init' on steroids",
  "main": "index.js",
  "scripts": {
    "test": "echo \"Error: no test specified\" && exit 1"
  },
  "keywords": [
    "Git",
    "CLI"
  ],
  "author": "<YOUR NAME>",
  "license": "ISC"
}
Now install the dependencies:
npm install chalk clear clui figlet inquirer minimist configstore @octokit/rest @octokit/auth-basic lodash simple-git touch
Now create an index.js file in the same folder and require the following dependencies:
const chalk = require('chalk');
const clear = require('clear');
const figlet = require('figlet');
Adding Some Helper Methods
We’re going to create a lib folder where we’ll split our helper code into modules:
- files.js — basic file management
- inquirer.js — command-line user interaction
- github.js — access token management
- repo.js — Git repository management.
Let’s start with lib/files.js. Here, we need to:
- get the current directory (to get a default repo name)
- check whether a directory exists (to determine whether the current folder is already a Git repository by looking for a folder named
.git).
This sounds straightforward, but there are a couple of gotchas to take into consideration.
Firstly, you might be tempted to use the fs module’s realpathSync method to get the current directory:
path.basename(path.dirname(fs.realpathSync(__filename)));
This will work when we’re calling the application from the same directory (for example, using node index.js), but bear in mind that we’re going to be making our console application available globally. This means we’ll want the name of the directory we’re working in, not the directory where the application resides. For this purpose, it’s better to use process.cwd:
path.basename(process.cwd());
Secondly, the preferred method of checking whether a file or directory exists keeps changing. The current way is to use existsSync. This returns true if the path exists, false otherwise.
Finally, it’s worth noting that when you’re writing a command-line application, using the synchronous version of these sorts of methods is just fine.
Putting that all together, let’s create a utility package in lib/files.js:
const fs = require('fs');
const path = require('path');

module.exports = {
  getCurrentDirectoryBase: () => {
    return path.basename(process.cwd());
  },

  directoryExists: (filePath) => {
    return fs.existsSync(filePath);
  }
};
Go back to index.js and ensure you require the new file:
const files = require('./lib/files');
With this in place, we can start developing the application.
Initializing the Node CLI
Now let’s implement the start-up phase of our console application.
In order to demonstrate some of the packages we’ve installed to enhance the console output, let’s clear the screen and then display a banner:
// index.js

clear();

console.log(
  chalk.yellow(
    figlet.textSync('Ginit', { horizontalLayout: 'full' })
  )
);
You can run the application using node index.js. The output from this is shown below.
![]()
Next up, let’s run a simple check to ensure that the current folder isn’t already a Git repository. That’s easy: we just check for the existence of a .git folder using the utility method we just created:
//index.js

if (files.directoryExists('.git')) {
  console.log(chalk.red('Already a Git repository!'));
  process.exit();
}
Tip: notice we’re using the chalk module to show a red-colored message.
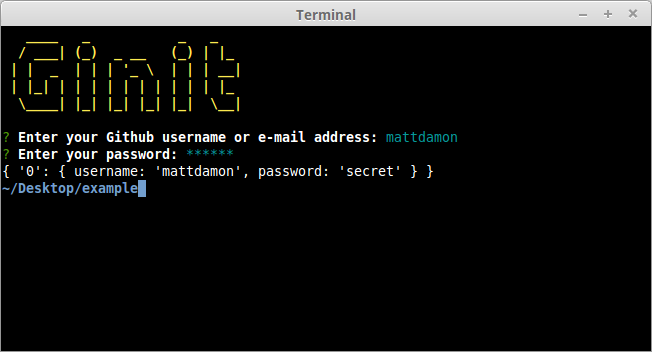
Prompting the User for Input
The next thing we need to do is create a function that will prompt the user for their GitHub credentials.
We can use Inquirer for this. The module includes a number of methods for various types of prompts, which are roughly analogous to HTML form controls. In order to collect the user’s GitHub username and password, we’re going to use the input and password types respectively.
First, create lib/inquirer.js and insert this code:
const inquirer = require('inquirer');

module.exports = {
  askGithubCredentials: () => {
    const questions = [
      {
        name: 'username',
        type: 'input',
        message: 'Enter your GitHub username or e-mail address:',
        validate: function( value ) {
          if (value.length) {
            return true;
          } else {
            return 'Please enter your username or e-mail address.';
          }
        }
      },
      {
        name: 'password',
        type: 'password',
        message: 'Enter your password:',
        validate: function(value) {
          if (value.length) {
            return true;
          } else {
            return 'Please enter your password.';
          }
        }
      }
    ];
    return inquirer.prompt(questions);
  },
};
As you can see, inquirer.prompt() asks the user a series of questions, provided in the form of an array as the first argument. Each question is made up of an object which defines the name of the field, the type (we’re just using input and password respectively here, but later we’ll look at a more advanced example), and the prompt (message) to display.
The input the user provides will be passed in to the calling function as a Promise. If successful, we’ll end up with a simple object with two properties — username and password.
You can test all of this out by adding the following to index.js:
const inquirer  = require('./lib/inquirer');

const run = async () => {
  const credentials = await inquirer.askGithubCredentials();
  console.log(credentials);
};

run();
Then run the script using node index.js.
Tip: when you’re done testing, don’t forget to remove the line const inquirer = require('./lib/inquirer'); from index.js, as we won’t actually need it in this file.
Dealing With GitHub Authentication
The next step is to create a function to retrieve an OAuth token for the GitHub API. Essentially, we’re going to “exchange” the username and password for a token.
Of course, we don’t want users to have to enter their credentials every time they use the tool. Instead, we’ll store the OAuth token for subsequent requests. This is where the configstore package comes in.
Storing Config
Storing config is outwardly quite straightforward: you can simply read and write to/from a JSON file without the need for a third-party package. However, the configstore package provides a few key advantages:
- It determines the most appropriate location for the file for you, taking into account your operating system and the current user.
- There’s no need to explicitly read or write to the file. You simply modify a configstore object and that’s taken care of for you in the background.
To use it, simply create an instance, passing it an application identifier. For example:
const Configstore = require('configstore');
const conf = new Configstore('ginit');
If the configstore file doesn’t exist, it’ll return an empty object and create the file in the background. If there’s already a configstore file, the contents will be made available to your application. You can now use conf as a simple object, getting or setting properties as required. As mentioned above, you don’t need to worry about saving it afterwards. That gets taken care of for you.
Tip: on macOS, you’ll find the file in /Users/[YOUR-USERNME]/.config/configstore/ginit.json. On Linux, it’s in /home/[YOUR-USERNME]/.config/configstore/ginit.json.
Communicating with the GitHub API
Let’s create a library for handling the GitHub token. Create the file lib/github.js and place the following code inside it:
const CLI = require('clui');
const Configstore = require('configstore');
const Octokit = require('@octokit/rest');
const Spinner = CLI.Spinner;
const { createBasicAuth } = require("@octokit/auth-basic");

const inquirer = require('./inquirer');
const pkg = require('../package.json');

const conf = new Configstore(pkg.name);
Now let’s add the function that checks whether we’ve already got an access token. We’ll also add a function that allows other libs to access octokit(GitHub) functions:
let octokit;

module.exports = {
  getInstance: () => {
    return octokit;
  },

  getStoredGithubToken: () => {
    return conf.get('github.token');
  },
};
If a conf object exists and it has github.token property, this means that there’s already a token in storage. In this case, we return the token value back to the invoking function. We’ll get to that later on.
If no token is detected, we need to fetch one. Of course, getting an OAuth token involves a network request, which means a short wait for the user. This gives us an opportunity to look at the clui package which provides some enhancements for console-based applications, among them an animated spinner.
Creating a spinner is easy:
const status = new Spinner('Authenticating you, please wait...');
status.start();
Once you’re done, simply stop it and it will disappear from the screen:
status.stop();
Tip: you can also set the caption dynamically using the update method. This could be useful if you have some indication of progress — for example, displaying the percentage complete.
Here’s the code to authenticate with GitHub:
module.exports = {
  getInstance: () => { ... },
  getStoredGithubToken: () => { ... },

  getPersonalAccesToken: async () => {
    const credentials = await inquirer.askGithubCredentials();
    const status = new Spinner('Authenticating you, please wait...');

    status.start();

    const auth = createBasicAuth({
      username: credentials.username,
      password: credentials.password,
      async on2Fa() {
        // TBD
      },
      token: {
        scopes: ['user', 'public_repo', 'repo', 'repo:status'],
        note: 'ginit, the command-line tool for initalizing Git repos'
      }
    });

    try {
      const res = await auth();

      if(res.token) {
        conf.set('github.token', res.token);
        return res.token;
      } else {
        throw new Error("GitHub token was not found in the response");
      }
    } finally {
      status.stop();
    }
  },
};
Let’s step through this:
- We prompt the user for their credentials using the
askGithubCredentialsmethod we defined earlier. - We use the createBasicAuth method to create an
authfunction, which we’ll call in the next step. We pass the user’s username and password to this method, as well as a token object with two properties:note— a note to remind us what the OAuth token is for.scopes— a list of scopes that this authorization is in. You can read more about available scopes in GitHub’s documentation.
- We then
awaitthe result of calling theauthfunction inside atryblock. - If authentication is successful and a token is present in the response, we set it in the
configstorefor next time and return the token. - If the token is missing, or authentication doesn’t succeed for whatever reason, the error will bubble on up the stack so that we can catch it in
index.js. We’ll implement this functionality later.
Any access tokens you create, whether manually or via the API as we’re doing here, you’ll be able to see them here. During the course of development, you may find you need to delete ginit’s access token — identifiable by the note parameter supplied above — so that you can re-generate it.
If you’ve been following along and would like to try out what we have so far, you can update index.js as follows:
const github = require('./lib/github');

...

const run = async () => {
  let token = github.getStoredGithubToken();
  if(!token) {
    token = await github.getPersonalAccesToken();
  }
  console.log(token);
};
The first time you run it, you should be prompted for your username and GitHub password. The app should then create a personal access token on GitHub and save the token to the configstore, before logging it to the console. Every time you run the app after that, the app will pull the token straight from the configstore and log that to the screen.
Dealing with Two-factor Authentication
Hopefully you noticed the on2Fa method in the code above. This will be called when a user has two-factor authentication enabled on their GitHub account. Let’s fill that out now:
// inquirer.js

const inquirer = require('inquirer');

module.exports = {
  askGithubCredentials: () => { ... },

  getTwoFactorAuthenticationCode: () => {
    return inquirer.prompt({
      name: 'twoFactorAuthenticationCode',
      type: 'input',
      message: 'Enter your two-factor authentication code:',
      validate: function(value) {
        if (value.length) {
          return true;
        } else {
          return 'Please enter your two-factor authentication code.';
        }
      }
    });
  },
};
We can call the getTwoFactorAuthenticationCode method from within the on2Fa method, like so:
// github.js

async on2Fa() {
  status.stop();
  const res = await inquirer.getTwoFactorAuthenticationCode();
  status.start();
  return res.twoFactorAuthenticationCode;
},
And now our app can handle GitHub accounts with two-factor authentication enabled.
Creating a Repository
Once we’ve got an OAuth token, we can use it to create a remote repository with GitHub.
Again, we can use Inquirer to ask a series of questions. We need a name for the repo, we’ll ask for an optional description, and we also need to know whether it should be public or private.
We’ll use minimist to grab defaults for the name and description from optional command-line arguments. For example:
ginit my-repo "just a test repository"
This will set the default name to my-repo and the description to just a test repository.
The following line will place the arguments in an array indexed by an underscore:
const argv = require('minimist')(process.argv.slice(2));
// { _: [ 'my-repo', 'just a test repository' ] }
Tip: this only really scratches the surface of the minimist package. You can also use it to interpret flags, switches and name/value pairs. Check out the documentation for more information.
We’ll write code to parse the command-line arguments and ask a series of questions. First, update lib/inquirer.js as follows:
const inquirer = require('inquirer');
const files = require('./files');

module.exports = {
  askGithubCredentials: () => { ... },
  getTwoFactorAuthenticationCode: () => { ... },

  askRepoDetails: () => {
    const argv = require('minimist')(process.argv.slice(2));

    const questions = [
      {
        type: 'input',
        name: 'name',
        message: 'Enter a name for the repository:',
        default: argv._[0] || files.getCurrentDirectoryBase(),
        validate: function( value ) {
          if (value.length) {
            return true;
          } else {
            return 'Please enter a name for the repository.';
          }
        }
      },
      {
        type: 'input',
        name: 'description',
        default: argv._[1] || null,
        message: 'Optionally enter a description of the repository:'
      },
      {
        type: 'list',
        name: 'visibility',
        message: 'Public or private:',
        choices: [ 'public', 'private' ],
        default: 'public'
      }
    ];
    return inquirer.prompt(questions);
  },
};
Next, create the file lib/repo.js and add this code:
const CLI = require('clui');
const fs = require('fs');
const git = require('simple-git/promise')();
const Spinner = CLI.Spinner;
const touch = require("touch");
const _ = require('lodash');

const inquirer = require('./inquirer');
const gh = require('./github');

module.exports = {
  createRemoteRepo: async () => {
    const github = gh.getInstance();
    const answers = await inquirer.askRepoDetails();

    const data = {
      name: answers.name,
      description: answers.description,
      private: (answers.visibility === 'private')
    };

    const status = new Spinner('Creating remote repository...');
    status.start();

    try {
      const response = await github.repos.createForAuthenticatedUser(data);
      return response.data.ssh_url;
    } finally {
      status.stop();
    }
  },
};
Once we have that information, we can simply use the GitHub package to create a repo, which will give us a URL for the newly created repository. We can then set that up as a remote in our local Git repository. First, however, let’s interactively create a .gitignore file.
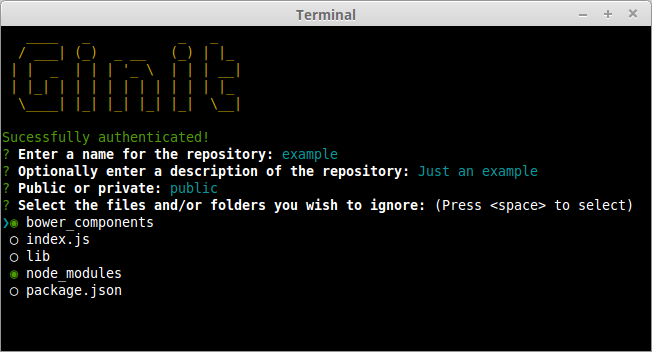
Creating a .gitignore File
For the next step, we’ll create a simple command-line “wizard” to generate a .gitignore file. If the user is running our application in an existing project directory, let’s show them a list of files and directories already in the current working directory, and allow them to select which ones to ignore.
The Inquirer package provides a checkbox input type for just that.
The first thing we need to do is scan the current directory, ignoring the .git folder and any existing .gitignore file (we do this by making use of lodash’s without method):
const filelist = _.without(fs.readdirSync('.'), '.git', '.gitignore');
If there’s nothing to add, there’s no point in continuing, so let’s simply touch the current .gitignore file and bail out of the function:
if (filelist.length) {
  ...
} else {
  touch('.gitignore');
}
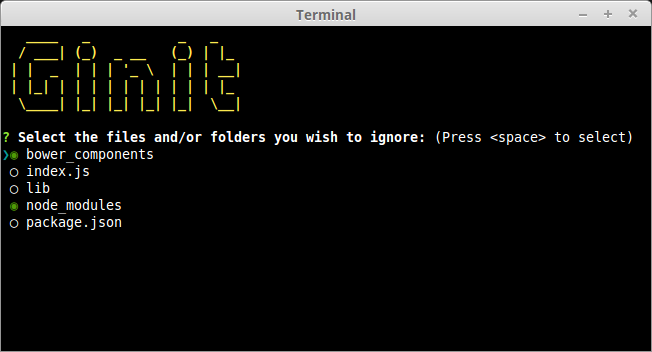
Finally, let’s utilize Inquirer’s checkbox “widget” to list the files. Insert the following code in lib/inquirer.js:
askIgnoreFiles: (filelist) => {
  const questions = [
    {
      type: 'checkbox',
      name: 'ignore',
      message: 'Select the files and/or folders you wish to ignore:',
      choices: filelist,
      default: ['node_modules', 'bower_components']
    }
  ];
  return inquirer.prompt(questions);
},
Notice that we can also provide a list of defaults. In this case, we’re pre-selecting node_modules and bower_components, should they exist.
With the Inquirer code in place, we can now construct the createGitignore() function. Insert this code in lib/repo.js:
createGitignore: async () => {
  const filelist = _.without(fs.readdirSync('.'), '.git', '.gitignore');

  if (filelist.length) {
    const answers = await inquirer.askIgnoreFiles(filelist);

    if (answers.ignore.length) {
      fs.writeFileSync( '.gitignore', answers.ignore.join( '\n' ) );
    } else {
      touch( '.gitignore' );
    }
  } else {
    touch('.gitignore');
  }
},
Once “submitted”, we then generate a .gitignore by joining up the selected list of files, separated with a newline. Our function now pretty much guarantees we’ve got a .gitignore file, so we can proceed with initializing a Git repository.
Interacting with Git from within the App
There are a number of ways to interact with Git, but perhaps the simplest is to use the simple-git package. This provides a set of chainable methods which, behind the scenes, run the Git executable.
These are the repetitive tasks we’ll use it to automate:
- run
git init - add the
.gitignorefile - add the remaining contents of the working directory
- perform an initial commit
- add the newly created remote repository
- push the working directory up to the remote.
Insert the following code in lib/repo.js:
setupRepo: async (url) => {
  const status = new Spinner('Initializing local repository and pushing to remote...');
  status.start();

  try {
    git.init()
      .then(git.add('.gitignore'))
      .then(git.add('./*'))
      .then(git.commit('Initial commit'))
      .then(git.addRemote('origin', url))
      .then(git.push('origin', 'master'));
  } finally {
    status.stop();
  }
},
Putting It All Together
First, let’s set a helper function in lib/github.js for setting up an oauth authentication:
githubAuth: (token) => {
  octokit = new Octokit({
    auth: token
  });
},
Next, we create a function in index.js for handling the logic of acquiring the token. Place this code before the run() function:
const getGithubToken = async () => {
  // Fetch token from config store
  let token = github.getStoredGithubToken();
  if(token) {
    return token;
  }

  // No token found, use credentials to access GitHub account
  token = await github.getPersonalAccesToken();

  return token;
};
Finally, we update the run() function by writing code that will handle the main logic of the app:
const repo = require('./lib/repo');

...

const run = async () => {
  try {
    // Retrieve & Set Authentication Token
    const token = await getGithubToken();
    github.githubAuth(token);

    // Create remote repository
    const url = await repo.createRemoteRepo();

    // Create .gitignore file
    await repo.createGitignore();

    // Set up local repository and push to remote
    await repo.setupRepo(url);

    console.log(chalk.green('All done!'));
  } catch(err) {
      if (err) {
        switch (err.status) {
          case 401:
            console.log(chalk.red('Couldn\'t log you in. Please provide correct credentials/token.'));
            break;
          case 422:
            console.log(chalk.red('There is already a remote repository or token with the same name'));
            break;
          default:
            console.log(chalk.red(err));
        }
      }
  }
};
As you can see, we ensure the user is authenticated before calling all of our other functions (createRemoteRepo(), createGitignore(), setupRepo()) sequentially. The code also handles any errors and offers the user appropriate feedback.
You can check out the completed index.js file on our GitHub repo.
At this point you should have a working app. Give it a try and satisfy yourself that it works as expected.
Making the ginit Command Available Globally
The one remaining thing to do is to make our command available globally. To do this, we’ll need to add a shebang line to the top of index.js:
#!/usr/bin/env node
Next, we need to add a bin property to our package.json file. This maps the command name (ginit) to the name of the file to be executed (relative to package.json):
"bin": {
  "ginit": "./index.js"
}
After that, install the module globally and you’ll have a working shell command:
npm install -g
Tip: this will also work on Windows, as npm will helpfully install a cmd wrapper alongside your script.
If you want to confirm the install worked, you can list your globally installed Node modules using this:
npm ls -g --depth=0
Taking it Further
We’ve got a fairly nifty, albeit simple command-line app for initializing Git repositories. But there’s plenty more you could do to enhance it further.
If you’re a Bitbucket user, you could adapt the program to use the Bitbucket API to create a repository. There’s a Node.js API wrapper available to help you get started. You may wish to add an additional command-line option or prompt to ask the user whether they want to use GitHub or Bitbucket (Inquirer would be perfect for just that) or merely replace the GitHub-specific code with a Bitbucket alternative.
You could also provide the facility to specify your own set of defaults for the .gitgnore file, instead of a hardcoded list. The preferences package might be suitable here, or you could provide a set of “templates” — perhaps prompting the user for the type of project. You might also want to look at integrating it with the .gitignore.io command-line tool/API.
Beyond all that, you may also want to add additional validation, provide the ability to skip certain sections, and more.
Frequently Asked Questions (FAQs) about JavaScript Command Line Interface (CLI) with Node.js
What is the significance of JavaScript Command Line Interface (CLI) with Node.js?
JavaScript Command Line Interface (CLI) with Node.js is a powerful tool that allows developers to automate tasks, build scripts, and create utilities. It enables developers to interact with their applications in a more efficient and direct manner. CLI tools can be used to automate repetitive tasks, thus increasing productivity. They also provide a way to interact with the system, files, and databases, making it easier to perform complex operations.
How can I create a CLI application using Node.js?
Creating a CLI application using Node.js involves several steps. First, you need to set up your project by initializing a new Node.js project. Then, you need to install the necessary packages, such as ‘commander’ for handling command-line arguments. After that, you can start writing your CLI application by creating a new JavaScript file and writing your code. Finally, you need to make your application executable by adding a shebang line at the top of your file and setting the file’s permissions to be executable.
What are some best practices for building a CLI with Node.js?
When building a CLI with Node.js, it’s important to follow best practices to ensure your application is efficient, maintainable, and user-friendly. Some of these best practices include: using a command-line argument parser like ‘commander’ or ‘yargs’, providing helpful error messages, using a consistent command syntax, and providing a ‘help’ command that explains how to use your application.
Can I use external libraries while creating a CLI with Node.js?
Yes, you can use external libraries while creating a CLI with Node.js. Libraries can provide additional functionality and make it easier to perform complex tasks. For example, the ‘chalk’ library can be used to add colors to the console output, and the ‘inquirer’ library can be used to create interactive prompts.
How can I test my CLI application built with Node.js?
Testing a CLI application built with Node.js can be done using various testing frameworks like ‘Mocha’ or ‘Jest’. These frameworks allow you to write tests that simulate user interactions with your application and check the output. It’s also important to test your application on different platforms (Windows, Linux, macOS) to ensure it works correctly on all of them.
How can I distribute my CLI application built with Node.js?
Once you’ve built and tested your CLI application, you can distribute it by publishing it to the npm registry. This allows other developers to easily install and use your application. You can also distribute your application as a standalone executable file.
What are some common challenges when building a CLI with Node.js and how can I overcome them?
Some common challenges when building a CLI with Node.js include handling command-line arguments, dealing with asynchronous operations, and ensuring compatibility across different platforms. These challenges can be overcome by using libraries like ‘commander’ or ‘yargs’ for argument parsing, using ‘async/await’ for handling asynchronous operations, and testing your application on different platforms to ensure compatibility.
Can I build a cross-platform CLI with Node.js?
Yes, you can build a cross-platform CLI with Node.js. Node.js is a cross-platform runtime, which means that applications built with it can run on any platform that supports Node.js. However, it’s important to test your application on all target platforms to ensure it works correctly.
How can I improve the performance of my CLI built with Node.js?
There are several ways to improve the performance of your CLI built with Node.js. These include optimizing your code, using efficient data structures and algorithms, and minimizing the use of synchronous operations. You can also use profiling tools to identify bottlenecks in your application and address them.
Can I use TypeScript to build a CLI with Node.js?
Yes, you can use TypeScript to build a CLI with Node.js. TypeScript is a statically typed superset of JavaScript that adds static types, classes, and interfaces. It can help catch errors early during the development process and can make your code more readable and maintainable.
Lukas is a freelance web and mobile developer based in Manchester in the North of England. He's been developing in PHP since moving away from those early days in web development of using all manner of tools such as Java Server Pages, classic ASP and XML data islands, along with JavaScript - back when it really was JavaScript and Netscape ruled the roost. When he's not developing websites and mobile applications and complaining that this was all fields, Lukas likes to cook all manner of World foods.
Network admin & freelance web developer.