
In this tutorial, we’ll learn to implement Save/Load game functionality in our game. We will begin by saving the necessary player-related data such as the level we’re on, where we are, and our example tutorial statistics.

If you need a project for testing, you can use the one at the end of the previous article which dealt with cross-scene saving of data, and it’s perfect for following this tutorial:
Key Takeaways
- Saving and loading game data in Unity can be achieved using a .NET/Mono feature known as Serialization, which allows writing down a .NET object to a hard drive in its raw binary form.
- The data to be saved includes everything in the PlayerStatistics class, scene ID where the game was saved, and the location in the scene where the player was when the game was saved.
- The process of saving data involves getting a class containing player’s data and serializing it down to the hard drive into a known file. Loading data, on the other hand, involves finding the known save file, deserializing its contents into a generic object, and casting the object into the type of our data class.
- Scene identification and position can be solved by adding an Integer variable and three new float values respectively into the Player’s data package class.
- The process of serialization and deserialization requires writing functions that will serialize and deserialize data, which are included in the GlobalObject. It is crucial to remember to close the Stream object in the code to avoid any potential problems.
Download
Saving Data Between Scenes in Unity – previous article
[GitHub Repository]
[ZIP Download]
If you want to download a finished project, the link is at the end of this article.
Concept Breakdown
For saving the in-game data to a hard drive in a format that can be understood and loaded later on, we will be using a .NET/Mono feature known as Serialization. You can find out more about theory of serialization at the following links:
In short, “serializing” means writing down a .NET object to a hard drive in its raw binary form. It may sound a bit unintuitive, but think of it this way: we’re saving an instance of a class to a hard drive.
You may remember that while finishing up our last example, we wrapped our player’s data into a single class. You may already be able to tell where this is going. Let’s just go over the logic flow real quick:
Saving data:
- Get a class containing player’s data
- Serialize down to hard drive into known file
Loading data:
- Find known save file
- Deserialize the contents into generic object
- Cast object into the type of our data class
What do we need to save?
- Everything that was already in the PlayerStatistics class which was saved across scenes
- Scene ID where the game was saved
- Location in the scene where the player was when the game was saved
Preparing Things
Using the project from our previous example, we will need to prepare some things in order to begin writing this functionality correctly. We need to consider the following problems:
- What scene was the player on when the game was saved?
- Where in the scene was the player?
- How do we initialize the Saving procedure?
- How do we initialize the Loading procedure?
- How do we know if we need to start the level anew, or load existing data?
Proposed Solutions:
Scene identification? Adding a new Integer variable into our Player’s data package class, so we know what scene the player was on.
Scene position? Unfortunately, we cannot add a Transform or Vector3 object into the Player’s data package class because they are not serializable objects. We need to add three new float values denoting the player’s X, Y, and Z position instead, and apply them to the position vector of the player when we are loading data.
Saving/Loading procedure Keeping it simple for now, we will assign two hotkeys for save and load: F5 and F9 respectively.
Fresh start or load? We will need to keep a boolean value which tells us if the scene has been loaded, or started anew. For this, we need our GlobalObject class which persists between scenes because we will need to load the data and set the variable, before initializing the loading procedure of the scene the player was on when they saved the game.
Logic
This may sound a bit disorienting so let’s break this down into a flowchart.
This explains the flow of the program from a PlayerControl class, which is the primary class we’ll be dealing with today. It’s a class that’s responsible for the player’s input:
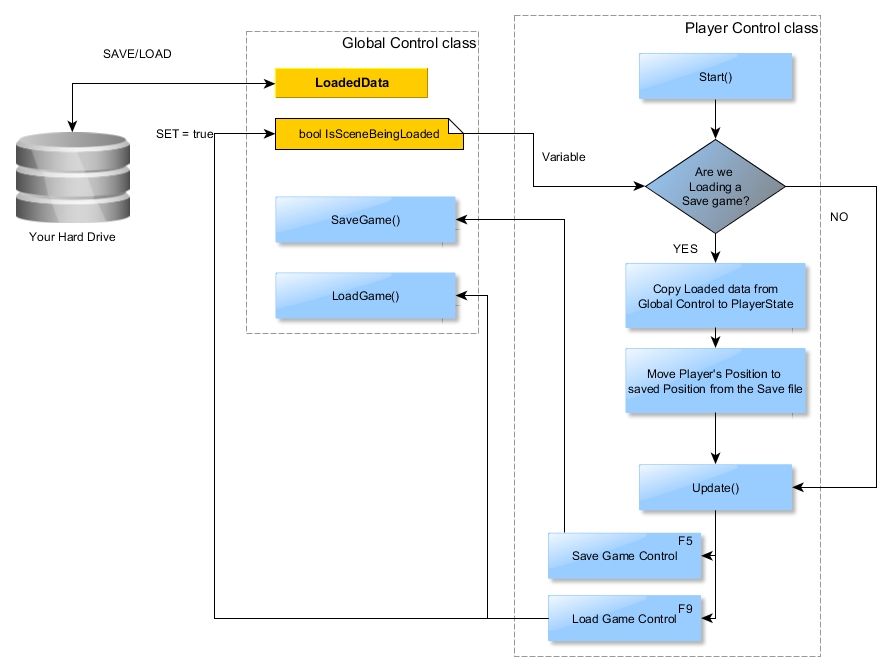
Notice a few oddities:
- Global Control now always carries a publicly available bool that states whether we are loading a scene, or starting it anew. It also carries the copy of a saved player’s data.
- Player Control class at Starting (Scene Loading event) always checks if maybe the scene is Loaded from a save game, or anew. This tells us if we need to copy the loaded data, or leave it alone.
Code
Let’s tackle the new functionality step by step.
Scene ID and Position
First, we need to solve the two biggest problems as listed above: Scene ID, and position of the player within the scene.
Assuming we have a class that holds our player’s data, like this:
public class PlayerStatistics

{

    public float HP;

    public float Ammo;

    public float XP;

}
We need to add the following:
[Serializable]

public class PlayerStatistics

{

    public int SceneID;

    public float PositionX, PositionY, PositionZ;
    public float HP;

    public float Ammo;

    public float XP;

}
Let’s get the obvious out of the way first: We have a custom “attribute” declaration in front of the class: [Serializable]. This tells the Engine that the data in this class is suitable for writing down in binary form, or “serializing”.
We have also added our Scene ID and Position values.
Serialization Functions
Now, let’s write the functions that will serialize and deserialize data. We need to go into our GlobalObject (or similar object you should have):
//In global object:

public PlayerStatistics LocalCopyOfData;

public bool IsSceneBeingLoaded = false;
    public void SaveData()

    {

        if (!Directory.Exists("Saves"))

            Directory.CreateDirectory("Saves");
        BinaryFormatter formatter = new BinaryFormatter();

        FileStream saveFile = File.Create("Saves/save.binary");
        LocalCopyOfData = PlayerState.Instance.localPlayerData;
        formatter.Serialize(saveFile, LocalCopyOfData);
        saveFile.Close();

    }
    public void LoadData()

    {

        BinaryFormatter formatter = new BinaryFormatter();

        FileStream saveFile = File.Open("Saves/save.binary", FileMode.Open);
        LocalCopyOfData = (PlayerStatistics)formatter.Deserialize(saveFile);
        saveFile.Close();

    }
OK, this is a lot of code at once, let’s break it down. Let’s first explain the Save function:
Path check
if (!Directory.Exists("Saves"))

   Directory.CreateDirectory("Saves");
While File.Create will create a new file, it will not create the path of directories where the file is supposed to be located. Therefore, if the directory Saves does not exist, an exception will be thrown and the game will not be saved.
Binary Formatter
BinaryFormatter formatter = new BinaryFormatter();
This will require adding a new Using namespace above, specifically this one:
using System.Runtime.Serialization.Formatters.Binary;
Pro-tip: Write “BinaryFormatter” in the code and without pressing Space, Enter or Tab (which will initiate Intellisense completion in both MonoDevelop and Visual Studio), hit Right-click over the declaration and use Resolve -> Add Using namespace.
File
FileStream saveFile = File.Create("Saves/save.binary");
This will require the following namespace: using System.IO;
The Stream object we will have gotten will create a new file if it doesn’t exist, and overwrite it if it does exist, under a path we have set. For the purpose of the example, we’re using a very simple and hardcoded relative path.
Note: You can also use whatever extension of the file you want, or even no extension at all. It doesn’t matter since no Operating System will open this file, nor is there any program out there that will read this file’s format or requires extension association. We can only read the file if we know the source code of the class from which it was serialized.
Data
LocalCopyOfData = PlayerState.Instance.localPlayerData;
We need to fetch a reference to the object we are serializing. In my project’s example, all the relevant player data is contained in an instance of the “PlayerStatistics” class, located within the singleton instance of the PlayerState class.
The magic
formatter.Serialize(saveFile, LocalCopyOfData);
The above represents the entire difficulty of writing a class in its raw binary form to the hard drive. Ah, the joys of the .NET/Mono framework!
You will notice the Serialize function requires two arguments:
- Stream object. Our FileStream is an extension of a Stream object so we can use that.
- object that will be serialized. As you can see, we can serialize literally everything (as long as it carries the Serializable attribute), because everything within the .NET/Mono framework is extended from the base object class.
Do NOT forget this!
saveFile.Close();
Seriously, do not forget this.
If we forget to close the Stream object in our code, we will encounter one of the two problems (whichever happens first):
- Any attempt to access or remove the file on the hard drive (which may or may not appear empty), will give an OS error message saying the file is in use by another program.
- Attempting to deserialize an unclosed object will stall the program on the deserialization line, without exceptions or warnings. It’ll simply stop giving signs of life.
Note how neither of the symptoms actually gives any meaningful information about an unclosed stream.
OK, let’s go look at the Load function:
File (opening)
FileStream saveFile = File.Open("Saves/save.binary", FileMode.Open);
Instead of using Create, we will be using the Open function to obtain our Stream object. Self explanatory, really.
The magic difference
LocalCopyOfData = (PlayerStatistics)formatter.Deserialize(saveFile);
Note how we are not yet feeding the loaded data into our PlayerState instance.
This is because we first need to load the data to determine what scene the player is on, then we need to load that scene, and then feed the loaded data.
Control Functions
Finally, let’s implement our Save/Load logic somewhere.
A good place for this example would be the class that handles the player’s input. Within the example project, that would be our PlayerControl class.
Just for this example, we’ll put the following code directly in our PlayerControl class’ Update function, but as development goes on, we’ll need to move this into the part of the code where the player actually has control (when no menus are opened, cutscene isn’t playing, etc):
///In Control Update():
        if (Input.GetKey(KeyCode.F5))

        {

            PlayerState.Instance.localPlayerData.SceneID = Application.loadedLevel;

            PlayerState.Instance.localPlayerData.PositionX = transform.position.x;

            PlayerState.Instance.localPlayerData.PositionY = transform.position.y;

            PlayerState.Instance.localPlayerData.PositionZ = transform.position.z;
            GlobalControl.Instance.SaveData();

        }
        if (Input.GetKey(KeyCode.F9))

        {

            GlobalControl.Instance.LoadData();

            GlobalControl.Instance.IsSceneBeingLoaded = true;
            int whichScene = GlobalControl.Instance.LocalCopyOfData.SceneID;
            Application.LoadLevel(whichScene);

        }
The Quicksave function:
- Saves the current Scene ID into the current player data
- Saves the current player location into the current player data
- Calls the function to save the player data into the save file
Now, the Quickload function is a bit different:
First, we use the function to load the data into GlobalControl’s “LocalCopyOfData” instance. After that, we poke it to find which scene the player is saved on.
We set the public boolean variable that says the scene is now being loaded, and initialize the LoadLevel function.
You might be wondering: “We aren’t even copying the player position or PlayerStatistics data, so… why are we doing this?”
If you remember the flowchart from before, in the PlayerControl’s Start function we query the Global Control for this boolean variable, and then copy over the loaded data.
This is because we cannot copy over the data and then load the scene. The data will not be carried over. We also cannot load the scene first, and copy the data in the same function, because anything after the LoadLevel() function will be ignored, since the object and the script are destroyed and a new level starts with new objects.
So, we use a bit of a workaround – we use the GlobalObject, which persists between those loadings, to load our data into the player.
In our PlayerControl Start() Function we need:
///In Control Start()

if (GlobalControl.Instance.IsSceneBeingLoaded)

        {

            PlayerState.Instance.localPlayerData = GlobalControl.Instance.LocalCopyOfData;
            transform.position = new Vector3(

                            GlobalControl.Instance.LocalCopyOfData.PositionX,

                            GlobalControl.Instance.LocalCopyOfData.PositionY,

                            GlobalControl.Instance.LocalCopyOfData.PositionZ + 0.1f);
            GlobalControl.Instance.IsSceneBeingLoaded = false;

        }
As you can see, we copy over the data first and then move the player to the saved location. We also move the player just a tiny amount upwards from the saved position, just to avoid any physics-related errors. After that we set the control boolean to false.
Done!
You can now test your in-game saving and loading. Feel free to change the statistics of the player, or traverse to another scene and hit the F5 button. You can now exit the game, restart your computer, it doesn’t matter.
When you turn the game back on, (or are just impatient, you can immediately) hit F9, and continue where you left off!
If you want to get fancy, try to write additional redundancy checks to see if the save file exists or even incrementing save files (so you can always load an earlier save).
Download the Project
If you want to see how the finished demo works or looks like (or if you got stuck somewhere and need help), the project can be downloaded from the following locations:
Conclusion
We have saved and loaded the player’s and relevant info, but what about the rest of the in-game world? What if we have pick ups in the world we want to save? Or enemies we want to stay dead?
This will be covered in a followup to this tutorial, coming shortly. Until then, if you want to come prepared and armed to the teeth with code, look up .NET/Mono’s Delegates and Events.
Questions? Comments? Please leave them below, and don’t forget to hit that thumbs up button if you liked this writeup!
Frequently Asked Questions (FAQs) about Saving and Loading Player Game Data in Unity
How Can I Save Player Progress in Unity?
Saving player progress in Unity involves creating a system that records the state of the game at a particular moment. This can be achieved using PlayerPrefs, a simple solution provided by Unity for saving and loading data. PlayerPrefs allows you to save float, int, and string data types. However, it’s not suitable for large amounts of data. For more complex data, you can use serialization to convert your data into a format that can be easily stored and retrieved.
How Can I Load Saved Game Data in Unity?
Loading saved game data in Unity involves retrieving the saved data and applying it to the current game state. If you used PlayerPrefs to save the data, you can use PlayerPrefs.Get to retrieve the data. If you used serialization, you’ll need to deserialize the data back into its original form.
Where Are Unity Save Files Located?
Unity save files are typically located in the persistent data path of the application. You can access this path using Application.persistentDataPath. This path is read-write enabled and is unique to each user on the device.
How Can I Save Complex Data Types in Unity?
For complex data types, you can use serialization. Unity supports both binary and JSON serialization. Binary serialization is more efficient but less human-readable, while JSON serialization is less efficient but more human-readable.
How Can I Implement Autosave in Unity?
Implementing autosave in Unity involves periodically saving the game state without player intervention. This can be achieved by setting up a timer that triggers the save function at regular intervals.
How Can I Save Game Settings in Unity?
Game settings can be saved in Unity using PlayerPrefs. You can create a settings menu that allows the player to adjust various settings, and then save these settings using PlayerPrefs.
How Can I Save Player Inventory in Unity?
Saving player inventory in Unity involves recording the state of the player’s inventory at a particular moment. This can be achieved using serialization to convert the inventory data into a format that can be easily stored and retrieved.
How Can I Save and Load Game Data Across Different Devices?
Saving and loading game data across different devices involves storing the game data in a location that can be accessed from any device. This can be achieved using cloud storage services such as Google Play Games Services for Android or iCloud for iOS.
How Can I Encrypt Saved Game Data in Unity?
Encrypting saved game data in Unity involves converting the data into a format that can’t be easily read or modified. This can be achieved using encryption algorithms such as AES.
How Can I Handle Save Data Corruption in Unity?
Handling save data corruption in Unity involves implementing measures to detect and recover from data corruption. This can include creating backup save files, implementing error checking in your save and load functions, and providing the player with the option to reset their save data.