

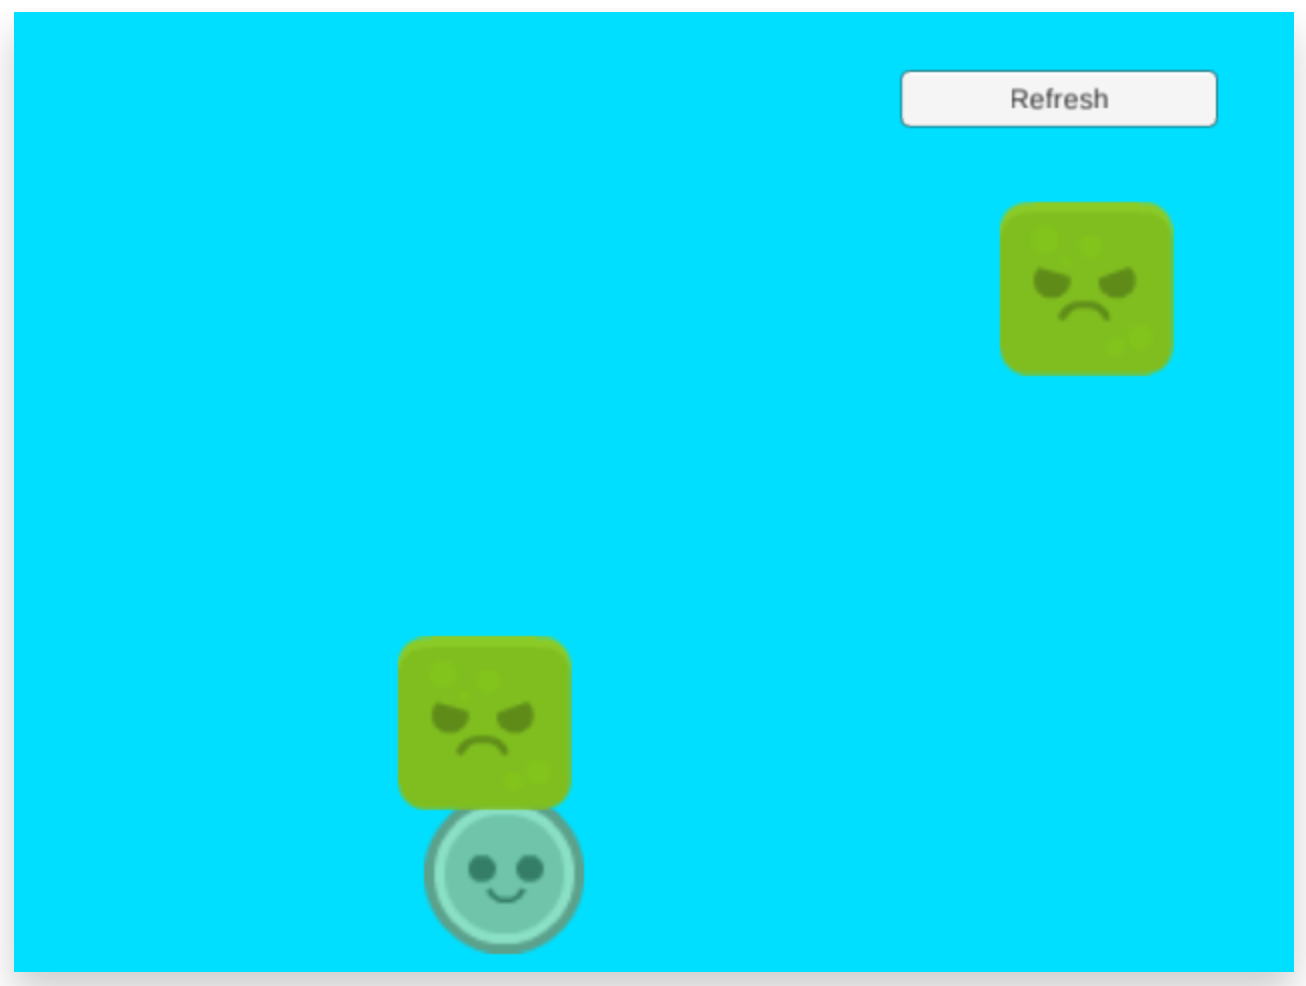
In this tutorial, we’ll be building a simple Dodger game in Unity. To see and play the final result, go here.
Key Takeaways
- The tutorial outlines the process of building a simple Dodger game in Unity, using key elements like player input, player/enemy bounds, random location generation, collision, and lose condition.
- The creation process involves setting up assets, creating player and enemy characters, getting player input, adding collision, and randomly spawning the enemy.
- The tutorial also covers the addition of basic UI elements like a reload button, as well as finalizing the game for PC, Mac, or Web builds.
- The tutorial also answers FAQs about adding complexity, optimizing performance, adding multiplayer functionality, sound effects, music, publishing, monetizing, adding AI enemies, a scoring system, a pause feature, and controller support to the Dodger game clone in Unity.
Analyzing the Game
Dodger is a small, simplistic game that doesn’t take much logic to program and can be customized almost endlessly. Dodger only has a few key elements of Gameplay:
- Player Input
- Player/Enemy Bounds
- Random Location Generation
- Collision
- Lose Condition
Using these five elements we will create a simple Dodger clone. This tutorial assumes you have installed Unity.
Adding the Assets
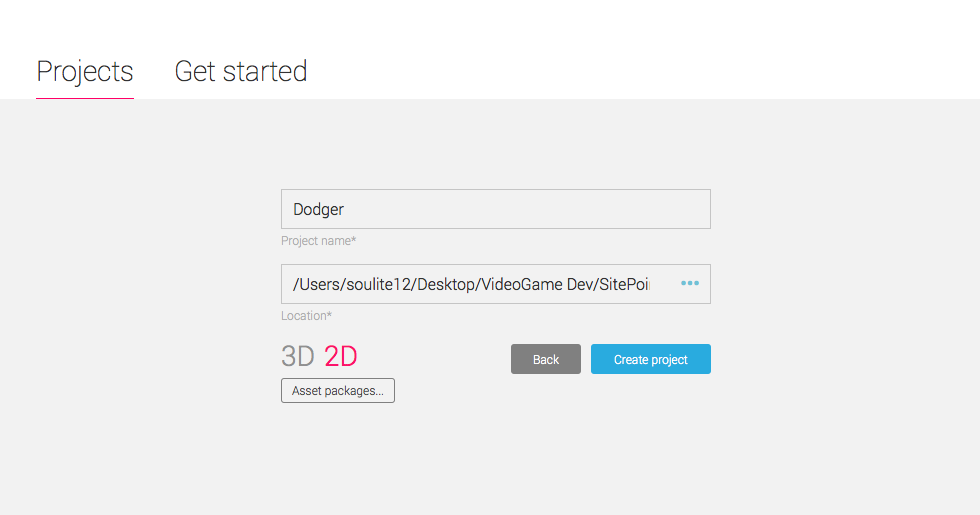
Create a New Unity2D Project and name it “Dodger” or “DodgerExample”.
First, you will want to download the images from the GitHub page (or right-click and save image as…).


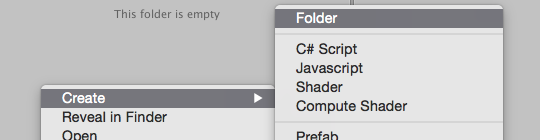
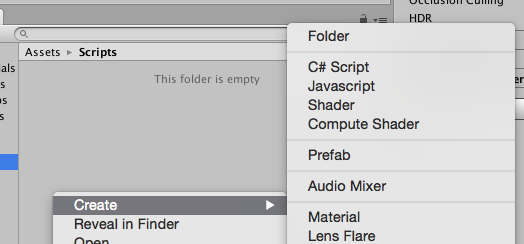
To create folders in Unity you need to Right-Click inside of the Assets Pane and select Create -> Folder. Name your new folder Images, and create 2 more folders named Prefabs and Scripts.
After creating your folders you will be able to drag the images you downloaded from the Github page into the Images folder. Select both of the images inside of your Images folder and set their Pixels Per Unit value to 32 and click Apply.
Creating the Player
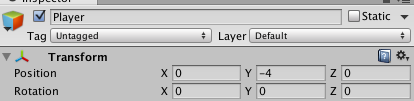
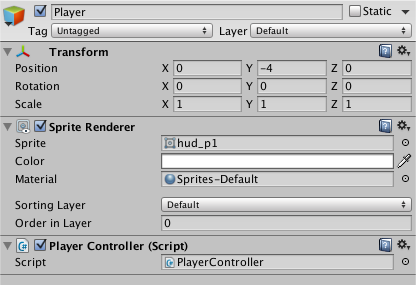
To add player input we will first have to create a Player game object. You can create a Player game object by dragging the image of the green smiling face into your hierarchy pane. Set the name of the game object to Player and set its Y Position to -3.5.
Modifying Our Camera
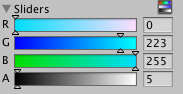
If we left the camera like this our sprites would have to use decimal numbers in order to stay just inside the screen like we want. Unity allows us to change the size of the main camera and its background color. Select the camera and click the background color. Set the color to a beautiful shade of blue (R: 0 G : 223 B: 255).
Select the size value of the main camera and set it to 4.4. Finally, inside of the Game pane click on Free Aspect and set the aspect ratio to 4:3.

Getting Player Input
We’ll start off our programming by getting player input. In order to get player input we will need to create a new C# Script and name it Player Controller.
Double Click the Script to open it in an IDE. Once the IDE is open add this code to the script:
    //Speed of the Player
    public float speed = 10.0F;

    //bounds of player
    public float leftBound = -5F;
    public float rightBound = 5F;
    public float upBound = 3.5F;
    public float downBound = -3.5F;
    // Use this for initialization
    void Start () {

    }

    // Update is called once per frame
    void Update () {
        //Horizontal Speed
        float movementSpeedX = Time.deltaTime * Input.GetAxis("Horizontal") * speed;
        //Vertical Speed
        float movementSpeedY = Time.deltaTime * Input.GetAxis("Vertical") * speed;
        //Player Movement
        transform.Translate(movementSpeedX, movementSpeedY, 0);

        //creates bounds around player
        if(transform.position.x > rightBound){
            transform.position = new Vector3(rightBound,transform.position.y,0);
        } else if(transform.position.x < leftBound){
            transform.position = new Vector3(leftBound,transform.position.y,0);
        }

        if(transform.position.y > upBound){
            transform.position = new Vector3(transform.position.x,upBound,0);
        } else if(transform.position.y < downBound){
            transform.position = new Vector3(transform.position.x,downBound,0);
        }
    }
Note: the actual values for the bounds may vary. If this is the case add the appropriate value to the bound variables
Add the Player Controller script to the Player game object in the hierarchy by dragging it from the Assets pane onto the Player game object. If you run the game and try to control the Player using the arrow keys you will see the player move on screen.
The Enemy
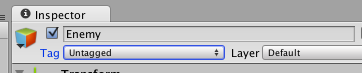
Next we will need to create the enemy. In order to create the enemy you will need to drag the angry green block into the hierarchy pane. Go ahead and name the game object Enemy. Click under the game object’s name where it says Untagged then click “Add Tag”. Create a tag named “Enemy”, and give the Enemy game object this tag. Select the Player game object and give the it the tag “Player”.

Now that we have the tags set which will tell the difference between the Player and the Enemy, we can start coding the enemy’s behavior. Open the Scripts folder in the Assets pane and create a new C# script named “EnemyController”. Add the EnemyController script to the Enemy game object. Open the script in your IDE and type this into your script:
    //speed of Enemy
    public float speed = 8F;

    // Use this for initialization
    void Start () {

    }

    // Update is called once per frame
    void Update () {
        //Movement of Enemy
        transform.Translate(0, -speed * Time.deltaTime, 0);
    }
Adding Collision
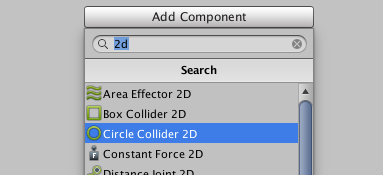
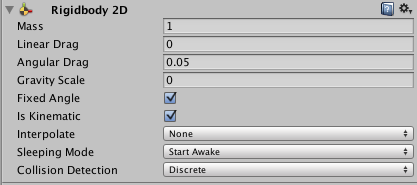
Inside of Unity select the Player game object. In the Player game object’s Inspector pane click the Add Component button, search for “Circle Collider 2D”, and add it to the Player game object. Do the same again, except search for “Rigidbody 2D” and add it to the Player game object. On the Rigidbody 2D set the values to the same as the image below.
Next select the Enemy game object, and inside of its Inspector pane click on the Add Component button. Search for “Box Collider 2D” and add it to the Enemy game object. Check “Is Trigger” inside of the menu for the Enemy game object’s Box Collider 2D.
Open the EnemyController script inside of your IDE and under the Update method type:
void OnTriggerEnter2D(Collider2D other){

        //Checks if other gameobject has a Tag of Player
        if(other.gameObject.tag == "Player"){
            //Pauses gameplay
            Time.timeScale = 0;
        }
}
Randomly Spawning the Enemy
Inside of Unity drag the Enemy game object in to the Prefabs folder inside of your Assets pane. Delete the Enemy that is inside of the hierarchy since we will be randomly generating the location of all of the spawned enemies. Right click inside of the hierarchy pane and select “Create Empty”. Name the empty game object “EnemySpawner” and sets its Y position to 6. Inside of the scripts folder create a new C# script named “EnemySpawnerController” and open it inside of your IDE.
Inside of your EnemySpawnerController script type:
    //rate at which enemies spawn
    public float spawnRate = 1;

    //enemy prefab
    public GameObject enemy;

    //bounds of spawner
    public float leftBound = -5F;
    public float rightBound = 5F;


    // Use this for initialization
    void Start () {
        //call SpawnEnemy based on spawnRate
        InvokeRepeating("SpawnEnemy", 1, spawnRate);
    }

    // Update is called once per frame
    void Update () {

    }

    void SpawnEnemy(){
        //a clone of the enemy prefab
        GameObject enemyClone;

        //spawns enemyClone at this location and rotation
        enemyClone = Instantiate(enemy, this.transform.position, this.transform.rotation) as GameObject;

        //randomly moves spawner along x axis
        float x = Random.Range(leftBound, rightBound);
        transform.position = new Vector3(x,this.transform.position.y, 0);
    }
Inside of Unity, drag the Enemy prefab (from inside the Prefabs folder) onto the Enemy value under the Enemy Spawner Controller menu inside of the EnemySpawner Inspector pane. Select the EnemySpawner in the Hierarchy pane and hit COMMAND+D (or right click the game object and select duplicate) to duplicate the game object. Name the new EnemySpawner game object to “EnemySpawner 2” and set its X position to 2. Select the EnemySpawner game object from the hierarchy pane and set its X position to 2.
Adding Basic UI
Inside of the hierarchy pane, right-click and select “Create Empty”. Set the new game object’s name to “UIManager”. In your scripts folder create a new C# script and name it “UIManager”. Open the script in your IDE and type:
// Use this for initialization
void Start () {
Time.timeScale = 1;
}
//Reloads the Level
public void Reload(){
Application.LoadLevel(Application.loadedLevel);
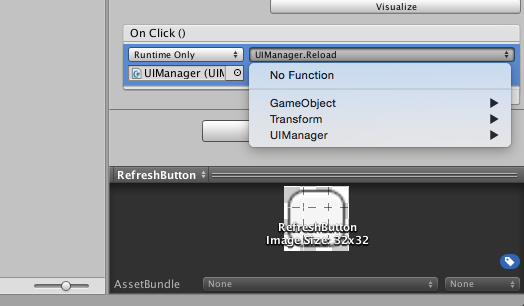
}Inside of Unity, in the top menu, select GameObject -> UI -> Button. Name the new button “Refresh Button” and set its X position to 202 and its Y position to 196. Hit the dropdown arrow next to Refresh Button in the the hierarchy pane and select the Text game object. Set the game objects text value to “Refresh”. Select the Refresh Button from the hierarchy pane and in its button Menu click the plus at the end of the On Click () menu. Set the On Click method’s game object to the UIManager game object and set the method to UIManager -> Reload.
Finishing Up
Create a “Scenes” folder in the Assets pane. Save our current scene as “MainLevel” and it to the scenes folder. From the top menu select File -> Build Settings and drag the MainLevel scene from the Assets pane into the Build Settings menu or hit “Add Current” in the menu. Finally, build the game to either PC, Mac, or Web and have fun playing.
Conclusion
This short but to-the-point tutorial went through the exact steps of creating a clone of the popular Dodger game in Unity. Hopefully, you liked it and are craving for more Unity content – it’s coming soon, we promise! Feedback? Comments? Leave them below!
You can download the full project on GitHub.
Frequently Asked Questions (FAQs) about Building a Dodger Game Clone in Unity
How can I add more complexity to the Dodger game clone in Unity?
Adding complexity to your Dodger game clone can be achieved by introducing new elements or increasing the difficulty level. For instance, you can add more obstacles or enemies that the player has to dodge. You can also introduce power-ups that give the player special abilities for a limited time. Another way to increase complexity is by adding levels, where each level is harder than the previous one. This can be done by increasing the speed of the obstacles or the number of obstacles as the player progresses through the levels.
How can I optimize the performance of my Dodger game clone in Unity?
Performance optimization in Unity can be achieved through various methods. One way is by using object pooling, which involves reusing objects from a “pool” instead of creating and destroying them. This can significantly improve performance, especially in games where many objects are created and destroyed frequently. Another way is by optimizing your scripts. This can be done by avoiding expensive operations in your update methods, using coroutines for operations that don’t need to be executed every frame, and avoiding unnecessary calculations.
How can I add multiplayer functionality to my Dodger game clone in Unity?
Adding multiplayer functionality to your Dodger game clone can be a bit complex, but Unity provides several tools and APIs to help you with this. One of these is the Unity Networking API, which allows you to create multiplayer games by handling the networking aspect for you. You can use this API to synchronize game states between players, handle player connections and disconnections, and send and receive data between players.
How can I add sound effects and music to my Dodger game clone in Unity?
Adding sound effects and music to your Dodger game clone can greatly enhance the player’s experience. Unity provides the AudioSource component for playing sounds. You can attach this component to any game object and then assign an AudioClip to it, which is the actual sound file that will be played. You can also control various properties of the sound, such as its volume and pitch, and whether it should loop.
How can I publish my Dodger game clone made in Unity?
Once you’ve finished developing your Dodger game clone, you can publish it on various platforms. Unity supports a wide range of platforms, including Windows, macOS, Linux, Android, iOS, and many more. To publish your game, you first need to build it by selecting the target platform and then clicking on the “Build” button. After the build process is complete, you can then distribute the resulting game file on your chosen platform.
How can I monetize my Dodger game clone made in Unity?
There are several ways to monetize your Dodger game clone. One of the most common ways is through in-app purchases, where players can buy virtual goods or features in your game. Another way is through ads, where you display advertisements in your game and earn revenue from them. Unity provides several tools and services to help you implement these monetization methods, such as Unity IAP for in-app purchases and Unity Ads for advertisements.
How can I add AI enemies to my Dodger game clone in Unity?
Adding AI enemies to your Dodger game clone can make it more challenging and interesting. Unity provides several tools and APIs for creating AI, such as the NavMesh system for pathfinding and the Animator component for controlling animations. You can use these tools to create AI enemies that move around the game world, chase the player, and perform various actions.
How can I add a scoring system to my Dodger game clone in Unity?
A scoring system can be added to your Dodger game clone by using variables to keep track of the player’s score. You can increase the score whenever the player successfully dodges an obstacle, and then display the score on the screen using a UI Text component. You can also save the player’s high score using PlayerPrefs, which allows you to store small amounts of data between game sessions.
How can I add a pause feature to my Dodger game clone in Unity?
A pause feature can be added to your Dodger game clone by using the Time.timeScale property. By setting this property to 0, you can effectively pause the game, as this will stop the game’s time and thus stop all movement and animations. You can then display a pause menu with options to resume the game or quit to the main menu.
How can I add controller support to my Dodger game clone in Unity?
Adding controller support to your Dodger game clone can be done by using the Input system in Unity. This system allows you to handle input from various devices, including keyboards, mice, and game controllers. You can use the Input.GetAxis method to get the input from the controller’s analog sticks, and the Input.GetButton method to get the input from the controller’s buttons.

