

Isomorphic JavaScript frameworks and libraries have gained a lot of attention recently. Isomorphic JavaScript applications are applications written in JavaScript that can run both on the client and on the server. Because of this, you can write the code once and then execute it on the server to render static pages and on the client to allow for fast interactions.
In this article, we’ll be exploring and getting started with Rendr, an open-source library developed by the Airbnb team. The library was initially built with the goal of powering the company’s mobile apps running on Backbone.js and Node.js. Later the company made it an open source project and this let the project gain a lot of traction.
Key Takeaways
- Rendr is an open-source library developed by Airbnb, designed to allow rendering Backbone.js applications on both the client and server using common code for both ends.
- With Rendr, web page content can be rendered via the server before JavaScript code gets executed in the browser, allowing for faster interactions once the initial page load is done.
- Rendr requires a Node.js server to be installed and uses Grunt, a JavaScript task runner, for automating tasks such as minification, compilation, and unit testing.
- Rendr applications consist of five basic parts: Homepage, User View, Users List View, Repo View, and Repos List View, with each folder in the application containing code for all these parts.
- Rendr’s key components include views, templates, controllers, models, and collections, each of which plays a critical role in fetching, displaying, and managing data in the application.
What’s Rendr
The basic idea behind Rendr is to allow rendering Backbone.js applications on the client and the server by writing common code for both the ends. This allows web page content to be rendered via the server, way before JavaScript code gets executed in the browser. Once the initial page load is done and the browser has all the client side framework loaded, further routing of the application will be handled by Backbone.js on the client side. Rendr is not intended to be a complete framework and it has the following design goals:
- Writing an application logic which is irrespective of the environment
- Reducing the
if(server) { ... } else { ... }structures - Communicating with RESTful APIs as any other Backbone application would do
- Hiding library complexities
- Excluding a server-side DOM
In this tutorial we’ll explore a simple Rendr application, with a GitHub browser that fetches data of repositories and users via the GitHub REST API. This small application is provided as part of Rendr’s sample examples. You can download these examples from this GitHub repository. Here, we’ll be exploring the basic “00_simple” application.
Before deepening the topic, let’s understand what our application would look like. It would have the following sections:
- Repos List View: The repositories’ list section would fetch and list some GitHub repositories
- Repo View: Clicking on a specific repository, it opens its information page
- Users List View: The users’ list section fetches and lists the GitHub users
- User View: Clicking on a specific user, it opens up the user profile view with some basic user details and their repositories
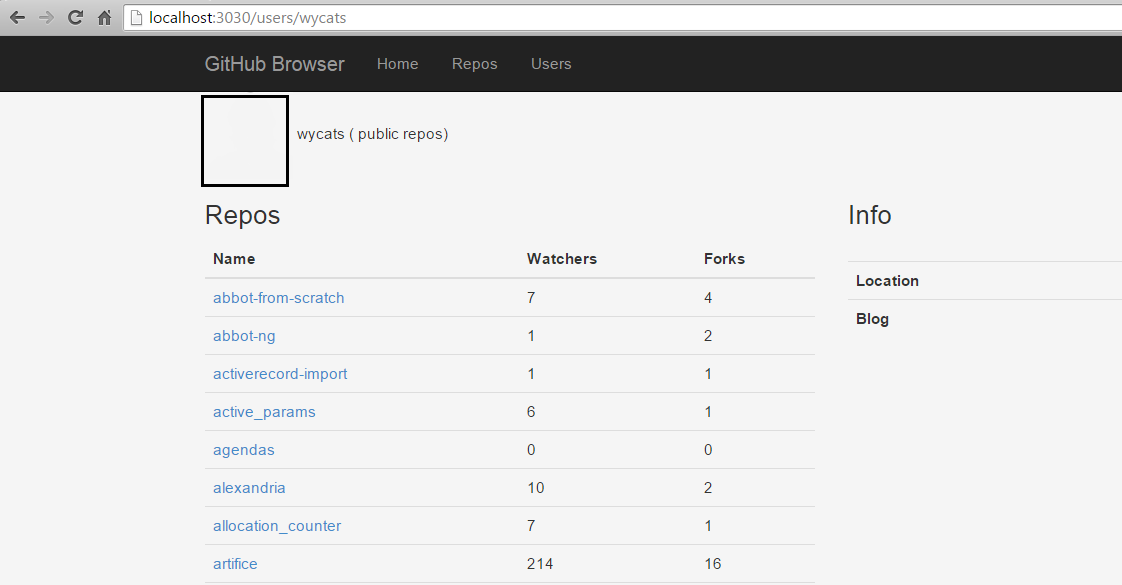
The following screenshot shows how our User View would look like
How to Install Rendr
Rendr needs a Node.js server installed as a prerequisite. If you need to install it, you can download it from the Node.js homepage. After this, we have to install Grunt, a JavaScript task runner that allows automating repetitive tasks like minification, compilation, unit testing, and so on. You can install it by running the following command:
npm install -g grunt-cli
If you want to learn more about Grunt, I suggest you to give a reading to the following articles published on SitePoint:
- How to Grunt and Gulp Your Way to Workflow Automation
- Automate Recurring Tasks with Grunt
- 5 Grunt Tasks that Improve the Performance of Your Website
Now, run the following command to install all the dependencies of the project:
npm install
Finally, run a web server to get the project started by executing the following command:
grunt server
Once the server starts, the application will run on default port 3030 and you’ll be able to access it by opening localhost:3030 in your browser. Let’s now understand how this application has been designed.
The Application Structure
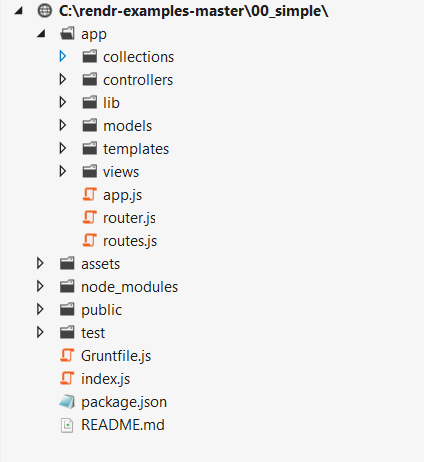
Open up the “00_simple” application in an IDE of your choice and take a look at its structure. You’ll notice that it is quite similar to any Backbone.js application with some conventions coming from Express and Rails as shown by the image below.
As for the various components of our Rendr application, it has five basic parts: Homepage, User View, Users List View, Repo View, and Repos List View. Each of the folders in the application (models, views, controllers, collections, and so on) will contain code for all these parts. However, we’re going to focus our attention on the Users List View mainly, which is the only model we’ll discuss in detail.
Initializing the Client/Server Routing Configuration
Now that we know the basic structure of our Rendr application, let’s see what we need to do to initialize the client and configure the server. The information about the request, the controller, and the actions (or methods) to be routed is contained within a file called routes.js:
module.exports = function(match) {

  match('', 'home#index');

  match('repos', 'repos#index');

  match('repos/:owner/:name', 'repos#show');

  match('users' , 'users#index');

  match('users/:login', 'users#show');

initi};
The above code initializes the mapping between the request URL input and the controller/action to which this request should be routed. For instance, a blank URL input will be routed to the index method of the home controller, whereas a URL input with this kind of structure repos/:owner/:name will be routed to the show method of the repos controller, using the match('', 'home#index') and match('repos/:owner/:name', 'repos#show') matches respectively.
Initializes Configurations
In this section we’ll understand how to initialize configurations such as dataAdapterConfig, apiPath, dataAdapter, or defaultEngine using index.js or server.js. For example, in our application, the configurations needed to call the GitHub API can be found in dataAdapterConfig section of index.js.
var dataAdapterConfig = {

  'default': {

    host: 'api.github.com',

    protocol: 'https'

  }

};
This dataAdapterConfig object is then passed to the rendr.createServer() method to initialize the Rendr server using the following sample code.
var server = rendr.createServer({

  dataAdapterConfig: dataAdapterConfig

});
This application model also performs the tasks of starting the server, initializing the fetcher, modelUtils, defining the template adapter and the template engine to be employed using the defined values of the configuration.
Bootstraps the Data and Initializes the Client Router
If you look at the layout file, app/templates/_layout.hbs, you’ll find the following code to bootstrap the default application data and initiate the client router using App.start().
var App = window.App = new (require('app/app'))({{json appData}});

App.bootstrapData({{json bootstrappedData}});

App.start();
Initializes the Template Adapter and Template Engine
By default, Rendr comes with HandleBar.js as the template adapter and template engine. However, you can use other adapters and engines by configuring them in the app.js file.
For example, Rendr supports Emblem.js as another template adapter. So if wish to use Emblem.js instead of the default HandleBar.js, the following configuration in App.js will be needed.
module.exports = BaseApp.extend({

  defaults: {

    templateAdapter: 'rendr-emblem'

  }

});
Similarly, if you would like to use a specific template engine, you can configure it in the App.js file with the configuration below:
module.exports = BaseApp.extend({

  defaults: {

    templateEngine: 'handlebars'

  }

});
Views
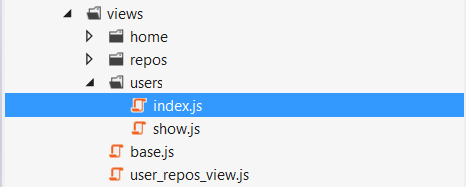
Rendr views extend Backbone.js views. You can see from the image below that the structure of the views folder in our application contains folders for home, users, and repos. It also contains the base.js and user_repos_view.js view files.
To look at the view that displays a list of the users, open the app/views/index.js file. Here you’ll find the following code:
var BaseView = require('../base');

module.exports = BaseView.extend({ className: 'users\_index_view' });

module.exports.id = 'users/index';
The above code shows how to extend the Rendr base view which in turn extends the Backbone.js view. The views also need to export an identifier which will be used to fetch and display data in these views. In our example, this identifier is users/index.
Note that this is a very basic example of how a view appears. Views in Rendr are able to render content across client and server, improve performance, lazy loading and support a variety of methods such as attach(), getAttributes(), getHTML(), getInnerHTML(), and much more.
Templates
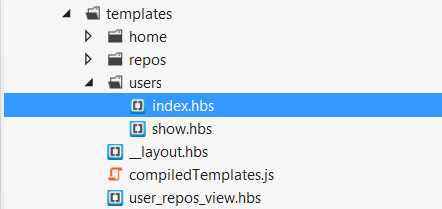
Rendr templates are used to define the structure of the data to be rendered on views. Template engines (such as Underscore, Handlebars, Mustache, etc.) compile the script, replace variables with real data from a JSON object and inject the HTML code into a specified place. The following image shows the structure of the templates folder in our application, which contains the default _layout.hbs and individual folders for home, repos, and users.
If you open the app/templates/users/index.hbs file, you’ll see that it defines the template for our users’ list view. This file iterates over all the users from the model and displays them as hyperlink.
<ul>

{{#each models}}

  <li>

    <a href="/users/{{login}}">{{login}}</a>;

  </li>

{{/each}}

</ul>
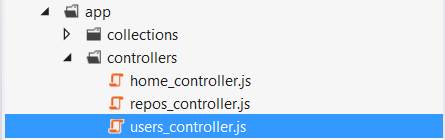
Controllers
Now that we have our view and template in place, we’ll look at another important aspect of our application: controllers. Controllers define the functions that the router will invoke when a URL is visited. They follow the naming convention of “name_controller.js”. The structure of the controllers folder which contains the controller files for home, repos and users is shown below.
If you open the users_controller.js file, you’ll find the following code snippet:
index: function(params, callback) {

  var spec = {

    collection: {collection: 'Users', params: params}

  };
  this.app.fetch(spec, function(err, result) {

    callback(err, result);

  });

}
The above code defines the index method. Here, the spec variable specifies to fetch the data from the users’ collection (we’ll see what a collection is in a moment, but for now consider it as a group of models) and this spec object is then passed to the app.fetch method.
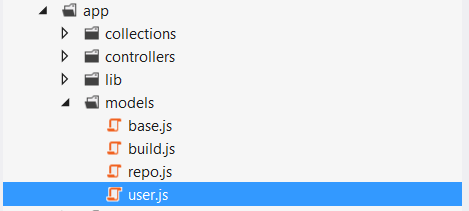
Models
Rendr models extend the Backbone.js models and can run on both client and server. If you look at the folder structure of models in our application, it contains model files for repo, user, and base.
Open the user.js file (app/models/user.js) which contains the following code needed to fetch user data from the GitHub API:
var Base = require('./base');

module.exports = Base.extend({ url: '/users/:login', idAttribute: 'login' });

module.exports.id = 'User';
The code above extends the base model class and defines the URL (similar to Backbone’s model.url) from where you can fetch the model data. In our case, this model is used to fetch data when we click on a particular user link on our users’ list view.
Collections
Rendr collections (derived from Backbone.js collections) are ordered sets of models which are used to delegate events for a group of models, listen to the addition or removal of models from the set, and synchronize those sets with a server. In addition to the features of Backbone.js collections, Rendr has two new features in which it acts like a collection store, and has the ability to synchronize the collection in the same fashion either on the client or the server. The collections’ folder in our application consists of base, repository and users’ collection.
Open the users.js collection which contains the following code:
var User = require('../models/user') , Base = require('./base');

module.exports = Base.extend({ model: User, url: '/users' });

module.exports.id = 'Users';
This code first extends the base collection, after which it defines the model for this collection (which is the user model) and finally specifies the URL where data can be fetched from. In our case, the collection gets the data from the GitHub REST API by passing the URL in {API-URL/users} format.
Conclusions
In this article we introduced Rendr, one of the most popular isomorphic JavaScript libraries. We took a look at the design, components and flow of a typical Rendr application with the help of a basic getting-started example. Although we touched most of the important concepts of Rendr, there are other interesting things that you can deepen. However, due to its limited product documentation for now, the best places to explore more on Rendr remain its GitHub references and other advanced examples we have downloaded. Feel free to experiment with Rendr and share your comments if you have any questions or suggestions.
This tutorial has proposed a detailed overview of all the basic concepts you could need to start developing a Rendr application and how its various components join together. We’ve created a view bound to a template and see how to combine them to display data in our application.
When a request is made, the router settings define which controller and method to call based on the URL input. This controller and method define the model or the collection where data can be fetched from. The model or collection does the actual data interaction and fetches data via APIs or database. Finally, data returned from this model or collection will be bound to the template we’ve created in the very first step.
Frequently Asked Questions about Rendr
What is Rendr and how does it work?
Rendr is a JavaScript library that allows you to run your Backbone.js apps seamlessly on both the client and the server. It is designed to help developers build large-scale web applications that are both SEO-friendly and fast. Rendr works by rendering pages on the server-side first, then binding events on the client-side, allowing for a smooth user experience.
How does Rendr compare to other JavaScript libraries?
Unlike other JavaScript libraries that only run on the client-side, Rendr can run on both the client and server-side. This dual functionality allows for faster initial page loads, better search engine optimization, and improved performance.
How can I install and use Rendr?
Rendr can be installed via npm, the Node.js package manager. Once installed, you can use it in your Backbone.js applications to render views on the server-side, then bind events on the client-side for a seamless user experience.
What are the benefits of using Rendr?
Rendr offers several benefits, including faster initial page loads, improved SEO, and better performance. It also allows developers to write code that can run on both the client and server-side, reducing the need for duplicate code.
Can Rendr be used with other JavaScript frameworks?
Yes, Rendr can be used with other JavaScript frameworks like Angular, React, and Vue.js. However, it is specifically designed to work with Backbone.js.
How does Rendr improve SEO?
Rendr improves SEO by rendering pages on the server-side first. This allows search engines to crawl and index your pages more effectively, improving your site’s visibility in search results.
What are the system requirements for using Rendr?
Rendr requires Node.js and npm to be installed on your system. It also requires a Backbone.js application to work with.
Can I use Rendr for mobile app development?
While Rendr is primarily designed for web application development, it can also be used for mobile app development. However, it may not offer the same level of performance and functionality as dedicated mobile app development frameworks.
How does Rendr handle data fetching?
Rendr handles data fetching through its model and collection classes. These classes fetch data from the server and populate the views with the fetched data.
Is Rendr open source?
Yes, Rendr is an open-source project. You can contribute to its development on GitHub.

