
Quizzes are fun! They’re a great way of learning about new subjects, and they allow you to engage your audience with something fun and playful. From a developer’s perspective, “How do I make a JavaScript quiz?” is one of the most common questions asked by people learning web development, and for good reason.
Coding your own JavaScript quiz game is a fantastic learning exercise. It teaches you how to deal with events, manipulate the DOM, handle user input, and use local storage to track their score. When you have a basic quiz up and running, there are a whole bunch of possibilities to add more advanced functionality, such as pagination.
In this tutorial, I’ll walk you through how to make a quiz in JavaScript that you’ll be able to adapt to your needs and add to your own site. If you’d like to see what we’ll be ending up with, you can skip ahead and see the working JavaScript quiz code.
For more in-depth JavaScript knowledge and challenges, get out our free book: Learn to Code with JavaScript.
Things to Be Aware of Before Starting
Here are a few things to know before starting:
- This is a front-end tutorial, meaning anyone who knows how to look through the source code of a page can find the answers. For serious quizzes, the data needs to be handled through the back end, which is beyond the scope of this tutorial.
- The code in this article uses modern JavaScript syntax (ES6+), meaning it will not be compatible with any version of Internet Explorer. However, it will work just fine on modern browsers, including Microsoft Edge.
- If you need to support older browsers, I’ve written a JavaScript quiz tutorial compatible with IE8. Or, if you’d like a refresher on ES6, check out this course by Darin Haener over on SitePoint Premium.
- You’ll need some familiarity with HTML, CSS, and JavaScript, but each line of code will be explained individually.
Step 1 – The Basic Structure of Your JavaScript Quiz
Ideally, we want the quiz’s questions and answers to be in our JavaScript code and have our script automatically generate the quiz app. That way, we won’t need to write a lot of repetitive markup, and we can add and remove questions easily.
In this example, we’ll be structuring our project using three key files:
- An HTML file for the basic user interface (UI).
- A CSS file for styling.
- A JavaScript file to handle all the interactive functionality.
However, if you prefer, you can also include the CSS and JavaScript code directly within the HTML file as inline code.
When learning how to make a quiz in HTML and JavaScript, it’s important to understand how the HTML structure interacts with the JavaScript logic. So, as the first step, let’s set up the HTML structure of our JavaScript quiz game.
- A <div> to hold the quiz.
- A <button> to submit the answers.
- A <div> to display the results.
Here’s how that would look:
<div id="quiz"></div>
<button id="submit">Submit Quiz</button>
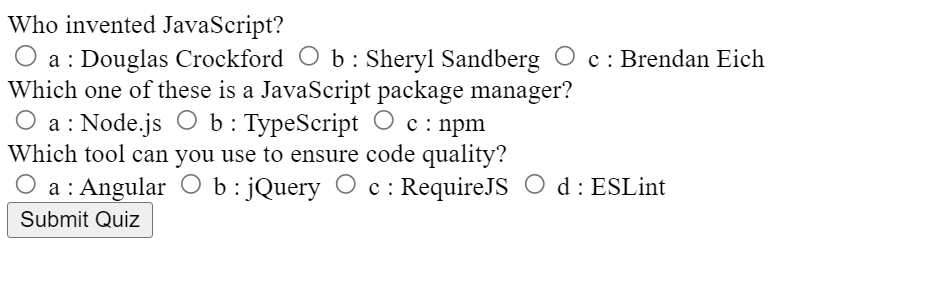
<div id="results"></div>This structure is a simple example of how to create quiz HTML code that serves as a foundation for your JavaScript quiz template. If you run the application now, you will just see a “Submit Quiz” button.
Step 2 – Initialize JavaScript Variables
Now, we can use the JavaScript document.getElementById method to select the above HTML elements and store references to them in the JavaScript quiz code like below:
const quizContainer = document.getElementById('quiz');
const resultsContainer = document.getElementById('results');
const submitButton = document.getElementById('submit');
The next thing our quiz app needs is some questions to display. We’ll use JavaScript object literals to represent the individual questions and an array to hold all of the questions that make up our quiz app. Using an array will make the questions easy to iterate over:
const myQuestions = [
  {
    question: "Who invented JavaScript?",
    answers: {
      a: "Douglas Crockford",
      b: "Sheryl Sandberg",
      c: "Brendan Eich"
    },
    correctAnswer: "c"
  },
  {
    question: "Which one of these is a JavaScript package manager?",
    answers: {
      a: "Node.js",
      b: "TypeScript",
      c: "npm"
    },
    correctAnswer: "c"
  },
  {
    question: "Which tool can you use to ensure code quality?",
    answers: {
      a: "Angular",
      b: "jQuery",
      c: "RequireJS",
      d: "ESLint"
    },
    correctAnswer: "d"
  }
];
Feel free to put in as many questions or answers as you want.
Note: As this is an array, the questions will appear in the order they’re listed. If you want to sort the questions in any way before presenting them to the user, check out our quick tip on sorting an array of objects in JavaScript.
Step 3 – Build the Quiz Function
Now that we have our list of questions, we can show them on the page. For that, we will be using a function named buildQuix(). Let’s go through the following JavaScript line by line to see how it works:
function buildQuiz(){
  // variable to store the HTML output
  const output = [];

  // for each question...
  myQuestions.forEach(
    (currentQuestion, questionNumber) => {

      // variable to store the list of possible answers
      const answers = [];

      // and for each available answer...
      for(letter in currentQuestion.answers){

        // ...add an HTML radio button
        answers.push(
          `<label>
            <input type="radio" name="question${questionNumber}" value="${letter}">
            ${letter} :
            ${currentQuestion.answers[letter]}
          </label>`
        );
      }

      // add this question and its answers to the output
      output.push(
        `<div class="question"> ${currentQuestion.question} </div>
        <div class="answers"> ${answers.join('')} </div>`
      );
    }
  );

  // finally combine our output list into one string of HTML and put it on the page
  quizContainer.innerHTML = output.join('');
}
First, we create an output variable to contain all the HTML output, including questions and answer choices.
Next, we can start building the HTML for each question. We’ll need to loop through each question like this:
myQuestions.forEach( (currentQuestion, questionNumber) => {
  // the code we want to run for each question goes here
});
For brevity, we’re using an arrow function to perform our operations on each question. Because this is in a forEach loop, we get the current value, the index (the position number of the current item in the array), and the array itself as parameters. We only need the current value and the index, which for our purposes, we’ll name currentQuestion and questionNumber respectively.
Now let’s look at the code inside our loop:
// we'll want to store the list of answer choices
const answers = [];

// and for each available answer...
for(letter in currentQuestion.answers){

  // ...add an html radio button
  answers.push(
    `<label>
      <input type="radio" name="question${questionNumber}" value="${letter}">
      ${letter} :
      ${currentQuestion.answers[letter]}
    </label>`
  );
}

// add this question and its answers to the output
output.push(
  `<div class="question"> ${currentQuestion.question} </div>
  <div class="answers"> ${answers.join('')} </div>`
);
For each question, we’ll want to generate the correct HTML. So, our first step is to create an array to hold the list of possible answers.s.
Next, we’ll use a loop to fill in the possible answers for the current question. For each choice, we’re creating an HTML radio button, which we enclose in a <label> element. This ensures that users can click anywhere on the answer text to select that answer. If the label was omitted, then users would have to click on the radio button itself, which is not very accessible.
Here, we’re using template literals, which are strings but more powerful. We’ll make use of the following features of template literals:
- Multi-line capabilities.
- Don’t need to use escape quotes within quotes because template literals use backticks.
- String interpolation allows embedding JavaScript expressions right into your strings like this: ${code_goes_here}.
Once we have our list of answer buttons, we can push the question HTML and the answer HTML onto our overall list of outputs.
Notice that we’re using a template literal and some embedded expressions to first create the question div and then create the answer div. The join expression takes our list of answers and puts them together in one string that we can output into our answers div.
Now that we’ve generated the HTML for each question, we can join it all together and show it on the page:
quizContainer.innerHTML = output.join('');Now, our buildQuiz function is complete, and you should be able to run the quiz app and see the questions displayed.
However, the structure of your code is important. Due to something called the temporal dead zone, you can’t reference your question array before it has been defined.
To recap, this is the correct structure:
// Functions
function buildQuiz(){ ... }
function showResults(){ ... }

// Variables
const quizContainer = document.getElementById('quiz');
const resultsContainer = document.getElementById('results');
const submitButton = document.getElementById('submit');
const myQuestions = [ ... ];

// Kick things off
buildQuiz();

// Event listeners
submitButton.addEventListener('click', showResults);
Step 4 – Displaying the Quiz Results
At this point, we want to build out our showResults function to loop over the answers, check them, and show the results. This is a crucial part of any quiz game JavaScript implementation, as it provides immediate feedback to the user based on their performance.
Here’s the function, which we’ll go through in detail next:
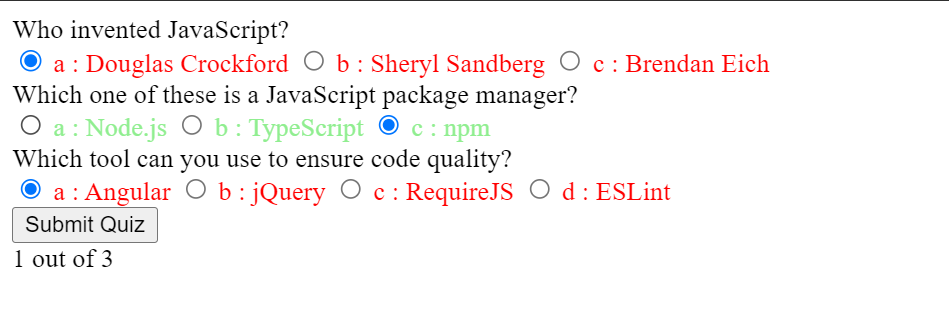
function showResults(){

  // gather answer containers from our quiz
  const answerContainers = quizContainer.querySelectorAll('.answers');

  // keep track of user's answers
  let numCorrect = 0;

  // for each question...
  myQuestions.forEach( (currentQuestion, questionNumber) => {

    // find selected answer
    const answerContainer = answerContainers[questionNumber];
    const selector = `input[name=question${questionNumber}]:checked`;
    const userAnswer = (answerContainer.querySelector(selector) || {}).value;

    // if answer is correct
    if(userAnswer === currentQuestion.correctAnswer){
      // add to the number of correct answers
      numCorrect++;

      // color the answers green
      answerContainers[questionNumber].style.color = 'lightgreen';
    }
    // if answer is wrong or blank
    else{
      // color the answers red
      answerContainers[questionNumber].style.color = 'red';
    }
  });

  // show number of correct answers out of total
  resultsContainer.innerHTML = `${numCorrect} out of ${myQuestions.length}`;
}
First, we select all the answer containers in our quiz’s HTML. Then, we’ll create variables to keep track of the user’s current answer and the total number of correct answers.
// gather answer containers from our quiz
const answerContainers = quizContainer.querySelectorAll('.answers');

// keep track of user's answers
let numCorrect = 0;
Now, we can loop through each question and check the answers.
We will be using 3 steps for that:
- Find the selected answer in the HTML.
- Handle what happens if the answer is correct.
- Handle what happens if the answer is wrong.
Let’s look more closely at how we’re finding the selected answer in our HTML:
// find selected answer
const answerContainer = answerContainers[questionNumber];
const selector = `input[name=question${questionNumber}]:checked`;
const userAnswer = (answerContainer.querySelector(selector) || {}).value;
First, we’re making sure we’re looking inside the answer container for the current question.
In the next line, we’re defining a CSS selector that will let us find which radio button is checked.
Then we’re using JavaScript’s querySelector to search for our CSS selector in the previously defined answerContainer. In essence, this means that we’ll find which answer’s radio button is checked.
Finally, we can get the value of that answer by using .value.
Dealing with Incomplete User Input
What if the user has left an answer blank? In this case, using .value would cause an error because you can’t get the value of something that’s not there. To solve this, we’ve added ||, which means “or”, and {}, which is an empty object. Now, the overall statement says:
- Get a reference to our selected answer element OR, if that doesn’t exist, use an empty object.
- Get the value of whatever was in the first statement.
As a result, the value will either be the user’s answer or undefined, which means a user can skip a question without crashing our quiz app.
Evaluating the Answers and Displaying the Result
The next statements in our answer-checking loop will let us handle correct and incorrect answers.
// if answer is correct
if(userAnswer === currentQuestion.correctAnswer){
  // add to the number of correct answers
  numCorrect++;

  // color the answers green
  answerContainers[questionNumber].style.color = 'lightgreen';
}
// if answer is wrong or blank
else{
  // color the answers red
  answerContainers[questionNumber].style.color = 'red';
}
If the user’s answer matches the correct choice, increase the number of correct answers by one and (optionally) color the set of choices green. If the answer is wrong or blank, color the answer choices red (again, optional).
Once the answer-checking loop is finished, we can show how many questions the user got right:
// show number of correct answers out of total
resultsContainer.innerHTML = `${numCorrect} out of ${myQuestions.length}`;
And now we have a working JavaScript quiz!
If you’d like, you can wrap the whole quiz in an IIFE (immediately invoked function expression), which is a function that runs as soon as you define it. This will keep your variables out of global scope and ensure that your quiz app doesn’t interfere with any other scripts running on the page.
(function(){
  // put the rest of your code here
})();
Now you’re all set! Feel free to add or remove questions and answers and style the quiz however you like.
Now, if you run the application, you can select the answers and submit the quiz to get the results.
Step 5 – Adding Styles
Since now we have a working quiz, let’s make it more user friendly by adding some styles. However, I won’t be going into details of each style. You can directly copy the below code into the styles.css file.
 @import url(https://fonts.googleapis.com/css?family=Work+Sans:300,600);

body{
  font-size: 20px;
  font-family: 'Work Sans', sans-serif;
  color: #333;
  font-weight: 300;
  text-align: center;
  background-color: #f8f6f0;
}
h1{
  font-weight: 300;
  margin: 0px;
  padding: 10px;
  font-size: 20px;
  background-color: #444;
  color: #fff;
}
.question{
  font-size: 30px;
  margin-bottom: 10px;
}
.answers {
  margin-bottom: 20px;
  text-align: left;
  display: inline-block;
}
.answers label{
  display: block;
  margin-bottom: 10px;
}
button{
  font-family: 'Work Sans', sans-serif;
  font-size: 22px;
  background-color: #279;
  color: #fff;
  border: 0px;
  border-radius: 3px;
  padding: 20px;
  cursor: pointer;
  margin-bottom: 20px;
}

button:hover{
  background-color: #38a;
}

.slide{
  position: absolute;
  left: 0px;
  top: 0px;
  width: 100%;
  z-index: 1;
  opacity: 0;
  transition: opacity 0.5s;
}
.active-slide{
  opacity: 1;
  z-index: 2;
}
.quiz-container{
  position: relative;
  height: 200px;
  margin-top: 40px;
}
At this point, your quiz might look like this (with a tiny bit of styling):
Step 6 – Implementing Pagination
As you can see in the above images, the questions in the quiz are ordered one after another. We have to scroll down to select our answers. Although this looks fine with three questions, you might start struggling to answer them when the number of questions increases. So, we need to find a way to show only one question at a time through pagination.
For that, you’ll need:
- A way to show and hide questions.
- Buttons to navigate the quiz.
So, let’s make some adjustments to our code, starting with HTML:
<div class="quiz-container">
  <div id="quiz"></div>
</div>
<button id="previous">Previous Question</button>
<button id="next">Next Question</button>
<button id="submit">Submit Quiz</button>
<div id="results"></div>
Most of that markup is the same as before, but now we’ve added navigation buttons and a quiz container. The quiz container will help us position the questions as layers that we can show and hide.
Next, inside the buildQuiz function, we need to add a <div> element with class slide to hold the question and answer containers that we just created:
output.push(
  `<div class="slide">
    <div class="question"> ${currentQuestion.question} </div>
    <div class="answers"> ${answers.join("")} </div>
  </div>`
);
Next, we can use some CSS positioning to make the slides sit as layers on top of one another. In this example, you’ll notice we’re using z-indexes and opacity transitions to allow our slides to fade in and out. Here’s what that CSS might look like:
.slide{
  position: absolute;
  left: 0px;
  top: 0px;
  width: 100%;
  z-index: 1;
  opacity: 0;
  transition: opacity 0.5s;
}
.active-slide{
  opacity: 1;
  z-index: 2;
}
.quiz-container{
  position: relative;
  height: 200px;
  margin-top: 40px;
}
Now we’ll add some JavaScript to make the pagination work. As before, the order is important, so this is the revised structure of our code:
// Functions
// New functions go here

// Variables
// Same code as before

// Kick things off
buildQuiz();

// Pagination
// New code here

// Show the first slide
showSlide(currentSlide);

// Event listeners
// New event listeners here
We can start with some variables to store references to our navigation buttons and keep track of which slide we’re on. Add these after the call to buildQuiz(), as shown above:
// Pagination
const previousButton = document.getElementById("previous");
const nextButton = document.getElementById("next");
const slides = document.querySelectorAll(".slide");
let currentSlide = 0;
Next we’ll write a function to show a slide. Add this beneath the existing functions (buildQuiz and showResults):
function showSlide(n) {
  slides[currentSlide].classList.remove('active-slide');
  slides[n].classList.add('active-slide');
  currentSlide = n;
  if(currentSlide === 0){
    previousButton.style.display = 'none';
  }
  else{
    previousButton.style.display = 'inline-block';
  }
  if(currentSlide === slides.length-1){
    nextButton.style.display = 'none';
    submitButton.style.display = 'inline-block';
  }
  else{
    nextButton.style.display = 'inline-block';
    submitButton.style.display = 'none';
  }
}
Here’s what the first three lines do:
- Hide the current slide by removing the active-slide class.
- Show the new slide by adding the active-slide class.
- Update the current slide number.
The next lines introduce the following JavaScript logic:
- If we’re on the first slide, hide the Previous Slide button. Otherwise, show the button.
- If we’re on the last slide, hide the Next Slide button and show the Submit button. Otherwise, show the Next Slide button and hide the Submit button.
After we’ve written our function, we can immediately call showSlide(0) to show the first slide. This should come after the pagination code:
// Pagination
...

showSlide(currentSlide);
Next we can write functions to make the navigation buttons work. These go beneath the showSlide function:
function showNextSlide() {
  showSlide(currentSlide + 1);
}

function showPreviousSlide() {
  showSlide(currentSlide - 1);
}
Here, we’re making use of our showSlide function to allow our navigation buttons to show the previous slide and the next slide.
Finally, we’ll need to hook the navigation buttons up to these functions. This comes at the end of the code:
// Event listeners
...
previousButton.addEventListener("click", showPreviousSlide);
nextButton.addEventListener("click", showNextSlide);
Now your quiz has working navigation!
What’s Next?
Now that you have a basic JavaScript quiz app, it’s time to get creative and experiment.
Here are some suggestions you can try:
- Try different ways of responding to a correct answer or a wrong answer.
- Style the quiz nicely.
- Add a progress bar.
- Let users review answers before submitting.
- Give users a summary of their answers after they submit them.
- Update the navigation to let users skip to any question number.
- Create custom messages for each level of results. For example, if someone scores 8/10 or higher, call them a quiz ninja.
- Add a button to share results on social media.
- Save your high scores using localStorage.
- Add a countdown timer to see if people can beat the clock.
- Apply the concepts from this article to other uses, such as a project price estimator, or a social “which-character-are-you” quiz.
FAQs on How to Make a Simple JavaScript Quiz
How Can I Add More Questions to the JavaScript Quiz?
Adding more questions to your JavaScript quiz is a simple process. You need to add more objects to the questions array in your JavaScript code. Each object represents a question and has two properties: text (the question itself) and responses (an array of possible answers). Here’s an example of how you can add a new question:
questions.push({
  text: 'What is the capital of France?',
  responses: [
  {
    text: 'Paris',
    correct: true
  },
  {
    text: 'London',
    correct: false
  },
  {
    text: 'Berlin',
    correct: false
  },
  {
    text: 'Madrid',
    correct: false
  }
  ]
});
In this example, we’re adding a question about the capital of France, with four possible answers. The correct answer is marked with ‘correct: true’.
How Can I Randomize the Order of Questions in the Quiz?
Randomizing the order of questions can make your quiz more challenging and fun. You can achieve this by using the sort() method combined with the Math.random() function. Here’s how you can do it:
questions.sort(
  function() {
    return 0.5 - Math.random();
  }
);
This code will randomly sort the questions array each time the page is loaded.
How Can I Add a Timer to the Quiz?
Adding a timer can make your quiz more exciting. You can easily add a timer to the quiz using the JavaScript setInterval() function. Here’s a simple example:
var timeLeft = 30;
var timer = setInterval(function() {
  timeLeft--;
  document.getElementById('timer').textContent = timeLeft;
  if (timeLeft <= 0) {
    clearInterval(timer);
    alert('Time is up!');
  }
}, 1000);
In this example, the quiz will last for 30 seconds. The timer will update every second, and when the time is up, an alert will be shown.
How Can I Show the Correct Answer if the User Gets it Wrong?
You can show the correct answer by modifying the checkAnswer() function. You can add an else clause to the if statement that checks if the answer is correct. Here’s how you can do it:
function checkAnswer(question, response) {
  if (question.responses[response].correct) {
    score++;
  } else {
    alert('The correct answer is: ' + question.responses.find(r => r.correct).text);
  }
}
In this example, if the user’s answer is incorrect, an alert will be shown with the correct answer.
How Can I Add Images to the Questions?
You can add images to your questions by adding an ‘image’ property to the question objects. You can then use this property to display the image in your HTML. Here’s an example:
questions.push({
 text: 'What is this animal?',
 image: 'elephant.jpg',
 responses: [
 { text: 'Elephant', correct: true },
 { text: 'Lion', correct: false },
 { text: 'Tiger', correct: false },
 { text: 'Bear', correct: false }
 ]
});
In your HTML, you can display the image like this:
<img src="" id="questionImage">And in your JavaScript, you can update the src attribute of the image when displaying a new question:
document.getElementById('questionImage').src = question.image;In this example, an image of an elephant will be displayed when the question is shown.
How Do I Handle Multiple Correct Answers in a JavaScript Quiz?
Handling multiple correct answers involves allowing the user to select more than one answer and checking if any of the selected answers are correct. For example, here is how you can update the above showResults() function to handle multiple correct answers.
 function showResults() {
  const answerContainers = quizContainer.querySelectorAll('.answers');
  let numCorrect = 0;

  myQuestions.forEach((currentQuestion, questionNumber) => {
    const answerContainer = answerContainers[questionNumber];
    const selector = `input[name=question${questionNumber}]:checked`;
    const userAnswers = Array.from(answerContainer.querySelectorAll(selector)).map(input => input.value);

    if (userAnswers.sort().toString() === currentQuestion.correctAnswers.sort().toString()) {
      numCorrect++;
      answerContainers[questionNumber].style.color = 'lightgreen';
    } else {
      answerContainers[questionNumber].style.color = 'red';
    }
  });

  resultsContainer.innerHTML = `${numCorrect} out of ${myQuestions.length}`;
}
Is It Necessary to Maintain Seperate JavaScript File and a CSS File?
Maintaining separate JavaScript and CSS files is not a must. However, it is generally considered a best practice since it improves the readability and maintainability of your code.