

Key Takeaways
- Django’s static files, including CSS, JavaScript, and images, are crucial for enhancing the aesthetics and functionality of web applications, and Django provides built-in mechanisms for efficient management and delivery.
- Setting up a demo project in Django involves creating a directory, a virtual environment, installing dependencies, and configuring static file settings to integrate static files into the web application.
- In development environments, Django can serve static files directly when the DEBUG setting is True, using the django.contrib.staticfiles app to manage these files without additional configuration.
- WhiteNoise is an essential tool for serving static files in both development and production, allowing for consistent file handling across different environments by integrating directly into Django’s middleware.
- Using Amazon S3 for static file storage offers scalability and reliability, especially when serving a large number of files or handling high traffic, and requires configuring Django to use S3 as the storage backend for static files.
- Proper configuration of Django settings, such as STATIC_ROOT, STATIC_URL, and STATICFILES_DIRS, is crucial for the effective management and serving of static files, ensuring optimal performance and user experience.
In this tutorial, we’ll look at what static files are in Django, the benefits of managing them efficiently, their purpose in web applications, and we’ll set up a demo project to illustrate how to manage and serve static files using different methods and tools.
Django is a high-level Python web development framework that provides web developers with a powerful toolkit to create web applications quickly and efficiently.
While Django is great for creating web applications quickly and efficiently, it’s equally important to take care of the look and feel of the web applications you develop. In order to do that, you have learn how to manage the assets that support and provide the look and feel of your applications.
Static Files in Django
In Django, static files are those files that are served directly to the client without any processing by the server.
These typically include CSS, JavaScript files, images, icons, fonts and other assets necessary for the look and feel of your web application.
Django provides mechanisms to manage and serve these static files efficiently, ensuring a smooth user experience.
Managing static files efficiently
To ensure that the users of your web application have a good user experience and the application performs as expected, you have to manage the static files efficiently.
Properly organizing and caching static files will ensure fast page load times, and that responsiveness is improved, enhancing overall user satisfaction.
Django offers various tools and conventions to aid in the handling of static files.
The purpose of static files in web applications
Static files are very important, as they set out how a web application looks and feels. They define how components in an application are styled, how they behave in response to user interactions, and eventually what a user sees when they visit a particular web application.
When you serve the static files efficiently, you’ll be able to create a visually appealing and responsive user interface, making the application more engaging and user friendly.
Setting Up a Demo Project
To illustrate the concepts of static files management in Django, we’ll set up a demo project from scratch.
This project will include creating a Django project, configuring static file settings, and integrating static files into a simple web application.
By following along with the demo project, you’ll gain hands-on experience with managing static files in Django and understand their significance in web development.
For the purposes of this tutorial, we will create a landing page such that when users visit the home page of our project, they’ll see a styled heading welcoming them to the site. It will also display today’s date using JavaScript, and we will also serve an image to complete the page.
Creating a directory to hold the project
Let’s begin by creating a directory that will hold the demo project using the following command:
mkdir sitepoint_django_static_tut
Creating a virtual environment
It’s recommended that you create and isolate new projects within virtual environments. This means that each project will have its own dependencies without affecting the global Python installation.
We’ll use the virtualenv package to create it. If it isn’t installed in your development environment, install it using pip install virtualenv, and create a virtual environment using the following command:
virtualenv myenv
The above command creates a virtual environment named myenv. To use the virtual environment, you have to activate it:
Linux/macOS:
. myenv/bin/activate
Windows:
. myenv\Scripts\activate
Installing dependencies
Once the virtual environment is active, you can now go ahead and install the dependencies of your project. For a start, we’ll install Django. We’ll install other dependencies as we get to the sections that demonstrate their usage:
pip install Django
This will install the latest stable version of Django, which at the time of writing is version 5.0.
Creating a Django project
Upon successful installation of Django, you now have access to Django management commands. Let’s use them to create a Django project in the virtual environment:
django-admin startproject sitepoint_django .
The command above will create Django project named sitepoint_django and the dot at the end signifies that we intend to create the project in the current directory.
Creating a demo app
To illustrate the various concepts of the static file management, we need to create at least one Django app in our project:
python manage.py startapp static_demo
This will create a new app in our project named static_demo. For it to be recognized by our project, we have to add it to the installed apps setting in the settings.py file of our project. Open up sitepoint_django/settings.py, go to the INSTALLED_APPS setting and add static_demo.apps.StaticDemoConfig to the bottom of the list, as shown below:
# sitepoint_django/settings.py

INSTALLED_APPS = [
    # other apps
    'static_demo.apps.StaticDemoConfig',
]
Creating the home page template
We’ll render some HTML when the user visits the home page of our site. In the static_demo app, create a templates directory, and in it create another directory and name it static_demo. In this directory, create a template and name it index.html so the path will be static_demo/templates/static_demo/index.html.
Place the following code into index.html:
<!-- static_demo/index.html -->

<!DOCTYPE html>
<html lang="en">
<head>
    <meta charset="UTF-8">
    <meta name="viewport" content="width=device-width, initial-scale=1.0">
    <title>Sitepoint Django Tutorial</title>
</head>
<body>
    <h2>Hello there, welcome to our great site!</h2>
</body>
</html>
Creating the index view
For the template to be shown to users whenever they visit the home page of our app, we need to create a view function that will be triggered to render the home.html template. Open the static_demo/views.py file and put in the following code:
# static_demo/views.py

from django.shortcuts import render

def index(request):
    return render(request, "static_demo/home.html")
Creating the static_demo URL file
We want the index view in the static_demo app to render the home page whenever a user visits our site. So we’ll create a URL scheme for the view function that will render the home page. For that, we need to create a urls.py file for the static_demo app, then connect the static_demo URL file to projects URL file.
Therefore, in the static_demo app, create a file and name it urls.py and add the following code into it:
# static_demo/urls.py

from django.urls import path
from .import views

app_name = 'static_demo'

urlpatterns = [
    path('', views.index, name="index"),
]
The code above creates a URL for the index view of our project, so if a user visits something like http://oursite.com/, or if you visit http://127.0.0.1:8000 in development, the index view will be called to respond to that.
Let’s add it to the project URL file. Open up the sitepoint_django/urls.py file and add in the following code:
# sitepoint_django/urls.py

from django.contrib import admin
from django.urls import path, include # add an import for include

urlpatterns = [
    path('admin/', admin.site.urls),
    path('', include('static_demo.urls')), # add this line
]
The code above makes some changes to the default urls.py file. We’ve added an import for include function, which tells Django that we’re including the static_demo.urls.
Testing the project
The initial configuration of the project is done at this point. Let’s run the development server to see if everything is tied up well.
Run the project with the following command:
python manage.py runserver
If everything is setup correctly, you should be able to visit http://127.0.0.1:8000. You’ll see some unstyled text welcoming you to the site.
Serving Static Files in Development
In order to add styling to the page, JavaScript for the date, and the image, we have to make changes to the project. Let’s do so incrementally and see how we can serve the different static files in different ways, starting with the development environment.
Setting up a static files directory
Django recommends that all static assets be managed appwise: that is, all CSS, JS and images that a particular app needs should be resident in the confines of that app. So let’s update the static_demo app and create a directory named static, and inside it create another directory named static_demo. Then in the static_demo directory create three more directories: css, js, and images. In the end, we’ll have a structure similar to the one below:
static_demo/
    └── static/
        └── static_demo/
            ├── css/
            ├── js/
            └── images/
The reason why you would want to create a static_demo directory in the static directory is to help you namespace your static assets. If you have more than one app, and you have the CSS in both apps named as styles.css, Django would only work with the first stylesheet it finds, as it wouldn’t be able to distinguish between the others. Therefore, we namespace them so that Django will be able to know which asset file we’re referring to in our templates.
Creating the static files
In this step, let’s just set up minimal static assets that will demonstrate how you can serve the files in development.
In the js directory, create a file and name it todays_date.js, and add the following code:
/* static_demo/js/todays_date.js */

let formattedDate = new Date().toLocaleDateString();

document.getElementById('todaysDate').innerText = `The date today is ${formattedDate}`;
The code above gets today’s date from JavaScript, formats it into a string, and then displays it in a div with an ID of todaysDate.
In the css directory, create a file, name it styles.css, and add the following code:
/* static_demo/css/styles.css */

body {
    display: flex;
    flex-direction: column;
    justify-content: center;
    align-items: center;
    margin: 0;
}

h2 {
    font-size: 24px;
    color: green;
}
The code above uses the Flexbox layout to center all the items on the page both horizontally and vertically. It also sets the H2 element’s font size to 24px and its color to green.
For the image, you can use any image of your liking. Just copy some image into the images directory and take note of the name.
Configuring static file settings
To serve static files in development, a number of things must be set in the Django settings.py file. Open the sitepoint_django/settings.py file and check to see it you have the following settings:
# sitepoint_django/settings.py`

DEBUG=True
In development, it’s generally recommended to set DEBUG to True in your Django project settings. This setting enables various debugging features, including detailed error messages and stack traces, which are invaluable for diagnosing and fixing issues during development.
Additionally, when DEBUG is set to True, the django.contrib.staticfiles app automatically serves static files from each app’s static directory. This behavior simplifies the development process by eliminating the need for manual configuration to serve static files.
In the INSTALLED_APPS setting, check to see if you have the django.contrib.staticfiles added. If not, add it above the apps you have in the project. For example, in this project add it above the static_demo app string, as shown below:
# sitepoint_django/settings.py`

INSTALLED_APPS = [

    'django.contrib.staticfiles',
    'static_demo.apps.StaticDemoConfig',
]
The django.contrib.staticfiles app provided by Django is essential for serving static files during development. By default, it traverses your project’s apps to locate static file directories within each app. However, if you have additional static assets that aren’t associated with any particular app, you can still make them accessible to django.contrib.staticfiles by setting the STATICFILES_DIRS setting in your project’s settings.py file. This setting allows you to specify additional directories where static files are located. For example:
# sitepoint_django/settings.py`

STATICFILES_DIRS = [
    "/dir/with/staticfiles/static",
    "/someother/dir/static",
    "/home/example.com/static",
]
In addition to DEBUG and STATICFILES_DIRS, another important setting to include in your Django project settings file is STATIC_URL. While Django provides a default value for STATIC_URL, you can explicitly define it in your settings.py file if it’s not already present.
The STATIC_URL setting specifies the base URL from which static assets will be served. For example, setting STATIC_URL = "static/" instructs Django to serve static assets from the /static/ URL path. This means that, for instance, the styles file located in the static_demo app will be accessible at a URL like http://127.0.0.1:8000/static/static_demo/css/styles.css.
Updating the template
With the settings out of the way, to use the static files in the template, we have to update it with the following HTML:
<!-- static_demo/index.html -->

<!-- add static file handling functionality -->
{% load static %}

<!DOCTYPE html>
<html lang="en">
<head>
    <meta charset="UTF-8">
    <meta name="viewport" content="width=device-width, initial-scale=1.0">
    <title>Sitepoint Django Tutorial</title>

    <!-- link to css  below -->
    <link rel="stylesheet" href="{% static 'static_demo/css/styles.css'%}">
</head>
<body>
    <h2>Hello there, welcome to our great site</h2>
    <p id="todaysDate"></p>
    <!-- link to image  below -->
    <img src="{% static 'static_demo/images/flowerImage.png' %}" alt="Flower Image">

    <!-- link to js  below -->
    <script src="{% static 'static_demo/js/todays_date.js' %}"></script>
</body>
</html>
That template update introduces us to a new tag: {% load static %}. This tag loads the static file handling functionality provided by the Django templating engine. Including this tag in a Django template file enables us to use template tags and filters related to static files.
For example, using it in our template enables us to reference static files like images, CSS and JS in HTML elements. Using it also enables Django to generate URLs for the references static assets:
<link rel="stylesheet" href="{% static 'static_demo/css/styles.css'%}">

<img src="{% static 'static_demo/images/flowerImage.png' %}" alt="Flower Image">

<script src="{% static 'static_demo/js/todays_date.js' %}"></script>
With those settings and the template update in place, we should run the project and see if the files are being served in development. Run the project using the following command:
python manage.py runserver
If everything is set up correctly, we should have the development server running on http://127.0.0.1:8000. If we visit that link, we should have page similar to the one below.
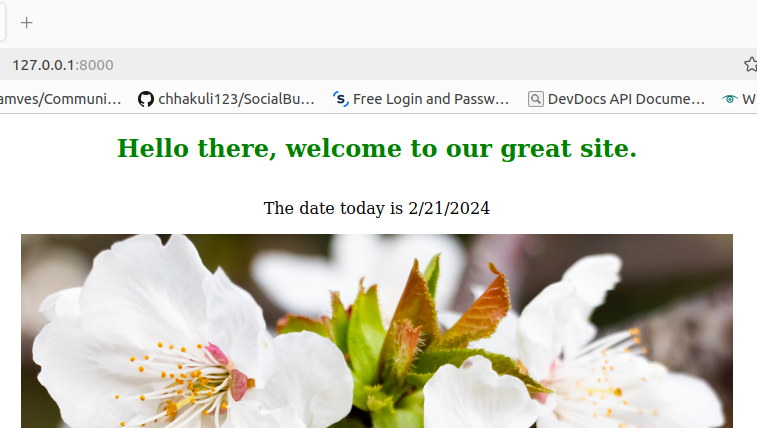
Having a similar image shows that the static files have been applied correctly.
You should note that in Django development, when DEBUG=True in your project’s settings, and django.contrib.staticfiles is enabled, this allows Django’s development server (runserver) to serve static files. In this scenario, any changes made to static files, such as CSS, JavaScript, or images, are automatically detected and applied by Django. This seamless process greatly simplifies development, as you will instantly see the effects of your changes without needing to manually refresh or restart the server.
However, in production environments, serving static files typically involves using a separate web server or CDN. In this case, changes to static files may not be automatically detected and applied by Django, necessitating manual intervention to ensure that the updated files are served to users. Additionally, if you opt to manually serve static files using a different method, such as the django.views.static.serve() view, automatic detection and application of changes may not occur, and you may need to implement your own mechanisms for handling static file updates.
Serving Static Files Using WhiteNoise
In development, while django.contrib.staticfiles simplifies the process of serving static assets, ensuring seamless updates as you make changes.
However, when transitioning to production, settings like DEBUG=True must be disabled, and static files might be served from a CDN or another server. This necessitates a solution that bridges both environments — enabling smooth serving of files during development while accurately reflecting the production environment.
Enter the WhiteNoise package. Designed to seamlessly integrate with Django, WhiteNoise offers a robust solution for serving static files in both development and production environments, providing a unified approach that ensures consistency and reliability across deployment stages. Let’s explore WhiteNoise.
Installing and configuring WhiteNoise in Django
Getting started with WhiteNoise is straightforward .In this section, we’ll walk through the installation process and guide you on how to configure WhiteNoise within your Django project.
We install WhiteNoise like so:
pip install whitenoise
After successful installation, head over to sitepoint_django/settings.py, scroll down to the bottom, and find the STATIC_URL setting. Below it, add the STATIC_ROOT setting:
# sitepoint_django/settings.py

STATIC_ROOT = BASEDIR / "staticfiles"
The setting above tells Django that when the collectstatic is run all static assets in all apps in your project will be collected and stored into this directory named staticfiles.
The next thing to do is to run the collectstatic management command:
python manage.py collectstatic
To enable WhiteNoise, you have to add it to the MIDDLEWARE settings list, edit the settings.py file, and add the WhiteNoise middleware after the Django SecurityMiddleware and before all other middleware:
# sitepoint_django/settings.py

MIDDLEWARE = [
    # ...
    "django.middleware.security.SecurityMiddleware",
    "whitenoise.middleware.WhiteNoiseMiddleware",
    # ...
]
Using WhiteNoise in development
With just the steps above, WhiteNoise can serve you static files in production. But if you run the project at this point, the Django development server will automatically take over static file handling. But to benefit from similar behavior in development and in production, it’s a good idea to use it serve files in development as well.
To do that, we’ll disable Django’s static file handling and allow WhiteNoise to take over by simply editing the settings file and adding the WhiteNoise to INSTALLED_APPS list setting above the django.contrib.staticfiles:
# sitepoint_django/settings.py

INSTALLED_APPS = [
    # ...
    "whitenoise.runserver_nostatic",
    "django.contrib.staticfiles",
    # ...
]
You also need to disable DEBUG by setting it to False:
# sitepoint_django/settings.py

DEBUG=False
With these steps, you can seamlessly serve your static assets using the WhiteNoise package.
To verify that WhiteNoise is indeed serving your files, you can remove or comment out the django.contrib.staticfiles option from the INSTALLED_APPS setting list. However, it’s important to note that removing django.contrib.staticfiles will render a few static file management commands unavailable, such as the collectstatic command. This command is essential for collecting and consolidating static files from your apps into a single directory for efficient serving in production environments.
Advanced WhiteNoise configuration options
While the steps above are sufficient for most cases, WhiteNoise provides a few more options for configuration. For example, you can add compression and caching support to your project. To enable it, open the sitepoint_django/settings.py file and add the following settings:
# sitepoint_django/settings.py

STORAGES = {
    # ...
    "staticfiles": {
        "BACKEND": "whitenoise.storage.CompressedManifestStaticFilesStorage",
    },
}
The setting above will ensure that WhiteNoise compresses and hashes the static files to unique name, so they will be safely cached.
Using WhiteNoise in shared hosting environments
Shared hosting is a type of web hosting service where multiple websites are hosted on a single physical server. In this setup, resources such as disk space, bandwidth, and processing power are shared among multiple users, making it a cost-effective option for hosting small to medium-sized websites.
Shared hosting environments are typically managed by hosting providers, who handle server maintenance, security, and technical support, allowing website owners to focus on building and managing their websites without needing to worry about server administration tasks.
Challenges of managing static files in shared hosting
While shared hosting offers an affordable and convenient hosting solution for many websites, it also has limitations compared to other types of hosting, such as virtual private servers (VPS) or dedicated servers. These limitations include the following:
-
Restrictions to server configurations and settings, limiting the ability to customize server software or install additional tools.
-
Resource constraints such as disk space also play a role, as there might be limitations on the amount of bandwidth that can be used to serve these files to visitors.
-
Performance might be another challenge in shared hosting, because sharing resources with other users can result in slower load times for static files, especially during periods of high traffic or resource utilization.
Configuring to use WhiteNoise
WhiteNoise is a Python package that seamlessly integrates with Django, making it an ideal choice for serving static files in shared hosting environments. Unlike other software installations such as Apache and Nginx, which may not be permissible in certain hosting environments, WhiteNoise can be easily installed alongside your other project packages.
By configuring Django to use WhiteNoise, you can efficiently serve static files directly from your Django application without the need for additional server software. This simplifies the setup process and ensures compatibility with a wide range of hosting providers.
Most shared hosting providers provide a cPanel that allows you to do server configurations and file uploads. So once you’ve uploaded your files, you can make the following changes to the project settings.py file:
# sitepoint_django/settings.py

STATIC_URL='static/'

# replace username with your cpanel username
# use public_html if you are working on your main domain like https://example.com
STATIC_ROOT='/home/username/public_html/static'

# OR
# use folder name if you are working on a sub-domain like https://subdomain.example.com
STATIC_ROOT='/home/username/subdomain.mydomain.com/static'
With those settings in place, all you need to do is run the collectstatic command so that your static files will be collected into any of the above STATIC_ROOT directories, depending on the domain.
Serving Static Files From AWS S3
Amazon Simple Storage Service (S3) is a scalable object storage service offered by Amazon Web Services (AWS). It enables users to create storage spaces known as buckets where you can store your various kinds of data like documents, images, videos and notable for our tutorial static files.
AWS offers a free tier for several of its services, including Amazon S3. The free tier allows users to get started with AWS services at no cost for a certain period or up to specific usage limits. To get started, you can signup for the S3 free tier. However, to complete the signup process you’ll need to provide payment information.
Creating an S3 Bucket
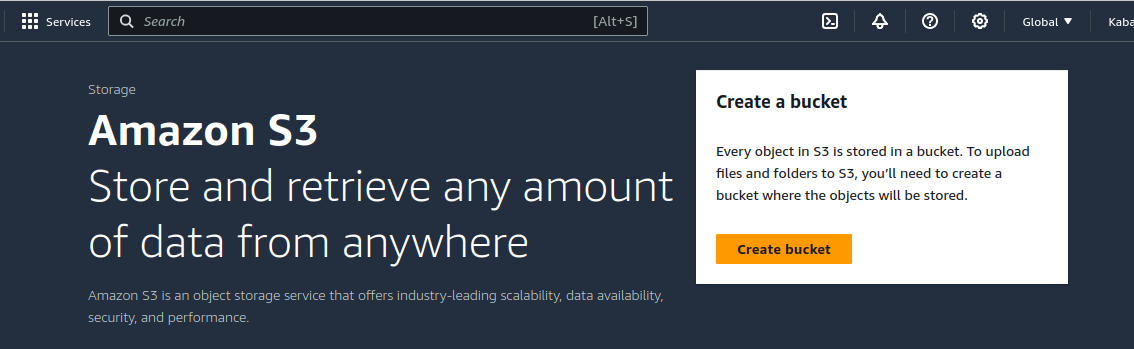
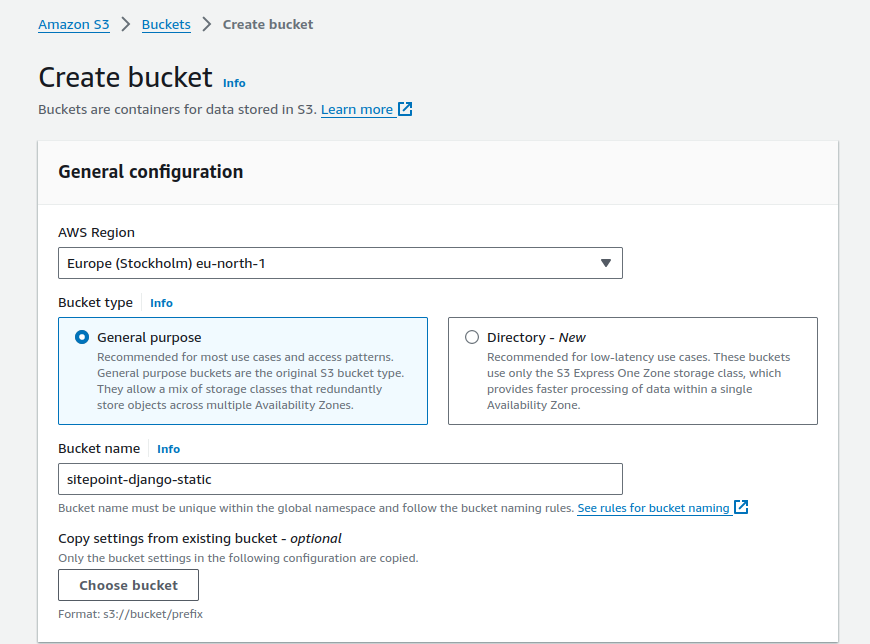
To create a bucket, go to the S3 dashboard and click on the Create bucket button.
Give the bucket a unique dns-compliant name. You can optionally select a region closer to you or your users.
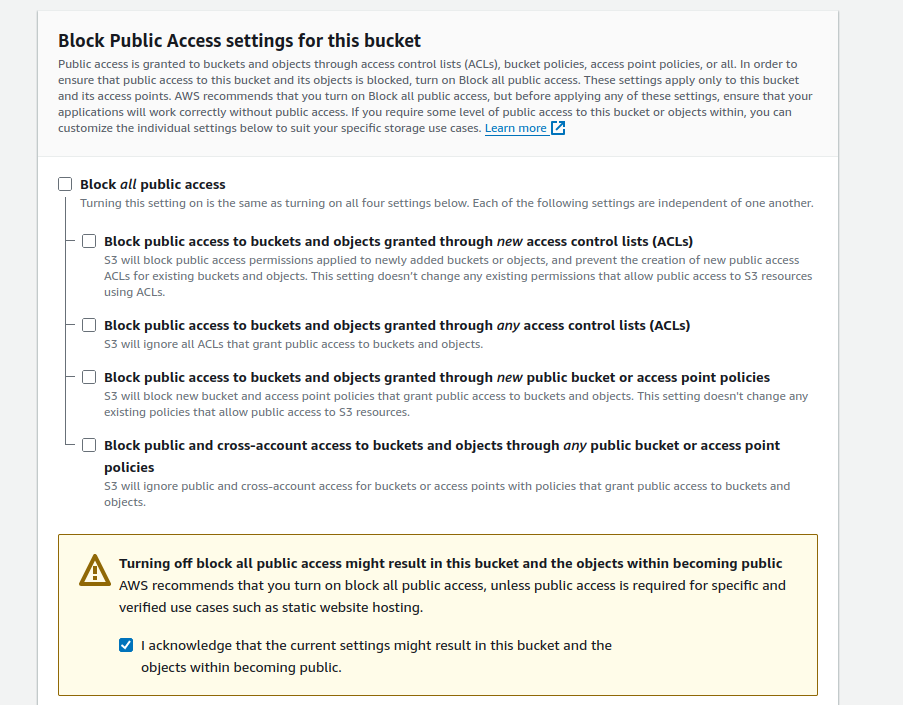
Enable ACL for the bucket.
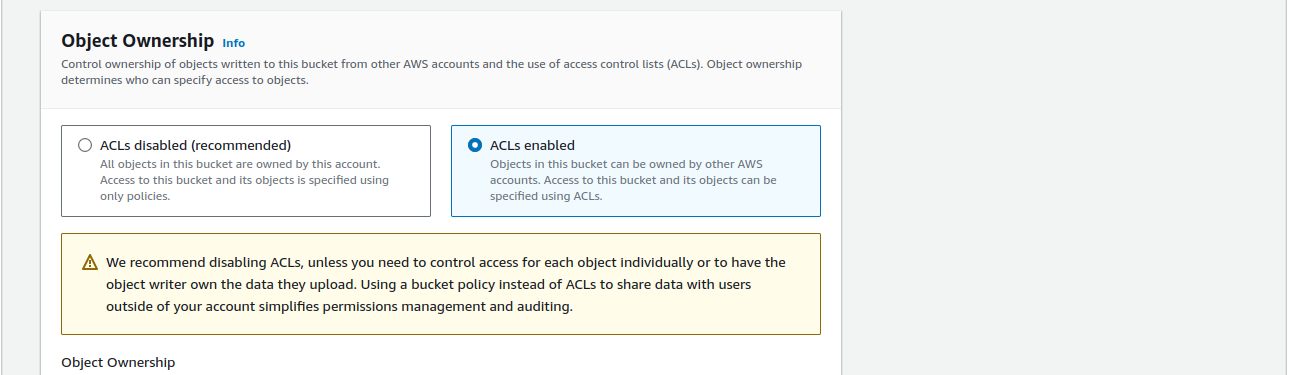
Enable public access for the bucket, by turning off Block all public access.
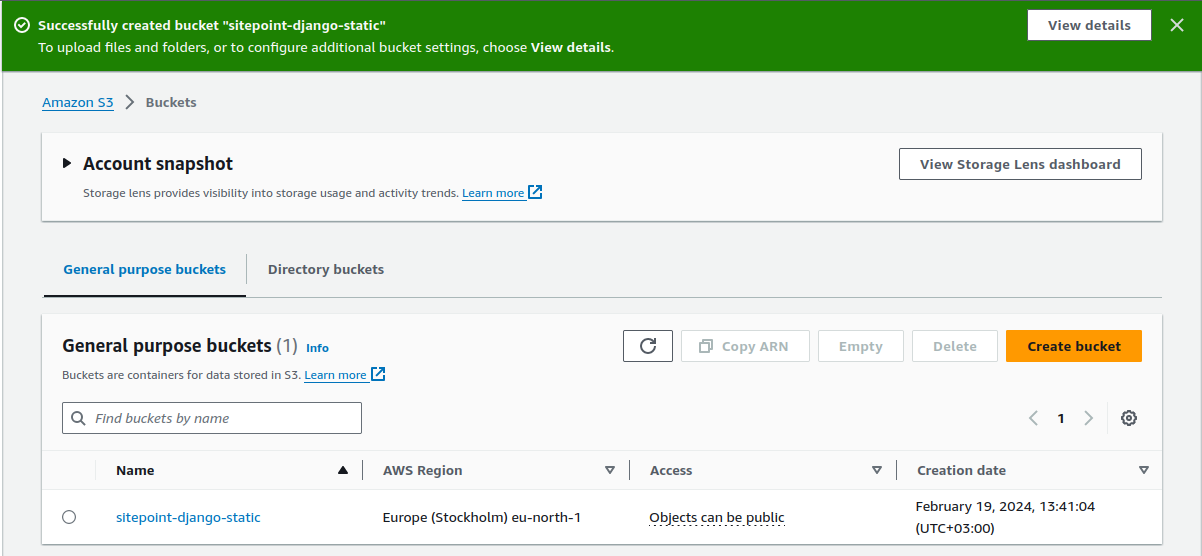
Upon successful creation, you should see your bucket on the main S3 page.
Enabling IAM access
After creation of a bucket, you can use the bucket as a root user, but AWS recommends you create an IAM (Identity Access Management) user group and assign them access to only a particular bucket.
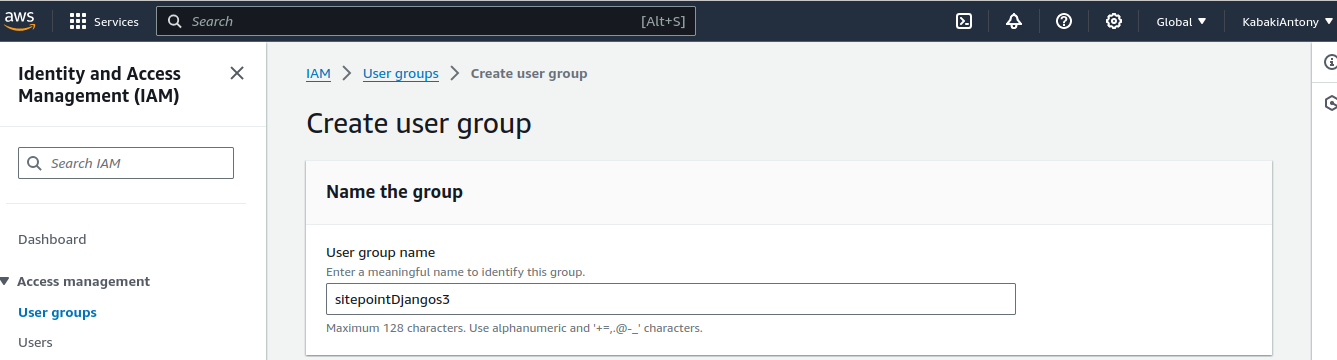
Creating IAM group
Go to the main IAM page and select User groups on the sidebar. Then click the Create group button. Assign the group a name.
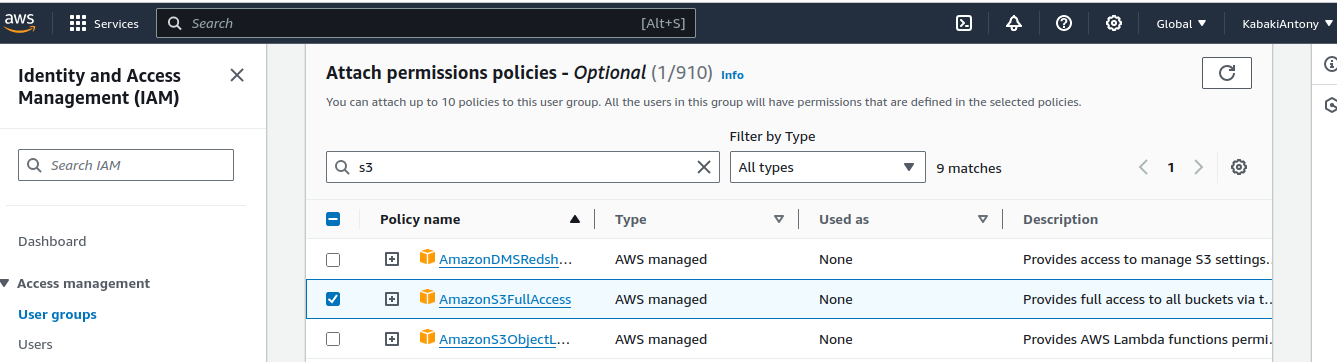
Then under Attach permisions polices, search for S3 and assign AmazonS3FullAccess the click Create group button.
Creating IAM user
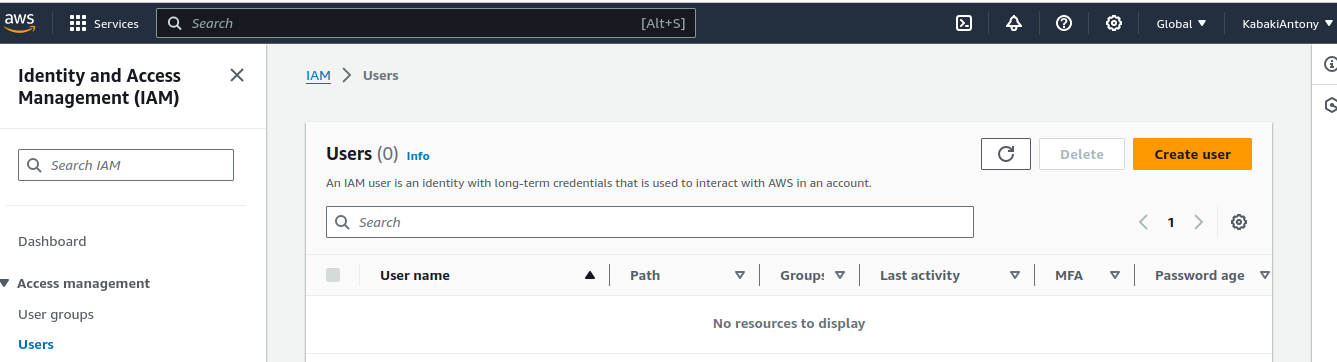
While still on the IAM page, select Users on the panel on the left and the click the Create user button.
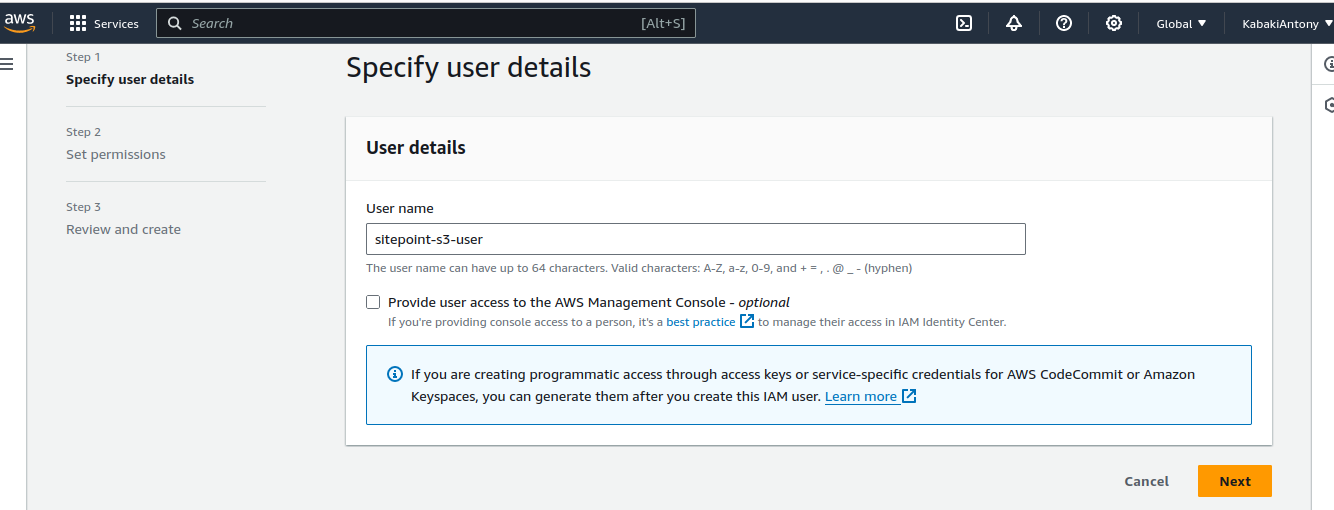
Give the IAM user a name and click the Next button.
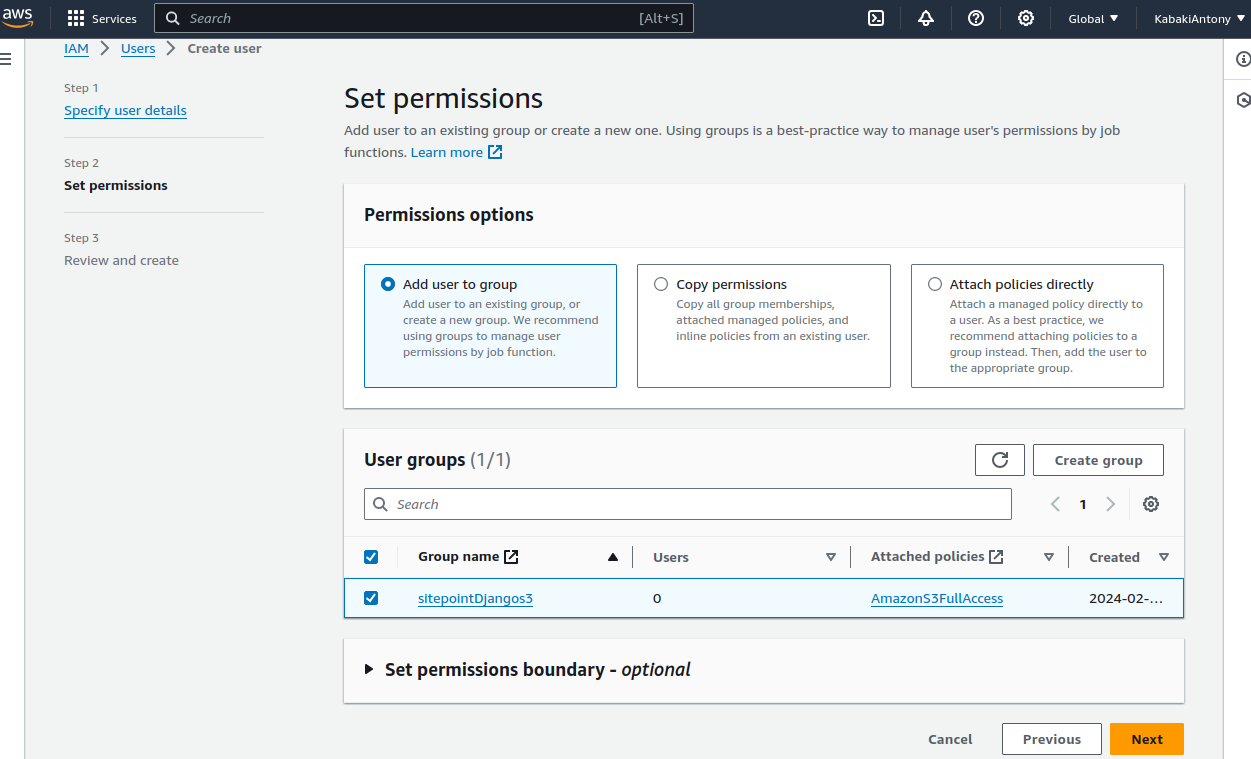
Under the Set permissions option, leave the Add user to group as the selected option, then go to User groups and select the user group you created above and then click the Next button.
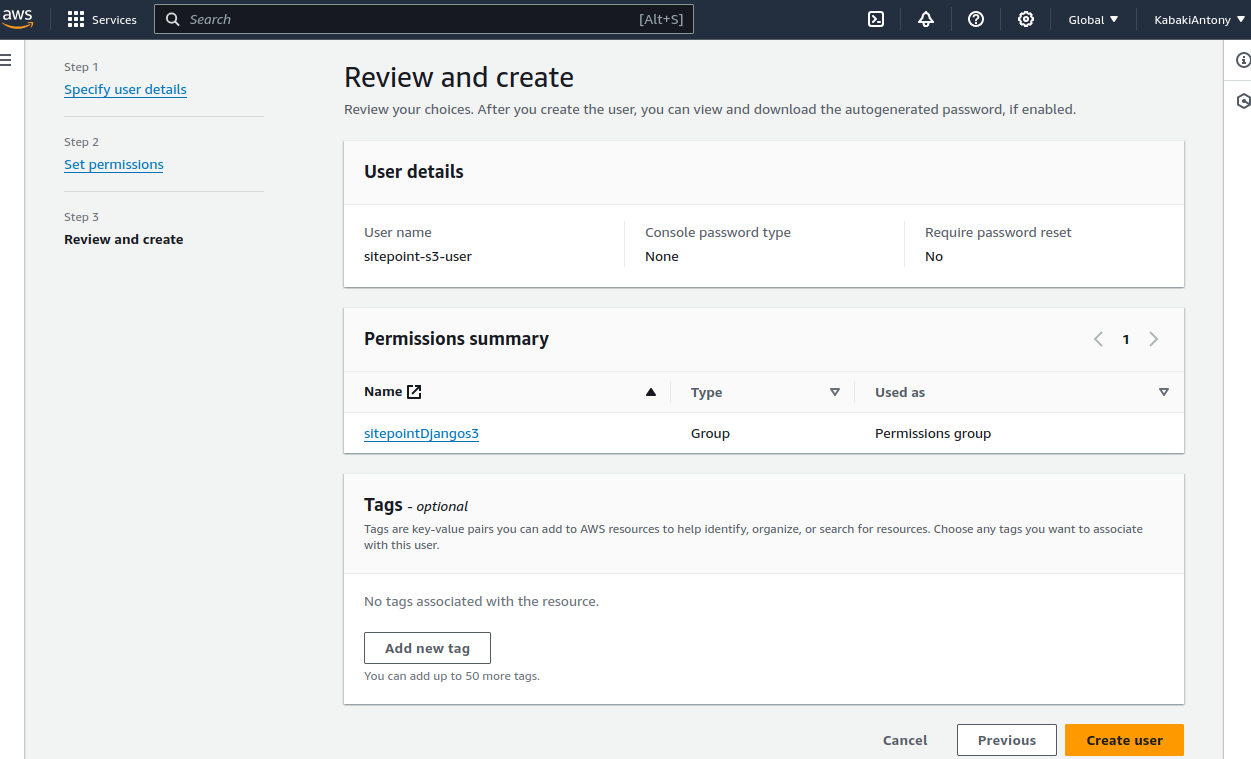
Review and click Create user.
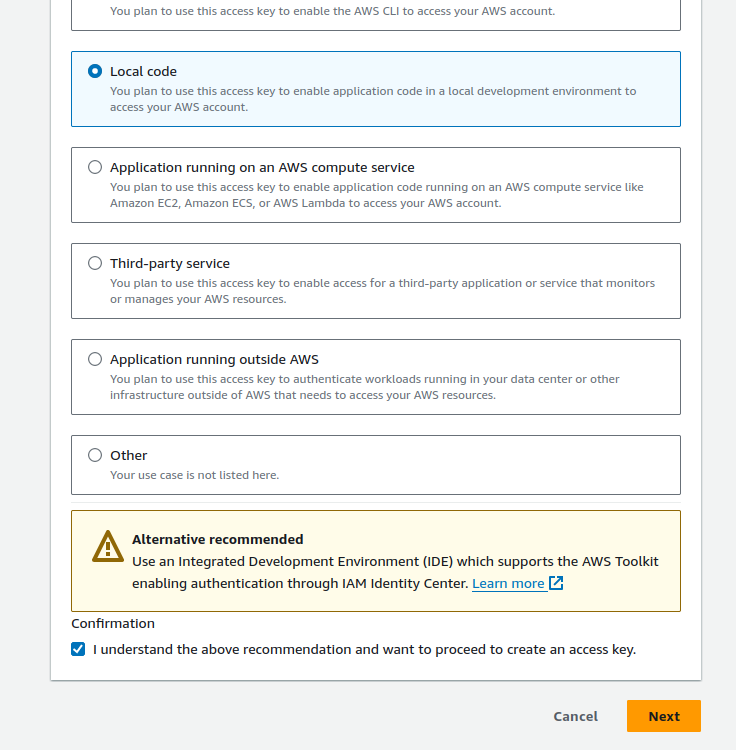
Now click on the user name to view the user details. Click on the Security credentials tab and then click Create access key. Choose Local code and click the Next button.
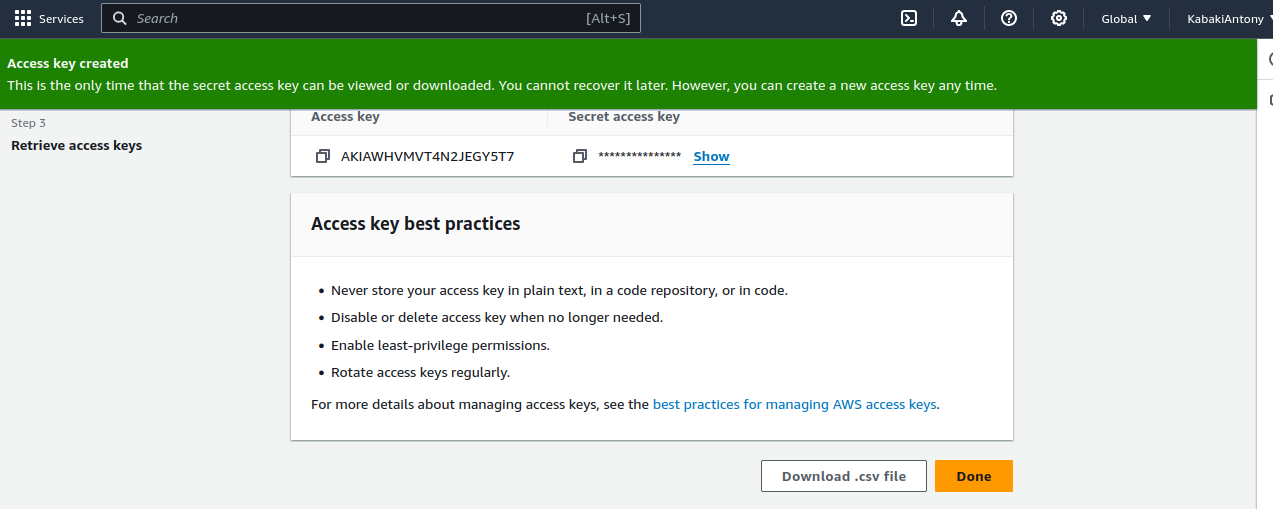
After that, click the Create access key button. You can copy the keys to your .env file if you have one, or download the CSV file for later usage.
Configuring Django to use AWS S3 for static files
After creating the S3 bucket, we need to configure the project to serve files from S3. In the previous section, we configured WhiteNoise to serve our static assets. We need to disable WhiteNoise so that we can serve the assets from S3. To do that, go to the sitepoint_django/settings.py file and the comment out the relevant lines of code:
# sitepoint_django/settings.py

INSTALLED_APPS = [
    # ...
    # "whitenoise.runserver_nostatic",
    # ...
]

MIDDLEWARE = [
    # ...
    # "whitenoise.middleware.WhiteNoiseMiddleware",
    # ...
]

# STORAGES = {
#     "staticfiles": {
#         "BACKEND": "whitenoise.storage.CompressedManifestStaticFilesStorage",
#     },
# }
The code above comments out all the settings we had put in place for WhiteNoise.
Installing packages
For the project to be able to work with S3, we need to install two packages: boto3 and django-storages. boto3 provides the low-level Python API for interacting with AWS services, while django-storages extends Django’s file storage capabilities to integrate with cloud storage providers like Amazon S3, allowing you to seamlessly manage and serve static and media files in your Django application:
pip install boto3 django-storages
Configuring settings
For our project to be able to serve files from S3, we need to make a few changes to the settings.py file and update it with the following code:
# sitepoint_django/settings.py
import os  # first add an import for the os module

# S3 storage setting
STORAGES = {
    'staticfiles': {
        'BACKEND': 'storages.backends.s3boto3.S3Boto3Storage',
        'OPTIONS': {
            'bucket_name': os.getenv('AWS_STORAGE_BUCKET_NAME'),
            'location': 'static',
            'querystring_auth': False,
        },
    }
}
The settings above create a STORAGES dictionary that serves as a centralized configuration container for defining various storage backends used within the project.
It’s important to note this setting is only available for versions of Django from 4.2 and above. For earlier versions, visit the documentation.
In the code above, we have a setting for staticfiles which identifies the storage configuration for managing static files.
After the STORAGES settings we need to add some AWS-specific settings in our settings file, so scroll to the portion where you’ll find the STATIC_URL setting and the make the following changes:
# sitepoint_django/settings.py

USE_S3 = os.getenv('USE_S3')

if USE_S3:
    AWS_ACCESS_KEY_ID = os.getenv('AWS_ACCESS_KEY_ID')
    AWS_SECRET_ACCESS_KEY = os.getenv('AWS_SECRET_ACCESS_KEY')
    AWS_S3_OBJECT_PARAMETERS = {
        "CacheControl": "max-age=2592000",
    }

else:
    STATIC_URL = 'static/'
    STATIC_ROOT = BASE_DIR / 'staticfiles'
Uploading static files to S3
Once the settings are in place, the next task is to upload your static files to the S3 bucket. You do that by running collectstatic:
python manage.py collectstatic --no-input
This will collect all static files in our project’s apps, move them into the S3 bucket, and put them into a static folder as defined in the STORAGES dictionary. The no --no-input flag instructs Django to run in non-interactive mode, bypassing any prompts for user input.
When used, Django will automatically proceed with that static files collections process without requiring any manual intervention from the user.
Running the project
Once all the settings are in place, you can run the project. Let’s run the project in development and serve the files from the S3 bucket:
python manage.py runserver
To verify that you are indeed serving files from S3, you can view the source code of the home page:
<link rel="stylesheet" href="https://sitepoint-django-static.s3.amazonaws.com/static/static_demo/css/styles.css">

<img src="https://sitepoint-django-static.s3.amazonaws.com/static/static_demo/images/flowerImage.png" alt="Flower Image">

<script src="https://sitepoint-django-static.s3.amazonaws.com/static/static_demo/js/todays_date.js"></script>
Looking at the HTML elements reveals that indeed the URLs point to the S3 bucket.
Conclusion
In summary, managing static files in Django involves assessing project requirements, scalability needs, and hosting environment constraints to choose the most suitable method.
For example, WhiteNoise middleware provides an efficient solution for serving static files in shared hosting environments, where resource constraints and limited server access may pose challenges.
By configuring Django settings appropriately and leveraging tools like WhiteNoise, developers can ensure reliable and optimized static file serving, regardless of the hosting environment. Each method offers its own advantages and considerations, requiring careful evaluation to meet the specific needs of the project and deliver a seamless user experience.
We’ve covered several key points:
Methods for managing static files. We’ve discussed various approaches, including serving static files locally, using Django’s built-in development server, leveraging third-party storage solutions like Amazon S3, and serving files using packages like WhiteNoise. Each method has its own advantages and considerations, depending on factors such as scalability, performance, and ease of deployment.
Common settings and commands:
STATIC_ROOT: specifies the directory where collected static files will be stored.STATIC_URL: defines the base URL for accessing static files via the web server.STATICFILES_DIRS: specifies additional directories containing static assets.STATICFILES_STORAGE: configures the storage backend for handling static files.collectstatic: collects all static assets from all app directories to theSTATIC_ROOT.
Further reading: