
Unity is currently one of the most popular choices when it comes to building virtual reality applications. Google Cardboard is a great first choice for getting started in the field – spending $20 on a VR headset rather than potentially hundreds is a much safer bet for getting started (and there are plenty of people with smartphones who could potentially enjoy your app with an equally smaller upfront cost!).
I’ve previously covered how to build VR for the web today via JS, along with demos on Visualizing a Twitter Stream in VR and JS and plenty others. For those who prefer Unity development, it’s about time I evened these numbers and wrote some more on VR development in Unity. For some rather strange reason, I couldn’t find many in depth or varied guides to working with the Google Cardboard Unity SDK from scratch, so I did what any SitePoint writer would do. I put one together!
Update as of 21st March: Since writing this article, Google has updated their SDK and changed how the crosshair functionality works. We have a new article covering these changes here. Most of this tutorial is still accurate, it is just the crosshair functionality which has changed. So follow along with this guide, then read the new article to get your crosshair working!
Key Takeaways
- Unity is a preferred platform for developing Google Cardboard VR apps due to its versatility and ease of use.
- Essential tools for building a VR app include Unity (v4.5 or higher), the Cardboard SDK for Unity, Java SE SDK, and the Android SDK.
- Setting up the Android SDK involves installing Java, downloading the SDK Tools Only package, and configuring the SDK Manager with necessary components.
- The Cardboard SDK for Unity is integral for project setup; it includes prefabs like `CardboardMain` which simplifies the creation of VR scenes.
- Interaction in VR can be programmed using Unity’s event system and components like `Physics Raycaster` for gaze-based events, and scripts for dynamic interactions like changing sky textures or triggering particle systems.
- Testing the VR app in Unity’s editor is possible with simulated controls, but for full effect, deploying and running the app on an Android device provides the best preview of user experience.
What You’ll Need
To follow along, you’ll need the following bits of software and hardware:
- Unity – At least v4.5 is recommended. I’m using Unity v5 Pro for this guide. Unity v5 Personal apparently works a-okay too.
- Windows or Mac – I’ll be using Windows in this tutorial for a change (mainly because most Unity devs seem to be on Windows, so it’s only fair I follow suit for the article!)
- Cardboard SDK for Unity – That link will provide you with the GitHub repo. I’ll explain this and setting up Java and Android in this article.
- Java SE SDK – This will be required to install the Android SDK.
- Android SDK – If you are downloading this for the first time, you only need the “SDK Tools Only” bits of the SDK. I’ll explain this soon.
- A Google Cardboard style headset
- An Android device to put inside that headset – it is possible to export this to work with iOS, but I won’t be covering that process as I don’t have an iPhone!
- Relatively basic knowledge of Unity – I’ll cover a lot of the absolute basics for those new to it all but having a small amount of knowledge will help!
The Code
Want to jump straight into the code? My sample project is up at GitHub for you to do whatever you’d like!
Preparing the Android SDK
In order to create an Android mobile app, we’ll need the Android SDK working on our system. For seasoned Android developers who’ve already got this running, feel free to skip to the next section!
To begin the Android SDK process, you first will need to check you’ve got the Java SE SDK installed on your system. If you aren’t sure, try skipping to the Android SDK install step first. The installation will complain if you don’t have Java!
Which Java?
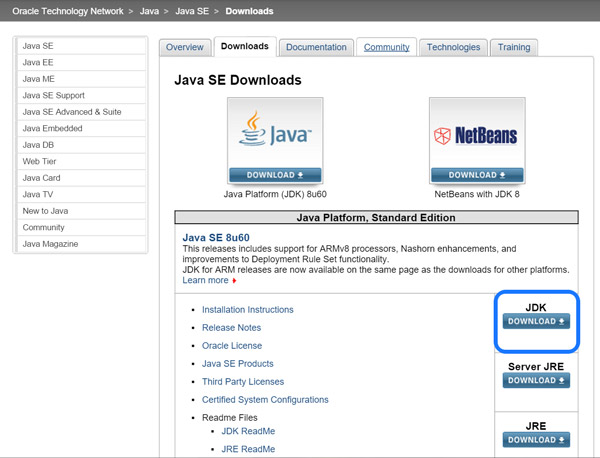
If your system is Java-free, it can be a bit confusing to know which of the various Java options you’ll need. Head to the Java SE download page and choose the JDK download option:
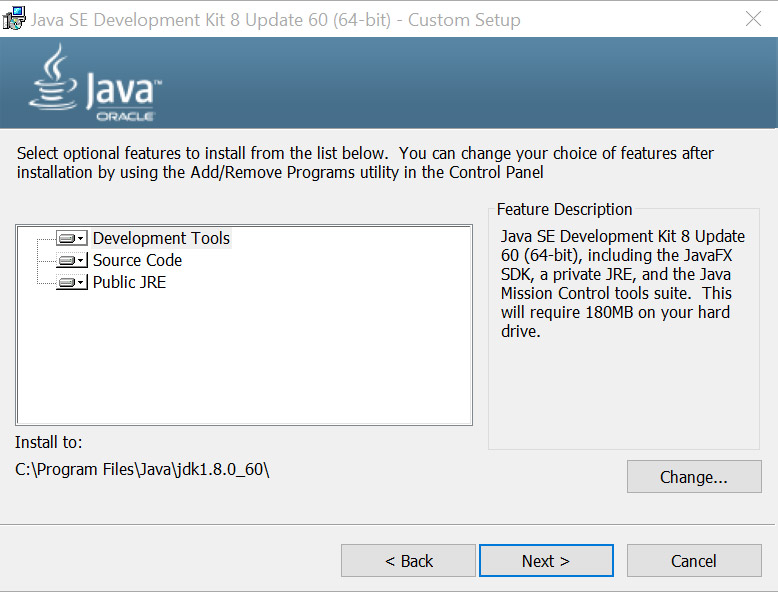
Once you’ve got that downloaded, run through the very typical install process that looks a bit like so:
Android SDK Download and Install
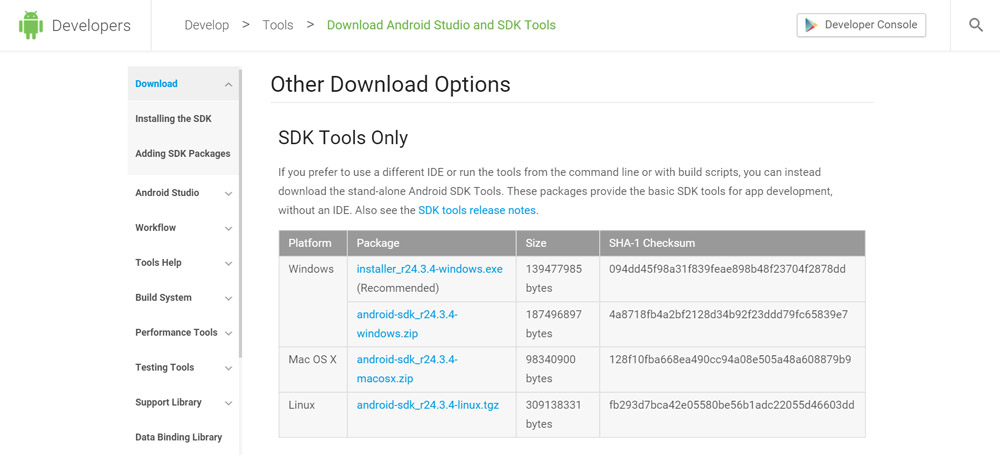
If you are new to Android development, you’ll need to download the Android SDK and install it. You only need the “SDK Tools Only” bit of the SDK which is available at their Other Download Options page. This provides the bare minimum. You could download the whole Android Studio package if you’re looking to do a lot of Android app development in future. If you are sticking with the “SDK Tools Only” option, head to that page and choose the version for your operating system:
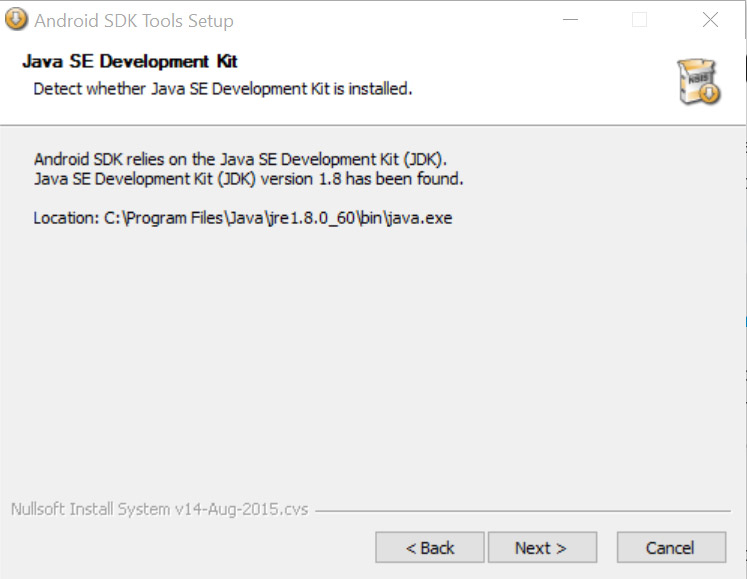
Run that installation file you’ve downloaded. If you weren’t sure if you had Java installed, the installation should confirm this for you:
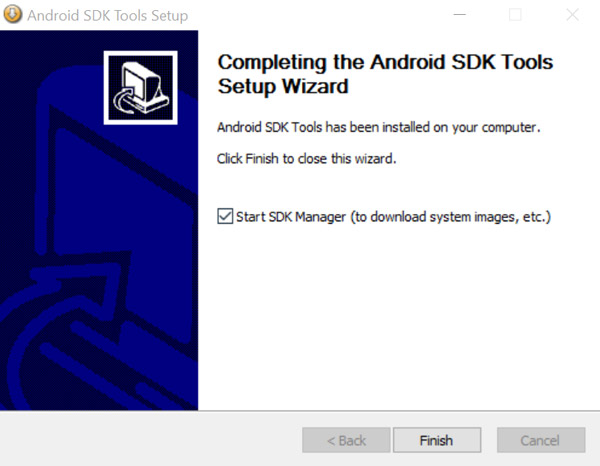
Follow the rest of the prompts (they are pretty standard installation prompts) and install the SDK to your system. When it is done, keep the checkbox ticked before you click Finish, that way you can load the SDK Manager:
The SDK Manager should appear and look like so:
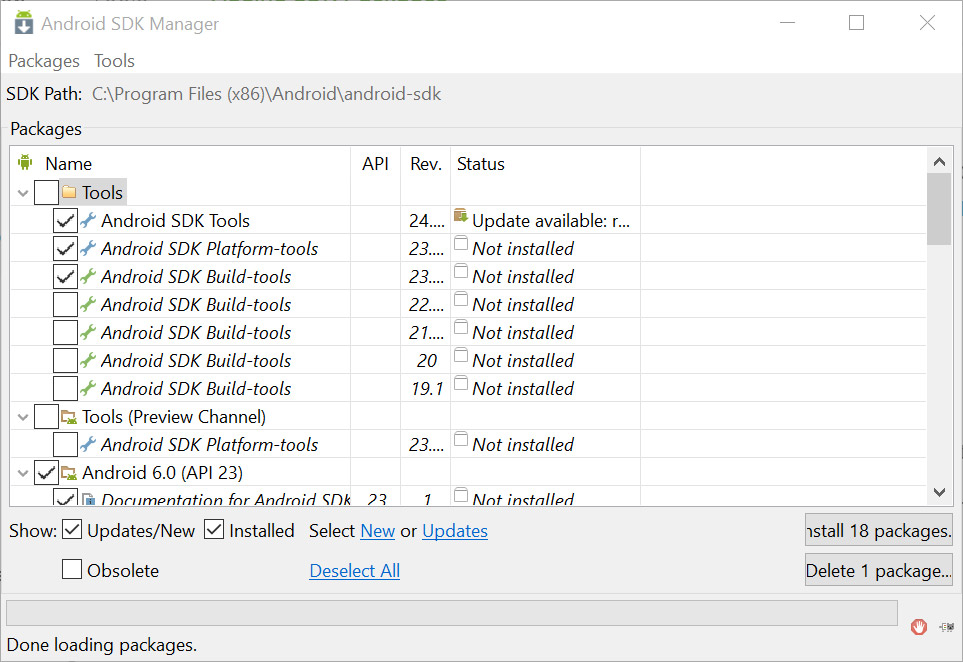
It is likely to have a bunch of checkboxes already selected for you. Let’s reduce it to just what we’ll need for now. Underneath the “Tools” folder, you’ll want the following selected:
- Android SDK Tools – This should be at the top of the list.
- Android SDK Platform-tools – This will be right after the SDK Tools.
- Android SDK Build-tools – You should only need the latest revision of this (you can see the revisions under the “Rev.” column)
That should look like so:
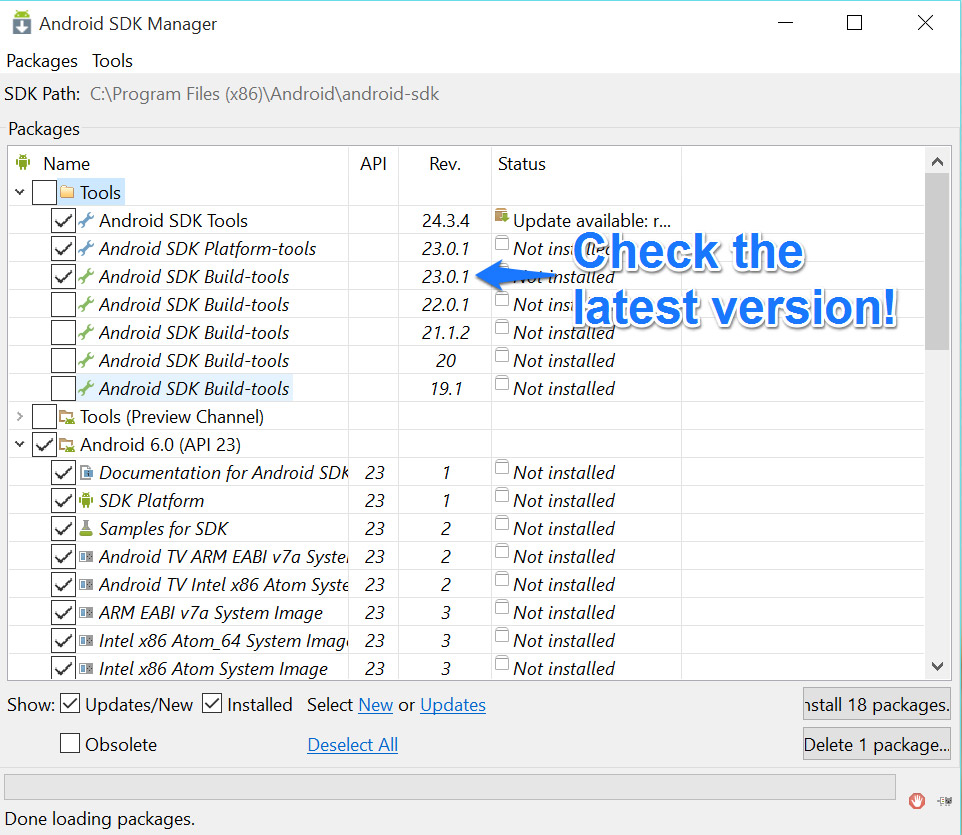
Then, within the latest Android API folder (whichever is highest, at the time of writing that’s “Android 6.0 (API 23)”), choose the following:
- SDK Platform – You’ll need this!
- A system image – You can choose either an ARM or an Intel system image to allow you to emulate that Android system on your computer. If you’re looking to do all testing on your physical Android device, you can skip this.
- Google APIs – This will let us use any Google APIs with our app. This doesn’t include Google Cardboard – I’ve just included it for convenience, you can likely skip this one too.
That should look like the following:

Click “Install X packages” in the bottom right corner to begin the installation process. You’ll need to accept the licence before it will let you install.
Once that is installed, you should have everything you need on the Android side of things!
Creating A Cardboard Empowered Unity Project
From the Cardboard SDK Github repo linked above, all you’ll really need to download is the Cardboard SDK For Unity .unitypackage file here.
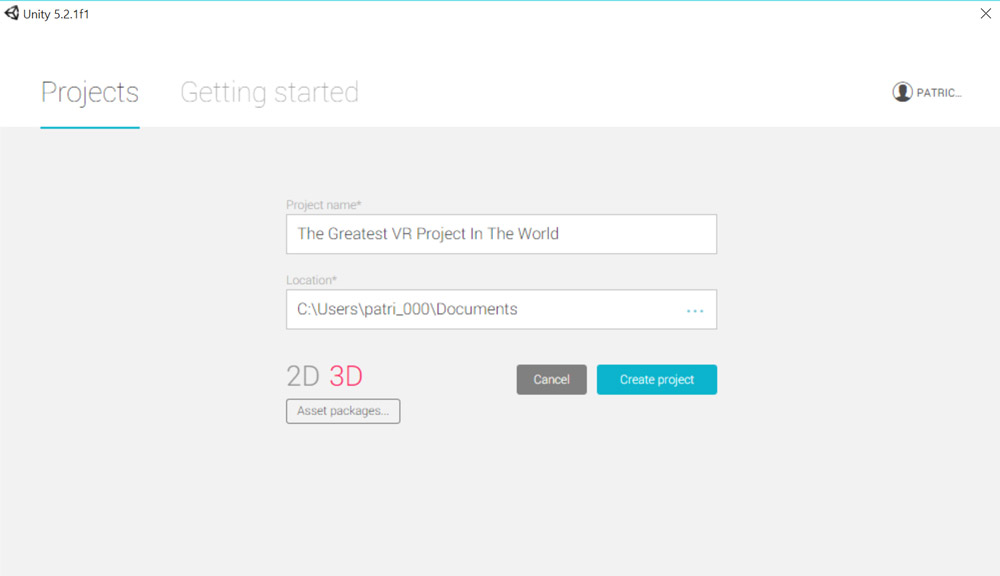
Once that has downloaded, we’re ready to begin our actual Unity project. Open up Unity and do the obvious first step – create a new project.
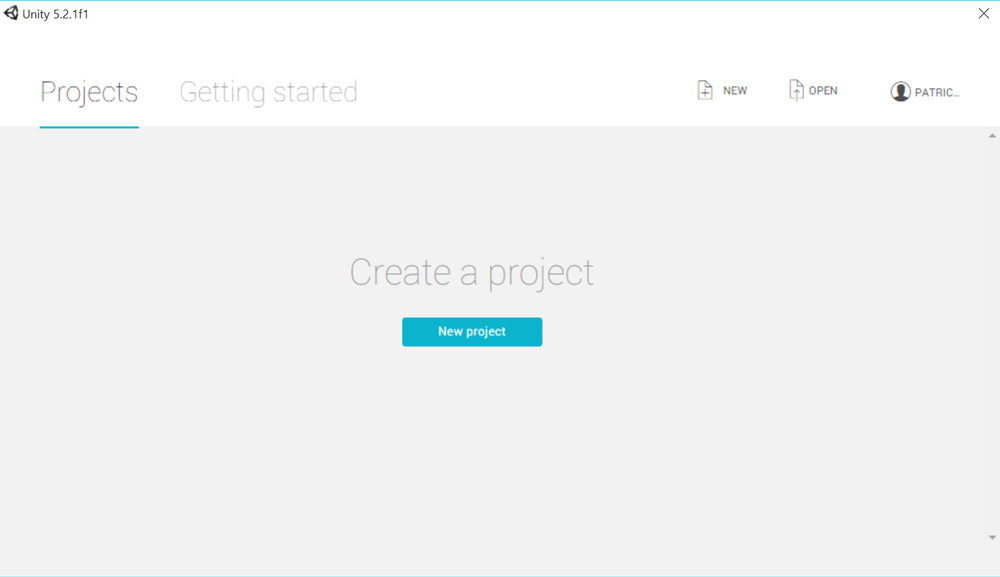
Choose 3D and give your project a name. Don’t worry about adding asset packages on this screen, we’ll be adding our custom one in the next step. Select “Create Project” once you’re ready to begin:
Next, go to Assets > Import Package > Custom Package… and find your Cardboard SDK .unitypackage file you downloaded earlier.
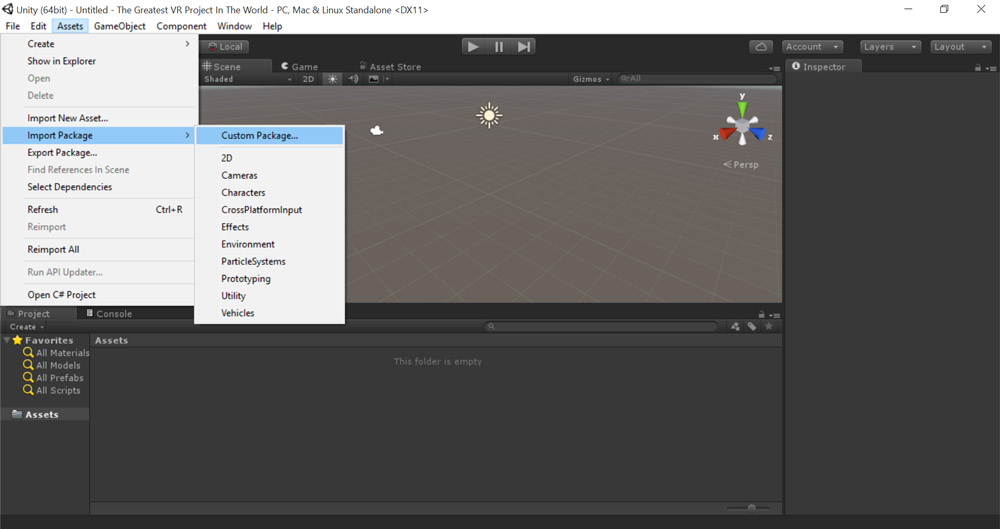
If you are using Unity 5, you won’t need the legacy folders and can untick those:

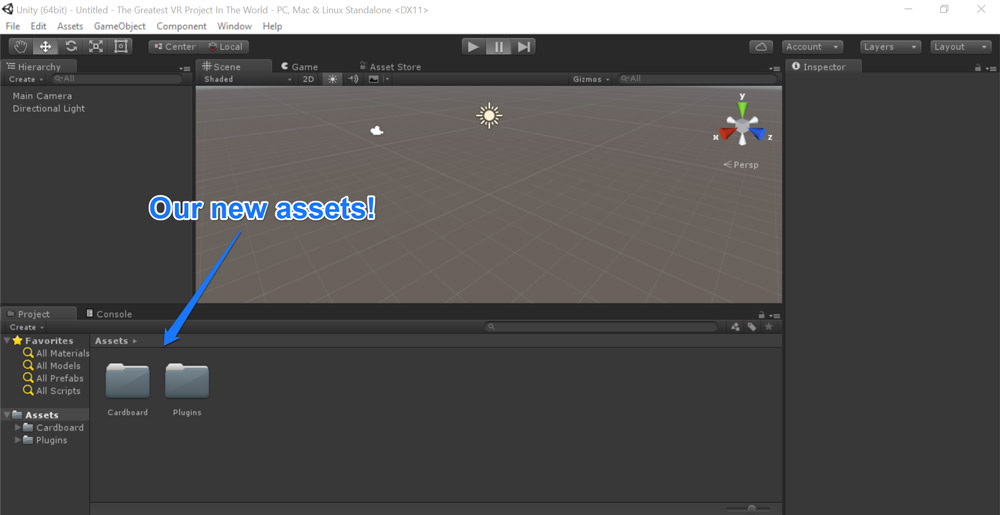
When that is successful, your new Cardboard SDK assets should appear in your project inside a “Cardboard” folder:
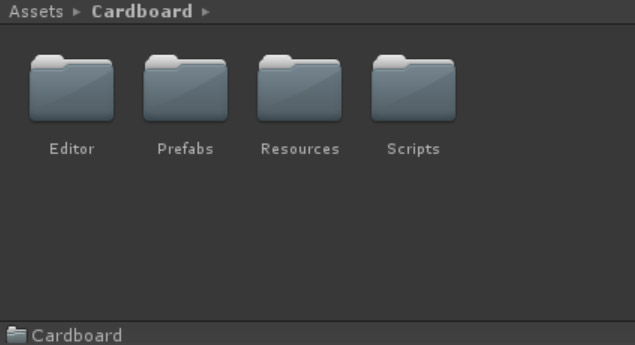
Within the Cardboard SDK folder, you’ll find four subfolders – “Editor”, “Prefabs”, “Resources” and “Scripts”:
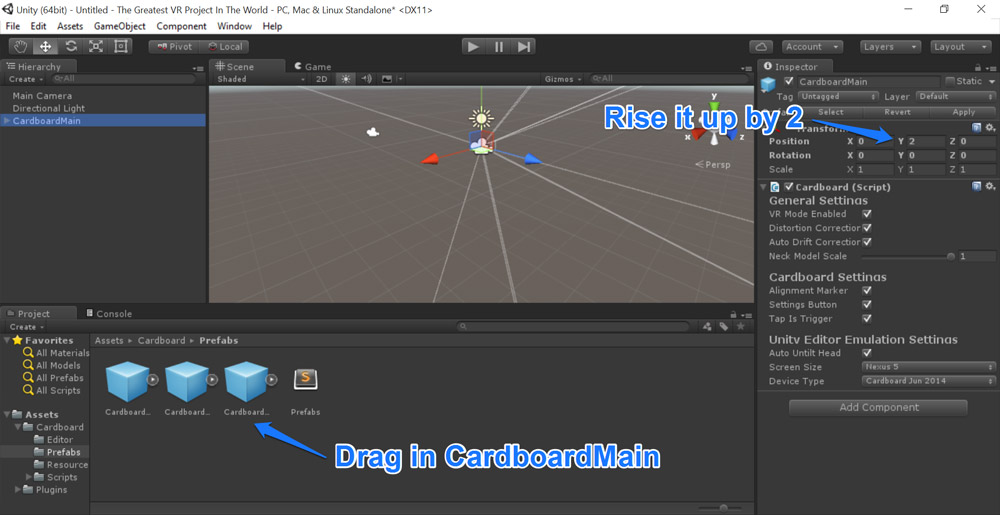
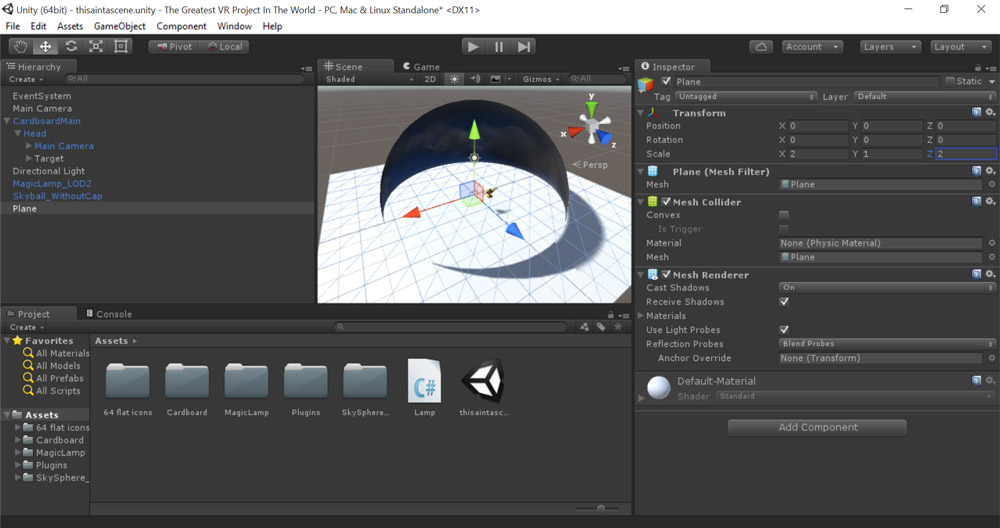
Inside the “Prefabs” folder, you’ll find a Prefab called “CardboardMain.prefab”. Drag that into your scene and raise it up by 2 on the Y axis (otherwise the user will feel like they’re either tiny or super short!):
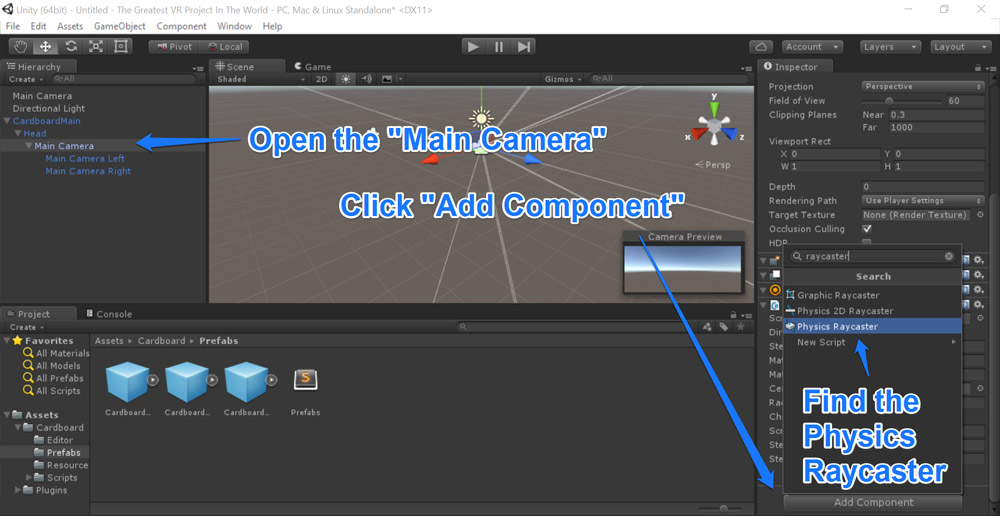
Open up the “CardboardMain” prefab and you’ll find the “Main Camera” within it. This is our two stereoscopic style cameras working in unison to display the scene in wonderous VR when looking at it though a Google Cardboard headset. In our “Main Camera” object, we’ll want to add a “Physics Raycaster” component. To do so, click “Add Component” whilst you’ve got the “Main Camera” open. I typically find it by typing in “raycaster” in the window that pops up. We’ll need a Physics Raycaster to be able to interact with elements by looking at them.
Next, you can add in an icon to show when the user is looking at an object. I used a free icon in the Unity store from the 64 Flat Game Icons pack by Office57. You could create your own sprite for this too if you’d prefer. Get a sprite from somewhere and import it into your project.
Create an empty game object within the “Head” object in “CardboardMain”. I’ve renamed mine as “Target”. Then drag your sprite inside this object:
![]()
That should be all you need to enable plenty of very useful Cardboard view tracking and controls.
Responding To Cardboard Events
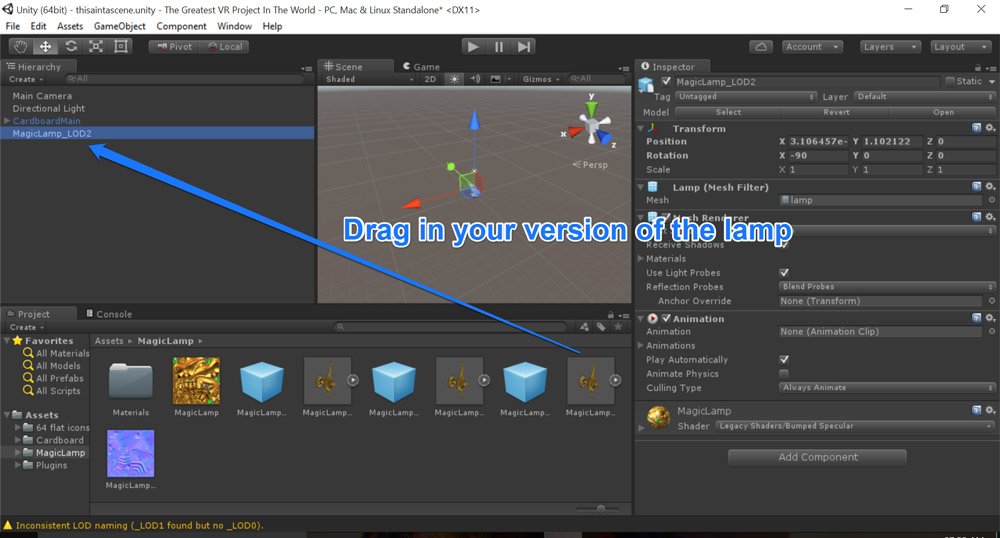
Now we have our CardboardMain view created, we’ll need a few things in the scene to interact with. For my demo, I used the Magic Lamp by 3dFoin and SkySphere Volume 1 by the Hedgehog Team from the Unity Store. You can use any objects you’d like, drag the lamp into your scene:
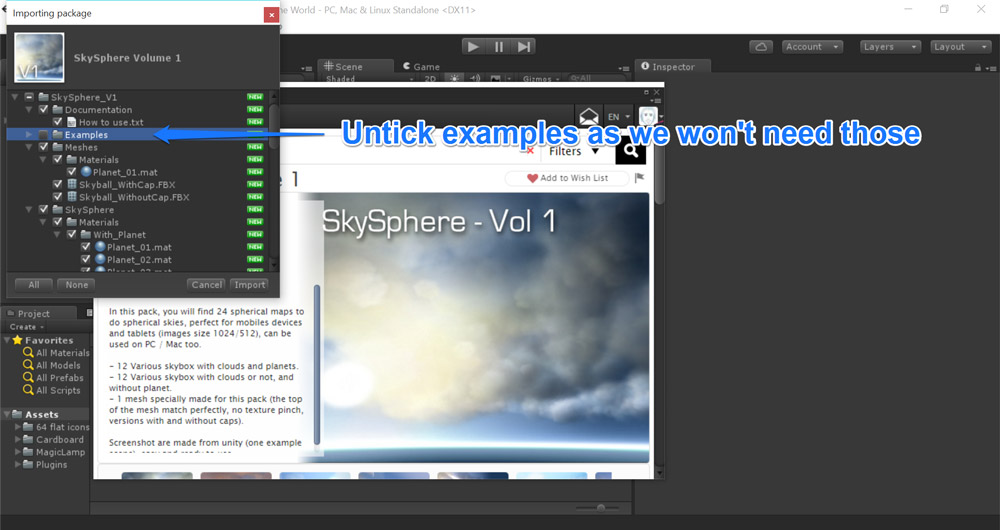
When importing the SkySphere, feel free to untick the “Examples” folder to keep things clean in our project:
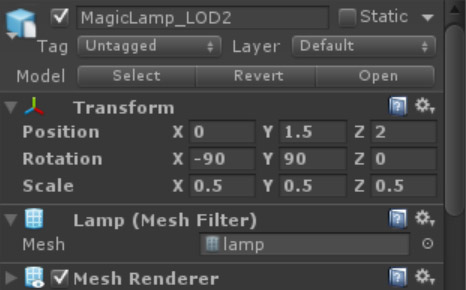
Place your lamp at position {x: 0, y: 1.5, z: 2} with a rotation of {x: -90, y: 90, z: 0} and scale it by 0.5 on all axes so it’s not too big in comparison to our scene:
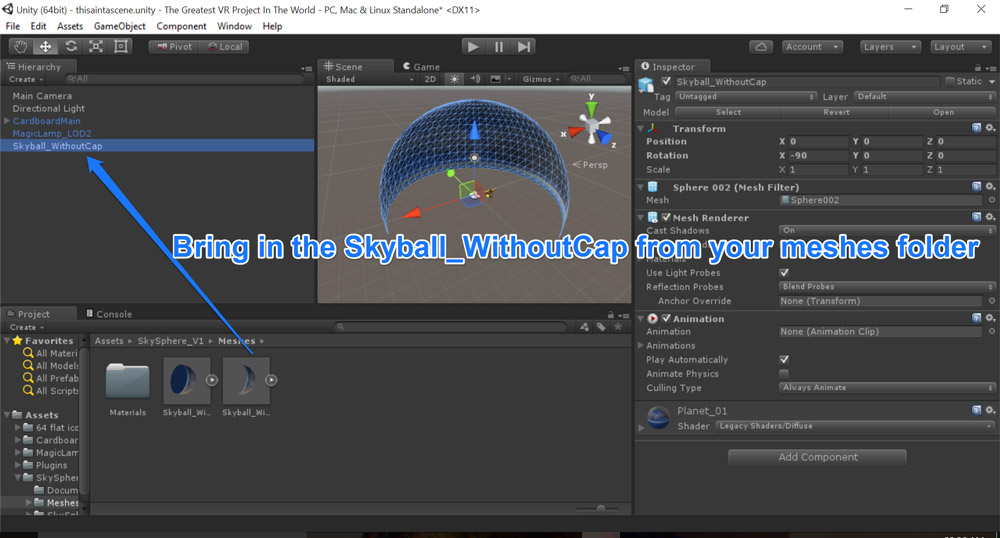
Then drag in the “Skyball_WithoutCap” from the SkySphere_V1 > Meshes folder. It should be placed at {0,0,0} with an X rotation of -90:
In order to interact with the Cardboard SDK on this object, you’ll need some code on that object. Our initial bit of functionality will focus around causing events to occur when we look at the lamp and then look away. Each time the user looks away from the lamp, the sky will change texture:
using UnityEngine;

using UnityEngine.EventSystems;

using System.Collections;
public class Lamp : MonoBehaviour {

  public Renderer skybox;

  public Material sky1;

  public Material sky2;

  public Material sky3;

  public Material sky4;

  private int currentSky = 0;
  void Start () {
  }
  public void stareAtLamp() {

    switch (currentSky) {

      case 0:

        skybox.material = sky2;

        currentSky++;

        break;

      case 1:

        skybox.material = sky3;

        currentSky++;

        break;

      case 2:

        skybox.material = sky4;

        currentSky++;

        break;

      case 3:

        skybox.material = sky1;

        currentSky = 0;

        break;

    }

  }

}
The code above is pretty straightforward stuff, we set up a skybox variable, four materials for that skybox and an integer to store the number of the current skybox. Then, we’ve got a public method called stareAtLamp() which changes our skybox’s material to the next one in the series of materials, or takes it back to the first material if we’re at the last one.
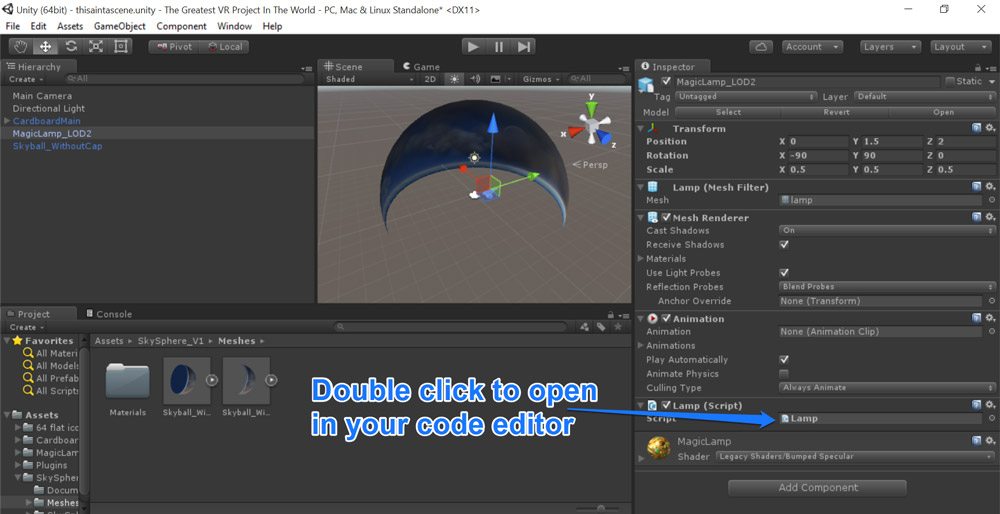
To add this code to our project, select your lamp and click “Add Component”. Type in “script” and you should find “New Script…”. Click that and call it “Lamp”. Put in our code from above.
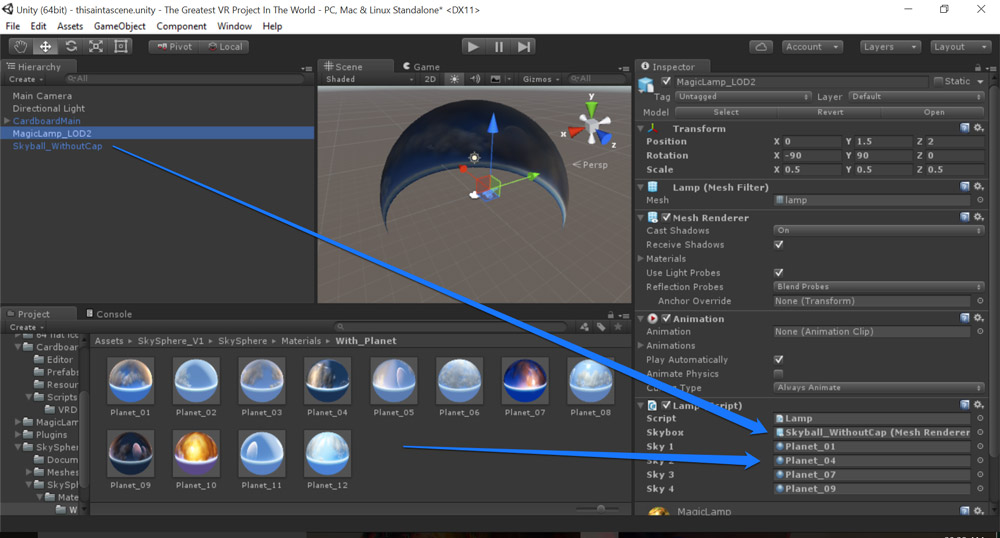
When your code is saved, those public variables will be available as options for your script. Drag your skybox object from the Hierarchy of your project into the skybox variable. Find the materials for your SkySphere from the Assets > SkySphere_V1 > SkySphere > Materials > With_Planet folder (or whatever other materials you’d prefer) and drag a few of them into the four sky materials.
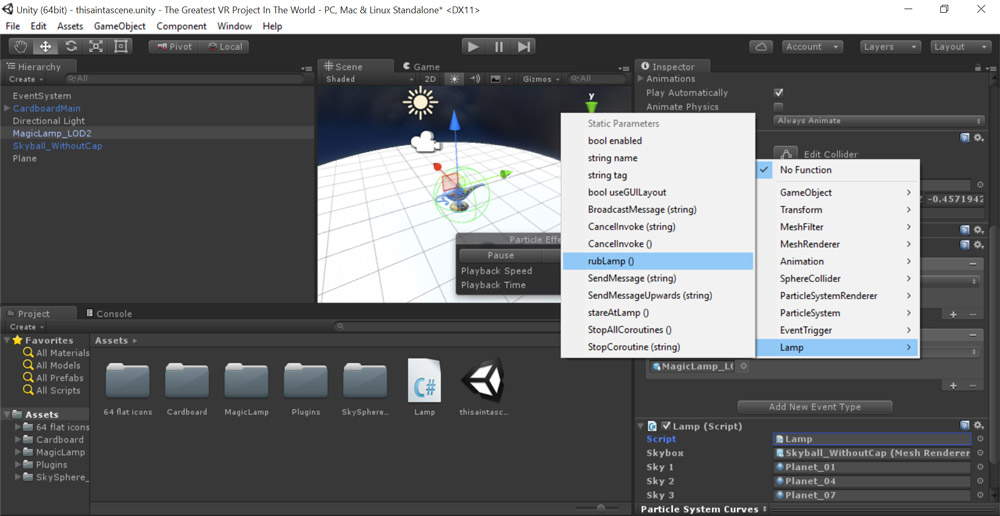
We will need one more component within our lamp object – a “Event Trigger”. This is what will actually call the stareAtLamp() function we coded earlier. Head to “Add Component” with your lamp object selected and find the “Event Trigger” component. Then once it is in your lamp object, click “Add New Event Type” and choose “PointerExit”:
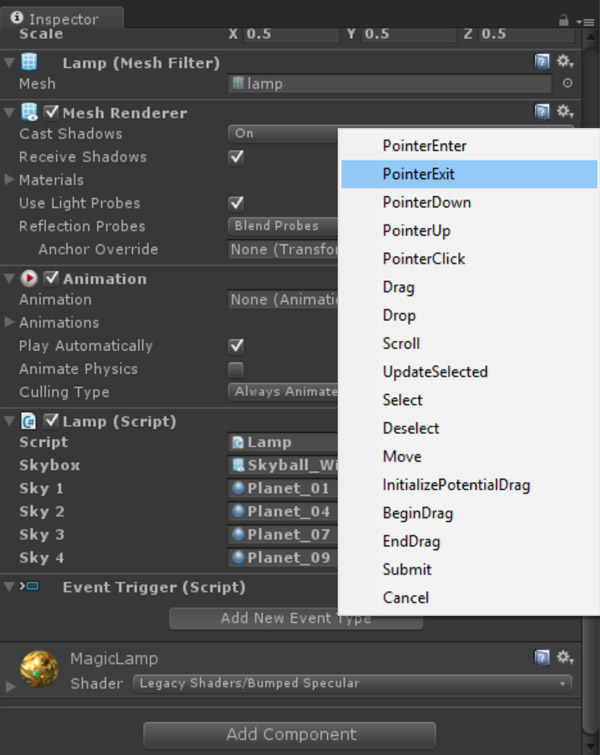
From here, you’ll now have an area to add in responses to that “PointerExit” event. Click the “+” icon on the bottom left and then drag in your lamp object to the box that appears underneath “Runtime Only”:
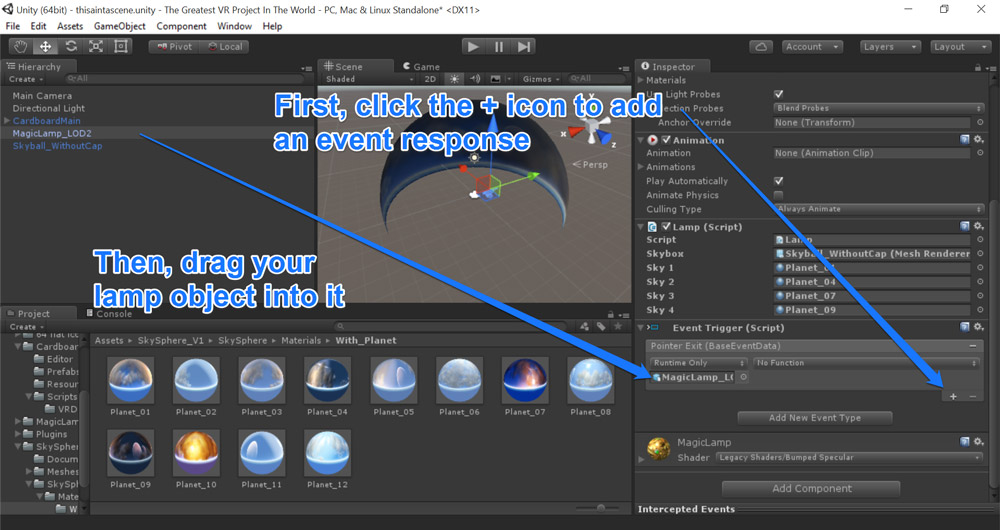
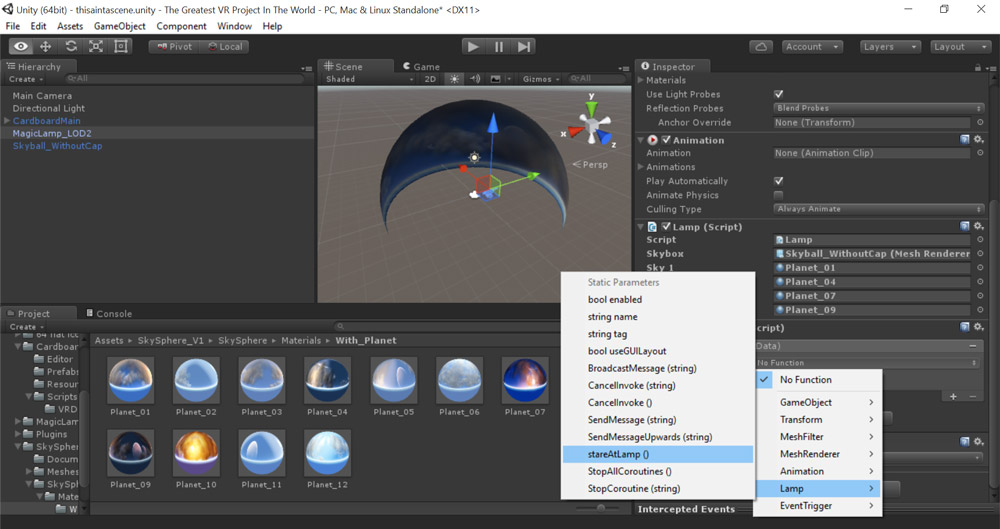
This allows us to access the lamp’s functions as possible responses. Click on the dropdown that says “No function”, find “Lamp” and then choose the stareAtLamp() function.
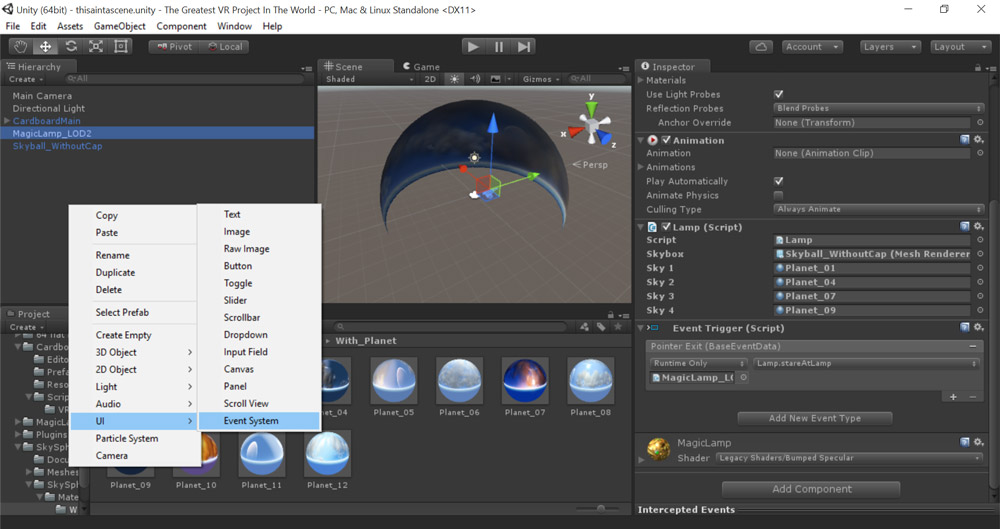
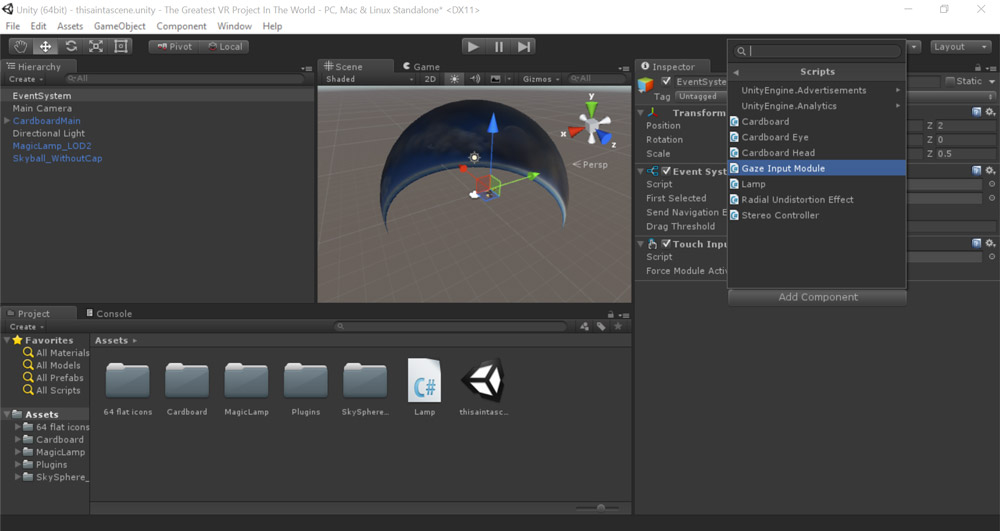
In order for the event trigger to work, our scene needs an “Event System”. Head back to your scene and create one from UI > Event System.
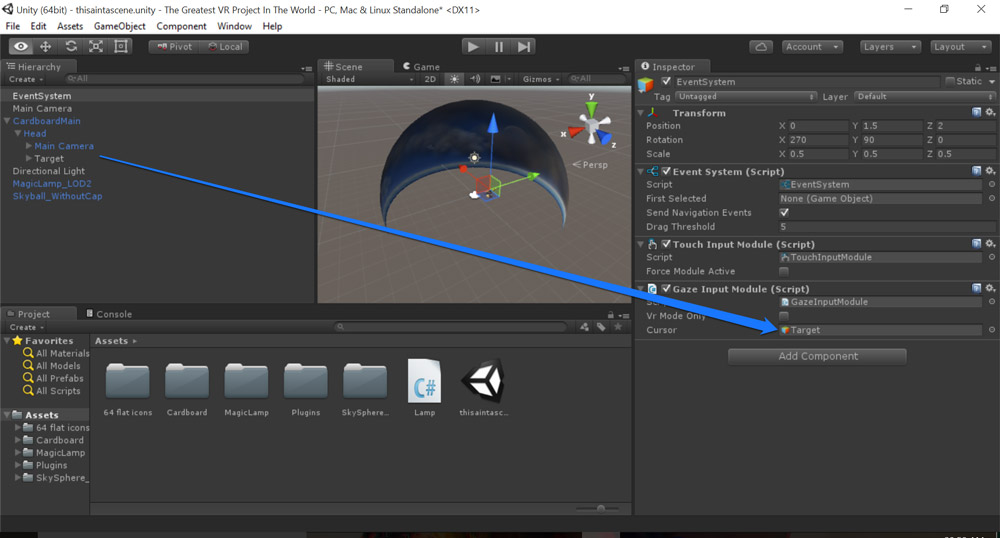
You can remove the “Standalone Input Module” from the Event System if you’d like. The main important component we do need is the “Gaze Input Module” from the Cardboard SDK. You can add this one by clicking “Add Component” and going to Scripts > GazeInputModule:
Now we define our target sprite as the one that appears when we are using the GazeInputModule and are looking at an object. Drag the “Target” object (or whatever you chose to call it within your CardboardMain object) into the cursor setting for the component:
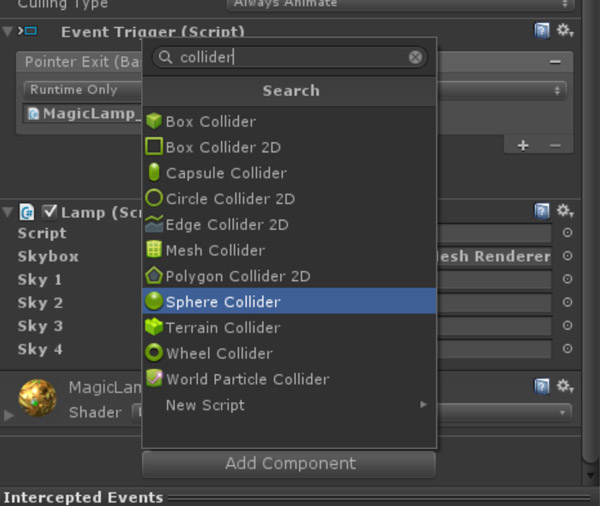
In order to pick up when we are looking at this lamp, we’ll need to add a collider to it. To do so, click “Add Component” and type in “collider” to find “Sphere Collider”. Add that in:
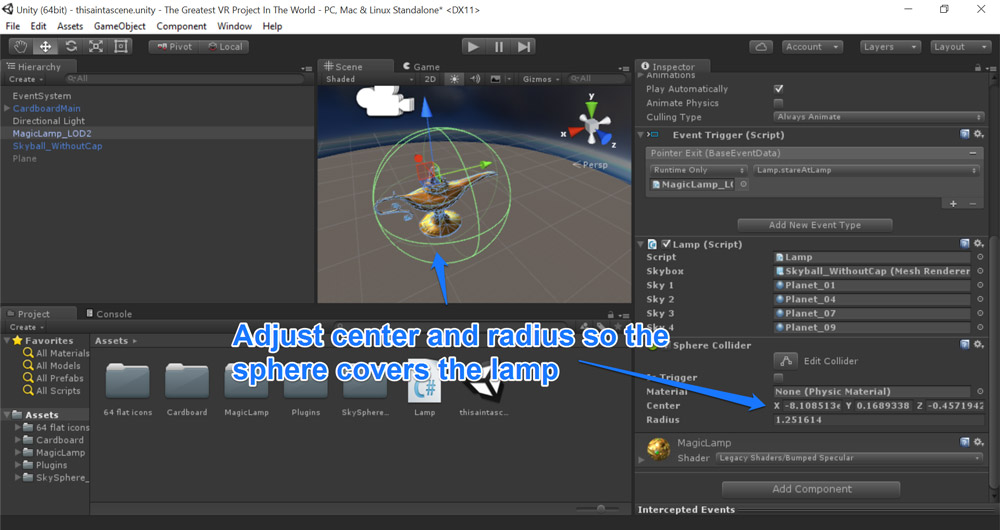
Then, if necessary, adjust the position and radius of the sphere collider so that the green sphere around the lamp covers its shape:
We are almost ready to test out our VR app!
Delete the “MainCamera” object in your scene if you haven’t already instinctively removed it – the “CardboardMain” object is our new camera.
Before we test, add a simple floor to the scene too. Create a “Plane” object from 3D Object > Plane and ensure it is positioned at {x: 0, y: 0, z: 0}. Scale that plane to {x: 2, y: 1, z: 2} so that it extends out to the whole skybox:
Testing Our App
We should have everything in place to be able to try out our VR app and see how well it plays. To do so, click the Play button at the top of Unity and it should get the app running for you. Two important controls to remember are:
- To simulate looking around your scene, hold down the Alt key while moving your mouse.
- To simulate tilting your head, hold down the Shift key while moving your mouse.
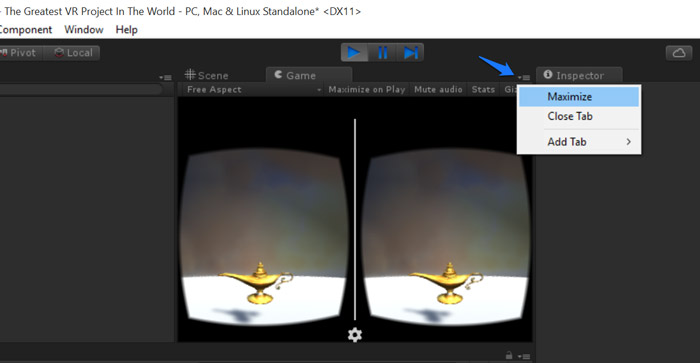
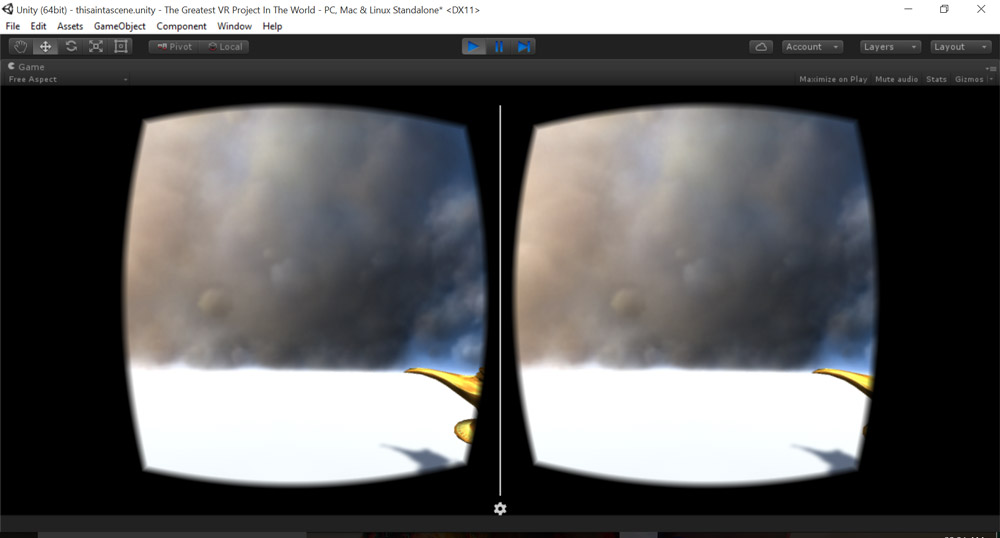
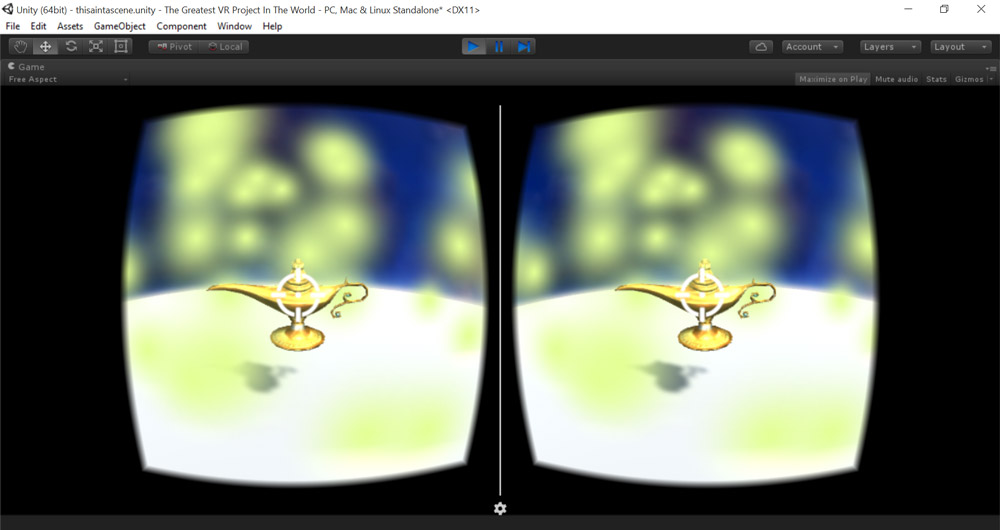
You should see your scene running nicely showing your lamp. To see it a bit bigger, there’s a tiny icon on the top right. Click that and choose “Maximise”. You can also click “Maximise on Play” to request it does this automatically when you are testing:
You should have your scene running maximised now:
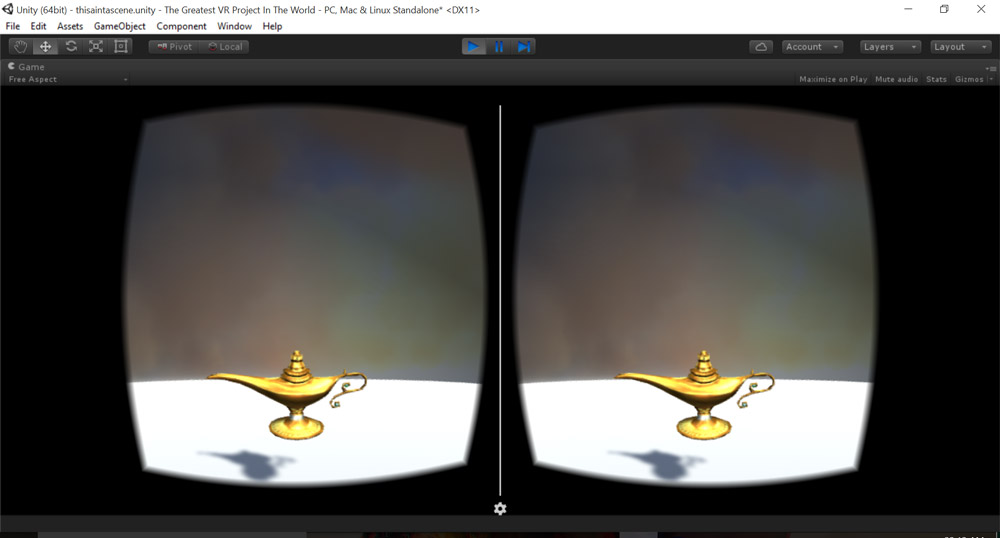
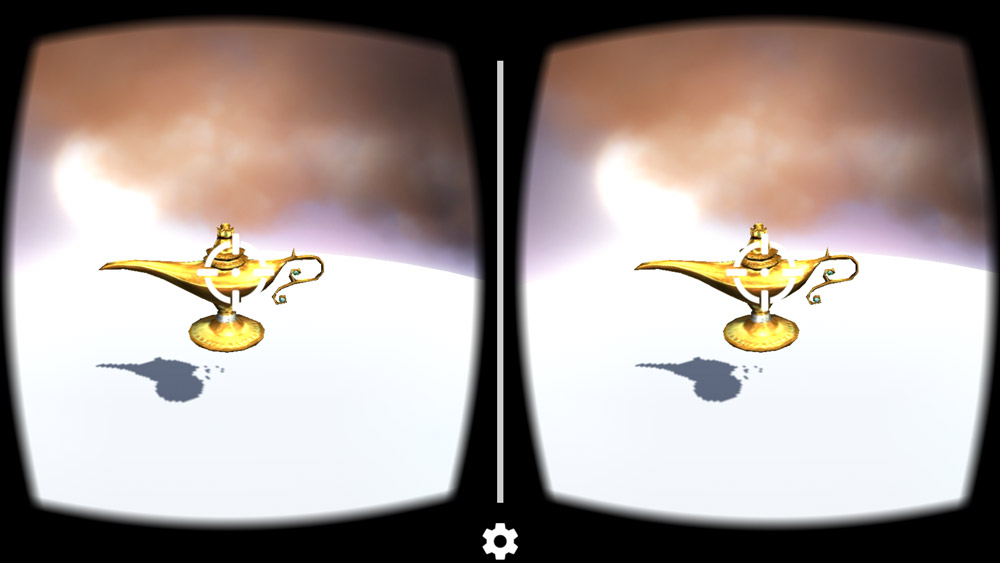
If you look at the lamp, your icon should appear indicating that you are indeed looking at the lamp:
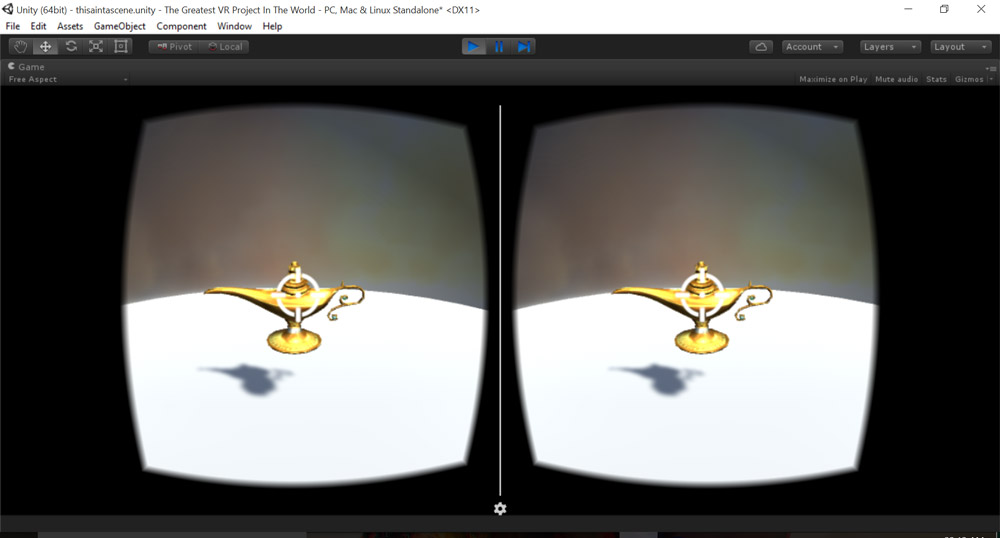
If you look away, the sky should change like magic!
Excellent, that’s our first use of the Cardboard SDK. However, there’s one more function we haven’t taken advantage of on the Cardboard headset – our clicker on the side. Here’s how to engage that.
Using The Clicker
To add click events from the Cardboard headset, we’ll need to add a new event handler. First, we will set up what that event should actually do. For me, the lamp just isn’t quite magical enough. I’m going to include a particle system that is set off any time the viewer clicks the lamp. To do so, open up the lamp once more and click “Add Component”, then type in “particle”. You should find “Particle System”. Add this onto your lamp. You should now see white particles floating out of it:
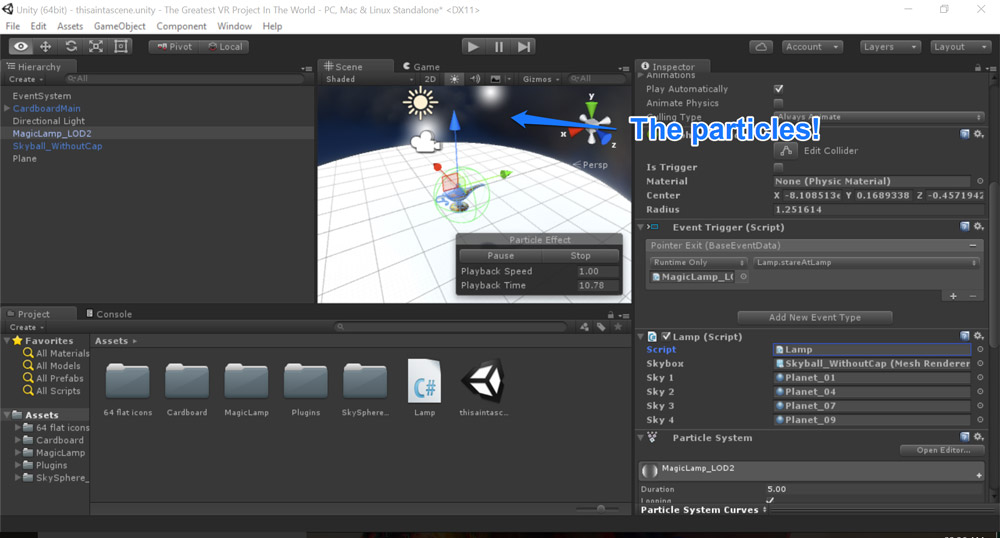
You can play around with the Particle System settings to your own preferences and see what you think looks the coolest! I set the color to be more of a yellow, changed the duration to 10 and set them to go in a random direction via the “Shape” section. One setting you’ll need to change so that the particles only appear on click is to change the “Rate” within “Emission” to be 0:
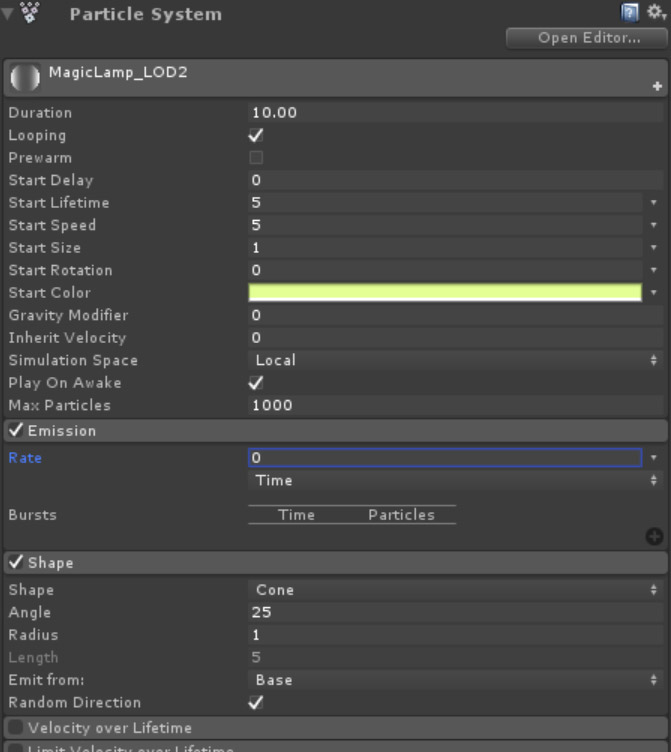
I also ended up using a “Gravity Modifier” of 1, which made the particles look a bit cooler as they fell back down over the lamp. Give that a try!
Within the code, we’ll add a new function called rubLamp() that emits a burst of particles from our Particle System:
public void rubLamp() {

  GetComponent<ParticleSystem>().Emit(10);

}
Then, we go back to our lamp object’s “Event Trigger” component and add one for “Pointer Click”:
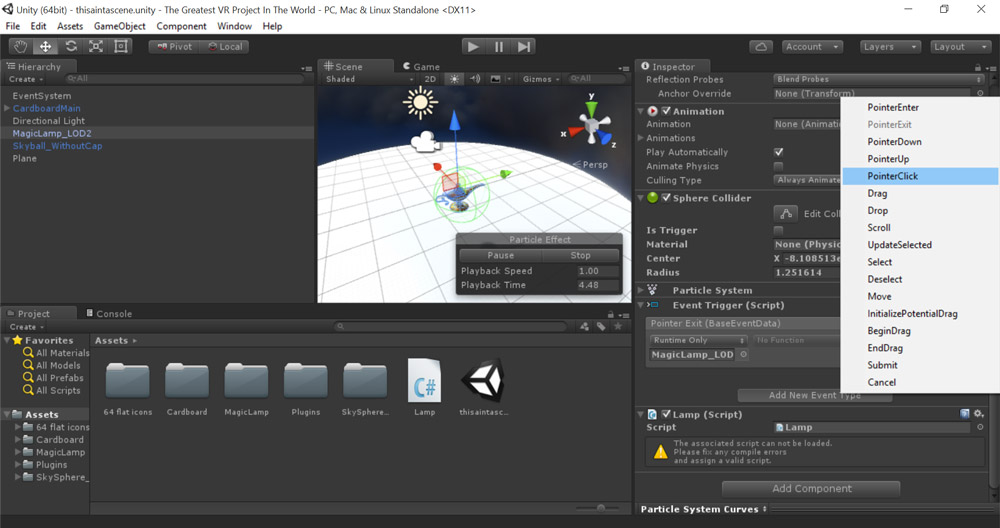
We then click and add our rubLamp() function as the response:
Now if we play our scene and click that lamp, we’ll have particles bursting from it. Quite neat!
Getting The App Onto An Android Device
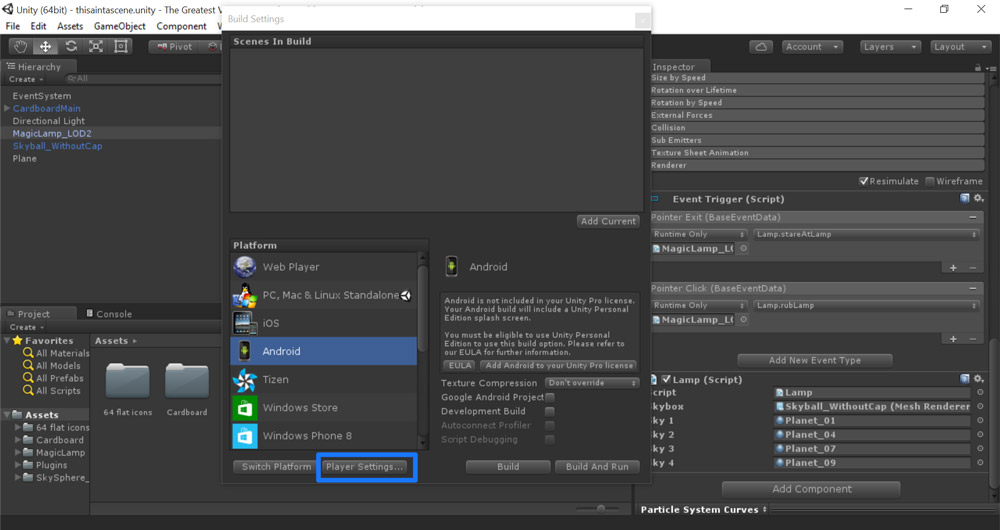
Now we definitely want to get it onto our phone so that we can try it within a Google Cardboard headset. In Unity, go to File > Build Settings. In the screen that appears, choose “Android” from the list and then select “Player Settings”:
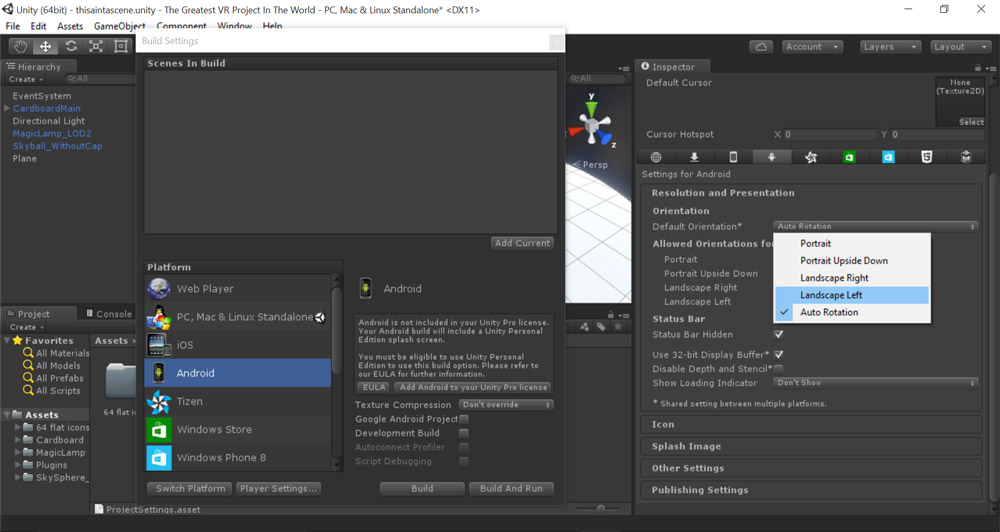
The settings will appear on the right (you might need to move the “Build Settings” window to the left a little to see it all). Under Resolution and Presentation, change “Default Orientation” to “Landscape Left”:
Then underneath that, open up the “Other Settings” section and update the bundle identifier to include your company name and the app’s name – com.companyName.appName. I used com.SitePoint.GreatestVRProjectInTheWorld:
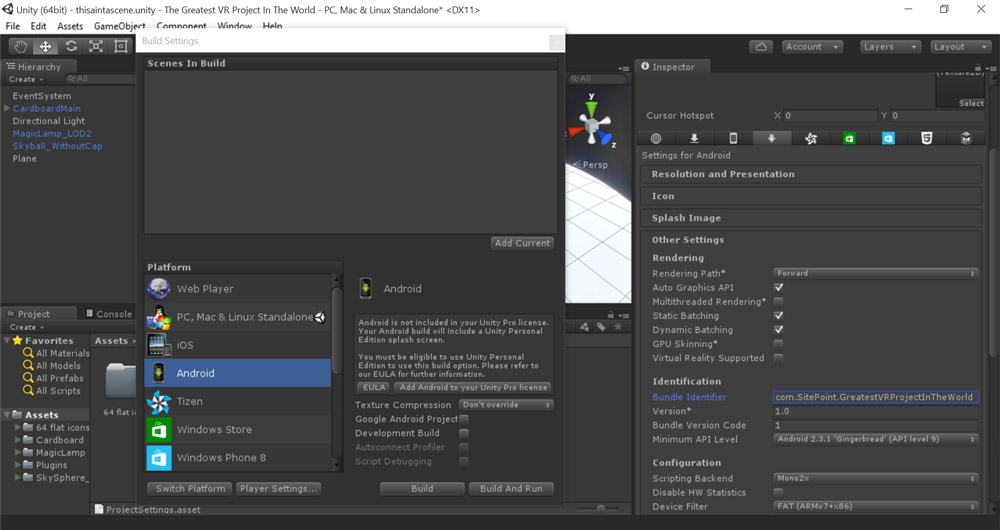
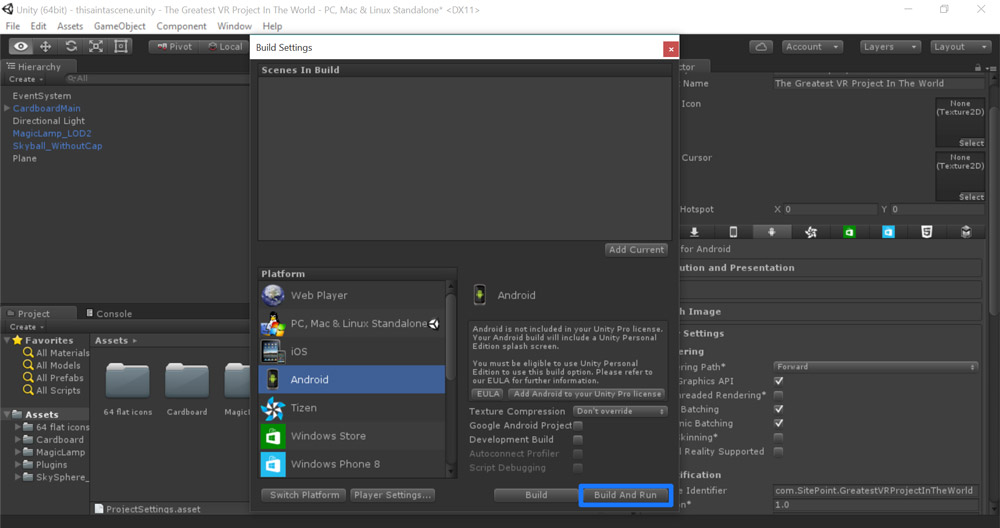
You should now be ready to go! Connect up your Android phone via USB to your computer and click “Build and Run” in the “Build Settings” window:
Choose where to save your apk file and give it a name:
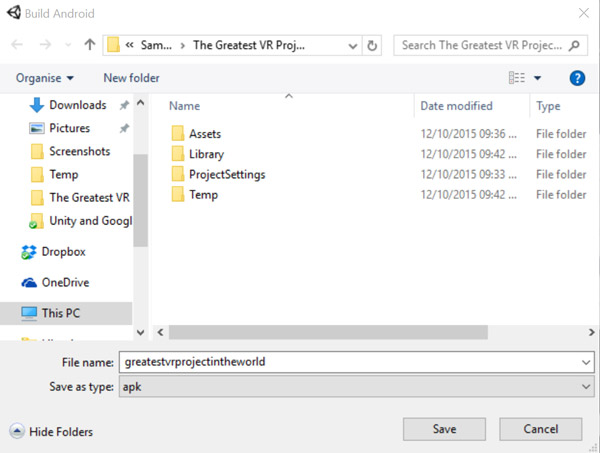
Unity should then run through and do everything else for you. It will place the app on your phone and run it. Once the app is on your phone, disconnect it from your computer, put it into your Google Cardboard and enjoy your VR creation!
Conclusion
Working with Google Cardboard and Unity is surprisingly really straight forward! From this initial demo, you’re now empowered with all the capabilities of Unity, combined with the capabilities of a whole portable VR platform! A little while back I covered calling Web APIs in Unity – the Cardboard SDK integrates well into that whole process, so you could have an IoT enabled VR Unity app if you combine the two techniques!
Feel free to use this code tutorial as the base for any Cardboard VR project you build in future! If you make something with it, please share it in the comments or get in touch with me on Twitter (@thatpatrickguy). I’d love to check it out!
If you’re looking for other links and sample projects to guide you in VR and Unity development, I’ve got a set of curated links that might be perfect for you! Head over to Dev Diner and check out my VR with Unity Developer Guide, full of links to resources around the web. If you’ve got other great resources I don’t have listed – please let me know too!
Frequently Asked Questions (FAQs) about Building a Google Cardboard VR App in Unity
What are the prerequisites for building a Google Cardboard VR app in Unity?
To build a Google Cardboard VR app in Unity, you need to have a basic understanding of Unity and C# programming. Unity is a powerful game development engine, and C# is the programming language used in Unity. You also need to install the latest version of Unity and the Android or iOS module, depending on the platform you are targeting. Additionally, you need the Google VR SDK for Unity, which provides the necessary libraries and resources for VR development.
How can I set up my Unity project for Google Cardboard VR development?
Setting up your Unity project for Google Cardboard VR development involves several steps. First, you need to create a new Unity project. Then, you need to import the Google VR SDK into your project. After that, you need to configure your project settings to ensure that your app runs in VR mode when it’s launched. This includes setting the default orientation to landscape, enabling VR support, and adding Cardboard to the list of Virtual Reality SDKs.
How can I create interactive objects in my Google Cardboard VR app?
Creating interactive objects in your Google Cardboard VR app involves scripting. You can use C# in Unity to create scripts that define the behavior of your objects. For example, you can create a script that changes the color of an object when the user looks at it. To detect the user’s gaze, you can use the GvrReticlePointer provided by the Google VR SDK, which changes its size based on the distance of the object being pointed at.
How can I test my Google Cardboard VR app in Unity?
You can test your Google Cardboard VR app directly in the Unity editor. To do this, you need to use the GvrEditorEmulator provided by the Google VR SDK. This tool allows you to simulate head movements using your mouse and keyboard. However, for a more accurate test, you should build and run your app on an Android or iOS device with a Google Cardboard viewer.
How can I optimize my Google Cardboard VR app for better performance?
Optimizing your Google Cardboard VR app for better performance involves various techniques. One of the most important things is to maintain a high frame rate to prevent motion sickness. You can achieve this by reducing the complexity of your 3D models, using simpler shaders, and minimizing overdraw. You should also avoid expensive operations like real-time shadows and dynamic lighting.
How can I publish my Google Cardboard VR app on the Google Play Store or the App Store?
Publishing your Google Cardboard VR app on the Google Play Store or the App Store involves several steps. First, you need to build your app in Unity and generate an APK for Android or an IPA for iOS. Then, you need to create a developer account on the Google Play Console or the App Store Connect. After that, you can submit your app for review. Once your app is approved, it will be available for download.
Can I monetize my Google Cardboard VR app?
Yes, you can monetize your Google Cardboard VR app in various ways. One of the most common methods is through in-app purchases, where users can buy virtual goods or premium features. Another method is through ads, where you can display banner ads or video ads in your app. You can also offer your app as a paid download, where users need to pay a one-time fee to download your app.
What are some common challenges in Google Cardboard VR development?
Some common challenges in Google Cardboard VR development include maintaining a high frame rate, handling user input, creating realistic 3D models and environments, and dealing with motion sickness. These challenges can be overcome with careful planning, optimization, and testing.
Can I use other VR SDKs in Unity besides the Google VR SDK?
Yes, Unity supports several VR SDKs besides the Google VR SDK. These include the Oculus SDK, the OpenVR SDK, and the Windows Mixed Reality SDK. Each SDK has its own features and capabilities, so you should choose the one that best fits your needs.
What are some resources for learning more about Google Cardboard VR development in Unity?
There are many resources available for learning more about Google Cardboard VR development in Unity. These include the official Unity and Google VR documentation, online tutorials and courses, and Unity community forums. You can also find many books and articles on the subject.