

Finding a list of links on a website is not a rare thing. For example, a lot of blogs have their own blogroll to spread the word about their friends’ blogs, or other websites displayed in a carousel to highlight some links, whether internal or external.
To create these lists, you can just add them in the HTML code and hardcode the links. The problem is that this method isn’t very practical: to modify, remove or add a link, you must modify the source code.
That’s why the WordPress Links Manager exists.
Key Takeaways
- The WordPress Links Manager is a tool for managing and sorting links, which can be easily accessed and modified from the administration panel. It is not included by default in WordPress versions 3.5 and later, but can be added with a plugin or by adding a filter in the functions.php file of your theme.
- Adding a new link in the Links Manager involves filling out a form with the link’s URL, name, description, and other optional details. Links can be kept private and unpublished, and they can be categorized for easier organization.
- Links can be edited or deleted from the links list in the Links Manager, similar to editing or deleting posts. Deleting a link is a definitive action as there is no trash bin in the Links Manager.
- Links can be displayed on your website using a widget provided by the Links Manager, which can be customized to display links from a specific category, sorted by title, rating, ID, or in a random order. The widget can also be set to display a link’s name, description, rating, and associated image.
What Is the WordPress Links Manager and Why Use It?
A Useful Tool to Manage Links
As its name suggests, the Links Manager allows you to manage a list of links, sorted by categories. These links are accessible from the administration panel so you can easily add a new one or modify and remove an existing one.
To display and use the links added in the Links Manager, we have several choices. By default, WordPress provides us a widget to add to a sidebar, which will display your links. But you can also build your own lists thanks to the dedicated API.
Where Is the WordPress Links Manager?
The Links Manager was provided by default in WordPress in earlier versions. However, it disappeared with version 3.5; since this release, you couldn’t find the Links Manager on a brand new WordPress installation. Moreover, if you used an earlier version than 3.5 and upgraded your installation, then the Links Manager was removed, unless you used it.
If you used an earlier version of WordPress than 3.5, and had links before the upgrade, then you should have the Link Manager. If you haven’t, you can find it by downloading the Links Manager plugin, which is the official way to retrieve the old tool. You can install it just as you would install any other plugin, or you can install it as a mu-plugin if you think that it should be a part of WordPress.
Note that the plugin is a very short one: actually it is a one line plugin that only adds a filter to activate the Links Manager. That means you can activate the Links Manager by yourself by adding the following line in the functions.php file of your theme.
add_filter('pre_option_link_manager_enabled', '__return_true');This also means that if you develop themes for other users and want to use the Links Manager in these themes, you can activate it with this line. That way, your users won’t have to download a plugin to be able to correctly use your theme.
Whether present by default in your WordPress installation or activated with the plugin or the filter, the Links Manager can be found in the administration panel’s sidebar with its own section: “Links“.
Adding a New Link
By accessing the “Links” section, you arrive by default at your links list. Similar to your posts list, this list also provides an “Add new” button next to the page’s title. Hit this button to add a new link thanks to a complete form.
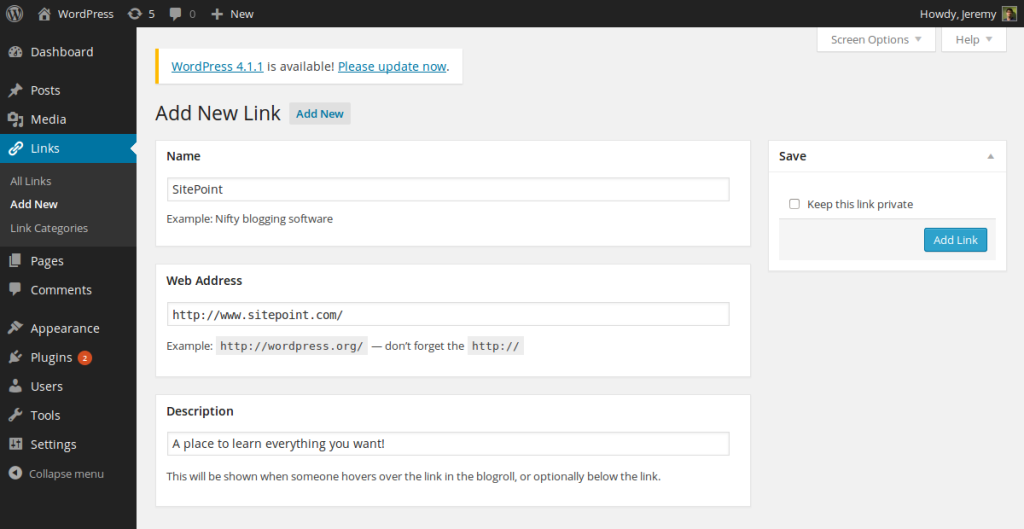
This form contains a lot of different options. Depending on your use of the links you add, some of these options will be totally useless, but don’t worry: the only required field is the “Web Address” one in which you indicate the link’s URL. All the other fields are optional, so fill them out only if you will use them.
Describing Your Link
Displaying links is a thing, but if you want to make these links useful, then you need to describe them. In the “Name” field, you can indicate a name for your link. The name should be short, but also descriptive: a link’s name should be viewed in the same light as a post’s title.
Below the “Web Address” field, you can find the “Description” field. In this field, you can really describe your link; you can indicate why you chose it, why you think it’s useful, or simply what it is.
For example, let’s create a link to SitePoint.
More Details About Your Link
You can choose to add more detail your link by indicating a relationship: if this link points to a specific person (for example, if the address is your friend’s personal webpage), then you can indicate the relationship you have with this person. There are several options, and you surely won’t use all of them, but you should know they exist if you ever need them.
The “Link Relationship” section is where you fill in the rel HTML attribute of your link, once it is displayed. If you use this section, be sure that it is read by the script which displays your links!
The “Advanced” section can be useful to add some additional information about your links. The “Image Address” field excepts an image’s URL. For example, if you want to display your links in a carousel, this field is the best place to indicate the image illustrating the link.
If your link points to a website using an RSS feed, you can indicate it in the “RSS Address” field. For example, your carousel can display a background image thanks to the previous field and add a small RSS button to indicate where your users can follow the website.
A big text area labeled “Notes” allows you to add anything you want about your link. It can be an information used (and eventually displayed) by your theme, or it can be a personal note to inform your future you why you added this link.
If you want to rate your links, it is possible thanks to the last field of the “Advanced” section: a list which allows you to rate the link between 0 and 10.
Finally, you can chose to open the link in a new tab, or not, by selecting the right option in the “Target” section. Note that, once again, be sure that the script you use to display your links correctly fills the target HTML attribute.
Private Links
Right above the submitting button, you can find a checkbox labeled “Keep this link private“. As you can guess, this allows you to create links without publishing them, temporarily or not.
Private links can be published at any time by simply unchecking the box, and you can hide public links by checking the box when you edit the link information.
Private links won’t be displayed by WordPress: the widget we will see below will simply ignore them and your visitors won’t be able to see them. They won’t even know that these links exist.
Private links can be useful to simulate drafts: if you need more time to prepare the description of a link, but don’t want to delete all the information you have already typed, then private links are a good option.
Organizing Your Links
After filling all the fields you want, you can add the link by simply hitting the “Add Link” button. But, there is a section we haven’t yet discovered: “Categories“.
Contrary to your posts which will go into the “Unsorted” category if you don’t make your choice before submitting them, your links don’t need a category. If you don’t choose a category, then the link won’t be included in any category.
However, if you use links in several places, organizing them can be a good idea. For example, a carousel will only display the links sorted in a “Carousel” category while a widget in your sidebar will display all the links in a “Sidebar” category.
The links categories list is similar to the posts categories list, as you can select the category you want for your link by simply checking the right one, but you can also add a new category, thanks to the link below the list.
Note that you can select several categories and, if you have a lot of categories, you can filter the list by only displaying the most used categories.
You can manage your links categories by accessing the “Link Categories” subsection of the “Links” section in the administration panel’s sidebar. This page lists your categories and allows you to add a description or modify their slug. A form allows you to add a new category directly with this information (contrary to the link we talked above, which only allows you to choose the name of the new category).
You can finally delete all your unused categories: they are easy to pinpoint thanks to the “Links” column which displays the number of links, using the corresponding category.
Editing or Removing a Link
As we said above, the links list is similar to the posts one, so you won’t be disoriented by the way you can edit or remove a link.
In fact, by hovering over a link’s row, you’ll see two links appear: “Edit” and “Delete“. By hitting “Delete“, a message prompt will be displayed, asking you to validate your choice. Be careful: there is no trash bin in the Links Manager so deleting a link is a definitive action.
Note that, as in the posts list, hitting the link’s name or the “Edit” link will have the same effect of redirecting you to the right page. This page is almost the same as the one where you can add a link. The difference is in the page’s title and in some buttons’ labels. Moreover, the form is prefilled with the current values you can modify.
Finally, the links list can be filtered by categories, and checkboxes allow you to simultaneously delete several links.
Displaying Links with the Widget
If your theme allows you to customize a place like a sidebar or a footer with widgets, then you can easily display your links in this place, as WordPress provides a widget within its Links Manager.
Like any other widget, to add the Links Manager widget, you must go into the “Widgets” subsection of the “Appearance” section of the administration panel. You’ll see here the list of available widgets where you will be able to find the “Links” one. Drag and drop the Links widget to wherever you want it to appear. This will open a menu that enables you to personalize the widget.
From here, you can here the link category that you want to display (for example, the “Blogroll” category in a sidebar). If you don’t have a lot of links, or if you have not set any category because you use links in only one place, you can also choose to display all categories.
Once you have chosen the category you wish to use, you can customize the display by itself, beginning with the way the links are sorted. You have four choices: sorting links by title, by rating, by ID, or displaying links in a random order.
Below these two drop-down lists you can see four checkboxes. These will allow you to choose what you want to display: you can display the link’s name, its description, or even its rating and its associated image.
Finally, you can limit the number of links to show. For example, assume that you have a category where you put some articles you find on the web. Displaying them in your sidebar can be a good idea to share your findings but, depending on the number of links you have in this category, the result can be very long. A solution can be to remove some links when you add new ones, but you can also keep all your links and display only the last five ones.
Don’t forget to validate your choices by hitting the “Save” button, and enjoy the result on your website!
In Conclusion
Sharing links is a large part of what the Internet is, so doing it on your website is a good idea. Thanks to WordPress’ Links Manager, you can easily manage a list of links by adding, editing, removing and sorting them via the administration panel.
Displaying our links with the widget is useful but, sometimes, we want to go further, to customize more things. A solution can be to write our own scripts to display our links.
The good news is that it is possible thanks to a dedicated API that allows you to retrieve the links stored in your database, to display them the way you want, in the HTML elements you want. The Links Manager API will be the topic of a future article.
Frequently Asked Questions about WordPress Links Manager
What is the WordPress Links Manager and why is it important?
The WordPress Links Manager is a built-in tool that allows you to manage and organize your links or bookmarks in your WordPress site. It’s important because it helps you keep track of all your external links, making it easier for you to update or remove them when necessary. It also allows you to categorize your links, making your site more organized and user-friendly.
How do I access the WordPress Links Manager?
To access the WordPress Links Manager, you need to go to your WordPress dashboard. From there, you can find the ‘Links’ option in the left-hand menu. If you can’t see it, it might be because your WordPress version is 3.5 or later, where the Links Manager is hidden by default. You can enable it by installing and activating the Link Manager plugin.
What are some alternatives to the WordPress Links Manager?
There are several alternatives to the WordPress Links Manager. Some of the most popular ones include the Simple Links plugin, the Link Library plugin, and the Pretty Links plugin. These plugins offer additional features such as link shortening, tracking, and more advanced link organization options.
How do I add a new link in the WordPress Links Manager?
To add a new link in the WordPress Links Manager, go to ‘Links’ > ‘Add New’ in your WordPress dashboard. You can then enter the URL of the link, give it a name, and assign it to a category. You can also add a description and target attribute if you want.
Can I categorize my links in the WordPress Links Manager?
Yes, you can categorize your links in the WordPress Links Manager. This feature allows you to group related links together, making it easier for you and your site visitors to find specific links. You can create a new category by going to ‘Links’ > ‘Link Categories’ in your WordPress dashboard.
How do I edit or delete a link in the WordPress Links Manager?
To edit or delete a link in the WordPress Links Manager, go to ‘Links’ in your WordPress dashboard. You will see a list of all your links. Hover over the link you want to edit or delete, and you will see the ‘Edit’ or ‘Delete’ option.
Can I display my links on my site using the WordPress Links Manager?
Yes, you can display your links on your site using the WordPress Links Manager. You can do this by adding the ‘Links’ widget to your sidebar or any widget-ready area on your site. You can also use a shortcode to display your links in a post or page.
How do I backup my links in the WordPress Links Manager?
To backup your links in the WordPress Links Manager, you can export them as an OPML file. Go to ‘Tools’ > ‘Export’ in your WordPress dashboard, select ‘Links’, and click ‘Download Export File’. You can then import this file to another WordPress site or keep it as a backup.
Can I import links to the WordPress Links Manager?
Yes, you can import links to the WordPress Links Manager. You can do this by going to ‘Tools’ > ‘Import’ in your WordPress dashboard, select ‘Blogroll’, and upload your OPML file. This is especially useful if you’re moving your site to a new WordPress installation.
What should I do if I encounter problems with the WordPress Links Manager?
If you encounter problems with the WordPress Links Manager, you can try deactivating and reactivating the Link Manager plugin. If the problem persists, you can seek help from the WordPress community through the WordPress support forums or contact the plugin developer directly.