
In my previous article, we covered what Docker is and how to get up and running with a few commands. However, we haven’t done anything useful just yet. There are numerous ways to get a WordPress environment using Docker, in this article, I’ll show you how to manually setup Docker containers to work with WordPress. If you’d like a quick intro into Docker, you can jump back to the first article here.
Key Takeaways
- Docker can be manually set up to work with WordPress by creating containers for MySQL and WordPress. The MySQL container is created using a MySQL image from Docker Hub, while the WordPress container is built from a PHP image.
- The MySQL container requires an environmental variable to be passed when first created, setting the password for the root user. Additional environmental variables can also be passed to the container, such as MYSQL_DATABASE, which ensures a database with that name is created.
- The PHP image for the WordPress container does not have the MySQL extension installed by default. This can be fixed by building a container via a Dockerfile, which uses the php:5.6-apache image, installs the mysqli extension, and executes apache2-foreground.
- The WordPress container needs to be linked with the MySQL container for the database to function. This is done by using the –link argument when running the WordPress container, with the name of the MySQL container as the first part and an alias as the second part.
- There can be issues with file permissions and the WordPress container’s IP address changing each time it is restarted. These can be addressed by modifying the Dockerfile to include an entrypoint.sh file that ensures write access to the container’s filesystem, and by adding lines to the wp-config.php file that define the ‘Home’ and ‘Site’ URL as the server’s IP address.
Setting up MySQL
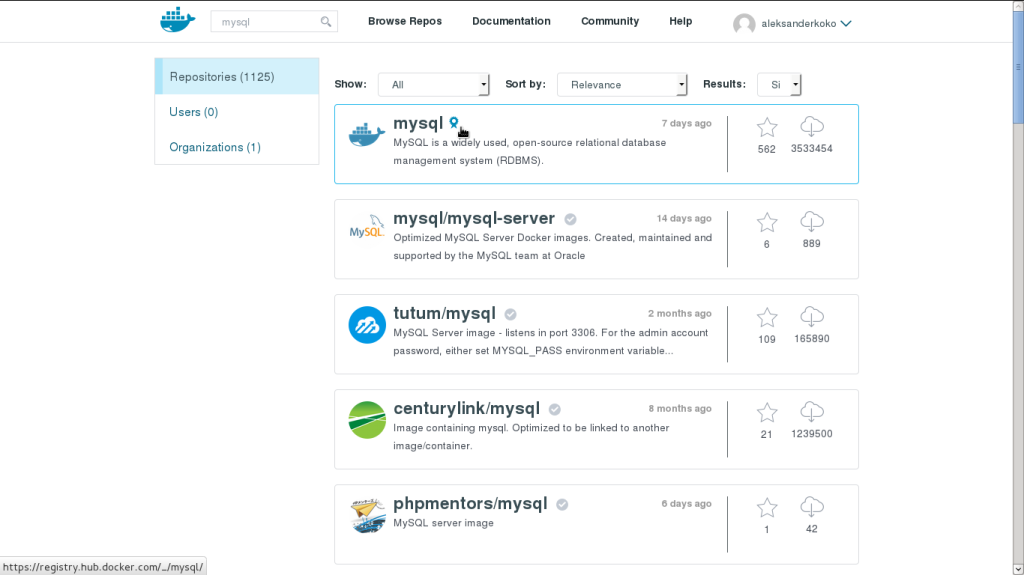
Every WordPress installation needs a MySQL database. To do this, we head over to Docker Hub and find a MySQL image.
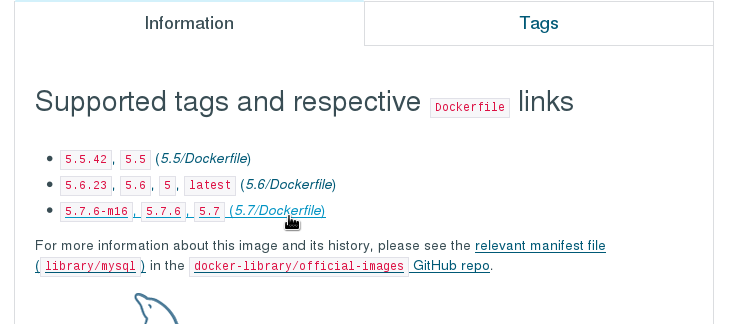
The Docker team already has a MySQL image ready for us to use. Before running any commands on the terminal, make sure to read the documentation for this image. The latest version at the time of writing is 5.7. However, the latest tag name is 5.6. The latest version of an image can be for any previous version, but one in its stable state.
The basic command to setup a container using this image is:
docker run --name wordpressdb -d mysql:5.7
If you don’t already have a copy of the image locally, Docker will pull that for you from the Docker Hub. We know so far that --name gives our container a name, -d makes sure that our container runs in the background.
If you run docker ps you will see that wordpressdb container is not running. It should be running though. Run docker logs wordpressdb and you will see a message like this:
error: database is uninitialized and MYSQL_ROOT_PASSWORD not set
  Did you forget to add -e MYSQL_ROOT_PASSWORD=... ?
Why is that? It’s because we didn’t pass a root password as an argument when we first built the container. So let’s do just that. First, we need to delete the container that we created with the name wordpressdb using docker rm wordpressdb. This is because the new container will use the same name and there can’t be two containers with the same name.
So let’s create our container again. We need to pass an environmental variable when we first create the container. It should look something like this:
docker run --name wordpressdb -e MYSQL_ROOT_PASSWORD=password -d mysql:5.7
-e MYSQL_ROOT_PASSWORD=password is an environmental variable. When the container is being built from the image, it reads this variable and sets the password for the root user to the specified value, which in this case is password.
If you now check docker logs wordpressdb, you’ll see a very long message, but don’t worry about this, it’s working. Again, run docker ps and you’ll see a container with the name wordpressdb that is active and running.
You can also pass other environmental variables to your container, you can find a complete list on the MySQL image documentation. Here’s another example:
docker run --name wordpressdb -e MYSQL_ROOT_PASSWORD=password -e MYSQL_DATABASE=wordpress -d mysql:5.7
If you tried to remove the previous container with the name wordpressdb, it probably failed. That’s because the container was still running in the background. You could first stop the running container and then remove it or just force remove it:
docker rm -f wordpressdb
If we use MYSQL_DATABASE, it makes sure that a database with that name is created. This way, we know for sure what the name of the database and roots password is. You can also create another user with a password and database. Here’s a quick test for you, look at their docs and try to do this yourself.
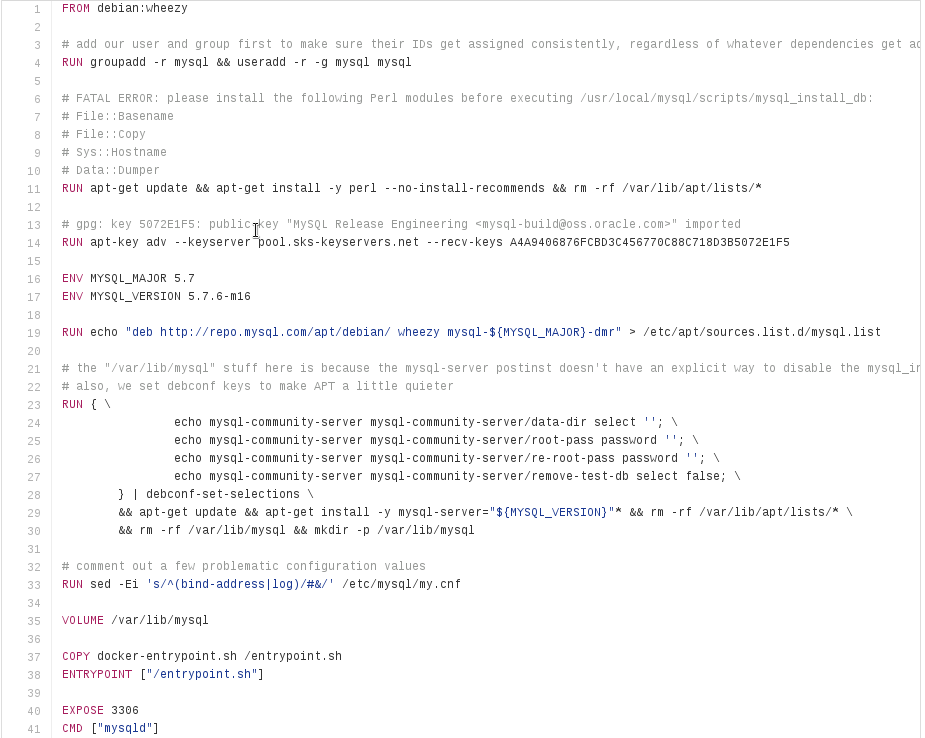
If you’d like to know more how this container is built, look at the Dockerfile. It uses debian wheezy and builds the container using bash commands. It pulls it from the repository and then starts mysqld. When building your container from this image, the first time it will execute the commands of the build file. When using the container, it will only exec mysqld.
Now that we have a running MySQL container, we can run a container that runs WordPress.
Building a WordPress Container
For this container we’ll use the PHP image. There are three types of PHP images, we only need the PHP image that comes with Apache.
docker run --name wordpress php:5.6-apache
Without -d option, it wont run in background, instead it will show you everything the container is outputting (the same way that docker logs [container_name] does).
From the output you can see that it has automatically assigned an IP to that container. In my case it’s 172.17.0.35. If you visit this address using your browser, you’ll get a forbidden error. Why is that? It’s because there is nothing in the /var/www/html folder (on the containers filesystem), it’s empty.
So how we can put files in that folder? By default, that folder stays inside the container, and it’s invisible. However, not for long (don’t forget to docker rm wordpress). First, create a folder and navigate inside it (don’t forget to remove the old wordpress container).
docker run --name wordpress -v "$PWD/":/var/www/html php:5.6-apache
-v is used for mapping two folders. The first part is the folder on your OS and the second is the folder in the containers filesystem. On Unix-like systems, the "$PWD" returns the location where the terminal is when the command runs. When you first start a terminal, you’ll be in your home directory. The equivalent on Windows is cd.More about PWD can be found here.
So in our example, the first part is “$PWD/”, which is the local directory and the second part is /var/www/html/. -v requires both to be full paths. However, if we look in our working directory, we can see that no files exist there. Create a file called index.php that contains the following:
<?php
phpinfo();
?>
Check this again in your browser. This time you’ll notice that the IP address has changed because we created a new container. Every time we create a new container, it changes its IP. If you see that message in your browser then you have done everything right.
Let’s see what it happens if we put the WordPress files there. Stop the container by using docker stop wordpress. Grab the latest copy of WordPress from wordpress.org and drop the files inside the project folder. Start the container again using docker start wordpress. Also, make note that you’ll initially need to make the files readable. You can run chmod -R 777 projectfolder on *nix systems. If you reload the page, your browser will tell you that:
Your PHP installation appears to be missing the MySQL extension which is required by WordPress.
By default, the PHP image doesn’t have the MySQL extension installed, but we can fix that. This time we’ll build a container via a Dockerfile. We’ve already seen how Dockerfiles work. They are built from a base image, do some processing, then execute one command in the end.
Create a new file named Dockerfile:
We want to use the php:5.6-apache image.
FROM php:5.6-apache
Then we’ll install the mysqli extension.
RUN docker-php-ext-install mysqli
Next, we need to execute apache2-foreground as the PHP image does (we only needed to install the MySQL extension after all).
CMD ["apache2-foreground"]
Using build files we can build images. Using this image, we build the container.
docker build -t phpwithmysql .
The -t is used to give a repository name. The . tells to Docker where the Dockerfile is located. As the Dockerfile is located in the working directory, . tells docker that it is in the working directory.
If you check the images with docker images, you’ll now see a new image with tag latest (because we didn’t specify a tag for this image). Now build container this container with this image like we did with php5.6-apache image.
docker run --name wordpress -v "$PWD/":/var/www/html phpwithmysql
Check your browser for the containers IP and you will see something like this:
If you got this far, then you have done everything right. Now we have to link WordPress with a database. This is far from the famous 5 minutes install of WordPress and more complex, but you will get to see the benefits of Docker in the long run.
So how do we link WordPress with the database? First we need to link the wordpress container with a database container (wordpressdb). This can be done via linking two containers. More on linking can be found here.
docker run --name wordpress --link wordpressdb:mysql -v "$PWD/":/var/www/html phpwithmysql
The new arguments is --link. The first part wordpressdb is the name of the container that we want to link, and the second part mysql is the alias. Docker modifies the host of the wordpress container and sets the IP of the wordpressdb to mysql. So when we fill the information for the database on WordPress configuration, we will set the host to ‘mysql’.
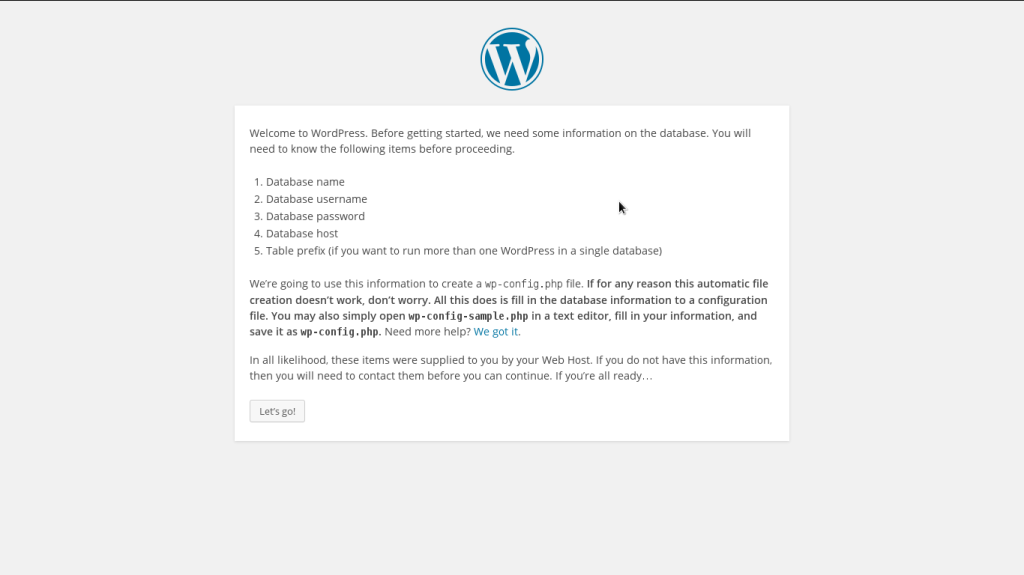
Now go to your browser using IP of the container (the new IP). Fill the information for the database and login to the administrator panel. If you try to install a new theme (which will try to make changes on filesystem), you will see something like this:
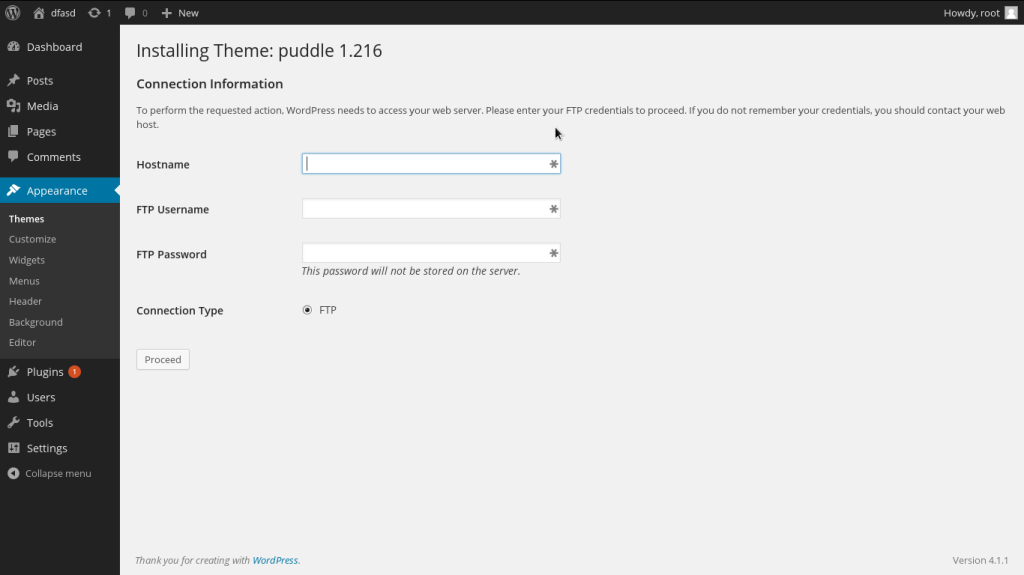
Why is that? It is because the user that runs Apache doesn’t have write access on the filesystem. This is where things get a little difficult. We need to build a new version of the phpwithmysql image. Go to your Dockerfile and modify it to look like this:
FROM php:5.6-apache

RUN docker-php-ext-install mysqli

COPY entrypoint.sh /entrypoint.sh

RUN chmod 777 /entrypoint.sh

ENTRYPOINT ["/entrypoint.sh"]

CMD ["apache2-foreground"]
We haven’t created entrypoint.sh file yet, but we will do this shortly. COPY copies entrypoint.sh to / inside the container. chmod 777 /entrypoint.sh makes that file executable. And finally ENTRYPOINT executes that file. Now create the entrypoint.sh file in the same directory as the Dockerfile.
#!/bin/bash
chown -R www-data:www-data .
exec "$@"
This is the simplified workaround of the official WordPress image, but will make sure we have write access to the containers filesystem. We can now build the new image:
docker build -t phpwithmysql:v2 .
Make sure to remove the old containers and create the new containers:
docker rm -f wordpress
docker rm -f wordpressdb
docker run --name wordpressdb -e MYSQL_ROOT_PASSWORD=password -e MYSQL_DATABASE=wordpress -d mysql:5.7
docker run --name wordpress --link wordpressdb:mysql -v "$PWD/":/var/www/html phpwithmysql:v2
Also, remove the old wp-config.php file.
Now check the IP for your wordpress container in your browser. This time you can install themes and plugins, and make changes on the containers filesystem.
Some of the steps above might seem quite cryptic and complex. That’s why there are official images for many different frameworks and languages. Every framework or language has different specifications on how they work. By default, Docker doesn’t allow the application to write on the filesystem. Is this a bad or good thing? I think it’s a good thing. We could create a third container that only holds files. There the application could write files. This way we would have a more modular architecture. But for those frameworks that can’t be changed (like WordPress), there are workarounds.
Final Tweaks
The last thing we have to do is to work around a problem that occurs when you stop the wordpress container, and start it again. The problem is that WordPress saves the last IP as its ‘Home’ and ‘Site’ URL. Stop wordpress container and start it again. This time it will have a new IP. If you try that in your browser, you will see that images, css and javascript files are not included properly. The solution is simple, just modify the wp-config.php by adding this lines:
define('WP_HOME',$_SERVER['SERVER_ADDR']);

define('WP_SITEURL',$_SERVER['SERVER_ADDR']);
Note that if you define these values in your wp-config.php file, you can’t change them later on in General Settings.
Conclusion
In this article, we covered how we can build containers for WordPress. We did it in a rather cryptic way, with long commands that can be hard to remember. There should be an easier way, and there is! The Docker team has built a WordPress image that you can easily setup in minutes. After all, who wants to remember every command to setup WordPress?
In the next article in this series, I” show you how use the official WordPress image, and we’ll also learn how to use Docker Compose to make things even easier.
So why did I write this article if there’s an easier way? Essentially, it was to get a better understanding of how Docker works, to do this you have to get your hands dirty with the underlying complexities. It’s more of a personal rule, so when I get to use Docker tomorrow, I’ll know more about how it works and how to tweak it for my needs. I hope you also now have a deeper understanding of how Docker works behind the scenes. Stay tuned for the third article on this series where we’ll have even more fun with Docker and WordPress.
What do you think about Docker so far? Would you consider it on your next project? Let me know in the comments below.
Frequently Asked Questions (FAQs) about Building Docker Containers for WordPress
How can I ensure my Docker container for WordPress is secure?
Security is a crucial aspect when setting up Docker containers for WordPress. To ensure your container is secure, always use the latest version of Docker and WordPress. Regularly update your Docker images and containers to include the latest security patches. Also, use Docker secrets to manage sensitive data like passwords. Avoid running Docker containers as root to minimize potential damage if a container is compromised. Lastly, use Docker security scanning tools to identify and fix vulnerabilities in your images.
How can I optimize the performance of my Docker container for WordPress?
To optimize the performance of your Docker container for WordPress, consider using a lightweight base image. This reduces the size of the image and speeds up the build process. Also, use Docker’s multi-stage builds to separate the build-time and runtime dependencies, which can significantly reduce the size of your final image. Additionally, limit the resources (CPU, memory) that your container can use to prevent it from consuming all available resources on the host machine.
How can I troubleshoot issues with my Docker container for WordPress?
Docker provides several tools for troubleshooting. Use the ‘docker logs’ command to view the logs of a running container. If your container is crashing, use the ‘docker inspect’ command to get more information about the container. You can also use the ‘docker stats’ command to monitor the resource usage of your containers. If you’re facing network issues, use the ‘docker network inspect’ command to inspect your Docker network.
How can I backup my WordPress site running in a Docker container?
To backup your WordPress site running in a Docker container, you can use the ‘docker cp’ command to copy files from the container to the host machine. You can also use Docker volumes to persist data. If you’re using a MySQL database, you can use the ‘mysqldump’ command to create a backup of your database.
How can I scale my WordPress site running in Docker containers?
Docker provides several tools for scaling applications. You can use Docker Compose to define and run multi-container applications, and scale them by increasing the number of container instances. You can also use Docker Swarm or Kubernetes, which are orchestration tools that can manage and scale your containers across multiple hosts.
How can I automate the deployment of my WordPress site in Docker containers?
You can automate the deployment of your WordPress site in Docker containers using CI/CD tools like Jenkins, Travis CI, or GitHub Actions. These tools can build your Docker images, run tests, and deploy your containers to a Docker host or a Kubernetes cluster.
How can I manage multiple WordPress sites in Docker containers?
To manage multiple WordPress sites in Docker containers, you can use Docker Compose to define each site as a separate service. You can also use Docker networks to isolate the network traffic of each site. If you’re using a reverse proxy like Nginx, you can configure it to route traffic to the appropriate container based on the domain name.
How can I update my WordPress site running in a Docker container?
To update your WordPress site running in a Docker container, you can pull the latest WordPress image from the Docker Hub, stop your running container, and start a new one using the updated image. Remember to backup your data before updating.
How can I monitor my WordPress site running in Docker containers?
Docker provides several tools for monitoring containers. You can use the ‘docker stats’ command to monitor the resource usage of your containers. You can also use tools like Prometheus and Grafana to collect and visualize metrics from your containers.
How can I migrate my existing WordPress site to a Docker container?
To migrate your existing WordPress site to a Docker container, you need to backup your WordPress files and database, create a Dockerfile and a Docker Compose file to define your WordPress and database services, build your Docker images, and start your containers. Remember to update your WordPress configuration to point to the new database service.