

Local notifications let an application inform its users that it has something for them. For example, a reminder or an new item for sale while the application isn’t running in the foreground. Local notifications are considered the best way by which an app can communicate with its user, even if the user is not actively using the app.
In this tutorial I will show you how to trigger local notifications in a cordova based app. I will explain how local notification work, how they differ from push notifications and the APIs provided by the Cordova Local-Notification Plugin to trigger local notifications. I will create a basic Reminder app to show how to use the Cordova Local-Notification plugin in a real world project.
Key Takeaways
- Local notifications allow an application to communicate with its users even when the app isn’t actively being used, making them a powerful tool for engagement.
- Cordova Local-Notification Plugin is a third-party tool that enables the display of local notifications in iOS, Android, and Windows Phone.
- The plugin provides APIs for checking permission, requesting permission, scheduling a notification, and cancelling a notification.
- The tutorial provides a step-by-step guide on how to create a basic Reminder app using the Cordova Local-Notification plugin, including creating the home screen, adding reminders, and displaying all and pending reminders.
- The Cordova Local-Notification Plugin also allows for the scheduling of repeating notifications, handling notification clicks, updating scheduled notifications, and scheduling notifications with custom sounds, icons, actions, and attachments.
How Do Local Notifications Work?
Local notifications are great for keeping users informed with timely and relevant content, while your app is not running in the foreground. Local notifications can display a message, play a distinctive sound, or update a badge on your app icon.
For an app to display a local notification it needs to schedule a local notification while it’s running in the foreground.
Local notifications are supported in Android, iOS and Windows Phone.
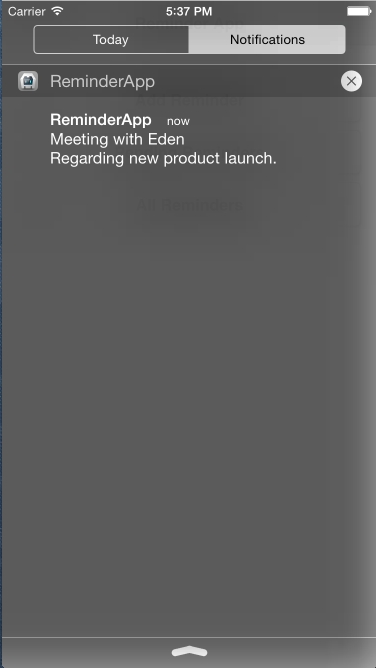
This is how a local notification looks in iOS
The Difference between Local and Push Notifications?
Both local and push notifications are displayed the same way, i.e. Composed of a title, message, sound and icon badge number.
The difference is that the local notifications are scheduled by the app itself whereas push notifications are generated by the app’s server to mobile operating system’s push service server. Local notifications can be triggered without the mobile being connected to Internet. Push notifications can only be fetched by a phone if it’s connected to the Internet.
Cordova Local-Notification Plugin
The Cordova Local-Notification Plugin is a third party Cordova plugin with which we can display local notifications in iOS, Android and Windows Phone.
In this tutorial I will use the plugin to schedule local notifications. Let’s see the APIs provided by the plugin:
Check Permission
For an app to schedule local notifications it needs to have permission from the user. To check if the app has permission use this code:
cordova.plugins.notification.local.hasPermission(function (granted) {

});
The granted parameter is true if the app has permission to schedule local notifications, otherwise it’s false.
Request Permission
If an app doesn’t have permission to schedule local notifications then it needs to request permissions. Here is the code to request permission:
cordova.plugins.notification.local.registerPermission(function (granted) {

});
The granted parameter is true if the user granted permission, otherwise false.
Schedule a Notification
You can schedule any number of notifications needed. Here is the code to schedule a notification:
var sound = device.platform == 'Android' ? 'file://sound.mp3' : 'file://beep.caf';

var date = new Date();
cordova.plugins.notification.local.schedule({

    id: 1,

    title: "Message Title",

    message: "Message Text",

    at: date,

    sound: sound,

    icon: "http://domain.com/icon.png"

});
The at property needs to reference a Date constructor object. If we pass the current time then the local notification is triggered instantly.
To make the notification repeat itself, add an every property assigned to the interval in minutes and a firstAt property assigned to when the notification will be triggered for the first time. Here is a code example:
var sound = device.platform == 'Android' ? 'file://sound.mp3' : 'file://beep.caf';

var date = new Date();
cordova.plugins.notification.local.schedule({

    id: 1

    title: "Message Title",

    message: "Message Text",

    firstAt: date,

    every: 25,

    sound: sound,

    icon: "http://domain.com/icon.png"

});
Cancel Notification
To cancel a pending notification you need the notification’s unique id. Here is an example:
cordova.plugins.notification.local.cancel(1, function () {

    // Notification was cancelled

}, scope);
Click Notification
This plugin triggers an event when the user opens the app by clicking on a local notification. Here is a code example:
cordova.plugins.notification.local.on("click", function (notification) {

    alert(notification.text);

}, scope);
Creating a Reminder App
Let’s get started with building a reminder app. The reminder app will let you add reminders for a specific date and time. For the reminder to trigger a local notification is scheduled by the app for that time.
The app will be designed using jQuery mobile. You can find the final code of this project on gitHub.
Starting
In the starting template, include jQuery and jQuery mobile. I won’t cover installing and creating a Cordova Application here, if you haven’t done this before, read the getting started guide. Instructions to run and build the application are available on the same page.
Give the Application an appropriate name and add the platforms you want to support. I am using Cordova’s Notification plugin and Device plugin in this tutorial, find instructions on how to add these here.
As we will be using local the notification plugin, install it by running the below command in the cordova project directory:
cordova plugin add https://github.com/katzer/cordova-plugin-local-notifications
Inside the www/index.html file, add the following JavaScript and CSS files to the head tag:
<link rel="stylesheet" href="https://code.jquery.com/mobile/1.4.5/jquery.mobile-1.4.5.min.css">
<script src="https://code.jquery.com/jquery-2.1.4.min.js"></script>

<script src="https://code.jquery.com/mobile/1.4.5/jquery.mobile-1.4.5.min.js"></script>
<script type="text/javascript" src="cordova.js"></script>
Here I added jQuery and jQuery Mobile from CDNs. You can embed these files locally so that the app works without an Internet connection.
Data Structure
In this tutorial I am going to use HTML5 local storage to store the app’s data.
I will be organizing all the data into an array that will be a property of an object. The object is stored as a JSON string in local storage.
When the app loads for the first time, local storage will be empty, so the data structure needs to be initiated. Below the code checks for the object in the local storage. As it’s empty it will create and store a new one. Place this code in a script tag at the bottom of the index.html page, before the closing body tag:
var info = null;
document.addEventListener("deviceready", function(){

if(!localStorage.getItem("rp_data"))

{

  var rp_data = {data: []};

  localStorage.setItem("rp_data", JSON.stringify(rp_data));

}
info = JSON.parse(localStorage.getItem("rp_data"));

}, false);
Here I created an info variable used throughout the app to access data. Whenever I make changes to the info variable I need to update local storage.
Creating the Home Screen
Let’s create a home screen for our app which will display when the app loads.
On the home screen I will place three buttons. These are for adding a new reminder, displaying all reminders and displaying pending reminders.
Here is the code to create a jQuery mobile page for our home screen. Place this code in the body tag of the index.html page (Replace the divs that are there):
<div data-role="page" id="home">

  <div data-role="header">

    <h1>Reminder App</h1>

  </div>
  <div data-role="main" class="ui-content">

    <p>

        <a target="_blank" href="#add" style="text-decoration: none"><button>Add Reminder</button></a>

        <a target="_blank" id="pending_click" href="#pending" style="text-decoration: none"><button>Pending Reminders</button></a>

        <a target="_blank" href="#all" style="text-decoration: none"><button>All Reminders</button></a>

    </p>

  </div>

</div>
Here I placed three buttons on the page, each of them pointing to a new page. Here is how the page should look:
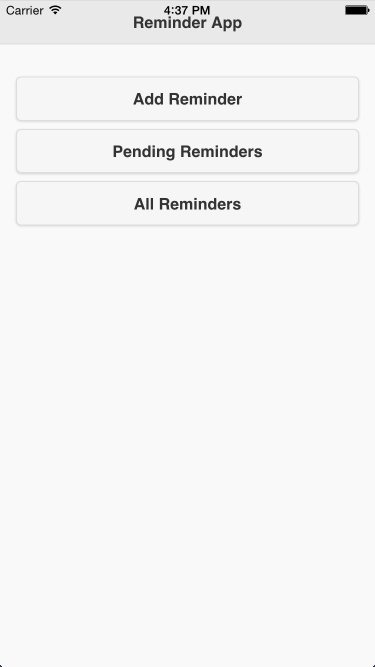
Note:: The code for the other pages should be added below this code, so that this page loads first.
Creating a Page to Add Reminder
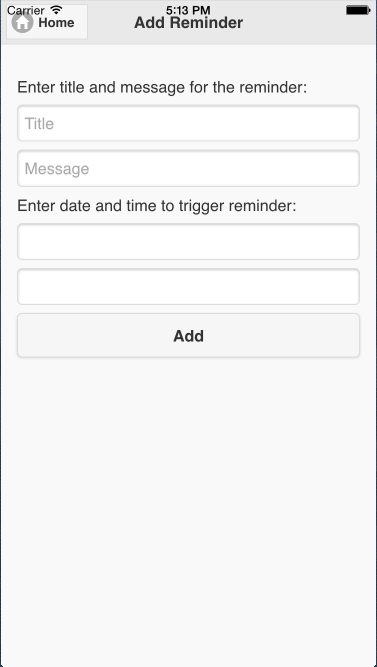
When a user clicks on the Add Reminder button on the homepage a new page is displayed where a user can add a new reminder.
Next, display four text boxes (title, message, date and time) and a button to add a reminder. Place the code in the body tag of the index.html file:
<div data-role="page" id="add">

  <div data-role="header">

    <a target="_blank" href="#home" class="ui-btn ui-icon-home ui-btn-icon-left">Home</a>

    <h1>Add Reminder</h1>

  </div>
  <div data-role="main" class="ui-content">

    <p>

        Enter title and message for the reminder:

        <input type="text" id="title" placeholder="Title" />

        <input type="text" id="message" placeholder="Message" />

        Enter date and time to trigger reminder:

        <input type="date" id="date" />

        <input type="time" id="time" />

        <a target="_blank" href="javascript:add_reminder()" style="text-decoration: none"><button>Add</button></a>

    </p>

  </div>

</div>
When user clicks on the Add button the add_reminder() function is called. Here’s the implementation of this function, add this code to the script tag of index.html file:
function add_reminder()

{

    var date = document.getElementById("date").value;

    var time = document.getElementById("time").value;

    var title = document.getElementById("title").value;

    var message = document.getElementById("message").value;
    if(date == "" || time == "" || title == "" || message == "")

    {

      navigator.notification.alert("Please enter all details");

      return;

    }
    var schedule_time = new Date((date + " " + time).replace(/-/g, "/")).getTime();

    schedule_time = new Date(schedule_time);
    var id = info.data.length;
    cordova.plugins.notification.local.hasPermission(function(granted){

      if(granted == true)

      {

        schedule(id, title, message, schedule_time);

      }

      else

      {

        cordova.plugins.notification.local.registerPermission(function(granted) {

            if(granted == true)

            {

              schedule(id, title, message, schedule_time);

            }

            else

            {

              navigator.notification.alert("Reminder cannot be added because app doesn't have permission");

            }

        });

      }

    });

}
First we are retrieving the field values and checking their integrity. Then formatting the date and time to get a proper formatted string to use in the Date constructor.
Then the app checks if it has the correct permissions. If not then it requests permission and invokes the schedule function which schedules a reminder.
Here is the implementation of the schedule function:
function schedule(id, title, message, schedule_time)

{

    cordova.plugins.notification.local.schedule({

        id: id,

        title: title,

        message: message,

        at: schedule_time

    });
    var array = [id, title, message, schedule_time];

    info.data[info.data.length] = array;

    localStorage.setItem("rp_data", JSON.stringify(info));
    navigator.notification.alert("Reminder added successfully")

}
The schedule function schedules a local notification and stores the reminder details in local storage for future reference.
Here is how the page now looks:
Displaying All Reminders
When a user clicks the All Reminders button on the homepage a new page is displayed with all the reminders added.
Place this code in the body tag of the index.html file:
<div data-role="page" id="all">

  <div data-role="header">

    <a target="_blank" href="#home" class="ui-btn ui-icon-home ui-btn-icon-left">Home</a>

    <h1>All Reminders</h1>

  </div>
  <div data-role="main" class="ui-content">

    <table data-role="table" data-mode="column" id="allTable" class="ui-responsive table-stroke">

      <thead>

        <tr>

          <th>Title</th>

          <th>Time</th>

        </tr>

      </thead>

      <tbody>

      </tbody>

    </table>

  </div>

</div>
Here is the JavaScript code to populate the table with all reminders. Place this code in the script tag:
$(document).on("pagebeforeshow","#all",function(){
    var html = '';
    for(var count = 0; count < info.data.length; count++)

    {

        html = html + "<tr><td>" + info.data[count][1] + "</td><td>" + info.data[count][3] + "</td></tr>";
    }
    $("table#allTable tbody").empty();

    $("table#allTable tbody").append(html).closest("table#allTable").table("refresh").trigger("create");

});
Here is how the page now looks:
Displaying Pending Reminders
When a user clicks on the Pending Reminders button on the homepage a new page is displayed with pending reminders.
Place this code in the body tag of the index.html file to display this page:
<div data-role="page" id="pending">

  <div data-role="header">

    <a target="_blank" href="#home" class="ui-btn ui-icon-home ui-btn-icon-left">Home</a>

    <h1>Pending</h1>

  </div>
  <div data-role="main" class="ui-content">

    <table data-role="table" data-mode="column" id="pendingTable" class="ui-responsive table-stroke">

      <thead>

        <tr>

          <th>Title</th>

          <th>Time</th>

        </tr>

      </thead>

      <tbody>

      </tbody>

    </table>

  </div>

</div>
Here is the JavaScript code to populate the table with pending reminders. Place this code in the script tag:
$(document).on("pagebeforeshow","#pending",function(){
    var html = '';
    for(var count = 0; count < info.data.length; count++)

    {

        var schedule_time = new Date(info.data[count][3]).getTime();

        var current_time = new Date().getTime();
        if(current_time < schedule_time)

        {

          html = html + "<tr><td>" + info.data[count][1] + "</td><td>" + info.data[count][3] + "</td></tr>";

        }

    }
    $("table#pendingTable tbody").empty();

    $("table#pendingTable tbody").append(html).closest("table#pendingTable").table("refresh").trigger("create");

});
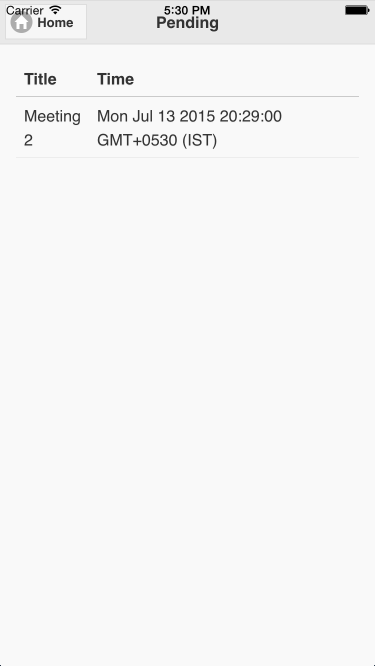
Here is how the page now looks:
Conclusion
The app is functional, but basic and can be deployed to multiple platforms. The next steps to create a full app are letting users change the time of a reminder, or canceling reminders. Let me know your experiences trying this tutorial and ideas for expanding it.
Frequently Asked Questions (FAQs) about Integrating Local Notifications in Cordova Apps
How can I schedule a local notification in Cordova?
Scheduling a local notification in Cordova involves a few steps. First, you need to install the Cordova local notification plugin using the command cordova plugin add cordova-plugin-local-notification. After the plugin is installed, you can schedule a notification using the schedule method. This method accepts an object with various properties like id, title, text, and trigger. The id is a unique identifier for the notification, title and text are the content of the notification, and trigger determines when the notification should be displayed.
Can I cancel a scheduled notification?
Yes, you can cancel a scheduled notification in Cordova. The cancel method of the local notification plugin is used for this purpose. You need to pass the id of the notification you want to cancel to this method. For example, cordova.plugins.notification.local.cancel('your-notification-id').
How can I check if a notification has been scheduled?
You can check if a notification has been scheduled using the isScheduled method. This method accepts the id of the notification and a callback function. The callback function will be called with a boolean value indicating whether the notification is scheduled.
Can I schedule repeating notifications?
Yes, you can schedule repeating notifications in Cordova. The trigger property of the notification object can be used to specify the repeat interval. For example, to schedule a daily notification, you can set trigger: { every: 'day' }.
How can I handle notification clicks?
You can handle notification clicks using the onClick event. You need to add an event listener for this event and define a callback function that will be called when the notification is clicked. In the callback function, you can perform any action you want.
Can I update a scheduled notification?
Yes, you can update a scheduled notification in Cordova. You can use the update method for this purpose. This method accepts an object with the properties you want to update. The id property is required and should match the id of the notification you want to update.
Can I schedule notifications with custom sounds?
Yes, you can schedule notifications with custom sounds in Cordova. The sound property of the notification object can be used to specify the sound file. The sound file should be in the www directory of your Cordova project.
Can I schedule notifications with custom icons?
Yes, you can schedule notifications with custom icons in Cordova. The icon property of the notification object can be used to specify the icon file. The icon file should be in the res directory of your Cordova project.
Can I schedule notifications with actions?
Yes, you can schedule notifications with actions in Cordova. The actions property of the notification object can be used to specify the actions. Each action is an object with id and title properties. The id is a unique identifier for the action, and the title is the text that will be displayed for the action.
Can I schedule notifications with attachments?
Yes, you can schedule notifications with attachments in Cordova. The attachments property of the notification object can be used to specify the attachments. Each attachment is an object with id and uri properties. The id is a unique identifier for the attachment, and the uri is the path to the attachment file.