User Generated Content in WordPress Made Easy

Key Takeaways
- User-generated content on WordPress can be enabled in two ways: by allowing registered users to manage posts on the WordPress dashboard, or by enabling unregistered users to add guest posts through a plugin.
- For registered users, WordPress’ core structure allows multiple users to register using built-in roles. Users can then create, edit, and publish posts and pages based on their user role, such as Contributor, Author, or Editor.
- For unregistered users, plugins like User Submitted Posts can be used. This plugin allows users to submit a post via a form, which gets added as pending posts to be moderated. It also offers options to configure fields shown to users and pre-defined settings for incoming posts.
Posts from New Registered Users
When you first install WordPress, you need to register the Administrator user. However, that is not the only user that can register and access your WordPress site. The core structure of WordPress allows multiple users to register in your using the built-in roles. But, this doesn’t come enabled by default. To turn on the setting to let others register on your site, go to Settings > General and check the ‘Anyone can register’ option. From this moment onwards, a register option will appear on your WordPress login screen, which is shown below.
 Alternatively, if you do not want the general public to register, just a few selected users, you can login as the Admin user and create new users yourself under Users > Add New.
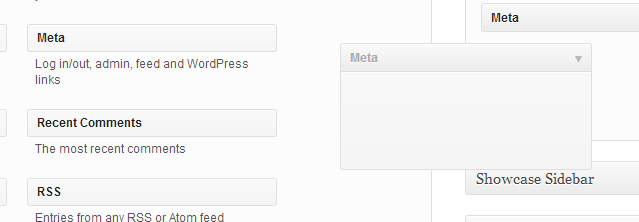
Once you have enabled the registration feature, you can let your readers know by adding a widget to the sidebar. You can do that by creating a Meta widget to your sidebar. Go to Appearance > Widgets and drag the Meta widget to your sidebar, or adding a ‘Login/Register’ link manually to the sidebar to the top of the page.
Alternatively, if you do not want the general public to register, just a few selected users, you can login as the Admin user and create new users yourself under Users > Add New.
Once you have enabled the registration feature, you can let your readers know by adding a widget to the sidebar. You can do that by creating a Meta widget to your sidebar. Go to Appearance > Widgets and drag the Meta widget to your sidebar, or adding a ‘Login/Register’ link manually to the sidebar to the top of the page.
 Once a user registers on your website, or you manually create an account, the user will be able to log into your site. After logging in, they will be able to create, edit and publish posts and pages, depending on their user role.
In short, a Contributor can add and edit posts, but cannot publish them. Authors can add, edit and even publish their own posts. An Editor has all the capabilities of an Author, in addition to the ability to edit and publish posts of others. Here’s a list of user roles
and their capabilities.
Many websites like the popular Sportskeeda use wrappers around the basic WordPress functionality, but the basic idea remains pretty simple. Users are registered as Contributors and can post their articles for moderation, which then go live when approved by an Editor.
Once a user registers on your website, or you manually create an account, the user will be able to log into your site. After logging in, they will be able to create, edit and publish posts and pages, depending on their user role.
In short, a Contributor can add and edit posts, but cannot publish them. Authors can add, edit and even publish their own posts. An Editor has all the capabilities of an Author, in addition to the ability to edit and publish posts of others. Here’s a list of user roles
and their capabilities.
Many websites like the popular Sportskeeda use wrappers around the basic WordPress functionality, but the basic idea remains pretty simple. Users are registered as Contributors and can post their articles for moderation, which then go live when approved by an Editor.
Posts from Unregistered Users – User Submitted Posts
Plugin Overview
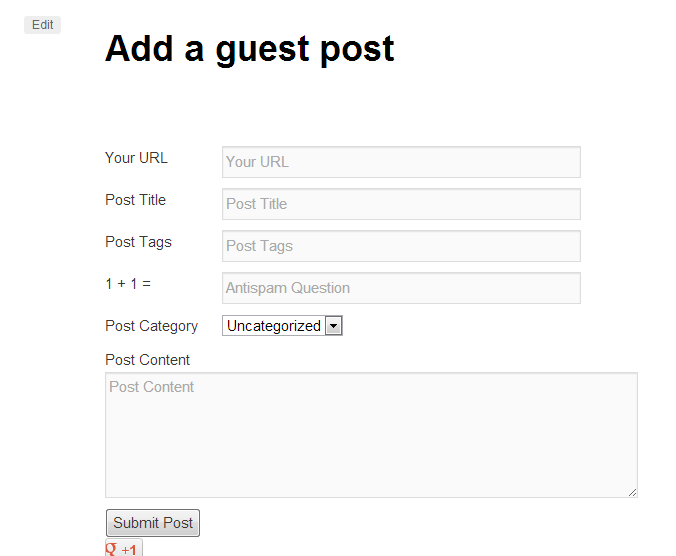
If you want the ability to accept guest posts or other user generated content without new users needing to register with your site, you will have to use a plugin. There are many plugins that enable users to post content to your site to be published after moderation. However, for this purpose, we’re going to use the plugin User Submitted Posts for its simplicity; it allows users to submit a post via a form, which gets added as pending posts to be moderated. After installing and activating the plugin, you can modify its settings. To do so, go to Settings > User Submitted Posts. Once in the settings page, the overview explains how you should use the plugin. Under Options on that page, you can configure which fields you want to show to your users. You can also set pre-defined settings for incoming posts like auto publishing and attaching categories, assigned author, moderation level, email alerts, enabling the rich text editor, redirect URL and success/error messages.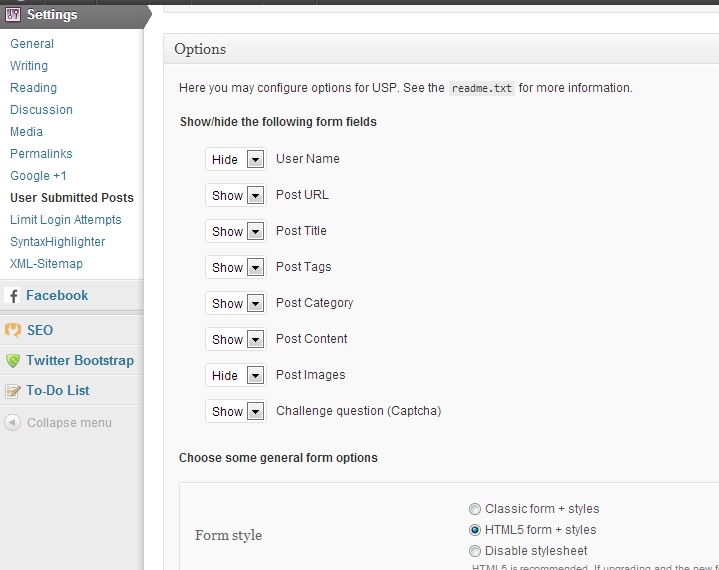
Attaching the Form to a Post or Page
To display the form on any post or page, you are required to use the following shortcode at the appropriate place.[user-submitted-posts]<?php
if (function_exists('user_submitted_posts')) user_submitted_posts();
?>
Moderating User Submitted Posts
Once a user has added a post, you’ll then see it in the pending posts section under Posts > All Posts. You can head over to the post, edit it if you like and publish it as you see fit.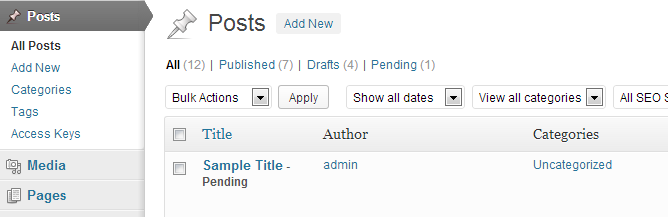 Ideally, you should assign a category and an author to all such incoming posts to make sure they’re not confused with your existing posts.
Announcing the New Feature
One drawback in this plugin is that it doesn’t come with a built-in widget. However, you can add a widget by using the shortcode attached to this plugin. To do so, go to Appearance > Widgets, and add a ‘Text’ widget with the shortcode for the form as the content of the widget and an appropriate title. You’ll be able to view the same form as a widget. This process, however, is not efficient as it loads the form in every single page of your blog, which might affect the loading time of your site, putting more load on your server. Hence, the best way to do this might be to add the form using the shortcode in a separate page and then put the link for the page on the sidebar.Conclusion
Did we help you in engaging with your users by allowing them to submit posts to your website? Are there more efficient ways of doing so? Do let us know in the comments below.Frequently Asked Questions about User-Generated Content in WordPress
What are the benefits of user-generated content in WordPress?
User-generated content (UGC) in WordPress offers several benefits. It can significantly increase engagement on your website as it allows users to contribute and interact directly. This can lead to increased traffic and improved SEO rankings. UGC also provides fresh and diverse content, which can enhance the value of your site and keep visitors coming back. Moreover, it can help build a community around your brand, fostering loyalty and trust among your users.
How can I moderate user-generated content on my WordPress site?
WordPress provides several tools and plugins to help you moderate UGC. For instance, you can use plugins like User Submitted Posts or Frontend Post WordPress Plugin, which offer features like content approval, spam protection, and more. You can also set up comment moderation in WordPress settings to manually approve comments before they appear on your site.
Can user-generated content improve my site’s SEO?
Yes, UGC can significantly improve your site’s SEO. User-generated content can increase your site’s visibility on search engines as it provides fresh and unique content regularly. It also increases the amount of keyword-rich content on your site, which can help improve your site’s ranking.
How can I encourage users to contribute content to my WordPress site?
There are several ways to encourage users to contribute content. You can offer incentives like rewards or recognition, create a user-friendly submission process, and actively engage with your users by responding to their comments and contributions. You can also promote user submissions on your social media channels to encourage more participation.
What are some best practices for managing user-generated content in WordPress?
Some best practices for managing UGC include setting clear guidelines for content submission, regularly moderating and reviewing user submissions to ensure quality and relevance, and providing feedback to users. It’s also important to ensure that your site is secure and that user data is protected.
Can I use user-generated content for marketing purposes?
Yes, UGC can be a powerful marketing tool. User reviews, testimonials, and user-created content can provide social proof and build trust with potential customers. You can also use UGC for user-generated marketing campaigns, where users create content around your brand or products.
How can I protect my WordPress site from spam or inappropriate user-generated content?
WordPress offers several tools and plugins to protect your site from spam or inappropriate content. You can use plugins like Akismet for spam protection, and set up comment moderation to manually approve comments. It’s also important to set clear guidelines for user submissions and regularly monitor user-generated content.
Can user-generated content help me understand my audience better?
Absolutely. UGC can provide valuable insights into your audience’s interests, preferences, and opinions. By analyzing user comments, reviews, and submissions, you can better understand what your audience values and tailor your content and marketing strategies accordingly.
How can I ensure the quality of user-generated content on my WordPress site?
Ensuring the quality of UGC involves setting clear content guidelines, regularly reviewing and moderating user submissions, and providing feedback to users. You can also use plugins that offer content approval features to ensure that only high-quality content is published on your site.
What are some popular WordPress plugins for managing user-generated content?
Some popular WordPress plugins for managing UGC include User Submitted Posts, Frontend Post WordPress Plugin, and WP User Frontend. These plugins offer features like content submission forms, content approval, and more, making it easier to manage user-generated content on your site.
Shaumik is a data analyst by day, and a comic book enthusiast by night (or maybe, he's Batman?) Shaumik has been writing tutorials and creating screencasts for over five years. When not working, he's busy automating mundane daily tasks through meticulously written scripts!

Published in
·Extensions·JavaScript·Laravel·Libraries·Miscellaneous·Performance·Performance & Scaling·PHP·Scaling·September 13, 2017