Extending Post Columns in Your Admin Areas

This tutorial will outline how to extend the WordPress administration screens for your post types by customizing what columns of information are displayed.
We will start by outlining how WordPress displays your post type listings by default and what information is shown to your users. We will then move onto what hooks will be required and how we will manipulate the columns that are show for your post type.
Finally we will pull in additional meta data for our posts and display that information in our columns.
By the end you should be able to extend and modify the administration screens for your post type, allowing you to show additional information and actions for your users.
Key Takeaways
- WordPress administration screens for post types can be extended and customized to display specific columns of information, enhancing functionality and providing additional actions and information to end users.
- WordPress uses two filters to customize the display of information: one determines the columns shown for a post type, and the other populates the column data. The ‘manage_$post_type_posts_columns’ filter is used to determine the columns, and the ‘manage_$post_type_posts_custom_column’ filter is used to populate the columns.
- The ‘manage_$post_type_posts_columns’ filter can add new columns, remove columns, or alter their display position. The ‘manage_$post_type_posts_custom_column’ filter can determine the content displayed in the columns, using the variables $column and $post_id to identify the column and post.
- Customizing the data displayed to users can be especially useful for custom post types, as it allows access to each post’s ID and all of its meta data. This can be used to add additional actions into these columns, such as dynamically updating content or selecting new media.
The WordPress Posts Management Interface
When you create your own post types (or use the default post types such as ‘posts’ and ‘pages’), WordPress will create an administrative area that you can manage your posts from. This area is generally accessed from the backend of your website via the main administration menu.
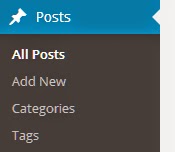
In the image above, we can either select the ‘Posts’ administration menu or its sub-menu ‘All Posts’.
Selecting either one of these options will bring you to the posts administration screen shown below.
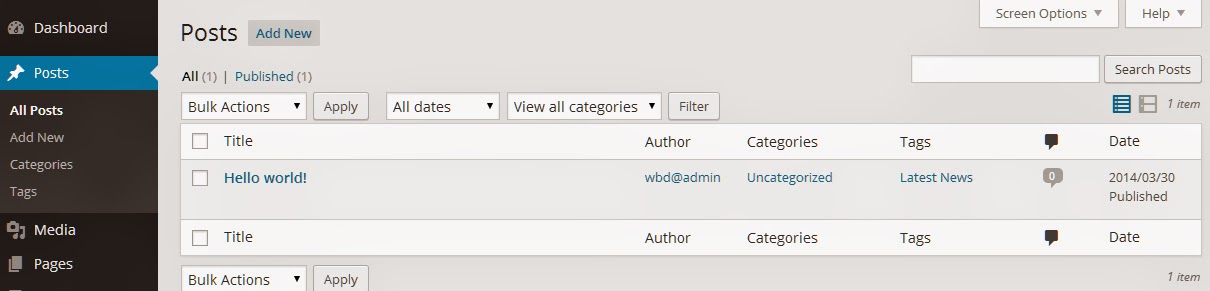
This administration screen will outline all of the posts for your post type. In this example it will display all of your blog posts, but it could easily display your ‘pages’ or any custom post types you have defined.
Extending the Posts Management Interface
Now that you know what the posts management is, we can now work on enhancing this interface to provide additional functionality.
The main reason you will want to extend these interfaces is to provide additional actions and information to your end users.
If you have expanded the default WordPress post types to include additional meta information (or you have defined entirely new post types), often you will want to show this information to the user directly from this management area.
We are going to show you how you can enhance these post management interfaces by customizing and populating post columns.
Customizing and Populating Post Columns
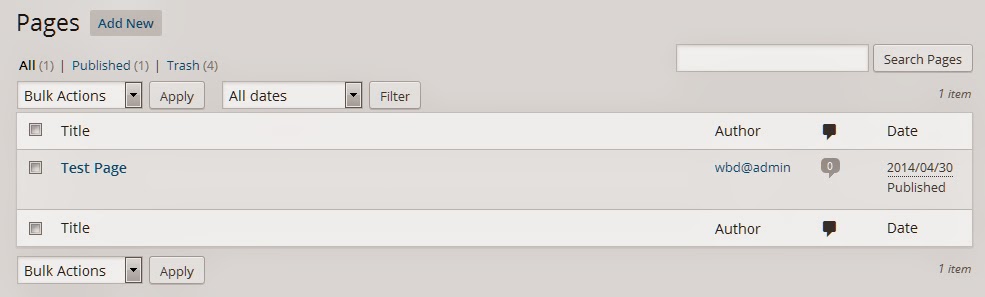
When WordPress displays the administrative area for your post type it will list a series of default columns. For example, when viewing Pages you will typically see the Title, Author, Comments and Date as shown below
To customize the way in information is displayed you will need to use two filters, one to determine the columns that will be shown for your post type and another to populate your column data.
Customizing Post Columns
To customize your content type you will need to use the manage_$post_type_posts_columns filter.
Replace $post_type with the name of your content type and you will be able to determine what columns are shown for that type. For example here are a few ways in which this filter can be called
manage_post_posts_columns- customise
postpost type
- customise
manage_page_posts_columns- customise your
pagepost type
- customise your
manage_services_posts_columns- customise a custom content type called
services(that you have defined before)
- customise a custom content type called
For our example we will be using the manage_page_posts_columns filter to determine what columns are displayed for our page post type.
This filter takes in a single parameters called $columns which is an associative array of column names and its displayed title. This variable is what you will be interacting with.
Now that you have access to the $columns array you can either add new columns to your post type, remove columns or even alter the position in which they are displayed. For our example we will be removing a few columns and adding our new ones.
//manage the columns of the `page` post type
function manage_columns_for_page($columns){
    //remove columns
    unset($columns['date']);
    unset($columns['comments']);
    unset($columns['author']);
    //add new columns
    $columns['page_featured_image'] = 'Page Featured Image';
    $columns['page_template'] = 'Page Template';
    $columns['page_content']    = 'Page Content';
    return $columns;
}
add_action('manage_page_posts_columns','manage_columns_for_page');
This function will first remove the date, comments and author columns using the unset() function (which removes / destroys variables). Secondly, the function will add three new columns called page_featured_image, page_template and page_content.
Populating Post Columns
Now that you have determined what columns will be shown for your post type, you will need to hook into another filter so you can populate your columns.
Themanage_$post_type_posts_custom_column filter will be used for this purpose.
Replace $post_type with the name of your content type and you will be able to determine exactly what content is displayed in your columns. For example here are a few ways in which this filter can be called
manage_post_posts_custom_column- populate the
postpost type columns
- populate the
manage_page_posts_custom_column- populate the
pagepost type columns
- populate the
manage_services_posts_custom_column- populate the columns for a custom content type called
services
- populate the columns for a custom content type called
For our tutorial we will be populating the columns for our page post type so we will be calling the manage_page_posts_custom_column filter.
This filter takes in two parameter, $column and $post_id. With these variables we are able to determine what column is being customized (since it will loop through all columns set in the $columns array) and also what the ID of the post is (so we can use WordPress functions given that we know what post we want to pull data from).
We will call a function, passing in those variables and then look for our newly created columns. When we find the column we are looking for we will collect our data and then output it for display.
//Populate custom columns for `page` post type
function populate_page_columns($column,$post_id){
    //featured image column
    if($column == 'page_featured_image'){
        //if this page has a featured image
        if(has_post_thumbnail($post_id)){
            $page_featured_image = get_the_post_thumbnail($post_id,'thumbnail');
            echo $page_featured_image;
        }else{
            echo 'This page has no featured image';
        }
    }
    //page template column
    if($column == 'page_template'){
        //get the current page template being used for the page
        $page_template_name = get_post_meta( $post_id, '_wp_page_template', true );
        //get a listing of all of the page templates for our site
        $page_templates = get_page_templates();
        if(in_array($page_template_name,$page_templates)){
            //search through each template
            foreach($page_templates as $key <= $value){
                //if the template matches our current template, we found it
                if($page_template_name == $value){
                    echo 'This page is using the ' . $key . ' template';
                }
            }
        }else{
            echo 'This page is using the default template';
        }
    }
    //page content column
    if($column == 'page_content'){
        //get the page based on its post_id
        $page = get_post($post_id);
        if($page){
            //get the main content area
            $page_content = apply_filters('the_content', $page->post_content);
            echo $page_content;
        }
    }
}
add_action('manage_page_posts_custom_column','populate_page_columns',10,2);
For our featured image column we are checking to see if the page has a featured image (post thumbnail) set. We call has_post_thumbnail() and pass in our $post_id variable which returns either true or false depending on if a featured image has been set for this page.
If we do have a featured image we call the get_the_post_thumbnail() function, passing in our $post_id variable and the size we want thumbnail. We will then echo this image item out and it will appear inside our column.
For our page template column we first get the current page template being used by the page by looking at its _wp_page_template meta data. This key holds the filename of what template will be served when displaying the page.
After this we get an array containing all of the websites page templates with the get_page_templates() function. This returns an associative array where the key is the pretty name of the template (defined in your templates with the phrase template name: name_of_the_template) and its value as the actual file-name of the template (for example my_page_template.php)
We check to see if the page template for this page exists in the listing of all page templates. If it doesn’t it means that it is using the default template (meaning it will be displaying page.php).
If the value does exist however we then loop through all of the registered page templates and compare their values to the current meta value of the page. When we have found a template with the same name, we know this template is correct and we display its pretty name (by echoing out a simple statement)
For our page content column we call the get_post() function, passing in our $post_id variable. This function will retrieve the page belonging to this ID. If we found a page we then collect the pages content into a variable by using the apply_filters function. We pass into this filter the value of the_contentand also the page content pulled from the $page variable (post object). Once collected we display it.
As a final note, notice how we are passing 10 and 2 into our add_action function. These specify that this hook will execute on priority 10 and also it will pass in 2 arguments. Feel free to view the documentation for the add_action function on the WordPress Codex
Below is an example of how your page administration screen could given your new columns.
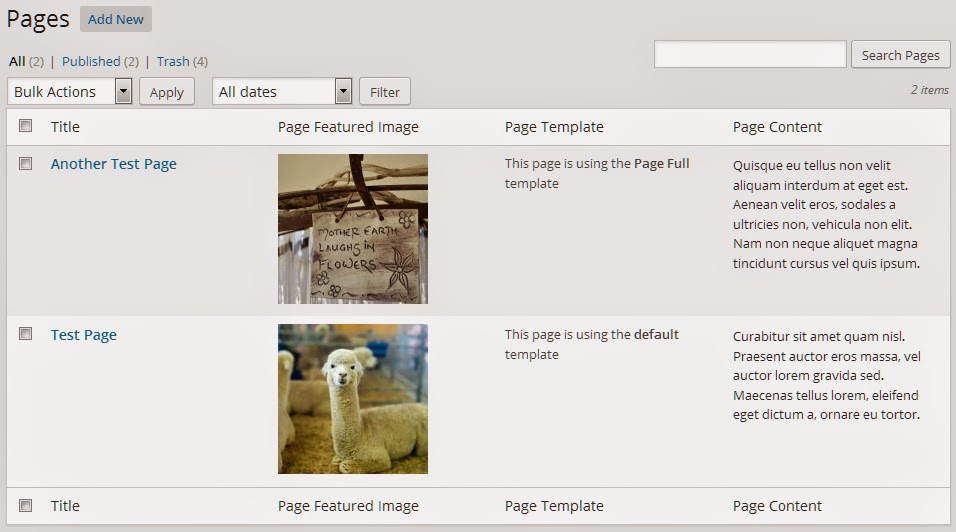
In Conclusion
Now that you know how to extend your pages administration screen with customized columns, you can go through all of your post types and customize the exact data you want shown for your post.
Being able to customize what data you display to your users will be highly useful for custom post types as you can bring in whatever information you need given that you have access to each post’s ID (and thus all of its meta data). You may even want to add additional actions into these columns, such as dynamically updating content or selecting new media, this is all possible with customized columns.
Frequently Asked Questions on Extending Post Columns in Admin Areas
How can I add a new column to the WordPress admin post list?
Adding a new column to the WordPress admin post list involves using the ‘manage_posts_columns’ filter. This filter allows you to modify the columns that are displayed in the post list. You can add a new column by creating a function that modifies the columns array and then hooking this function to the ‘manage_posts_columns’ filter. The key of the array item will be the ID of the new column, and the value will be the displayed title of the column.
How can I display custom content in my new admin column?
To display custom content in your new admin column, you need to hook a function to the ‘manage_posts_custom_column’ action. This function will be triggered for each column in each row of the post list. The function should check the column ID and output the appropriate content for the column.
Can I add a new column to a custom post type list?
Yes, you can add a new column to a custom post type list. The process is similar to adding a column to the post list. You just need to use the ‘manage_{$post_type}posts_columns’ filter and the ‘manage{$post_type}_posts_custom_column’ action, where {$post_type} is the ID of your custom post type.
How can I sort my new admin column?
To make your new admin column sortable, you need to hook a function to the ‘manage_edit-{$post_type}_sortable_columns’ filter. This function should return an array that includes your column ID as a key and the query variable to sort by as a value.
How can I add a new column to the admin user list?
Adding a new column to the admin user list is similar to adding a column to the post list. You just need to use the ‘manage_users_columns’ filter to add the column and the ‘manage_users_custom_column’ action to display the content in the column.
Can I use this method to add columns to other admin lists?
Yes, you can use this method to add columns to other admin lists. The process is similar, you just need to use the appropriate filters and actions for the list you want to modify.
How can I remove a column from the admin post list?
To remove a column from the admin post list, you can use the ‘manage_posts_columns’ filter. Create a function that modifies the columns array to remove the item with the key of the column you want to remove, and then hook this function to the ‘manage_posts_columns’ filter.
Can I change the order of the columns in the admin post list?
Yes, you can change the order of the columns in the admin post list. You can do this by modifying the columns array in your ‘manage_posts_columns’ filter function. The order of the items in the array will be the order of the columns in the post list.
How can I add a column to the admin comment list?
Adding a column to the admin comment list is similar to adding a column to the post list. You just need to use the ‘manage_edit-comments_columns’ filter to add the column and the ‘manage_comments_custom_column’ action to display the content in the column.
Can I add a column to the admin media list?
Yes, you can add a column to the admin media list. The process is similar to adding a column to the post list. You just need to use the ‘manage_media_columns’ filter to add the column and the ‘manage_media_custom_column’ action to display the content in the column.
Full stack developer and overall web enthusiast. I love everything to do with web / design and my passion revolves around creating awesome websites. Focusing primarily on WordPress, I create themes, plugins and bespoke solutions.