

In part one of this series, we learned how to get our Todo application up and running and deploy it to GitHub pages. This worked just fine, but unfortunately the whole app was crammed into a single component. In this article, we’ll examine a more modular component architecture. We’ll look at how to break this single component into a structured tree of smaller components that are easier to understand, re-use and maintain.
This article is part 2 of the SitePoint Angular 2+ Tutorial on how to create a CRUD App with the Angular CLI.
- Part 0 — The Ultimate Angular CLI Reference Guide
- Part 1 — Getting our first version of the Todo application up and running
- Part 2 — Creating separate components to display a list of todos and a single todo
- Part 3 — Update the Todo service to communicate with a REST API
- Part 4 — Use Angular router to resolve data.
- Part 5 — Add authentication to protect private content
- Part 6 — How to Update Angular Projects to the latest version.
You don’t need to have followed part one of this tutorial, for part two to make sense. You can simply grab a copy of our repo, checkout the code from part one, and use that as a starting point. This is explained in more detail below.

Key Takeaways
- Refactoring an Angular application into smaller, reusable components enhances code maintainability and understandability, as demonstrated by breaking down a monolithic AppComponent into distinct components for various functionalities.
- Utilizing Angular CLI simplifies the creation and management of components within the application, streamlining development processes such as component generation and module declaration.
- Implementing smart and dumb components promotes a clear separation of concerns, where smart components manage data and business logic, and dumb components focus on presentation and user interaction, thereby enhancing modularity and reusability.
- Employing custom events and property bindings allows components to communicate effectively, ensuring data flows seamlessly between parent and child components without tightly coupling them.
- Moving the TodoDataService provider from AppComponent to AppModule ensures that services are available application-wide, supporting better scalability and maintainability as the application grows and potentially adopts lazy loading modules.
- The structured approach in component architecture not only aids in making the application easier to test and debug but also prepares the groundwork for future enhancements such as integrating with REST APIs or implementing advanced Angular features.
A Quick Recap
So let’s look at what we covered in part one in slightly more detail. We learned how to:
- initialize our Todo application using the Angular CLI
- create a
Todoclass to represent individual todos - create a
TodoDataServiceservice to create, update and remove todos - use the
AppComponentcomponent to display the user interface - deploy our application to GitHub pages.
The application architecture of part 1 looked like this:
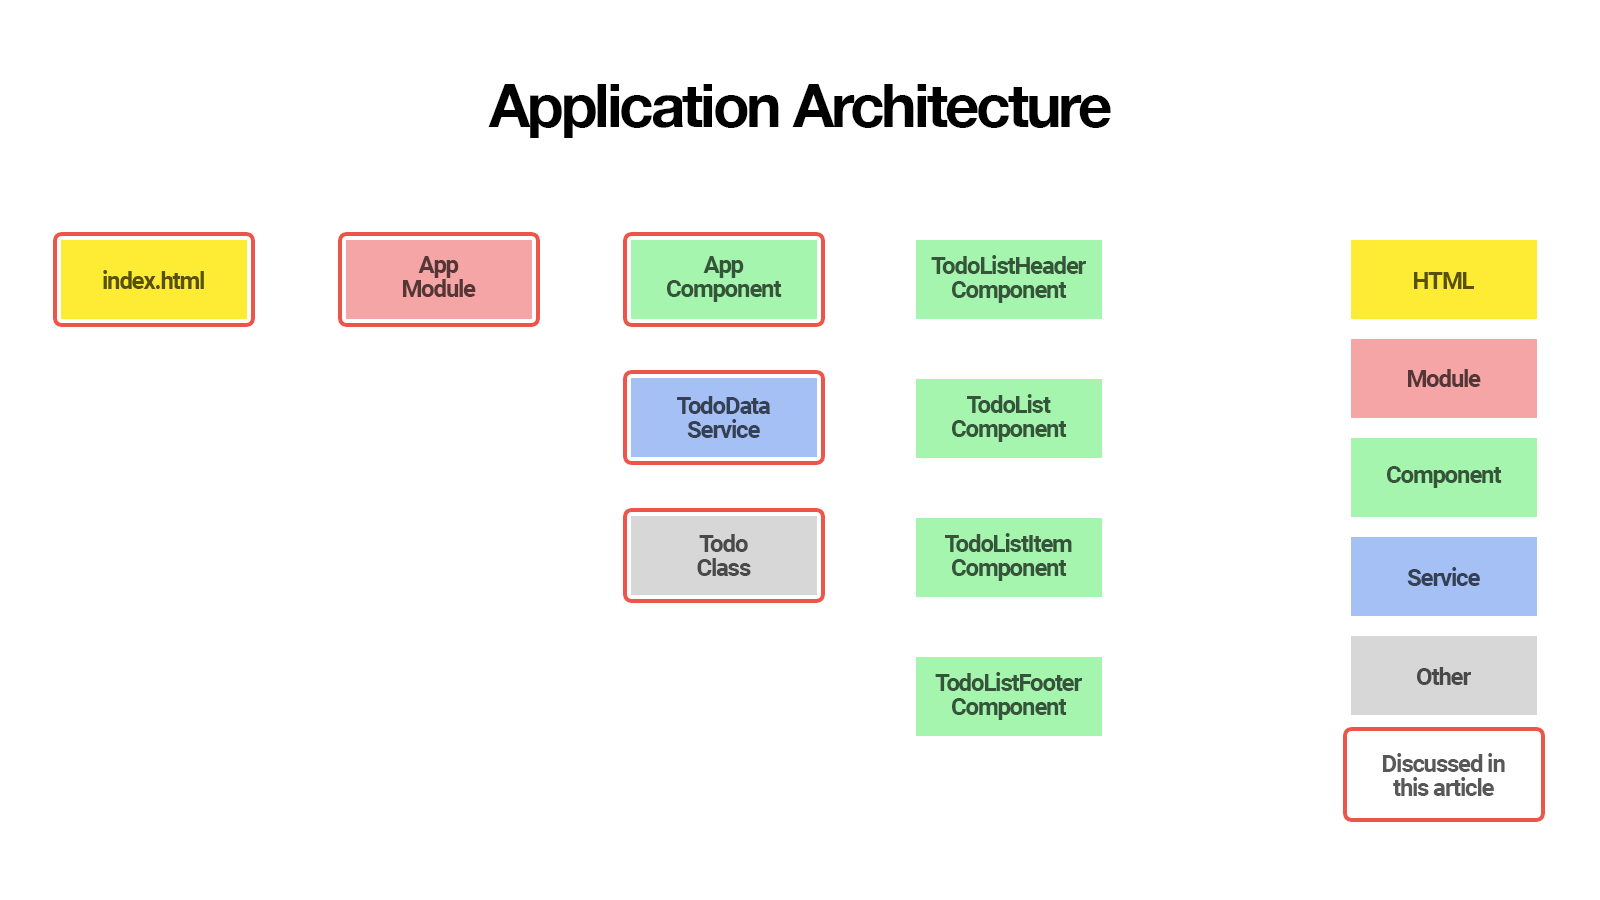
The components we discussed are marked with a red border.
In this second article, we’ll delegate some of the work that AppComponent is doing to smaller components that are easier to understand, re-use and maintain.
We’ll create:
- a
TodoListComponentto display a list of todos - a
TodoListItemComponentto display a single todo - a
TodoListHeaderComponentto create a new todo - a
TodoListFooterComponentto show how many todos are left.
By the end of this article, you’ll understand:
- the basics of Angular component architecture
- how you can pass data into a component using property bindings
- how you can listen for events emitted by a component using event listeners
- why it is a good practice to split components into smaller reusable components
- the difference between smart and dumb components and why keeping components dumb is a good practice.
So let’s get started!
Up and Running
The first thing you’ll need to follow along with this article is the latest version of the Angular CLI. You can install this with the following command:
npm install -g @angular/cli@latest
If you need to remove a previous version of of the Angular CLI, here’s how:
npm uninstall -g @angular/cli angular-cli
npm cache clean
npm install -g @angular/cli@latest
After that you’ll need a copy of the code from part one. This is available at https://github.com/sitepoint-editors/angular-todo-app. Each article in this series has a corresponding tag in the repository so you can switch back and forth between the different states of the application.
The code that we ended with in part one and that we start with in this article is tagged as part-1. The code that we end this article with is tagged as part-2.
You can think of tags like an alias to a specific commit id. You can switch between them using git checkout. You can read more on that here.
So, to get up and running (the the latest version of the Angular CLI installed) we would do:
git clone git@github.com:sitepoint-editors/angular-todo-app.git
cd angular-todo-app
npm install
git checkout part-1
ng serve
Then visit http://localhost:4200/. If all’s well, you should see the working Todo app.
The Original AppComponent
Let’s open src/app/app.component.html and have a look at the AppComponent that we finished with in part one:
<section class="todoapp">
  <header class="header">
    <h1>Todos</h1>
    <input class="new-todo" placeholder="What needs to be done?" autofocus="" [(ngModel)]="newTodo.title" (keyup.enter)="addTodo()">
  </header>
  <section class="main" *ngIf="todos.length > 0">
    <ul class="todo-list">
      <li *ngFor="let todo of todos" [class.completed]="todo.complete">
        <div class="view">
          <input class="toggle" type="checkbox" (click)="toggleTodoComplete(todo)" [checked]="todo.complete">
          <label>{{todo.title}}</label>
          <button class="destroy" (click)="removeTodo(todo)"></button>
        </div>
      </li>
    </ul>
  </section>
  <footer class="footer" *ngIf="todos.length > 0">
    <span class="todo-count"><strong>{{todos.length}}</strong> {{todos.length == 1 ? 'item' : 'items'}} left</span>
  </footer>
</section>
Here’s its corresponding class in src/app/app.component.ts:
import {Component} from '@angular/core';
import {Todo} from './todo';
import {TodoDataService} from './todo-data.service';

@Component({
  selector: 'app-root',
  templateUrl: './app.component.html',
  styleUrls: ['./app.component.css'],
  providers: [TodoDataService]
})
export class AppComponent {

  newTodo: Todo = new Todo();

  constructor(private todoDataService: TodoDataService) {
  }

  addTodo() {
    this.todoDataService.addTodo(this.newTodo);
    this.newTodo = new Todo();
  }

  toggleTodoComplete(todo: Todo) {
    this.todoDataService.toggleTodoComplete(todo);
  }

  removeTodo(todo: Todo) {
    this.todoDataService.deleteTodoById(todo.id);
  }

  get todos() {
    return this.todoDataService.getAllTodos();
  }

}
Although our AppComponent works fine technically, keeping all code in one big component does not scale well and is not recommended.
Adding more features to our Todo application would make the AppComponent larger and more complex, making it harder to understand and maintain.
Therefore, it’s recommended to delegate functionality to smaller components. Ideally the smaller components should be configurable so that we don’t have to rewrite their code when the business logic changes.
For example, in part three of this series we’ll update the TodoDataService to communicate with a REST API, and we want to make sure that we won’t have to change any of the smaller components when we refactor the TodoDataService.
If we look at the AppComponent template, we can extract its underlying structure as:
<!-- header that lets us create new todo -->
<header></header>

<!-- list that displays todos -->
<ul class="todo-list">

    <!-- list item that displays single todo -->
    <li>Todo 1</li>

    <!-- list item that displays single todo -->
    <li>Todo 2</li>
</ul>

<!-- footer that displays statistics -->
<footer></footer>
If we translate this structure to Angular component names, we get:
<!-- TodoListHeaderComponent that lets us create new todo -->
<app-todo-list-header></app-todo-list-header>

<!-- TodoListComponent that displays todos -->
<app-todo-list>

    <!-- TodoListItemComponent that displays single todo -->
    <app-todo-list-item></app-todo-list-item>

    <!-- TodoListItemComponent that displays single todo -->
    <app-todo-list-item></app-todo-list-item>
</app-todo-list>

<!-- TodoListFooterComponent that displays statistics -->
<app-todo-list-footer></app-todo-list-footer>
Let’s see how we can use the power of Angular’s component-driven development to make this happen.
A More Modular Component Architecture — Creating the TodoListHeaderComponent
Let’s start by creating the TodoListHeader component.
From the root of our project, we use Angular CLI to generate the component for us:
$ ng generate component todo-list-header
This generates the following files for us:
create src/app/todo-list-header/todo-list-header.component.css
create src/app/todo-list-header/todo-list-header.component.html
create src/app/todo-list-header/todo-list-header.component.spec.ts
create src/app/todo-list-header/todo-list-header.component.ts
It automatically adds TodoListHeaderComponent to the AppModule declarations:
import { BrowserModule } from '@angular/platform-browser';
import { NgModule } from '@angular/core';
import { FormsModule } from '@angular/forms';
import { HttpModule } from '@angular/http';

import { AppComponent } from './app.component';

// Automatically imported by Angular CLI
import { TodoListHeaderComponent } from './todo-list-header/todo-list-header.component';

@NgModule({
  declarations: [
    AppComponent,

    // Automatically added by Angular CLI
    TodoListHeaderComponent
  ],
  imports: [
    BrowserModule,
    FormsModule,
    HttpModule
  ],
  providers: [],
  bootstrap: [AppComponent]
})
export class AppModule { }
Adding a component to the module declarations is required to make sure that all view templates in the module can use it the component. Angular CLI conveniently added TodoListHeaderComponent for us so we don’t have to add it manually.
If TodoListHeaderComponent was not in the declarations and we used it in a view template, Angular would throw the following error:
Error: Uncaught (in promise): Error: Template parse errors:
'app-todo-list-header' is not a known element:
1. If 'app-todo-list-header' is an Angular component, then verify that it is part of this module.
2. If 'app-todo-list-header' is a Web Component then add "CUSTOM_ELEMENTS_SCHEMA" to the '@NgModule.schemas' of this component to suppress this message.
To learn more about module declarations, make sure to check out the Angular Module FAQ.
Now that we have all files generated for our new TodoListHeaderComponent, we can move the <header> element from src/app/app.component.html to src/app/todo-list-header/todo-list-header.component.html:
<header class="header">
  <h1>Todos</h1>
  <input class="new-todo" placeholder="What needs to be done?" autofocus="" [(ngModel)]="newTodo.title"
         (keyup.enter)="addTodo()">
</header>
Also add the corresponding logic to src/app/todo-list-header/todo-list-header.component.ts:
import { Component, Output, EventEmitter } from '@angular/core';
import { Todo } from '../todo';

@Component({
  selector: 'app-todo-list-header',
  templateUrl: './todo-list-header.component.html',
  styleUrls: ['./todo-list-header.component.css']
})
export class TodoListHeaderComponent {

  newTodo: Todo = new Todo();

  @Output()
  add: EventEmitter<Todo> = new EventEmitter();

  constructor() {
  }

  addTodo() {
    this.add.emit(this.newTodo);
    this.newTodo = new Todo();
  }

}
Instead of injecting the TodoDataService in our new TodoListHeaderComponent to save the new todo, we emit an add event and pass the new todo as an argument.
We already learned that the Angular template syntax allows us to attach a handler to an event. For example, consider the following code:
<input (keyup.enter)="addTodo()">
This tells Angular to run the addTodo() method when the enter key was pressed inside the input. This works because the keyup.enter event is an event that is defined by the Angular framework.
However, we can also let a component emit its own custom events, by creating an EventEmitter and decorating it with the @Output() decorator:
import { Component, Output, EventEmitter } from '@angular/core';
import { Todo } from '../todo';

@Component({
  // ...
})
export class TodoListHeaderComponent {

  // ...

  @Output()
  add: EventEmitter<Todo> = new EventEmitter();

  addTodo() {
    this.add.emit(this.newTodo);
    this.newTodo = new Todo();
  }

}
So we can now assign an event handler in the view template using Angular’s event binding syntax:
<app-todo-list-header (add)="onAddTodo($event)"></app-todo-list-header>
Every time we call add.emit(value) in TodoListHeaderComponent, the onAddTodo($event) handler will be called and $event will be equal to value.
This decouples our TodoListHeaderComponent from the TodoDataService and allows the parent component to decide what needs to happen when a new todo is created.
When we update the TodoDataService to communicate with a REST API in part three, we won’t have to worry about the TodoListHeaderComponent because it’s not even aware that the TodoDataService exists.
Smart vs Dumb Components
You may have already heard of smart and dumb components. Decoupling the TodoListHeaderComponent from the TodoDataService makes the TodoListHeaderComponent a dumb component. A dumb component is not aware of what happens outside itself. It only receives input via property bindings and only emits output data as events.
Using smart and dumb components is a good practice. It greatly improves separation of concerns, making your application easier to understand and maintain. If your database or back-end API changes, you don’t have to worry about your dumb components. It also makes your dumb components more flexible, allowing you to reuse them more easily in different situations. If your application needs the same component twice, where one time it needs to write to a back-end database and another time it needs to write to an in-memory database, a dumb component allows you to accomplish exactly that.
So now that we’ve created our TodoListHeaderComponent, let’s update our AppComponent template to use it:
<section class="todoapp">

  <!-- header is now replaced with app-todo-list-header -->
  <app-todo-list-header (add)="onAddTodo($event)"></app-todo-list-header>

  <section class="main" *ngIf="todos.length > 0">
    <ul class="todo-list">
      <li *ngFor="let todo of todos" [class.completed]="todo.complete">
        <div class="view">
          <input class="toggle" type="checkbox" (click)="toggleTodoComplete(todo)" [checked]="todo.complete">
          <label>{{todo.title}}</label>
          <button class="destroy" (click)="removeTodo(todo)"></button>
        </div>
      </li>
    </ul>
  </section>

  <footer class="footer" *ngIf="todos.length > 0">
    <span class="todo-count"><strong>{{todos.length}}</strong> {{todos.length == 1 ? 'item' : 'items'}} left</span>
  </footer>

</section>
Notice how we use the onAddTodo($event) handler to capture add events that are emitted by the TodoListHeaderComponent when the user enters a new todo title:
<app-todo-list-header (add)="onAddTodo($event)"></app-todo-list-header>
We add the onAddTodo() handler to the AppComponent class and remove the logic we no longer need:
import {Component} from '@angular/core';
import {Todo} from './todo';
import {TodoDataService} from './todo-data.service';

@Component({
  selector: 'app-root',
  templateUrl: './app.component.html',
  styleUrls: ['./app.component.css'],
  providers: [TodoDataService]
})
export class AppComponent {

  // No longer needed, now handled by TodoListHeaderComponent
  // newTodo: Todo = new Todo();

  constructor(private todoDataService: TodoDataService) {
  }

  // No longer needed, now handled by TodoListHeaderComponent
  // addTodo() {
  //   this.todoDataService.addTodo(this.newTodo);
  //   this.newTodo = new Todo();
  // }

  // Add new method to handle event emitted by TodoListHeaderComponent
  onAddTodo(todo: Todo) {
    this.todoDataService.addTodo(todo);
  }

  toggleTodoComplete(todo: Todo) {
    this.todoDataService.toggleTodoComplete(todo);
  }

  removeTodo(todo: Todo) {
    this.todoDataService.deleteTodoById(todo.id);
  }

  get todos() {
    return this.todoDataService.getAllTodos();
  }

}
We now successfully moved the <header> element and all underlying logic from AppComponent to its own TodoListHeaderComponent.
The TodoListHeaderComponent is a dumb component and the AppComponent remains responsible for storing the todo using the TodoDataService.
Next, let’s tackle the TodoListComponent.
Creating the TodoListComponent
Let’s use Angular CLI again to generate our TodoListComponent:
$ ng generate component todo-list
This generates the following files for us:
create src/app/todo-list/todo-list.component.css
create src/app/todo-list/todo-list.component.html
create src/app/todo-list/todo-list.component.spec.ts
create src/app/todo-list/todo-list.component.ts
It also automatically adds TodoListComponent to the AppModule declarations:
// ...
import { TodoListComponent } from './todo-list/todo-list.component';

@NgModule({
  declarations: [
    // ...
    TodoListComponent
  ],
  // ...
})
export class AppModule { }
We now take the todo list-related HTML from src/app/app.component.html:
<section class="main" *ngIf="todos.length > 0">
  <ul class="todo-list">
    <li *ngFor="let todo of todos" [class.completed]="todo.complete">
      <div class="view">
        <input class="toggle" type="checkbox" (click)="toggleTodoComplete(todo)" [checked]="todo.complete">
        <label>{{todo.title}}</label>
        <button class="destroy" (click)="removeTodo(todo)"></button>
      </div>
    </li>
  </ul>
</section>
We also move it to src/app/todo-list/todo-list.component.html:
<section class="main" *ngIf="todos.length > 0">
  <ul class="todo-list">
    <li *ngFor="let todo of todos" [class.completed]="todo.complete">
      <app-todo-list-item
        [todo]="todo"
        (toggleComplete)="onToggleTodoComplete($event)"
        (remove)="onRemoveTodo($event)"></app-todo-list-item>
    </li>
  </ul>
</section>
Notice that we’ve introduced a TodoListItemComponent which doesn’t yet exist. However, adding it to the template already allows us to explore what API the TodoListItemComponent should offer. This makes it easier for us to write the TodoListItemComponent in the next section, because we now know what input and outputs we would expect TodoListItemComponent to have.
We pass in the todo item through the todo property using the [todo] input property syntax and attach event handlers to the events we would expect the TodoListItemComponent to emit, such as the toggleComplete event and the remove event.
Let’s open up src/app/todo-list/todo-list.component.ts and add the logic we need for our view template:
import { Component, EventEmitter, Input, Output } from '@angular/core';
import { Todo } from '../todo';

@Component({
  selector: 'app-todo-list',
  templateUrl: './todo-list.component.html',
  styleUrls: ['./todo-list.component.css']
})
export class TodoListComponent {

  @Input()
  todos: Todo[];

  @Output()
  remove: EventEmitter<Todo> = new EventEmitter();

  @Output()
  toggleComplete: EventEmitter<Todo> = new EventEmitter();

  constructor() {
  }

  onToggleTodoComplete(todo: Todo) {
    this.toggleComplete.emit(todo);
  }

  onRemoveTodo(todo: Todo) {
    this.remove.emit(todo);
  }

}
To further demonstrate the difference between smart and dumb components, we’ll also make the TodoListComponent a dumb component.
First we define an input property todos by marking it with the @Input() decorator. This allows us to inject the todos from the parent component.
Next, we define two output events, remove and toggleComplete, using the @Output() decorator. Notice how we set their type to EventEmitter<Todo> and assign them each a new EventEmitter instance.
The EventEmitter<Todo> type annotation is a TypeScript generic that tells TypeScript that both remove and toggleComplete are EventEmitter instances and that the values they emit are a Todo instance.
Finally, we define the onToggleTodoComplete(todo) and onRemoveTodo(todo) event handlers that we specified in our view using (toggleComplete)="onToggleTodoComplete($event)" and (remove)="onRemoveTodo($event)".
Notice how we use $event as the argument name in the view template and todo as the parameter name in the method definition. To access the payload (emitted value) of an event in an Angular template, we must always use $event as the argument name.
So by specifying (toggleComplete)="onToggleTodoComplete($event)" in our view template, we tell Angular to use the event payload as the first argument when calling the onToggleTodoComplete method, which will match the first parameter of the onToggleTodoComplete method, namely todo.
We know that the payload will be a todo instance, so we define the onToggleTodoComplete method as onToggleTodoComplete(todo: Todo), making our code easier to read, understand and maintain.
Finally, we define our event handlers to also emit a toggleComplete and remove event when they receive an incoming payload and specify the todo as the event payload.
In essence, we let TodoListComponent bubble up the events from its child TodoListItemComponent instances.
This allows us to handle the business logic outside of TodoListComponent, keeping TodoListComponent dumb, flexible and lightweight.
We also need to rename two methods in AppComponent to reflect this:
...
export class AppComponent {

  // rename from toggleTodoComplete
  onToggleTodoComplete(todo: Todo) {
    this.todoDataService.toggleTodoComplete(todo);
  }

  // rename from removeTodo
  onRemoveTodo(todo: Todo) {
    this.todoDataService.deleteTodoById(todo.id);
  }

}
If we try to run our application at this stage, Angular will throw an error:
Unhandled Promise rejection: Template parse errors:
Can't bind to 'todo' since it isn't a known property of 'app-todo-list-item'.
1. If 'app-todo-list-item' is an Angular component and it has 'todo' input, then verify that it is part of this module.
2. If 'app-todo-list-item' is a Web Component then add "CUSTOM_ELEMENTS_SCHEMA" to the '@NgModule.schemas' of this component to suppress this message.
That’s because we haven’t created TodoListItemComponent yet.
So let’s do that next.
Creating the TodoListItemComponent
Again, we use Angular CLI to generate our TodoListItemComponent:
$ ng generate component todo-list-item
This generates the following files:
create src/app/todo-list-item/todo-list-item.component.css
create src/app/todo-list-item/todo-list-item.component.html
create src/app/todo-list-item/todo-list-item.component.spec.ts
create src/app/todo-list-item/todo-list-item.component.ts
It automatically adds TodoListItemComponent to the AppModule declarations:
// ...
import { TodoListItemComponent } from './todo-list-item/todo-list-item.component';

@NgModule({
  declarations: [
    // ...
    TodoListItemComponent
  ],
  // ...
})
export class AppModule { }
We can now move the original markup from inside the <li> to src/app/todo-list-item.component.html:
<div class="view">
  <input class="toggle" type="checkbox" (click)="toggleTodoComplete(todo)" [checked]="todo.complete">
  <label>{{todo.title}}</label>
  <button class="destroy" (click)="removeTodo(todo)"></button>
</div>
We don’t have to change anything to the markup, but we do have to make sure the events are handled properly, so let’s add the necessary code our TodoListItemComponent in src/app/todo-list-item/todo-list-item.component.ts:
import { Component, Input, Output, EventEmitter } from '@angular/core';
import { Todo } from '../todo';

@Component({
  selector: 'app-todo-list-item',
  templateUrl: './todo-list-item.component.html',
  styleUrls: ['./todo-list-item.component.css']
})
export class TodoListItemComponent {

  @Input() todo: Todo;

  @Output()
  remove: EventEmitter<Todo> = new EventEmitter();

  @Output()
  toggleComplete: EventEmitter<Todo> = new EventEmitter();

  constructor() {
  }

  toggleTodoComplete(todo: Todo) {
    this.toggleComplete.emit(todo);
  }

  removeTodo(todo: Todo) {
    this.remove.emit(todo);
  }

}
The logic is very similar to the logic we have in TodoListComponent.
First we define an @Input() so we can pass in a Todo instance:
@Input() todo: Todo;
Then we define the click event handlers for our template and emit a toggleComplete event when the checkbox is clicked and a remove event when the ‘X’ is clicked:
@Output()
remove: EventEmitter<Todo> = new EventEmitter();

@Output()
toggleComplete: EventEmitter<Todo> = new EventEmitter();

toggleTodoComplete(todo: Todo) {
  this.toggleComplete.emit(todo);
}

removeTodo(todo: Todo) {
  this.remove.emit(todo);
}
Notice how we don’t actually update or remove data. We merely emit events from the TodoListItemComponent when a user clicks a link to complete or remove a todo, making our TodoListItemComponent also a dumb component.
Remember how we attached event handlers to these events in the TodoListComponent template:
<section class="main" *ngIf="todos.length > 0">
  <ul class="todo-list">
    <li *ngFor="let todo of todos" [class.completed]="todo.complete">
      <app-todo-list-item
        [todo]="todo"
        (toggleComplete)="onToggleTodoComplete($event)"
        (remove)="onRemoveTodo($event)"></app-todo-list-item>
    </li>
  </ul>
</section>
The TodoListComponent then simply re-emits the events from TodoListItemComponent.
Bubbling up events from TodoListItemComponent through TodoListComponent allows us to keep both components dumb and ensures that we don’t have to update them when we refactor the TodoDataService to communicate with a REST API in part three of this series.
How cool is that!
Before we move on, let’s update our AppComponent template to use our new TodoListComponent:
<section class="todoapp">

  <app-todo-list-header (add)="onAddTodo($event)"></app-todo-list-header>

  <!-- section is now replaced with app-todo-list -->
  <app-todo-list [todos]="todos" (toggleComplete)="onToggleTodoComplete($event)"
                 (remove)="onRemoveTodo($event)"></app-todo-list>

  <footer class="footer" *ngIf="todos.length > 0">
    <span class="todo-count"><strong>{{todos.length}}</strong> {{todos.length == 1 ? 'item' : 'items'}} left</span>
  </footer>

</section>
Finally, let’s tackle the TodoListFooterComponent.
Creating the TodoListFooterComponent
Again, from the root of our project, we use Angular CLI to generate TodoListFooterComponent for us:
$ ng generate component todo-list-footer
This generates the following files:
create src/app/todo-list-footer/todo-list-footer.component.css
create src/app/todo-list-footer/todo-list-footer.component.html
create src/app/todo-list-footer/todo-list-footer.component.spec.ts
create src/app/todo-list-footer/todo-list-footer.component.ts
It automatically adds TodoListFooterComponent to the AppModule declarations:
// ...
import { TodoListFooterComponent } from './todo-list-footer/todo-list-footer.component';

@NgModule({
  declarations: [
    // ...
    TodoListFooterComponent
  ],
  // ...
})
export class AppModule { }
Now we move the <footer> element from src/app/app.component.html to src/app/todo-list-footer/todo-list-footer.component.html:
<footer class="footer" *ngIf="todos.length > 0">
  <span class="todo-count"><strong>{{todos.length}}</strong> {{todos.length == 1 ? 'item' : 'items'}} left</span>
</footer>
We also add the corresponding logic to src/app/todo-list-footer/todo-list-footer.component.ts:
import { Component, Input } from '@angular/core';
import { Todo } from '../todo';

@Component({
  selector: 'app-todo-list-footer',
  templateUrl: './todo-list-footer.component.html',
  styleUrls: ['./todo-list-footer.component.css']
})
export class TodoListFooterComponent {

  @Input()
  todos: Todo[];

  constructor() {
  }

}
The TodoListFooterComponent does not require any methods. We only define the todos property using the @Input() decorator so we can pass in the todos using the todos property.
Finally, let’s update our AppComponent template to also use our new TodoListFooterComponent:
<section class="todoapp">
  <app-todo-list-header (add)="onAddTodo($event)"></app-todo-list-header>
  <app-todo-list [todos]="todos" (toggleComplete)="onToggleTodoComplete($event)"
                 (remove)="onRemoveTodo($event)"></app-todo-list>
  <app-todo-list-footer [todos]="todos"></app-todo-list-footer>
</section>
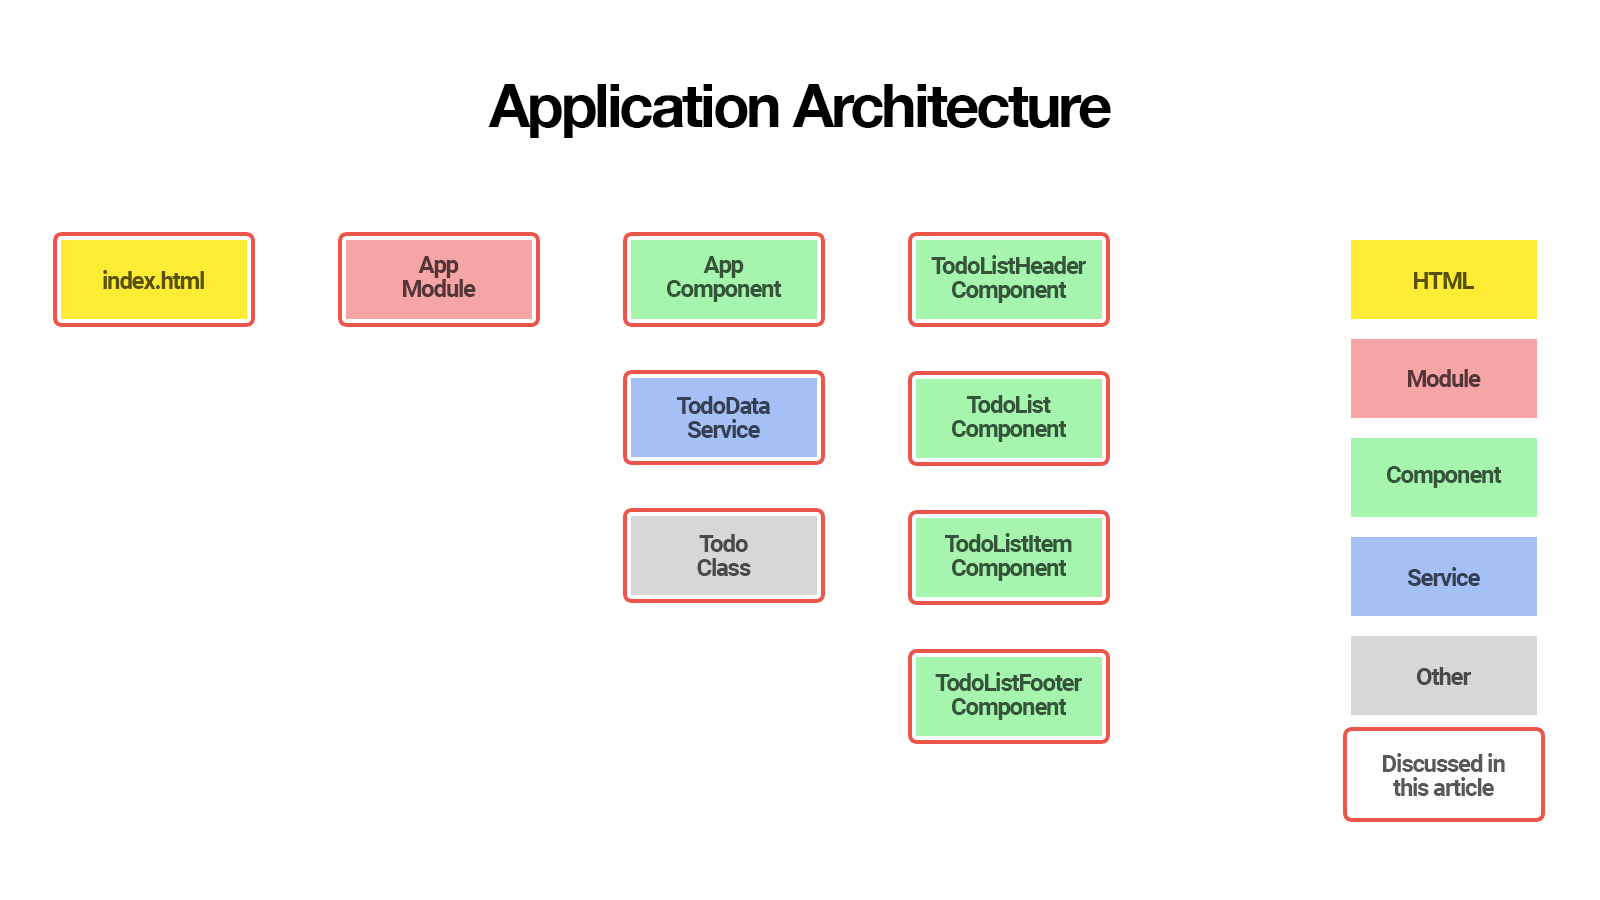
We have now successfully refactored our AppComponent to delegate its functionality to TodoListHeaderComponent, TodoListComponent and TodoListFooterComponent.
Before we wrap up this article, there is one more change we need to make.
Moving the TodoDataService Provider
In part 1, we registered the TodoDataService as a provider in AppComponent:
import {Component} from '@angular/core';
import {Todo} from './todo';
import {TodoDataService} from './todo-data.service';

@Component({
  selector: 'app-root',
  templateUrl: './app.component.html',
  styleUrls: ['./app.component.css'],
  providers: [TodoDataService]
})
export class AppComponent {

  newTodo: Todo = new Todo();

  constructor(private todoDataService: TodoDataService) {
  }

  addTodo() {
    this.todoDataService.addTodo(this.newTodo);
    this.newTodo = new Todo();
  }

  toggleTodoComplete(todo: Todo) {
    this.todoDataService.toggleTodoComplete(todo);
  }

  removeTodo(todo: Todo) {
    this.todoDataService.deleteTodoById(todo.id);
  }

  get todos() {
    return this.todoDataService.getAllTodos();
  }

}
Although this works fine for our Todo application, the Angular team recommends adding application-wide providers to the root AppModule, instead of the root AppComponent.
Services registered in AppComponent are only available to AppComponent and its component tree. Services registered in AppModule are available to all components in the entire application.
If our Todo application would grow and introduce lazy loaded modules at some point, the lazy loaded modules would not be able to access the TodoDataService, because TodoDataService would only be available to AppComponent and its component tree and not within the entire application.
Therefore we remove TodoDataService as a provider in the AppComponent:
import {Component} from '@angular/core';
import {Todo} from './todo';
import {TodoDataService} from './todo-data.service';

@Component({
  selector: 'app-root',
  templateUrl: './app.component.html',
  styleUrls: ['./app.component.css'],
  providers: []
})
export class AppComponent {

  newTodo: Todo = new Todo();

  constructor(private todoDataService: TodoDataService) {
  }

  addTodo() {
    this.todoDataService.addTodo(this.newTodo);
    this.newTodo = new Todo();
  }

  toggleTodoComplete(todo: Todo) {
    this.todoDataService.toggleTodoComplete(todo);
  }

  removeTodo(todo: Todo) {
    this.todoDataService.deleteTodoById(todo.id);
  }

  get todos() {
    return this.todoDataService.getAllTodos();
  }

}
Next, add it as a provider in the AppModule instead:
import { BrowserModule } from '@angular/platform-browser';
import { NgModule } from '@angular/core';
import { FormsModule } from '@angular/forms';
import { HttpModule } from '@angular/http';

import { AppComponent } from './app.component';
import { TodoDataService } from './todo-data.service';
import { TodoListComponent } from './todo-list/todo-list.component';
import { TodoListFooterComponent } from './todo-list-footer/todo-list-footer.component';
import { TodoListHeaderComponent } from './todo-list-header/todo-list-header.component';
import { TodoListItemComponent } from './todo-list-item/todo-list-item.component';

@NgModule({
  declarations: [
    AppComponent,
    TodoListComponent,
    TodoListFooterComponent,
    TodoListHeaderComponent,
    TodoListItemComponent
  ],
  imports: [
    BrowserModule,
    FormsModule,
    HttpModule
  ],
  providers: [TodoDataService],
  bootstrap: [AppComponent]
})
export class AppModule { }
This concludes part two of this series.
Summary
In the first article, we learned how to:
- initialize our Todo application using Angular CLI
- create a
Todoclass to represent individual todos - create a
TodoDataServiceservice to create, update and remove todos - use the
AppComponentcomponent to display the user interface - deploy our application to GitHub pages.
In this second article, we refactored AppComponent to delegate most of its work to:
- a
TodoListComponentto display a list of todos - a
TodoListItemComponentto display a single todo - a
TodoListHeaderComponentto create a new todo - a
TodoListFooterComponentto show how many todos are left.
In the process, we learned:
- the basics of Angular component architecture
- how to pass data into a component using property bindings
- how to listen for events emitted by a component using event listeners
- how splitting components into smaller reusable components makes our code easier to reuse and maintain
- how we can use smart and dumb to make our life a whole lot easier when we need to refactor our application’s business logic.
All code from this article is available at https://github.com/sitepoint-editors/angular-todo-app.
In the next part, we’ll refactor the TodoService to communicate with a REST API.
So stay tuned for part three!
This article was peer reviewed by Vildan Softic. Thanks to all of SitePoint’s peer reviewers for making SitePoint content the best it can be!
For expert-led online Angular training courses you can’t go past Ultimate Angular by Todd Motto. Try his courses here, and use the code SITEPOINT_SPECIAL to get 50% off and to help support SitePoint.
Frequently Asked Questions on Understanding Component Architecture in Angular
What is the significance of component architecture in Angular?
Component architecture is a fundamental aspect of Angular that helps in organizing and managing code. It allows developers to break down complex applications into smaller, manageable, and reusable pieces known as components. Each component has a specific role and can function independently, which makes debugging and testing easier. This modular approach also enhances the readability of the code, making it easier for other developers to understand and contribute to the project.
How does data binding work in Angular’s component architecture?
Data binding in Angular’s component architecture is a technique that allows an interaction between the component and the DOM. There are four forms of data binding which include: Interpolation, Property Binding, Event Binding, and Two-Way Binding. These forms of data binding allow for a seamless flow of data between the component and the view, making it possible to automate the process of updating the view whenever the model changes, and vice versa.
What is the role of decorators in Angular’s component architecture?
Decorators in Angular are special functions that modify JavaScript classes. They play a crucial role in the component architecture as they provide metadata about the component. The @Component decorator, for instance, allows you to mark a class as an Angular component and provide additional metadata that determines how the component should be processed, instantiated, and used at runtime.
How does dependency injection work in Angular’s component architecture?
Dependency Injection (DI) is a design pattern in which a class receives its dependencies from external sources rather than creating them itself. In Angular’s component architecture, DI is used to provide required dependencies to components. This makes components more modular, easier to reuse, and test.
What is the significance of Angular Modules?
Angular Modules, or NgModules, are fundamental building blocks in Angular. They provide a compilation context for components and help in organizing an application into cohesive blocks of functionality. NgModules collect related code into functional sets, which can be combined with other sets to create an application.
How does Angular handle component communication?
Angular provides several methods for component communication. Components can communicate with each other through Input and Output properties, via a service, or through parent-child relationships. The choice of method depends on the specific needs of your application and the relationship between the components.
What is the role of lifecycle hooks in Angular’s component architecture?
Lifecycle hooks are special methods provided by Angular that allow developers to tap into specific moments in the application lifecycle. They can be used to perform tasks like initializing data in a component, cleaning up before a component is destroyed, or reacting to changes in component’s input properties.
How does Angular’s component architecture support reusability?
Angular’s component architecture promotes reusability through its modular design. Components are independent and encapsulated, meaning they can be reused across different parts of an application. This not only reduces the amount of code needed but also improves the maintainability and scalability of the application.
How does Angular’s component architecture enhance testing?
The modular nature of Angular’s component architecture makes it easier to write unit tests. Each component can be tested independently, which simplifies the testing process and ensures that each part of the application functions as expected.
How does Angular’s component architecture support dynamic loading?
Angular’s component architecture supports dynamic loading through its advanced routing capabilities. With Angular, you can load components on demand, which can significantly improve the performance of your application, especially for large applications with many components.