Laravel Doctrine is a drop-in implementation of the famous ORM for the Laravel 5.X Framework, and a really interesting alternative to the default choice, Eloquent. In this article, we will learn how to use it, and when.

Why Doctrine, and not Eloquent?
Those of us who have used Laravel at least once, have probably used Eloquent. We all love its fluent and easy syntax, and we all know snippets like the following:
$user = new App\User;
$user->name = 'Francesco';
$user->email = 'francesco@foo.bar';
$user->save();
What we’re using here is the so called “Active Record” pattern. A frequently used architectural pattern, named by Martin Fowler in his ultra-famous book “Patterns of Enterprise Application Architecture”. To simplify and explain things, this pattern assumes that a single row in the database is treated like an object in our software. However, with time, this pattern encountered many criticisms:
Active Record is about a strong coupling between database operations and the classes in our software. For many little projects this approach is more than fine, but what if our software grows in complexity? We could stumble upon the need for more classes, not always related to a specific table in our database. There, Active Record doesn’t help us achieve a good level of abstraction from the data source.
the other main criticism is a direct consequence of the first: testability. If the model is tightly coupled to the database, building a test without it can be more difficult. It has to be said that a part of this problem can be reduced (not solved) with mocking and a good use of dependency injection.
Now, in the same book we mentioned before, Martin Fowler explained another architectural pattern: the Data Mapper. The Data Mapper consists of the presence of an intermediate layer which, working in both directions, provides access to the data source on one hand, and a good abstraction from it on the other. This means that objects in the software are not closely related to the data source, with great improvement in terms of responsibility isolation. The result? The developer can now focus on building an object that is nearer to the real world situation, and not to the database system chosen for the job.
Eloquent is an implementation of the Active Record pattern, and Doctrine is an implementation of Data Mapper. Let’s see how we can install Doctrine for Laravel, and how to configure and use it.
Installing Doctrine for Laravel
As usual, we will use Homestead Improved as a standard development environment for our tests.
Let’s create a new Laravel project.
composer create-project laravel/laravel Project
Then, we enter our project’s folder and add Laravel Doctrine as a dependency with Composer.
composer require "laravel-doctrine/orm:1.1.*"
We also need to add the following class to our service providers list, in the config/app.php file:
LaravelDoctrine\ORM\DoctrineServiceProvider::class,
Also, we can register the three facades for the EntityManager, Registry and Doctrine in the same file:
'EntityManager' => LaravelDoctrine\ORM\Facades\EntityManager::class,
'Registry'      => LaravelDoctrine\ORM\Facades\Registry::class,
'Doctrine'      => LaravelDoctrine\ORM\Facades\Doctrine::class,
Finally, we can publish the dedicated config file:
artisan vendor:publish --tag="config"
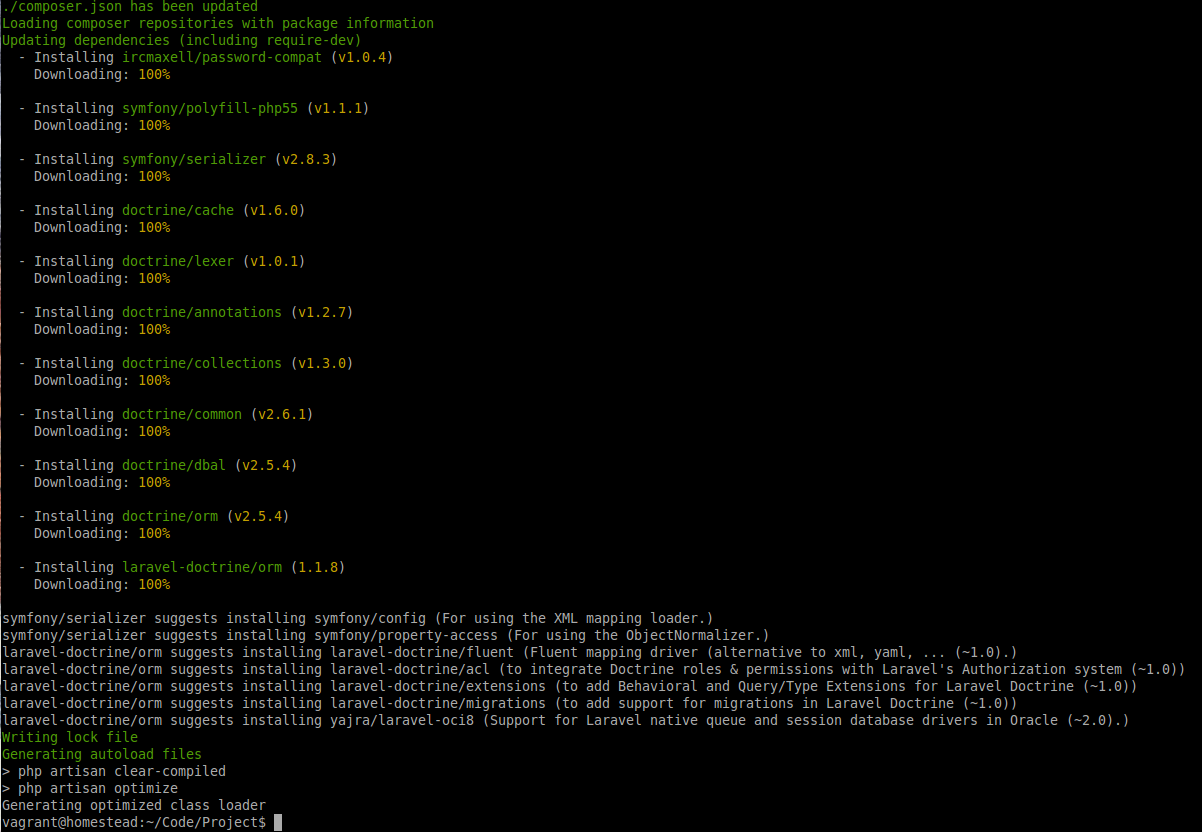
We are done! Laravel Doctrine is completely installed and configured.
The Example Application – ToDo List!
In order to learn something more about Doctrine for Laravel, we are going to replicate an existing application example that uses Eloquent. What about the Intermediate Task List on Laravel’s official site?
We will create a very basic multi-user task list. In this application, our user will be able to:
- log into their own area.
- list existing tasks.
- add a new task to the list.
- mark a task as done / not done.
- update an existing task in the list.
- delete an existing task from the list.
Obviously, every user will be able to see only their own tasks.
Let’s change the application’s namespace to TodoList first.
artisan app:name TodoList
Ok, now we can start from the very basics of Doctrine. In Eloquent, we used models. How do we start now?
Entities!
In Doctrine we use Entities to represent our application objects. Unlike with Eloquent where the model extends a base Model class, a Doctrine entity is a plain PHP class that does not extend anything.
Here’s a first stub of the Task entity:
<?php

namespace TodoList\Entities;

class Task
{
    private $id;
    private $name;
    private $description;
    private $isDone = false;

    public function __construct($name, $description)
    {
        $this->name = $name;
        $this->description = $description;
    }

    public function getId()
    {
        return $this->id;
    }

    public function getName()
    {
        return $this->name;
    }

    public function getDescription()
    {
        return $this->description;
    }

    public function setName($name)
    {
        $this->name = $name;
    }

    public function setDescription($description)
    {
        $this->description = $description;
    }

    public function isDone()
    {
        return $this->isDone;
    }

    public function toggleStatus()
    {
        if(!$this->isDone) {
            $this->isDone = true;
        } else {
            $this->isDone = false;
        }
    }
}
Not bad as a beginning. Yes, it’s a little more “verbose” than an Eloquent model. However, there is a specific reason for that. First of all, if we think about it, this is a plain PHP class. It says nothing about its implementation, has no extra responsibilities. Everything it does is strictly related to the task itself. That’s a good thing, because this approach is more “compatible” with the Single Responsibility Principle.
But…
Where is the Database?
In Eloquent, models are just an interface to the database. With some “magic”, sometimes without even writing a single line of code in the model, we can just start working with them. The only thing we have to do is design our database accordingly. With Doctrine, the key concept is a little bit different.
Here, we start designing our application from our classes which represent the “real world” problem we want to solve. Then, we bind our classes to tables, and properties to columns.
In Doctrine, we can do this in several ways. For this guide, we will use the “annotation” approach:
<?php

namespace TodoList\Entities;

use Doctrine\ORM\Mapping as ORM;

/**
 * @ORM\Entity
 * @ORM\Table(name="tasks")
 */
class Task
{
    /**
     * @ORM\Id
     * @ORM\GeneratedValue
     * @ORM\Column(type="integer")
     */
    private $id;

    /**
     * @ORM\Column(type="string")
     */
    private $name;

    /**
     * @ORM\Column(type="string")
     */
    private $description;

    /**
     * @ORM\Column(type="boolean")
     */
    private $isDone = false;
With these annotations (which we can find in the Doctrine\ORM\Mapping class), we bound the class and its properties to a specific structure in the database. In this case, to a tasks table that has an id, name and description field.
The only remaining thing to do now, is to build the database starting from this structure. Doctrine can do this for us:
artisan doctrine:schema:create
#  Creating database schema for default entity manager...
#  Database schema created successfully!
Let’s check what happened in the database with a tool of our choice (or from the CLI).
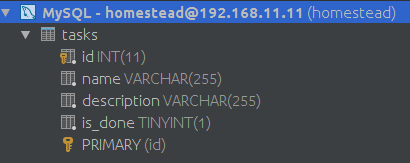
We got it!
Here’s what happened:
- with annotations, we added some meta data in our class, without really modifying it in a significant way. Annotations are comments, after all.
- by executing the artisan
doctrine:schema:createcommand, Doctrine automatically scans entities for ORM annotations. When found, it creates and modifies the database schema accordingly;
Sounds great, right? Now we can start working with it. Let’s do some tests before diving deeper.
The Entity Manager
Now that we have a database for our application, we should start figuring out how to insert new tasks and read them. For this purpose, at a basic level, we can use the EntityManager class.
Let’s add a new route to our routes file:
Route::get('test-add', function () {
    $task = new \TodoList\Entities\Task('Make test app', 'Create the test application for the Sitepoint article.');

    \EntityManager::persist($task);
    \EntityManager::flush();

    return 'added!';
});
… and execute it by browsing to the test-add URL. Once done, we verify the data.
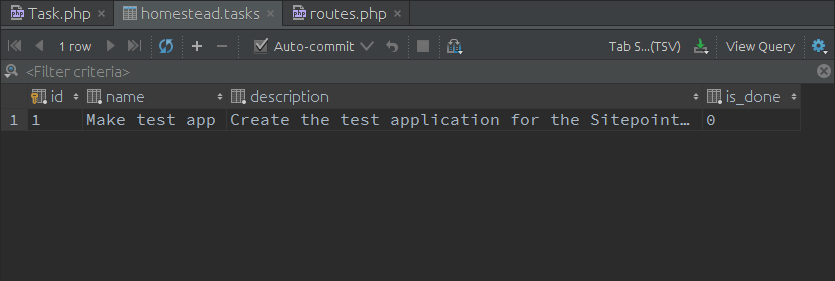
It worked!
The EntityManager is a special class which takes instances of entities and “translates” them into database records. As we can clearly see, the persistence responsibility is not related to the model/entity any more. But why two separate methods? What about the good old save? Well, things are a little different.
- the
persistmethod is used to give a specific instruction to theEntityManagerclass. It says “hey EntityManager, when I give you the signal, persist the entity”. - the
flushmethod is used to execute the instruction we previously gave theEntityManager– the signal it needed.
This is more flexible because we can also choose to make many modifications to many entities, and then finally call a single flush method for a specific “snapshot”. Of course, we can also use the Laravel Service Container to use the EntityManager:
Route::get('test-add', function (\Doctrine\ORM\EntityManagerInterface $em) {
    $task = new \TodoList\Entities\Task('Make test app', 'Create the test application for the Sitepoint article.');

    $em->persist($task);
    $em->flush();

    return 'added!';
});
The EntityManager is not just about adding entities. We can easily use it to find instances of existing ones. Let’s try to find the one we just added, in another find-test route.
Route::get('test-find', function (\Doctrine\ORM\EntityManagerInterface $em) {
    /* @var \TodoList\Entities\Task $task */
    $task = $em->find(TodoList\Entities\Task::class, 1);

    return $task->getName() . ' - ' . $task->getDescription();
});
If we check the URL, sure enough, that’s our previously inserted item!
The Application
Ok, time to move on from the basics and start having some fun with our intended real project.
We are going to start with the Tasks area. We will learn how to add, edit, remove and list them. Then, we will “protect” our items by introducing a user system in which every user will only see their own tasks.
The Tasks Area
Let’s start by creating a dedicated controller for Tasks.
artisan make:controller TaskController
We can leave it empty for now. In the resources/views folder, let’s create a very basic master layout that every view will use. We will call it master.blade.php.
<!doctype html>
<html lang="en">
<head>
<meta charset="UTF-8">
<title>@yield('title') :: ToDo List!</title>
<link rel="stylesheet" href="https://maxcdn.bootstrapcdn.com/bootstrap/3.3.6/css/bootstrap.min.css" integrity="sha384-1q8mTJOASx8j1Au+a5WDVnPi2lkFfwwEAa8hDDdjZlpLegxhjVME1fgjWPGmkzs7" crossorigin="anonymous">
<link rel="stylesheet" href="https://maxcdn.bootstrapcdn.com/bootstrap/3.3.6/css/bootstrap-theme.min.css" integrity="sha384-fLW2N01lMqjakBkx3l/M9EahuwpSfeNvV63J5ezn3uZzapT0u7EYsXMjQV+0En5r" crossorigin="anonymous">
</head>
<body>
<div class="container">
<h1>ToDo List!</h1>
<hr>
@if(session('success_message'))
<div class="alert alert-success alert-dismissible" role="alert">
<button type="button" class="close" data-dismiss="alert" aria-label="Close"><span aria-hidden="true">×</span></button>
{{ session('success_message') }}
</div>
@endif
@yield('content')
</div>
<script src="https://ajax.googleapis.com/ajax/libs/jquery/1.11.3/jquery.min.js"></script>
<script src="https://maxcdn.bootstrapcdn.com/bootstrap/3.3.6/js/bootstrap.min.js" integrity="sha384-0mSbJDEHialfmuBBQP6A4Qrprq5OVfW37PRR3j5ELqxss1yVqOtnepnHVP9aJ7xS" crossorigin="anonymous"></script>
</body>
</html>
The next step is creating the form. Let’s create a new file named add.blade.php.
@extends('master')

@section('title') Add a Task @endsection

@section('content')
    <div class="row">
        <div class="col-md-12">
            <h3>Add Task</h3>
            <p>Use the following form to add a new task to the system.</p>

            <hr>

            <form action="{{ url('add') }}" method="post">
                {{ csrf_field() }}

                <p><input autofocus type="text" placeholder="Name..." name="name" class="form-control" /></p>
                <p><input type="text" placeholder="Description..." name="description" class="form-control" /></p>

                <hr>

                <p><button class="form-control btn btn-success">Add Task</button></p>
            </form>
        </div>
    </div>
@endsection
Finally, the controller:
<?php

namespace TodoList\Http\Controllers;

use TodoList\Entities\Task;
use Illuminate\Http\Request;
use Doctrine\ORM\EntityManagerInterface;

class TaskController extends Controller
{
    public function getAdd()
    {
        return view('add');
    }

    public function postAdd(Request $request, EntityManagerInterface $em)
    {
        $task = new Task(
            $request->get('name'),
            $request->get('description')
        );

        $em->persist($task);
        $em->flush();

        return redirect('add')->with('success_message', 'Task added successfully!');
    }
}
The postAdd method has the logic we need to add a new item. As seen above, we are creating our entity and then saving it with persist followed by flush.
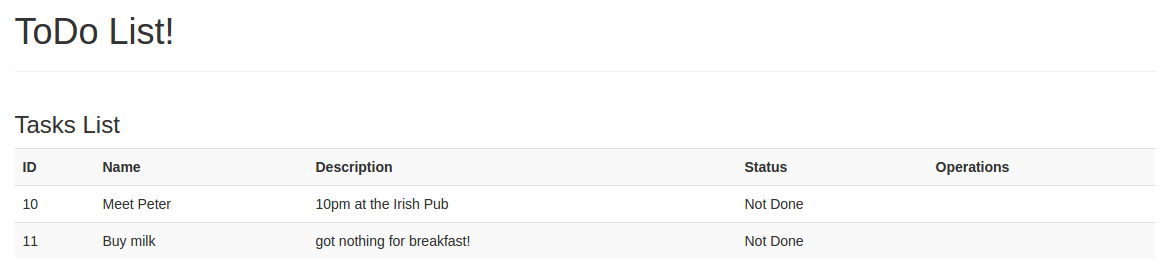
To read them, let’s create a new view, named tasks.blade.php:
@extends('master')

@section('title') Tasks List @endsection

@section('content')
    <div class="row">
        <div class="col-md-12">
            <h3>Tasks List</h3>

            <table class="table table-striped">
                <tr>
                    <th>ID</th>
                    <th>Name</th>
                    <th>Description</th>
                    <th>Status</th>
                    <th>Operations</th>
                </tr>

                @forelse($tasks as $task)
                    <tr>
                        <td>{{ $task->getId() }}</td>
                        <td>{{ $task->getName() }}</td>
                        <td>{{ $task->getDescription() }}</td>
                        <td>
                            @if($task->isDone())
                                Done
                            @else
                                Not Done
                            @endif
                        </td>
                        <td></td>
                    </tr>
                @empty
                    <tr>
                        <td colspan="5">No tasks in the list... for now!</td>
                    </tr>
                @endforelse
            </table>
        </div>
    </div>
@endsection
$tasks will contain the tasks list. Every element of this list is an instance of the Task entity we built before. No magic methods, no properties that we don’t remember… just methods we have created, keeping it clean! Now, to the controller!
...

class TaskController extends Controller
{
    public function getIndex(EntityManagerInterface $em)
    {
        $tasks = $em->getRepository(Task::class)->findAll();

        return view('tasks', [
            'tasks' => $tasks
        ]);
    }

...
We can see something new in getIndex: the getRepository method. Put simply, a Repository is an object with a very specific responsibility: deal with the persistence layer, starting from (or arriving to) simple entities. This means that we can continue treating our entities like plain PHP object but with the benefit of an easy persistence layer management. For more information about the repository pattern, please see here.
We can build a repository for every entity we have in our software, but Doctrine makes our life simpler by giving the EntityManager a getRepository method that creates a really basic repository with the most used methods. findAll is one of these methods.
The result of our search is put in the $tasks variable and passed to the view.
Change the Status of a Task
Let us now see how to switch a task’s status from “not done” to “done” and vice-versa. Let’s create a getToggle method in the TaskController that will respond to the toggle/STATUS_ID URL.
public function getToggle(EntityManagerInterface $em, $taskId)
{
    /* @var Task $task */
    $task = $em->getRepository(Task::class)->find($taskId);

    $task->toggleStatus();
    $newStatus = ($task->isDone()) ? 'done' : 'not done';

    $em->flush();

    return redirect('/')->with('success_message', 'Task successfully marked as ' . $newStatus);
}
We will call this specific URL from the list view. Let’s edit the table in the view:
...

<td>{{ $task->getId() }}</td>
<td>{{ $task->getName() }}</td>
<td>{{ $task->getDescription() }}</td>
<td>
    @if($task->isDone())
        Done
    @else
        Not Done
    @endif
        - <a href="{{ url('toggle/' . $task->getId()) }}">Change</a>
</td>

...
We can see that we didn’t use a persist method this time around. We called the toggleStatus method of our entity and then used flush. That’s because we already saved this entity in our database – we just need to update a single, existing property value to a different one.
We just used our existing entity’s logic without putting anything in the controller. Tomorrow, we could change everything in the framework, yet the business logic (the toggleStatus method) would have the same effect.
Deleting a Task
Let’s allow for the deletion of items now.
public function getDelete(EntityManagerInterface $em, $taskId)
{
    $task = $em->getRepository(Task::class)->find($taskId);

    $em->remove($task);
    $em->flush();

    return redirect('/')->with('success_message', 'Task successfully removed.');
}
The EntityManager automatically takes care of the task deletion process with the remove method. We can add a link in the “Operations” table column in our view to let the user delete a specific task.
...

<tr>
    <td>{{ $task->getId() }}</td>
    <td>{{ $task->getName() }}</td>
    <td>{{ $task->getDescription() }}</td>
    <td>
        @if($task->isDone())
            Done
        @else
            Not Done
        @endif
            - <a href="{{ url('toggle/' . $task->getId()) }}">Change</a>
    </td>
    <td>
        <a href="{{ url('delete/' . $task->getId()) }}">Delete</a>
    </td>
</tr>

...
Modifying a Task
Let’s create an edit.blade.php view.
@extends('master')

@section('title') Edit Task @endsection

@section('content')
    <div class="row">
        <div class="col-md-12">
            <h3>Edit Task</h3>
            <p>Use the following form to edit che chosen task.</p>

            <hr>

            <form action="{{ url('edit/' . $task->getId()) }}" method="post">
                {{ csrf_field() }}

                <p><input autofocus type="text" placeholder="Name..." name="name" class="form-control" value="{{ $task->getName() }}" /></p>
                <p><input type="text" placeholder="Description..." name="description" class="form-control" value="{{ $task->getDescription() }}" /></p>

                <hr>

                <p><button class="form-control btn btn-success">Save Task</button></p>
            </form>
        </div>
    </div>
@endsection
Now, to the controller: let’s add the getEdit and the postEdit methods.
public function getEdit(EntityManagerInterface $em, $taskId)
{
    $task = $em->getRepository(Task::class)->find($taskId);

    return view('edit', [
        'task' => $task
    ]);
}

public function postEdit(Request $request, EntityManagerInterface $em, $taskId)
{
    /* @var Task $task */
    $task = $em->getRepository(Task::class)->find($taskId);

    $task->setName($request->get('name'));
    $task->setDescription($request->get('description'));

    $em->flush();

    return redirect('edit/' . $task->getId())->with('success_message', 'Task modified successfully.');
}
Finally, let’s add the operation in the tasks list.
    <tr>
        <td>{{ $task->getId() }}</td>
        <td>{{ $task->getName() }}</td>
        <td>{{ $task->getDescription() }}</td>
        <td>
            @if($task->isDone())
                Done
            @else
                Not Done
            @endif
                - <a href="{{ url('toggle/' . $task->getId()) }}">Change</a>
        </td>
        <td>
            <a href="{{ url('edit/' . $task->getId()) }}">Edit</a> |
            <a href="{{ url('delete/' . $task->getId()) }}">Delete</a>
        </td>
    </tr>
Done!
Adding Users – Relationships
Now, how can we define a specific link between two entities? Let’s continue our exploration of Doctrine with more examples. To do this, we will need a new entity: the User.
<?php

namespace TodoList\Entities;

use Doctrine\Common\Collections\ArrayCollection;
use Doctrine\ORM\Mapping AS ORM;

/**
 * @ORM\Entity
 * @ORM\Table(name="users")
 */
class User
{
    /**
     * @ORM\Id
     * @ORM\GeneratedValue
     * @ORM\Column(type="integer")
     */
    private $id;

    /**
     * @ORM\Column(type="string")
     */
    private $name;

    /**
     * @ORM\Column(type="string")
     */
    private $email;

    /**
     * @ORM\OneToMany(targetEntity="Task", mappedBy="user", cascade={"persist"})
     * @var ArrayCollection|Task[]
     */
    private $tasks;

    /**
     * User constructor.
     * @param $name
     * @param $email
     * @param $password
     */
    public function __construct($name, $email)
    {
        $this->name = $name;
        $this->email = $email;

        $this->tasks = new ArrayCollection();
    }

    /**
     * @return mixed
     */
    public function getId()
    {
        return $this->id;
    }

    /**
     * @return mixed
     */
    public function getName()
    {
        return $this->name;
    }

    /**
     * @return mixed
     */
    public function getEmail()
    {
        return $this->email;
    }

    /**
     * @return mixed
     */
    public function getTasks()
    {
        return $this->tasks;
    }

    /**
     * Assigns the $task task to the current user.
     *
     * @param Task $task
     */
    public function addTask(Task $task)
    {
        if(!$this->tasks->contains($task)) {
            $task->setUser($this);
            $this->tasks->add($task);
        }
    }
}
What’s new here? In particular, this:
/**
 * @ORM\OneToMany(targetEntity="Task", mappedBy="user", cascade={"persist"})
 * @var ArrayCollection|Task[]
 */
private $tasks;
With the OneToMany annotation, we are defining a new one to many relationship between the User entity and the Task one. We are also specifying that this property will be an ArrayCollection, a structure that Doctrine uses for this purpose. We’ve also defined a couple of methods to access the current user’s tasks and add a new one.
/**
 * @return mixed
 */
public function getTasks()
{
    return $this->tasks;
}

/**
 * Assigns the $task task to the current user.
 *
 * @param Task $task
 */
public function addTask(Task $task)
{
    if(!$this->tasks->contains($task)) {
        $task->setUser($this);
        $this->tasks->add($task);
    }
}
The addTask method calls a setUser method that doesn’t exist yet. We will need to edit the Task class to reflect these changes. First of all, the user property…
/**
 * @ORM\ManyToOne(targetEntity="User", inversedBy="tasks")
 * @var User
 */
private $user;
… and then, a couple of methods to set and get the user instance.
/**
 * @return User
 */
public function getUser()
{
    return $this->user;
}

/**
 * @param User $user
 */
public function setUser(User $user)
{
    $this->user = $user;
}
Obviously, before going forward, we’ll need an “updated” version of our database to be sure that everything will work fine.
artisan doctrine:schema:update
The above command will update the schema structure according to our entities. Ok, test things out with the help of a test-rel temporary route.
Route::get('test-rel', function(\Doctrine\ORM\EntityManagerInterface $em) {
    $user = new \TodoList\Entities\User(
        'Francesco',
        'francescomalatesta@live.it'
    );

    $user->addTask(new \TodoList\Entities\Task(
        'Buy milk',
        'Because it is healthy'
    ));

    $user->addTask(new \TodoList\Entities\Task(
        'Buy chocolate',
        'Because it is good'
    ));

    $em->persist($user);
    $em->flush();

    return 'Done!';
});
Here’s what we can find in our tables:


It works! This is just an example, but the Doctrine documentation covers every kind of relationship you could need for your application.
Authenticating Users
With Eloquent, authenticating was very, very easy. By default, the chosen driver for the authentication system was “eloquent” and the User model was already there. With a little customization, the Doctrine approach can be just as simple.
To be more precise, here’s what we will have to do:
- be sure that our
Userentities implement the LaravelAuthenticatableinterface; - edit config settings in the
config/auth.phpfile;
Laravel Doctrine gives us a cool trait to handle all the required operations for the interface we want to implement. So, let’s edit the User entity.
...

<?php

namespace TodoList\Entities;

use Doctrine\Common\Collections\ArrayCollection;
use Doctrine\ORM\Mapping AS ORM;
use Illuminate\Contracts\Auth\Authenticatable;

/**
 * @ORM\Entity
 * @ORM\Table(name="users")
 */
class User implements Authenticatable
{
    use \LaravelDoctrine\ORM\Auth\Authenticatable;

...
Note: this trait will also add two new columns to our users table (password and remember_token).
Now we just have to change the config values in the config/auth.php file. More specifically, the ones in the providers array.
...

'providers' => [
    'users' => [
        'driver' => 'doctrine',
        'model' => TodoList\User::class,
    ],

    // 'users' => [
    //     'driver' => 'database',
    //     'table' => 'users',
    // ],
],

...
Once we’re done, we can move on to the log in phase. We make a new view, login.blade.php.
@extends('master')

@section('title') Login @endsection

@section('content')
    <div class="row">
        <div class="col-md-12">
            <h3>Login</h3>
            <p>Use the following form to login into the system.</p>

            <hr>

            <form action="{{ url('login') }}" method="post">
                {{ csrf_field() }}

                <p><input type="text" name="email" placeholder="Email..." class="form-control" /></p>
                <p><input type="password" name="password" placeholder="Password..." class="form-control" /></p>

                <hr>

                <p><button class="form-control btn btn-success">Login</button></p>
            </form>
        </div>
    </div>
@endsection
Let’s “protect” our TaskController with the auth middleware and create two routes (GET and POST) for the login procedure in the routes.php file.
<?php

Route::group(['middleware' => ['web']], function () {
    Route::get('test-user', function(\Doctrine\ORM\EntityManagerInterface $em) {
        $user = new \TodoList\Entities\User('Francesco', 'francescomalatesta@live.it');
        $user->setPassword(bcrypt('123456'));

        $em->persist($user);
        $em->flush();
    });

    Route::get('login', function() {
        return view('login');
    });

    Route::post('login', function(\Illuminate\Http\Request $request) {
        if(\Auth::attempt([
            'email' => $request->get('email'),
            'password' => $request->get('password')
        ])) {
            return redirect('/');
        }
    });

    Route::get('logout', function() {
        \Auth::logout();
        return redirect('login');
    });

    Route::group(['middleware' => ['auth']], function () {
        Route::controller('/', 'TaskController');
    });
});
Note: there’s also a test-user route to add a sample user.
The User’s Tasks
Even though we have defined a relationship, a task doesn’t have its owner yet. We can quickly fix this.
Let’s add a call to the User::setUser method in the TaskController::postAdd one.
public function postAdd(Request $request, EntityManagerInterface $em)
{
    $task = new Task(
        $request->get('name'),
        $request->get('description')
    );

    $task->setUser(\Auth::user());

    $em->persist($task);
    $em->flush();

    return redirect('add')->with('success_message', 'Task added successfully!');
}
The last step is implementing a limited list in which a user can only see their own tasks. To do this, we modify the TaskController::getIndex method like this:
public function getIndex(EntityManagerInterface $em)
{
    /* @var User $user */
    $user = \Auth::user();

    $tasks = $user->getTasks();

    return view('tasks', [
        'tasks' => $tasks
    ]);
}
By calling the getTasks method, we get all the tasks for the given user. In this case, as Auth::user returns an instance of the current user, we get only the logged in user’s tasks.
Conclusion
Our first test application with Laravel Doctrine is complete! It wasn’t hard, was it?
It should be noted that Laravel Doctrine has support for validation and can help us do password resets. Likewise, it supports multiple database connections for our entities just like native Laravel has for models.
Last but not least, in this test application we touched on repositories. However, we were not using them at their full potential. In fact, we can extend the Doctrine EntityRepository when we need a specific set of functionalities more focused on the domain problem at hand. The related page in the documentation contains a lot of interesting information.
Have you used Laravel Doctrine? Would you? Why / why not? Let us know in the comments!
Frequently Asked Questions (FAQs) about Laravel Doctrine
What is Laravel Doctrine and how does it differ from Eloquent ORM?
Laravel Doctrine is a drop-in implementation of the famous Doctrine ORM for Laravel. It provides an alternative to Laravel’s default Eloquent ORM. The key difference between Laravel Doctrine and Eloquent ORM lies in their approach to data management. Eloquent follows the Active Record pattern, where each object instance is tied to a single row in the database. On the other hand, Doctrine follows the Data Mapper pattern, where the in-memory object model and the database schema are decoupled, allowing for more flexibility and maintainability.
How can I install Laravel Doctrine in my project?
Laravel Doctrine can be installed via Composer. You need to run the command composer require laravel-doctrine/orm. After the package is installed, you need to register the service provider by adding LaravelDoctrine\ORM\DoctrineServiceProvider::class to your config/app.php file. Then, you can publish the configuration file using the command php artisan vendor:publish --tag="config".
How can I define entities in Laravel Doctrine?
In Laravel Doctrine, entities are plain PHP objects that represent rows in your database. You can define entities by creating a class and using Doctrine annotations to map the class properties to the corresponding database columns. For example, you can use the @Entity annotation to mark a class as an entity and the @Column annotation to map a property to a database column.
How can I perform CRUD operations in Laravel Doctrine?
Laravel Doctrine provides a simple API for performing CRUD operations. You can use the EntityManager class to persist and remove entities, and the Repository class to find entities. For example, to create a new entity, you can use the persist method of the EntityManager. To retrieve an entity, you can use the find method of the Repository.
How can I use Laravel Doctrine with Laravel’s authentication system?
Laravel Doctrine provides a bridge for using Doctrine entities with Laravel’s authentication system. You need to implement the Illuminate\Contracts\Auth\Authenticatable interface in your user entity and use the LaravelDoctrine\ORM\Auth\DoctrineUserProvider as the user provider in your config/auth.php file.
How can I use Laravel Doctrine with Laravel’s validation system?
Laravel Doctrine provides a bridge for using Doctrine entities with Laravel’s validation system. You can use the LaravelDoctrine\ORM\Validation\DoctrinePresenceVerifier as the presence verifier in your config/validation.php file.
How can I use Laravel Doctrine with Laravel’s pagination system?
Laravel Doctrine provides a bridge for using Doctrine entities with Laravel’s pagination system. You can use the paginate method of the Repository to retrieve a paginator instance for a query.
How can I use Laravel Doctrine with Laravel’s events system?
Laravel Doctrine provides a bridge for using Doctrine entities with Laravel’s events system. You can use Doctrine events such as prePersist, postPersist, preUpdate, postUpdate, preRemove, and postRemove to hook into the lifecycle of your entities.
How can I use Laravel Doctrine with Laravel’s caching system?
Laravel Doctrine provides a bridge for using Doctrine entities with Laravel’s caching system. You can use the Cache class to cache queries and results.
How can I use Laravel Doctrine with Laravel’s migrations system?
Laravel Doctrine provides a bridge for using Doctrine entities with Laravel’s migrations system. You can use the migrations:generate command to generate a migration from your entities.
 Francesco Malatesta
Francesco is a web developer and consultant from Italy. He is the founder of Laravel-Italia, the official Italian Laravel Community, and writes for HTML.IT, the first italian web development portal. He also translated some books about Laravel. In the meantime he follows other projects, works as a freelance backend consultant for PHP applications and studies IT Engineering in Rome. He loves to learn new things, not only about PHP or development but everything. He hopes to work for IBM, sooner or later.