

This article is part 3 of the SitePoint Angular 2+ Tutorial on how to create a CRUD App with the Angular CLI. In this article, we’ll update our application to communicate with a REST API back end.
Prefer to learn Angular using a step-by-step video course? Check out Learn Angular 5 on SitePoint Premium.
In part one we learned how to get our Todo application up and running and deploy it to GitHub pages. This worked just fine but, unfortunately, the whole app was crammed into a single component.
In part two we examined a more modular component architecture and learned how to break this single component into a structured tree of smaller components that are easier to understand, re-use and maintain.
- Part 0 — The Ultimate Angular CLI Reference Guide
- Part 1 — Getting our first version of the Todo application up and running
- Part 2 — Creating separate components to display a list of todos and a single todo
- Part 3 — Update the Todo service to communicate with a REST API back end
- Part 4 — Use Angular router to resolve data
- Part 5 — Add authentication to protect private content
- Part 6 — How to Update Angular Projects to the latest version.
You don’t need to have followed parts one and two of this tutorial for three to make sense. You can simply grab a copy of our repo, checkout the code from part two, and use that as a starting point. This is explained in more detail below.

Key Takeaways
- Utilize Angular’s HttpClient with RxJS to effectively handle asynchronous HTTP requests when communicating with a REST API.
- Store API URLs in environment variables to seamlessly switch between development and production environments without altering code.
- Implement ApiService methods such as getAllTodos, createTodo, and deleteTodo to interact with the REST API using appropriate HTTP methods.
- Transition TodoDataService from in-memory storage to leveraging ApiService for data operations, adapting to asynchronous patterns with Observables.
- Update AppComponent to manage Observables returned by ApiService, ensuring components react to data changes asynchronously.
- Introduce ApiMockService for unit testing, allowing the simulation of ApiService without actual HTTP requests, ensuring test reliability and independence.
- Configure Angular application testing setups to include necessary services like ApiService and handle asynchronous testing scenarios effectively.
A Quick Recap
Here’s what our application architecture looked like at the end of part 2:
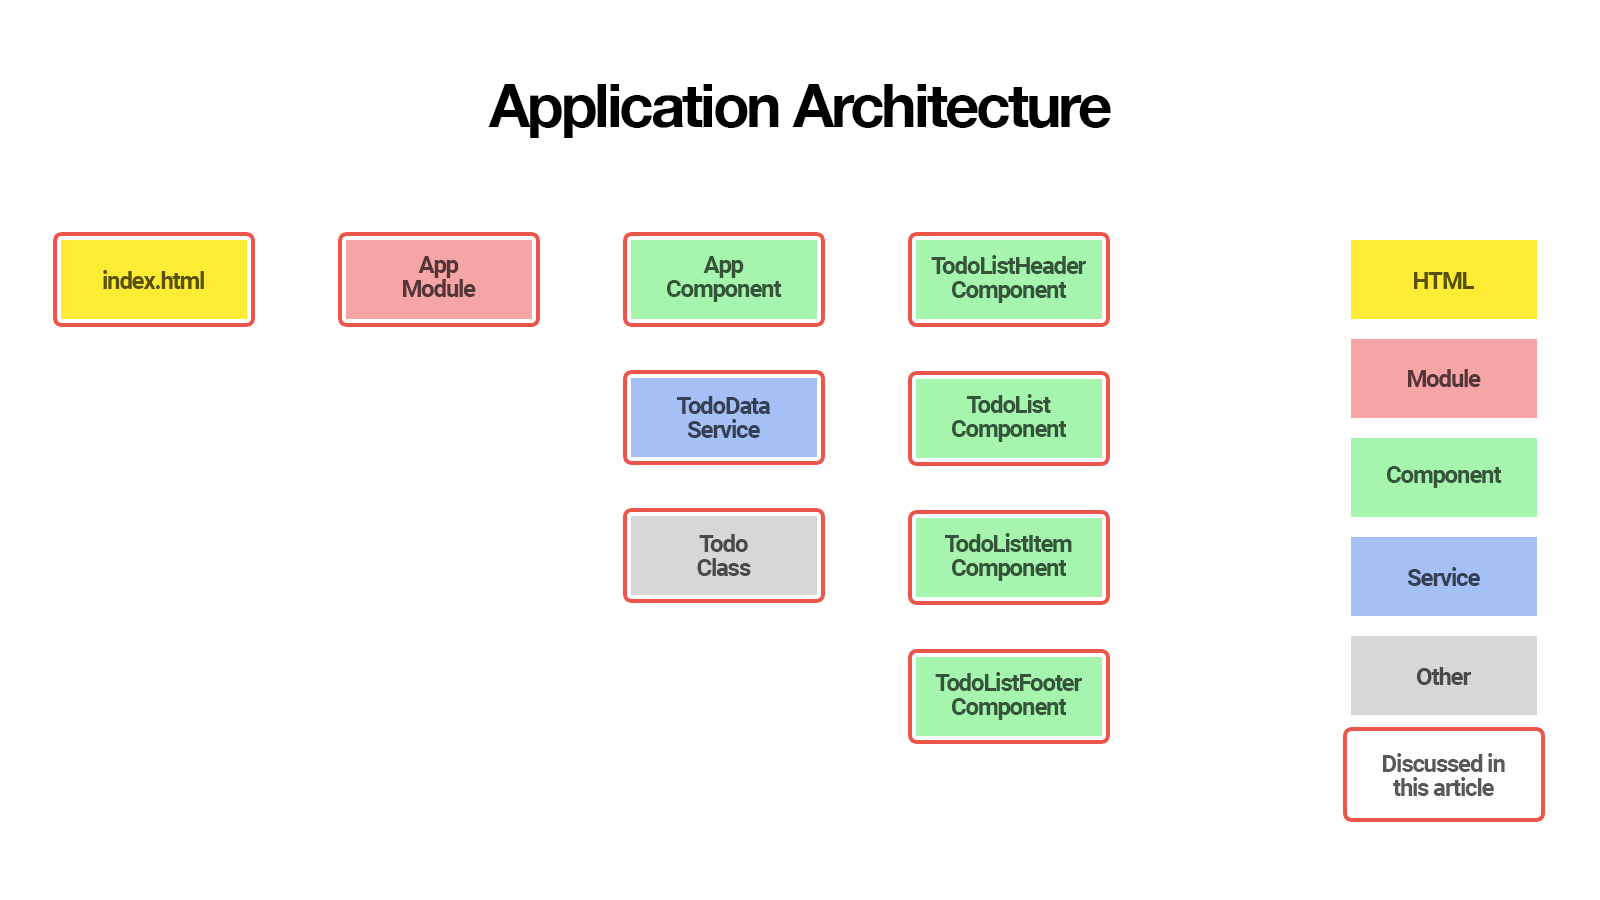
Currently, the TodoDataService stores all data in memory. In this third article, we’ll update our application to communicate with a REST API back end instead.
We will:
- create a mock REST API back end
- store the API URL as an environment variable
- create an
ApiServiceto communicate with the REST API back end - update the
TodoDataServiceto use the newApiService - update the
AppComponentto handle asynchronous API calls - create an
ApiMockServiceto avoid real HTTP calls when running unit tests.
By the end of this article, you’ll understand:
- how you can use environment variables to store application settings
- how you can use the Angular HTTP client to perform HTTP requests
- how you can deal with Observables that are returned by the Angular HTTP client
- how you can mock HTTP calls to avoid making real HTTP request when running unit tests.
So, let’s get started!
Up and Running
Make sure you have the latest version of the Angular CLI installed. If you don’t, you can install this with the following command:
npm install -g @angular/cli@latest
If you need to remove a previous version of the Angular CLI, you can:
npm uninstall -g @angular/cli angular-cli
npm cache clean
npm install -g @angular/cli@latest
After that, you’ll need a copy of the code from part two. This is available on GitHub. Each article in this series has a corresponding tag in the repository so you can switch back and forth between the different states of the application.
The code that we ended with in part two and that we start with in this article is tagged as part-2. The code that we end this article with is tagged as part-3.
You can think of tags like an alias to a specific commit id. You can switch between them using git checkout. You can read more on that here.
So, to get up and running (the latest version of the Angular CLI installed) we would do this:
git clone git@github.com:sitepoint-editors/angular-todo-app.git
cd angular-todo-app
git checkout part-2
npm install
ng serve
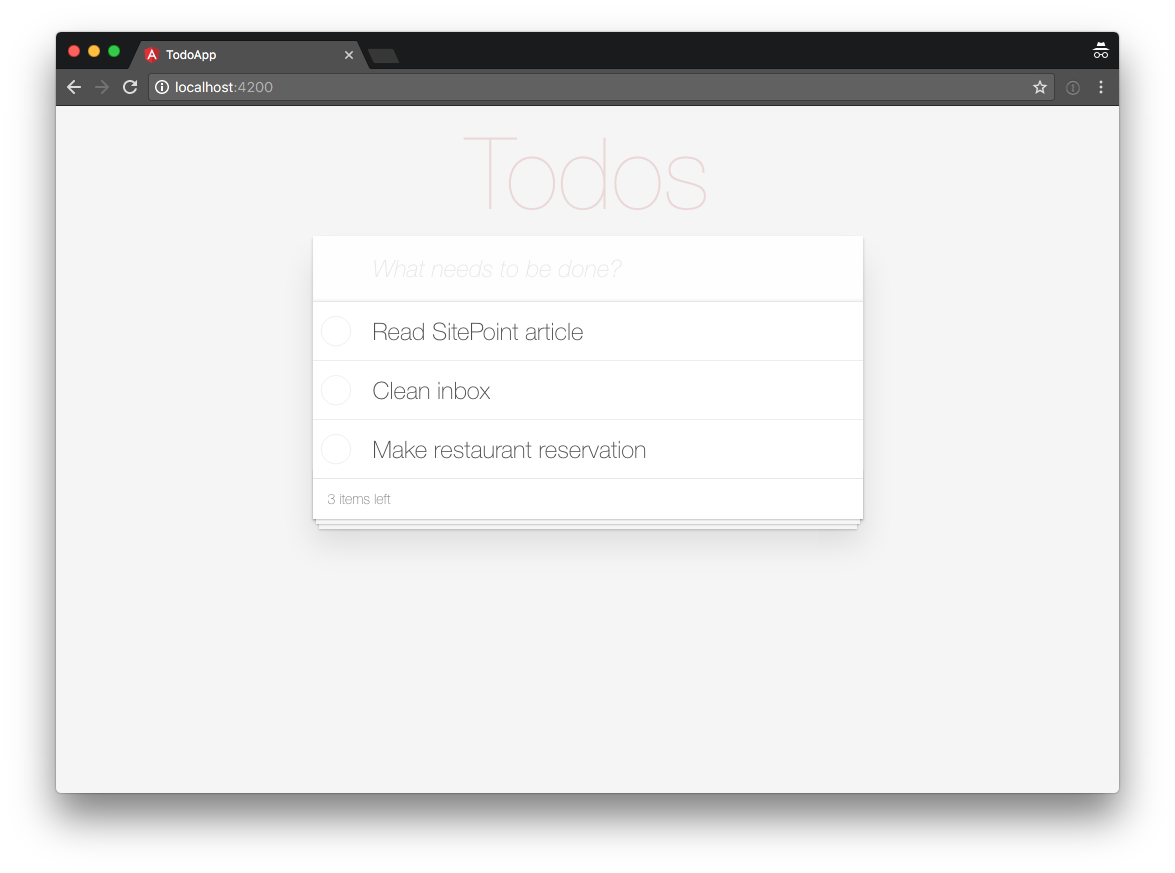
Then visit http://localhost:4200/. If all’s well, you should see the working Todo app.
Setting up a REST API back end
Let’s use json-server to quickly set up a mock back end.
From the root of the application, run:
npm install json-server --save
Next, in the root directory of our application, create a file called db.json with the following contents:
{
  "todos": [
    {
      "id": 1,
      "title": "Read SitePoint article",
      "complete": false
    },
    {
      "id": 2,
      "title": "Clean inbox",
      "complete": false
    },
    {
      "id": 3,
      "title": "Make restaurant reservation",
      "complete": false
    }
  ]
}
Finally, add a script to package.json to start our back end:
"scripts": {
  ...
  "json-server": "json-server --watch db.json"
}
We can now launch our REST API back end using:
npm run json-server
This should display the following:
  \{^_^}/ hi!

  Loading db.json
  Done

  Resources
  http://localhost:3000/todos

  Home
  http://localhost:3000
That’s it! We now have a REST API back end listening on port 3000.
To verify that your back end is running as expected, you can navigate your browser to http://localhost:3000.
The following endpoints are supported:
GET /todos: get all existing todosGET /todos/:id: get an existing todoPOST /todos: create a new todoPUT /todos/:id: update an existing todoDELETE /todos/:id: delete an existing todo
So if you navigate your browser to http://localhost:3000/todos, you should see a JSON response with all todos from db.json.
To learn more about json-server, make sure to check out mock REST APIs using json-server.
Storing the API URL
Now that we have our back end in place, we must store its URL in our Angular application.
Ideally, we should be able to this:
- store the URL in a single place so that we only have to change it once when we need to change its value
- make our application connect to a development API during development and connect to a production API in production.
Luckily, Angular CLI supports environments. By default, there are two environments: development and production, both with a corresponding environment file: src/environments/environment.ts and ‘src/environments/environment.prod.ts.
Let’s add our API URL to both files:
// src/environments/environment.ts
// used when we run `ng serve` or `ng build`
export const environment = {
  production: false,

  // URL of development API
  apiUrl: 'http://localhost:3000'
};
// src/environments/environment.prod.ts
// used when we run `ng serve --environment prod` or `ng build --environment prod`
export const environment = {
  production: true,

  // URL of production API
  apiUrl: 'http://localhost:3000'
};
This will later allow us to get the API URL from our environment in our Angular application by doing:
import { environment } from 'environments/environment';

// we can now access environment.apiUrl
const API_URL = environment.apiUrl;
When we run ng serve or ng build, Angular CLI uses the value specified in the development environment (src/environments/environment.ts).
But when we run ng serve --environment prod or ng build --environment prod, Angular CLI uses the value specified in src/environments/environment.prod.ts.
This is exactly what we need to use a different API URL for development and production, without having to change our code.
The application in this article series is not hosted in production, so we specify the same API URL in our development and production environment. This allows us to run ng serve --environment prod or ng build --environment prod locally to see if everything works as expected.
You can find the mapping between dev and prod and their corresponding environment files in .angular-cli.json:
"environments": {
  "dev": "environments/environment.ts",
  "prod": "environments/environment.prod.ts"
}
You can also create additional environments such as staging by adding a key:
"environments": {
  "dev": "environments/environment.ts",
  "staging": "environments/environment.staging.ts",
  "prod": "environments/environment.prod.ts"
}
and creating the corresponding environment file.
To learn more about Angular CLI environments, make sure to check out the The Ultimate Angular CLI Reference Guide.
Now that we have our API URL stored in our environment, we can create an Angular service to communicate with the REST API back end.
Creating the Service to Communicate with the REST API Back End
Let’s use Angular CLI to create an ApiService to communicate with our REST API back end:
ng generate service Api --module app.module.ts
This gives the following output:
installing service
  create src/app/api.service.spec.ts
  create src/app/api.service.ts
  update src/app/app.module.ts
The --module app.module.ts option tells Angular CLI to not only create the service but to also register it as a provider in the Angular module defined in app.module.ts.
Let’s open src/app/api.service.ts:
import { Injectable } from '@angular/core';

@Injectable()
export class ApiService {

  constructor() { }

}
Next, we inject our environment and Angular’s built-in HTTP service:
import { Injectable } from '@angular/core';
import { environment } from 'environments/environment';
import { Http } from '@angular/http';

const API_URL = environment.apiUrl;

@Injectable()
export class ApiService {

  constructor(
    private http: Http
  ) {
  }

}
Before we implement the methods we need, let’s have a look at Angular’s HTTP service.
If you’re unfamiliar with the syntax, why not buy our Premium course, Introducing TypeScript.
The Angular HTTP Service
The Angular HTTP service is available as an injectable class from @angular/http.
It’s built on top of XHR/JSONP and provides us with an HTTP client that we can use to make HTTP requests from within our Angular application.
The following methods are available to perform HTTP requests:
delete(url, options): perform a DELETE requestget(url, options): perform a GET requesthead(url, options): perform a HEAD requestoptions(url, options): perform an OPTIONS requestpatch(url, body, options): perform a PATCH requestpost(url, body, options): perform a POST requestput(url, body, options): perform a PUT request.
Each of these methods returns an RxJS Observable.
In contrast to the AngularJS 1.x HTTP service methods, which returned promises, the Angular HTTP service methods return Observables.
Don’t worry if you aren’t familiar yet with RxJS Observables. We only need the basics to get our application up and running. You can gradually learn more about the available operators when your application requires them and the ReactiveX website offers fantastic documentation.
If you want to learn more about Observables, it may also be worth checking out SitePoint’s Introduction to Functional Reactive Programming with RxJS.
Implementing the ApiService Methods
If we think back of the endpoints our REST API back end exposes:
-
GET /todos: get all existing todos -
GET /todos/:id: get an existing todo -
POST /todos: create a new todo -
PUT /todos/:id: update an existing todo -
DELETE /todos/:id: delete an existing todo
we can already create a rough outline of methods we need and their corresponding Angular HTTP methods:
import { Injectable } from '@angular/core';
import { environment } from 'environments/environment';

import { Http, Response } from '@angular/http';
import { Todo } from './todo';
import { Observable } from 'rxjs/Observable';

const API_URL = environment.apiUrl;

@Injectable()
export class ApiService {

  constructor(
    private http: Http
  ) {
  }

  // API: GET /todos
  public getAllTodos() {
    // will use this.http.get()
  }

  // API: POST /todos
  public createTodo(todo: Todo) {
    // will use this.http.post()
  }

  // API: GET /todos/:id
  public getTodoById(todoId: number) {
    // will use this.http.get()
  }

  // API: PUT /todos/:id
  public updateTodo(todo: Todo) {
    // will use this.http.put()
  }

  // DELETE /todos/:id
  public deleteTodoById(todoId: number) {
    // will use this.http.delete()
  }
}
Let’s have a closer look at each of the methods.
getAllTodos()
The getAllTodos() method allows us to get all todos from the API:
public getAllTodos(): Observable<Todo[]> {
  return this.http
    .get(API_URL + '/todos')
    .map(response => {
      const todos = response.json();
      return todos.map((todo) => new Todo(todo));
    })
    .catch(this.handleError);
}
First, we make a GET request to get all todos from our API:
this.http
  .get(API_URL + '/todos')
This returns an Observable.
We then call the map() method on the Observable to transform the the response from the API into an array of Todo objects:
.map(response => {
  const todos = response.json();
  return todos.map((todo) => new Todo(todo));
})
The incoming HTTP response is a string, so we first call response.json() to parse the JSON string to its corresponding JavaScript value.
We then loop over the todos of the API response and return an array of Todo instances. Note that this second use of map() is using Array.prototype.map(), not the RxJS operator.
Finally, we attach an error handler to log potential errors to the console:
.catch(this.handleError);
We define the error handler in a separate method so we can reuse it in other methods:
private handleError (error: Response | any) {
  console.error('ApiService::handleError', error);
  return Observable.throw(error);
}
Before we can run this code, we must import the necessary dependencies from the RxJS library:
import { Observable } from 'rxjs/Observable';
import 'rxjs/add/operator/map';
import 'rxjs/add/operator/catch';
import 'rxjs/add/observable/throw';
Note that the RxJS library is huge. Instead of importing the entire RxJS library using import * as Rx from 'rxjs/Rx', it’s recommended to only import the pieces you require. This will substantially reduce the size of your resulting code bundle to a minimum.
In our application we import the Observable class:
import { Observable } from 'rxjs/Observable';
We import the three operators that our code requires:
import 'rxjs/add/operator/map';
import 'rxjs/add/operator/catch';
import 'rxjs/add/observable/throw';
Importing operators ensures that our Observable instances have the corresponding methods attached to them.
If we do not have import 'rxjs/add/operator/map' in our code, then the following would not work:
this.http
  .get(API_URL + '/todos')
  .map(response => {
    const todos = response.json();
    return todos.map((todo) => new Todo(todo));
  })
This is because the Observable returned by this.http.get would not have a map() method.
We only have to import the operators once to enable the corresponding Observable methods globally in your application. However, importing them more than once isn’t a problem and won’t increase the resulting bundle size.
getTodoById()
The getTodoById() method allows us to get a single todo:
public getTodoById(todoId: number): Observable<Todo> {
  return this.http
    .get(API_URL + '/todos/' + todoId)
    .map(response => {
      return new Todo(response.json());
    })
    .catch(this.handleError);
}
We don’t need this method in our application, but it’s included to give you an idea of what it would look like.
createTodo()
The createTodo() method allows us to create a new todo:
public createTodo(todo: Todo): Observable<Todo> {
  return this.http
    .post(API_URL + '/todos', todo)
    .map(response => {
      return new Todo(response.json());
    })
    .catch(this.handleError);
}
We first perform a POST request to our API and pass in the data as the second argument:
this.http.post(API_URL + '/todos', todo)
We then transform the response into a Todo object:
map(response => {
  return new Todo(response.json());
})
updateTodo()
The updateTodo() method allows us to update a single todo:
public updateTodo(todo: Todo): Observable<Todo> {
  return this.http
    .put(API_URL + '/todos/' + todo.id, todo)
    .map(response => {
      return new Todo(response.json());
    })
    .catch(this.handleError);
}
We first perform a PUT request to our API and pass in the data as the second argument:
put(API_URL + '/todos/' + todo.id, todo)
We then transform the response into a Todo object:
map(response => {
  return new Todo(response.json());
})
deleteTodoById()
The deleteTodoById() method allows us to delete a single todo:
public deleteTodoById(todoId: number): Observable<null> {
  return this.http
    .delete(API_URL + '/todos/' + todoId)
    .map(response => null)
    .catch(this.handleError);
}
We first perform a DELETE request to our API:
delete(API_URL + '/todos/' + todoId)
We then transform the response into null:
map(response => null)
We don’t really need to transform the response here and could leave out this line. It’s just included to give you an idea of how you could process the response if you API would return data when you perform a DELETE request.
Here’s the complete code for our ApiService:
import { Injectable } from '@angular/core';
import { environment } from 'environments/environment';

import { Http, Response } from '@angular/http';
import { Todo } from './todo';
import { Observable } from 'rxjs/Observable';
import 'rxjs/add/operator/map';
import 'rxjs/add/operator/catch';
import 'rxjs/add/observable/throw';

const API_URL = environment.apiUrl;

@Injectable()
export class ApiService {

  constructor(
    private http: Http
  ) {
  }

  public getAllTodos(): Observable<Todo[]> {
    return this.http
      .get(API_URL + '/todos')
      .map(response => {
        const todos = response.json();
        return todos.map((todo) => new Todo(todo));
      })
      .catch(this.handleError);
  }

  public createTodo(todo: Todo): Observable<Todo> {
    return this.http
      .post(API_URL + '/todos', todo)
      .map(response => {
        return new Todo(response.json());
      })
      .catch(this.handleError);
  }

  public getTodoById(todoId: number): Observable<Todo> {
    return this.http
      .get(API_URL + '/todos/' + todoId)
      .map(response => {
        return new Todo(response.json());
      })
      .catch(this.handleError);
  }

  public updateTodo(todo: Todo): Observable<Todo> {
    return this.http
      .put(API_URL + '/todos/' + todo.id, todo)
      .map(response => {
        return new Todo(response.json());
      })
      .catch(this.handleError);
  }

  public deleteTodoById(todoId: number): Observable<null> {
    return this.http
      .delete(API_URL + '/todos/' + todoId)
      .map(response => null)
      .catch(this.handleError);
  }

  private handleError (error: Response | any) {
    console.error('ApiService::handleError', error);
    return Observable.throw(error);
  }
}
Now that we have our ApiService in place, we can use it to let our TodoDataService communicate with our REST API back end.
Updating TodoDataService
Currently our TodoDataService stores all data in memory:
import {Injectable} from '@angular/core';
import {Todo} from './todo';

@Injectable()
export class TodoDataService {

  // Placeholder for last id so we can simulate
  // automatic incrementing of ids
  lastId: number = 0;

  // Placeholder for todos
  todos: Todo[] = [];

  constructor() {
  }

  // Simulate POST /todos
  addTodo(todo: Todo): TodoDataService {
    if (!todo.id) {
      todo.id = ++this.lastId;
    }
    this.todos.push(todo);
    return this;
  }

  // Simulate DELETE /todos/:id
  deleteTodoById(id: number): TodoDataService {
    this.todos = this.todos
      .filter(todo => todo.id !== id);
    return this;
  }

  // Simulate PUT /todos/:id
  updateTodoById(id: number, values: Object = {}): Todo {
    let todo = this.getTodoById(id);
    if (!todo) {
      return null;
    }
    Object.assign(todo, values);
    return todo;
  }

  // Simulate GET /todos
  getAllTodos(): Todo[] {
    return this.todos;
  }

  // Simulate GET /todos/:id
  getTodoById(id: number): Todo {
    return this.todos
      .filter(todo => todo.id === id)
      .pop();
  }

  // Toggle todo complete
  toggleTodoComplete(todo: Todo) {
    let updatedTodo = this.updateTodoById(todo.id, {
      complete: !todo.complete
    });
    return updatedTodo;
  }

}
To let our TodoDataService communicate with our REST API back end, we must inject our new ApiService:
import { Injectable } from '@angular/core';
import { Todo } from './todo';
import { ApiService } from './api.service';
import { Observable } from 'rxjs/Observable';

@Injectable()
export class TodoDataService {

  constructor(
    private api: ApiService
  ) {
  }
}
We also update its methods to delegate all work to the corresponding methods in the ApiService:
import { Injectable } from '@angular/core';
import { Todo } from './todo';
import { ApiService } from './api.service';
import { Observable } from 'rxjs/Observable';

@Injectable()
export class TodoDataService {

  constructor(
    private api: ApiService
  ) {
  }

  // Simulate POST /todos
  addTodo(todo: Todo): Observable<Todo> {
    return this.api.createTodo(todo);
  }

  // Simulate DELETE /todos/:id
  deleteTodoById(todoId: number): Observable<Todo> {
    return this.api.deleteTodoById(todoId);
  }

  // Simulate PUT /todos/:id
  updateTodo(todo: Todo): Observable<Todo> {
    return this.api.updateTodo(todo);
  }

  // Simulate GET /todos
  getAllTodos(): Observable<Todo[]> {
    return this.api.getAllTodos();
  }

  // Simulate GET /todos/:id
  getTodoById(todoId: number): Observable<Todo> {
    return this.api.getTodoById(todoId);
  }

  // Toggle complete
  toggleTodoComplete(todo: Todo) {
    todo.complete = !todo.complete;
    return this.api.updateTodo(todo);
  }

}
Our new method implementations look a lot simpler because the data logic is now handled by the REST API back end.
However, there’s an important difference. The old methods contained synchronous code and immediately returned a value. The updated methods contain asynchronous code and return an Observable.
This means we also have to update the code that is calling the TodoDataService methods to handle Observables correctly.
Updating AppComponent
Currently, the AppComponent expects the TodoDataService to directly return JavaScript objects and arrays:
import {Component} from '@angular/core';
import {TodoDataService} from './todo-data.service';

@Component({
  selector: 'app-root',
  templateUrl: './app.component.html',
  styleUrls: ['./app.component.css'],
  providers: [TodoDataService]
})
export class AppComponent {

  constructor(
    private todoDataService: TodoDataService
  ) {
  }

  onAddTodo(todo) {
    this.todoDataService.addTodo(todo);
  }

  onToggleTodoComplete(todo) {
    this.todoDataService.toggleTodoComplete(todo);
  }

  onRemoveTodo(todo) {
    this.todoDataService.deleteTodoById(todo.id);
  }

  get todos() {
    return this.todoDataService.getAllTodos();
  }

}
But our new ApiService methods return Observables.
Similar to Promises, Observables are asynchronous in nature, so we have to update the code to handle the Observable responses accordingly:
If we currently call the TodoDataService.getAllTodos() method in get todos():
// AppComponent

get todos() {
  return this.todoDataService.getAllTodos();
}
the TodoDataService.getAllTodos() method calls the corresponding ApiService.getAllTodos() method:
// TodoDataService

getAllTodos(): Observable<Todo[]> {
  return this.api.getAllTodos();
}
This, in turn, instructs the Angular HTTP service to perform an HTTP GET request:
// ApiService

public getAllTodos(): Observable<Todo[]> {
  return this.http
    .get(API_URL + '/todos')
    .map(response => {
      const todos = response.json();
      return todos.map((todo) => new Todo(todo));
    })
    .catch(this.handleError);
}
However, there’s one important thing we have to remember!
As long as we don’t subscribe to the Observable returned by:
this.todoDataService.getAllTodos()
no actual HTTP request is made.
To subscribe to an Observable, we can use the subscribe() method, which takes three arguments:
onNext: a function that’s called when the Observable emits a new valueonError: a function that’s called when the Observable throws an erroronCompleted: a function that’s called when the Observable has gracefully terminated.
Let’s rewrite our current code:
// AppComponent

get todos() {
  return this.todoDataService.getAllTodos();
}
This will load the todos asynchronously when the AppComponent is initialized:
import { Component, OnInit } from '@angular/core';
import { TodoDataService } from './todo-data.service';
import { Todo } from './todo';

@Component({
  selector: 'app-root',
  templateUrl: './app.component.html',
  styleUrls: ['./app.component.css'],
  providers: [TodoDataService]
})
export class AppComponent implements OnInit {

  todos: Todo[] = [];

  constructor(
    private todoDataService: TodoDataService
  ) {
  }

  public ngOnInit() {
    this.todoDataService
      .getAllTodos()
      .subscribe(
        (todos) => {
          this.todos = todos;
        }
      );
  }
}
First, we define a public property, todos, and set its initial value to an empty array.
We then use the ngOnInit() method to subscribe to this.todoDataService.getAllTodos(), and when a value comes in, we assign it to this.todos, overwriting its initial value of an empty array.
Now let’s update the onAddTodo(todo) method to also handle an Observable response:
// previously:
// onAddTodo(todo) {
//  this.todoDataService.addTodo(todo);
// }

onAddTodo(todo) {
  this.todoDataService
    .addTodo(todo)
    .subscribe(
      (newTodo) => {
        this.todos = this.todos.concat(newTodo);
      }
    );
}
Again, we use the subscribe() method to subscribe to the Observable returned by this.todoDataService.addTodo(todo), and when the response comes in, we add the newly created todo to the current list of todos.
We repeat the same exercise for the other methods until our AppComponent looks like this:
import { Component, OnInit } from '@angular/core';
import { TodoDataService } from './todo-data.service';
import { Todo } from './todo';

@Component({
  selector: 'app-root',
  templateUrl: './app.component.html',
  styleUrls: ['./app.component.css'],
  providers: [TodoDataService]
})
export class AppComponent implements OnInit {

  todos: Todo[] = [];

  constructor(
    private todoDataService: TodoDataService
  ) {
  }

  public ngOnInit() {
    this.todoDataService
      .getAllTodos()
      .subscribe(
        (todos) => {
          this.todos = todos;
        }
      );
  }

  onAddTodo(todo) {
    this.todoDataService
      .addTodo(todo)
      .subscribe(
        (newTodo) => {
          this.todos = this.todos.concat(newTodo);
        }
      );
  }

  onToggleTodoComplete(todo) {
    this.todoDataService
      .toggleTodoComplete(todo)
      .subscribe(
        (updatedTodo) => {
          todo = updatedTodo;
        }
      );
  }

  onRemoveTodo(todo) {
    this.todoDataService
      .deleteTodoById(todo.id)
      .subscribe(
        (_) => {
          this.todos = this.todos.filter((t) => t.id !== todo.id);
        }
      );
  }
}
That’s it; all methods are now capable of handling Observables returned by the TodoDataService methods.
Notice that there’s no need to unsubscribe manually when you subscribe to an Observable that’s returned by the Angular HTTP service. Angular will clean up everything for you to prevent memory leaks.
Let’s see if everything’s working as expected.
Trying it Out
Open a terminal window.
From the root of our application directory, start the REST API back end:
npm run json-server
Open a second terminal window.
Again, from the root of our application directory, serve the Angular application:
ng serve
Now, navigate your browser to http://localhost:4200.
If all goes well, you should see this:
If you see an error, you can compare your code to the working version on GitHub.
Awesome! Our application is now communicating with the REST API back end!
Side tip: if you want to run npm run json-server and ng serve in the same terminal, you can use concurrently to run both commands concurrently without opening multiple terminal windows or tabs.
Let’s run our unit tests to verify that everything’s working as expected.
Running our Tests
Open a third terminal window.
Again, from the root of your application directory, run the unit tests:
ng test
It seems that 11 unit tests are failing:
Let’s see why our tests are failing and how we can fix them.
Fixing Our Unit Tests
First, let’s open up src/todo-data.service.spec.ts:
/* tslint:disable:no-unused-variable */

import {TestBed, async, inject} from '@angular/core/testing';
import {Todo} from './todo';
import {TodoDataService} from './todo-data.service';

describe('TodoDataService', () => {
  beforeEach(() => {
    TestBed.configureTestingModule({
      providers: [TodoDataService]
    });
  });

  it('should ...', inject([TodoDataService], (service: TodoDataService) => {
    expect(service).toBeTruthy();
  }));

  describe('#getAllTodos()', () => {

    it('should return an empty array by default', inject([TodoDataService], (service: TodoDataService) => {
      expect(service.getAllTodos()).toEqual([]);
    }));

    it('should return all todos', inject([TodoDataService], (service: TodoDataService) => {
      let todo1 = new Todo({title: 'Hello 1', complete: false});
      let todo2 = new Todo({title: 'Hello 2', complete: true});
      service.addTodo(todo1);
      service.addTodo(todo2);
      expect(service.getAllTodos()).toEqual([todo1, todo2]);
    }));

  });

  describe('#save(todo)', () => {

    it('should automatically assign an incrementing id', inject([TodoDataService], (service: TodoDataService) => {
      let todo1 = new Todo({title: 'Hello 1', complete: false});
      let todo2 = new Todo({title: 'Hello 2', complete: true});
      service.addTodo(todo1);
      service.addTodo(todo2);
      expect(service.getTodoById(1)).toEqual(todo1);
      expect(service.getTodoById(2)).toEqual(todo2);
    }));

  });

  describe('#deleteTodoById(id)', () => {

    it('should remove todo with the corresponding id', inject([TodoDataService], (service: TodoDataService) => {
      let todo1 = new Todo({title: 'Hello 1', complete: false});
      let todo2 = new Todo({title: 'Hello 2', complete: true});
      service.addTodo(todo1);
      service.addTodo(todo2);
      expect(service.getAllTodos()).toEqual([todo1, todo2]);
      service.deleteTodoById(1);
      expect(service.getAllTodos()).toEqual([todo2]);
      service.deleteTodoById(2);
      expect(service.getAllTodos()).toEqual([]);
    }));

    it('should not removing anything if todo with corresponding id is not found', inject([TodoDataService], (service: TodoDataService) => {
      let todo1 = new Todo({title: 'Hello 1', complete: false});
      let todo2 = new Todo({title: 'Hello 2', complete: true});
      service.addTodo(todo1);
      service.addTodo(todo2);
      expect(service.getAllTodos()).toEqual([todo1, todo2]);
      service.deleteTodoById(3);
      expect(service.getAllTodos()).toEqual([todo1, todo2]);
    }));

  });

  describe('#updateTodoById(id, values)', () => {

    it('should return todo with the corresponding id and updated data', inject([TodoDataService], (service: TodoDataService) => {
      let todo = new Todo({title: 'Hello 1', complete: false});
      service.addTodo(todo);
      let updatedTodo = service.updateTodoById(1, {
        title: 'new title'
      });
      expect(updatedTodo.title).toEqual('new title');
    }));

    it('should return null if todo is not found', inject([TodoDataService], (service: TodoDataService) => {
      let todo = new Todo({title: 'Hello 1', complete: false});
      service.addTodo(todo);
      let updatedTodo = service.updateTodoById(2, {
        title: 'new title'
      });
      expect(updatedTodo).toEqual(null);
    }));

  });

  describe('#toggleTodoComplete(todo)', () => {

    it('should return the updated todo with inverse complete status', inject([TodoDataService], (service: TodoDataService) => {
      let todo = new Todo({title: 'Hello 1', complete: false});
      service.addTodo(todo);
      let updatedTodo = service.toggleTodoComplete(todo);
      expect(updatedTodo.complete).toEqual(true);
      service.toggleTodoComplete(todo);
      expect(updatedTodo.complete).toEqual(false);
    }));

  });

});
Most of the failing unit tests are concerned with checking data handling. These tests are no longer required because data handling is now performed by our REST API back end instead of the TodoDataService, so let’s remove the obsolete tests:
/* tslint:disable:no-unused-variable */

import {TestBed, inject} from '@angular/core/testing';
import {TodoDataService} from './todo-data.service';

describe('TodoDataService', () => {
  beforeEach(() => {
    TestBed.configureTestingModule({
      providers: [
        TodoDataService,
      ]
    });
  });

  it('should ...', inject([TodoDataService], (service: TodoDataService) => {
    expect(service).toBeTruthy();
  }));

});
If we now run the unit tests, we get an error:
TodoDataService should ...
Error: No provider for ApiService!
The error is thrown because TestBed.configureTestingModule() creates a temporary module for testing and the injector of the temporary module is not aware of any ApiService.
To make the injector aware of the ApiService, we have to register it with the temporary module by listing ApiService as a provider in the configuration object that is passed to TestBed.configureTestingModule():
/* tslint:disable:no-unused-variable */

import {TestBed, inject} from '@angular/core/testing';
import {TodoDataService} from './todo-data.service';
import { ApiService } from './api.service';

describe('TodoDataService', () => {
  beforeEach(() => {
    TestBed.configureTestingModule({
      providers: [
        TodoDataService,
        ApiService
      ]
    });
  });

  it('should ...', inject([TodoDataService], (service: TodoDataService) => {
    expect(service).toBeTruthy();
  }));

});
However, if we do this, our unit test will use our real ApiService, which connects to our REST API back end.
We don’t want our test runner to connect to a real API when running our unit tests, so let’s create an ApiMockService to mock the real ApiService in unit tests.
Creating an ApiMockService
Let’s use Angular CLI to generate a new ApiMockService:
ng g service ApiMock --spec false
This shows the following:
installing service
  create src/app/api-mock.service.ts
  WARNING Service is generated but not provided, it must be provided to be used
Next, we implement the same methods as ApiService, but we let the methods return mock data instead of making HTTP requests:
import { Injectable } from '@angular/core';
import { Todo } from './todo';
import { Observable } from 'rxjs/Observable';
import 'rxjs/add/observable/of';

@Injectable()
export class ApiMockService {

  constructor(
  ) {
  }

  public getAllTodos(): Observable<Todo[]> {
    return Observable.of([
      new Todo({id: 1, title: 'Read article', complete: false})
    ]);
  }

  public createTodo(todo: Todo): Observable<Todo> {
    return Observable.of(
      new Todo({id: 1, title: 'Read article', complete: false})
    );
  }

  public getTodoById(todoId: number): Observable<Todo> {
    return Observable.of(
      new Todo({id: 1, title: 'Read article', complete: false})
    );
  }

  public updateTodo(todo: Todo): Observable<Todo> {
    return Observable.of(
      new Todo({id: 1, title: 'Read article', complete: false})
    );
  }

  public deleteTodoById(todoId: number): Observable<null> {
    return null;
  }
}
Notice how each method returns fresh new mock data. This may seem a bit repetitive, but it’s a good practice. If one unit test would change mock data, the change can never affect the data in another unit test.
Now that we have an ApiMockService service, we can substitute ApiService in our unit tests with ApiMockService.
Let’s open up src/todo-data.service.spec.ts again.
In the providers array, we tell the injector to provide the ApiMockService whenever the ApiService is requested:
/* tslint:disable:no-unused-variable */

import {TestBed, inject} from '@angular/core/testing';
import {TodoDataService} from './todo-data.service';
import { ApiService } from './api.service';
import { ApiMockService } from './api-mock.service';

describe('TodoDataService', () => {
  beforeEach(() => {
    TestBed.configureTestingModule({
      providers: [
        TodoDataService,
        {
          provide: ApiService,
          useClass: ApiMockService
        }
      ]
    });
  });

  it('should ...', inject([TodoDataService], (service: TodoDataService) => {
    expect(service).toBeTruthy();
  }));

});
If we now re-run the unit tests, the error is gone. Great!
We still have two more failing tests, though:
ApiService should ...
Error: No provider for Http!

AppComponent should create the app
Failed: No provider for ApiService!
The errors are similar to the one we just fixed.
To fix the first error, let’s open src/api.service.spec.ts:
import { TestBed, inject } from '@angular/core/testing';

import { ApiService } from './api.service';

describe('ApiService', () => {
  beforeEach(() => {
    TestBed.configureTestingModule({
      providers: [ApiService]
    });
  });

  it('should ...', inject([ApiService], (service: ApiService) => {
    expect(service).toBeTruthy();
  }));
});
The test fails with a message No provider for Http!, indicating that we need to add a provider for Http.
Again, we don’t want the Http service to send out real HTTP requests, so we instantiate a mock Http service that uses Angular’s MockBackend:
import { TestBed, inject } from '@angular/core/testing';

import { ApiService } from './api.service';
import { BaseRequestOptions, Http, XHRBackend } from '@angular/http';
import { MockBackend } from '@angular/http/testing';

describe('ApiService', () => {
  beforeEach(() => {
    TestBed.configureTestingModule({
      providers: [
        {
          provide: Http,
          useFactory: (backend, options) => {
            return new Http(backend, options);
          },
          deps: [MockBackend, BaseRequestOptions]
        },
        MockBackend,
        BaseRequestOptions,
        ApiService
      ]
    });
  });

  it('should ...', inject([ApiService], (service: ApiService) => {
    expect(service).toBeTruthy();
  }));
});
Don’t worry if configuring the test module looks a bit overwhelming.
You can learn more about setting up unit test in the official documentation for testing Angular applications.
To fix the final error:
AppComponent should create the app
Failed: No provider for ApiService!
let’s open up src/app.component.spec.ts:
import { TestBed, async } from '@angular/core/testing';

import { FormsModule } from '@angular/forms';
import { AppComponent } from './app.component';
import { NO_ERRORS_SCHEMA } from '@angular/core';
import { TodoDataService } from './todo-data.service';

describe('AppComponent', () => {
  beforeEach(async(() => {
    TestBed.configureTestingModule({
      imports: [
        FormsModule
      ],
      declarations: [
        AppComponent
      ],
      providers: [
        TodoDataService
      ],
      schemas: [
        NO_ERRORS_SCHEMA
      ]
    }).compileComponents();
  }));

  it('should create the app', async(() => {
    const fixture = TestBed.createComponent(AppComponent);
    const app = fixture.debugElement.componentInstance;
    expect(app).toBeTruthy();
  }));
});
Then provide the injector with our mock ApiService:
import { TestBed, async } from '@angular/core/testing';

import { FormsModule } from '@angular/forms';
import { AppComponent } from './app.component';
import { NO_ERRORS_SCHEMA } from '@angular/core';
import { TodoDataService } from './todo-data.service';
import { ApiService } from './api.service';
import { ApiMockService } from './api-mock.service';

describe('AppComponent', () => {
  beforeEach(async(() => {
    TestBed.configureTestingModule({
      imports: [
        FormsModule
      ],
      declarations: [
        AppComponent
      ],
      providers: [
        TodoDataService,
        {
          provide: ApiService,
          useClass: ApiMockService
        }
      ],
      schemas: [
        NO_ERRORS_SCHEMA
      ]
    }).compileComponents();
  }));

  it('should create the app', async(() => {
    const fixture = TestBed.createComponent(AppComponent);
    const app = fixture.debugElement.componentInstance;
    expect(app).toBeTruthy();
  }));
});
Hurray! All our tests are passing:
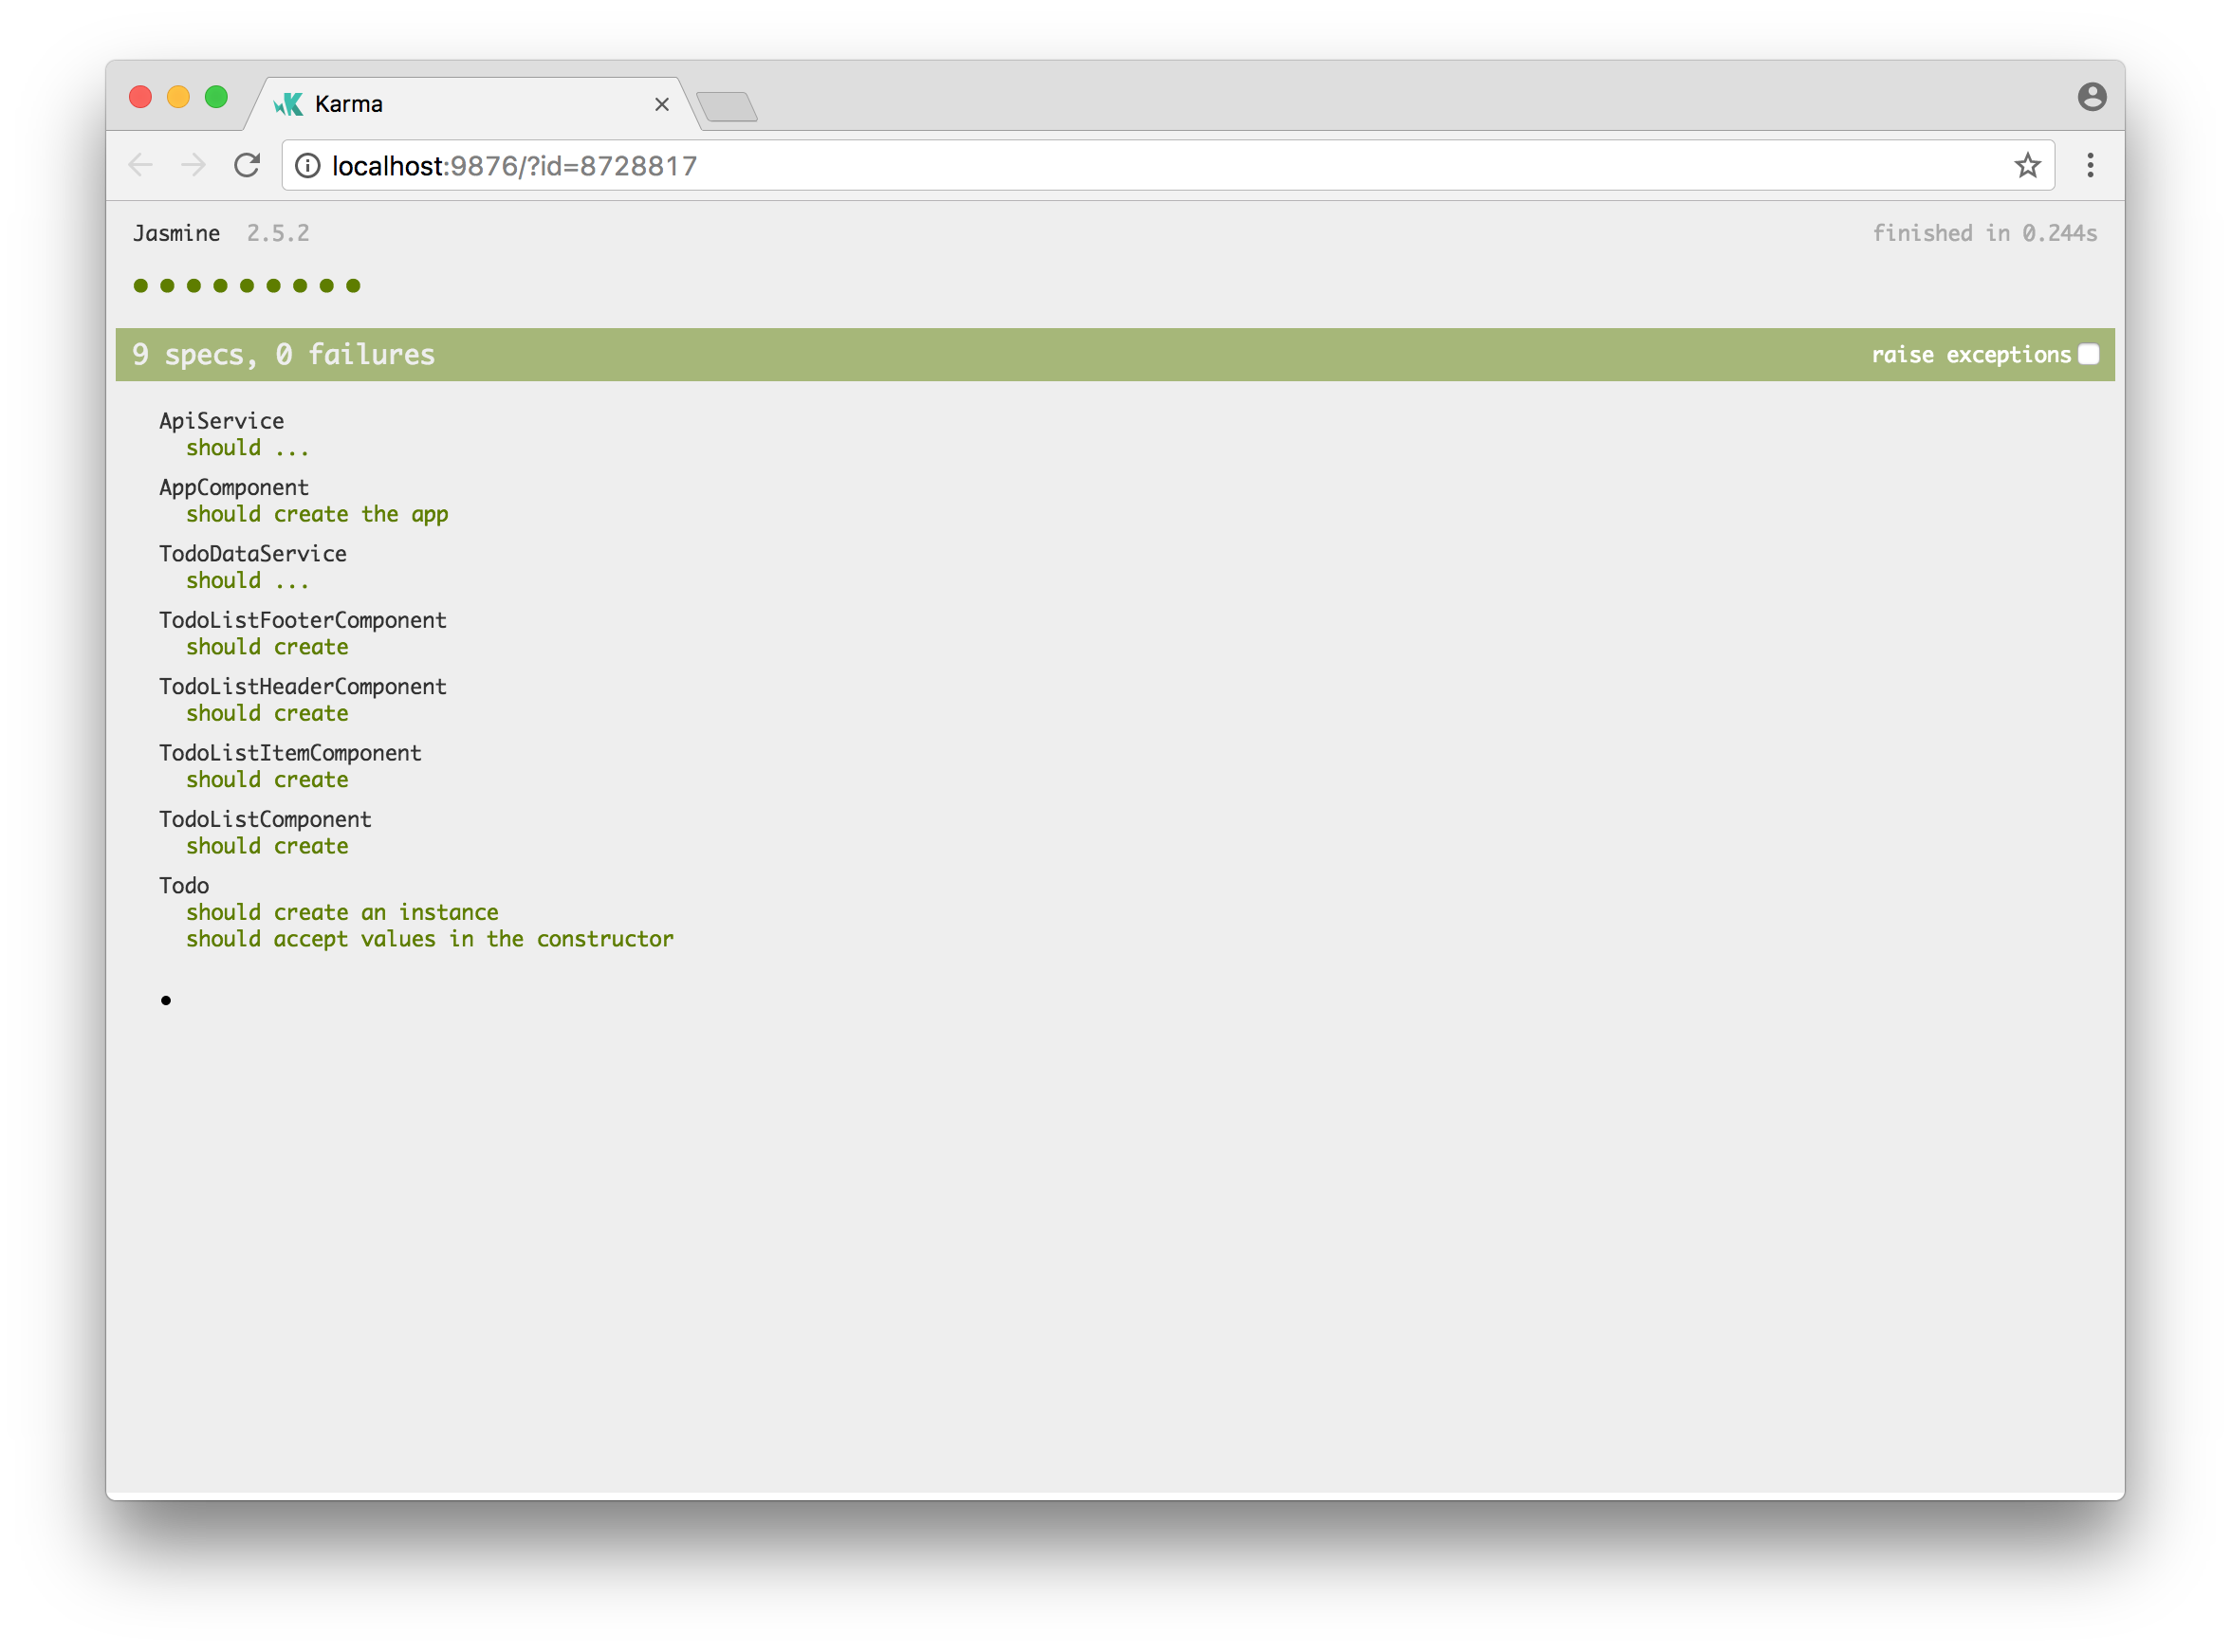
We have successfully connected our Angular application to our REST API back end.
To deploy our application to a production environment, we can now run:
ng build --aot --environment prod
We also upload the generated dist directory to our hosting server. How sweet is that?
Let’s recap what we’ve learned.
Summary
In the first article, we learned how to:
- initialize our Todo application using Angular CLI
- create a
Todoclass to represent individual todos - create a
TodoDataServiceservice to create, update and remove todos - use the
AppComponentcomponent to display the user interface - deploy our application to GitHub pages.
In the second article, we refactored AppComponent to delegate most of its work to:
- a
TodoListComponentto display a list of todos - a
TodoListItemComponentto display a single todo - a
TodoListHeaderComponentto create a new todo - a
TodoListFooterComponentto show how many todos are left.
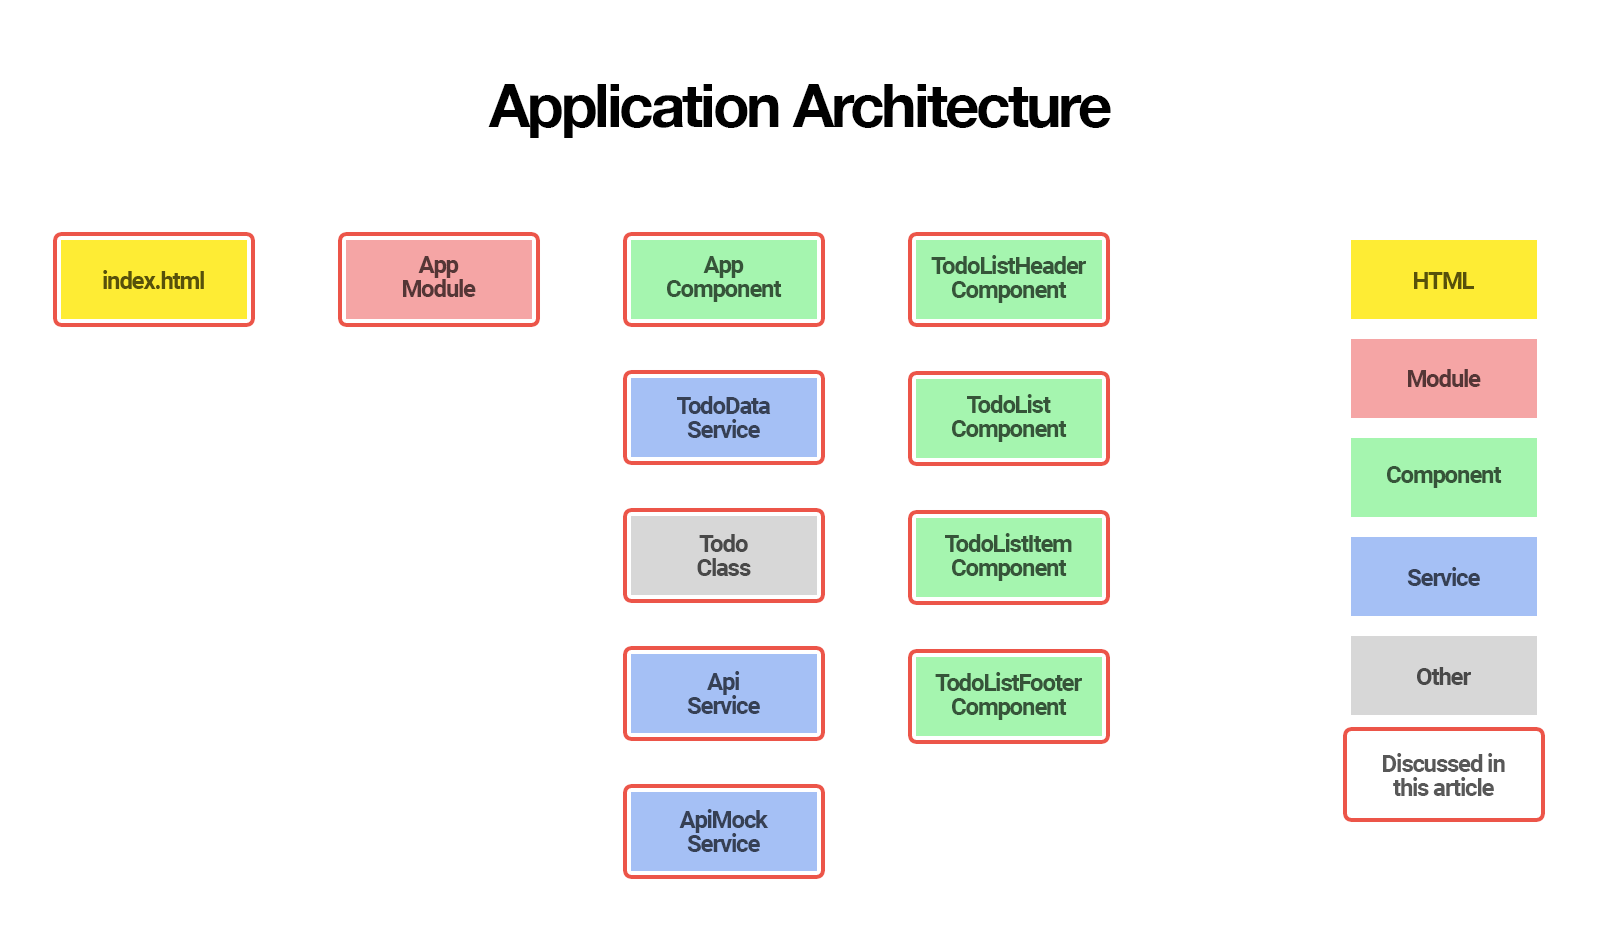
In this third article, we:
- created a mock REST API back end
- stored the API URL as an environment variable
- created an
ApiServiceto communicate with the REST API back end - updated the
TodoDataServiceto use the newApiService - updated the
AppComponentto handle asynchronous API calls - created an
ApiMockServiceto avoid real HTTP calls when running unit tests.
In the process, we learned:
- how to use environment variables to store application settings
- how to use the Angular HTTP client to perform HTTP requests
- how to deal with Observables that are returned by the Angular HTTP client
- how to mock HTTP calls to avoid real HTTP requests when running unit tests.
All code from this article is available on GitHub.
In part four, we’ll introduce the router and refactor AppComponent to use the router to fetch the todos from the back end.
In part five, we’ll implement authentication to prevent unauthorized access to our application.
This article was peer reviewed by Vildan Softic. Thanks to all of SitePoint’s peer reviewers for making SitePoint content the best it can be!
Frequently Asked Questions (FAQs) about Angular and RxJS API Service with REST Backend
What is the role of RxJS in Angular API service?
RxJS, short for Reactive Extensions for JavaScript, is a library for reactive programming that uses Observables, to make it easier to compose asynchronous or callback-based code. In the context of Angular API service, RxJS plays a crucial role in handling asynchronous operations. It provides a way to create and work with observables that makes it possible to manage multiple asynchronous operations, handle errors, and even cancel operations. This makes it a powerful tool for working with HTTP requests, which are inherently asynchronous.
How does Angular interact with REST backend?
Angular interacts with a REST backend through the HttpClient module. This module provides a simplified API for HTTP functionality. It allows Angular to make HTTP requests to the server, send user data, or retrieve data from the server. The HttpClient module also includes methods for requests such as GET, POST, PUT, DELETE, which correspond to the HTTP methods used in RESTful APIs.
How can I handle errors in Angular API service?
Error handling is an essential part of any application. In Angular API service, you can handle errors using the catchError operator from RxJS. This operator catches the error on the Observable, and allows you to handle it or return a new Observable. You can use it in the pipe method of the Observable, after the method that might throw an error.
How can I cancel a request in Angular API service?
In Angular API service, you can cancel a request using the unsubscribe method of the Subscription object. When you subscribe to an Observable, it returns a Subscription object. This object has an unsubscribe method that you can call to cancel the subscription, and consequently, the HTTP request.
How can I retry a failed request in Angular API service?
In Angular API service, you can retry a failed request using the retry or retryWhen operators from RxJS. The retry operator resubscribes to the Observable, effectively repeating the HTTP request. The retryWhen operator allows you to define a condition for retrying the request.
How can I make multiple requests in Angular API service?
In Angular API service, you can make multiple requests using the forkJoin function from RxJS. This function takes an array of Observables and returns a new Observable that emits an array of the results of the input Observables, once they all complete.
How can I transform the response data in Angular API service?
In Angular API service, you can transform the response data using the map operator from RxJS. This operator applies a given function to each item emitted by the Observable, and returns a new Observable that emits the results.
How can I send data to the server in Angular API service?
In Angular API service, you can send data to the server using the post method of the HttpClient module. This method takes the URL of the server and the data to send as parameters, and returns an Observable that you can subscribe to.
How can I update data on the server in Angular API service?
In Angular API service, you can update data on the server using the put method of the HttpClient module. This method takes the URL of the server, the data to update, and optionally, the options for the request as parameters, and returns an Observable that you can subscribe to.
How can I delete data from the server in Angular API service?
In Angular API service, you can delete data from the server using the delete method of the HttpClient module. This method takes the URL of the server and optionally, the options for the request as parameters, and returns an Observable that you can subscribe to.