

Samba is the software package that allows you to share files, printers and other common resources across a network. Delivering full connectivity with the Windows workgroup it is known and respected as an invaluable tool in homes and offices around the world and in this article I will be showing you how to install, set-up and manage a Samba Server on Ubuntu 12.04 LTS Precise Pangolin.
So let’s begin …
Key Takeaways
- Update System First: Begin by updating your Ubuntu system using `sudo apt-get update && apt-get upgrade` to ensure all packages are up to date before installing Samba.
- Installation Choices: Samba can be installed using graphical tools for desktop users or via the terminal for server environments, with commands provided for both scenarios.
- Configure Winbind: Adjust the `nsswitch.conf` file to enhance hostname resolution across your network, ensuring smooth integration with Windows workgroups.
- Graphical Management Tools: Utilize `system-config-samba` for a user-friendly setup of your Samba server, including configuring server settings and managing user access.
- Command Line Configuration: For more detailed control over Samba settings, modify the `smb.conf` file directly in the terminal, with a basic template provided to get started quickly.
Prerequisites
To get the best out of Samba your system should be running a static IP address and if you happen to be running a firewall, you should open the relevant ports to give the Samba service full access to your network.
Yes, you can use DHCP, but you will need to ensure that your DHCP server or router is providing you with a ‘fixed’ DHCP licence; but for those who wish to learn how to implement a static IP address on Ubuntu 12.04 you can read my previous article on networking tips and tricks
Update your system
Installing Samba is a very straight forward process so we shall begin by updating the system.
In Terminal or in your console type:
sudo apt-get update && apt-get upgrade
If there are any updates available to you, do that now before we proceed :-)
Installing Samba
For the purposes of this article I will have provided you with three different approaches to installing Samba:
1. For desktop users, who want to take advantage of ‘winbind’ (winbin) and use the graphical tools (system-config-samba), open Terminal and type:
sudo apt-get install samba samba-common system-config-samba winbind
2. For desktop users, who wish to take advantage of ‘winbind’ (winbind) but do not wish to use the graphical tools, open Terminal and type:
sudo apt-get install samba samba-common winbind
3. For server users, in your console type:
sudo apt-get install samba samba-common
Configuring Winbind
Before we tackle the subject of Samba itself, desktop users will notice that we have installed Winbin.
The purpose of this is to ensure that Ubuntu can provide full hostname resolution when viewing your local network and so we will want to configure this before moving on. Don’t worry, it is very simple as all we need to do is make a quick ‘order change’ to the ‘nsswitch.conf’ file.
To begin, open Terminal and type:
sudo gedit /etc/nsswitch.conf
Find the line that looks like this:
osts: files mdns4_minimal [NOTFOUND=return] dns mdns4
Now change it to look like this:
hosts: files mdns4_minimal [NOTFOUND=return] dns wins mdns4
Your nsswitch.conf file should now look something like this:
passwd:         compat
group:          compat
shadow:         compat
hosts:          files mdns4_minimal [NOTFOUND=return] dns wins mdns4
networks:       files
protocols:      db files
services:       db files
ethers:         db files
rpc:            db files
netgroup:       nis
When complete, simply ‘save’ and close your file before rebooting like so:
sudo reboot
Having done this you should now be able to select ‘GO > Network’ from the desktop menu and view your entire Windows and Linux based network. However, having said that, I have noticed some issues with regard to Winbind on the 32-bit version. So if you have difficulty with Winbind, just reverse the above instruction until an update is released. I am sure they are sorting it out :-)
From this point onwards the article will act a guide and depending on your needs it should not be viewed as an ordered process or a solution. For example, you may wish to add system users prior to completing any configuration work or you may even need to repeat some processes in order to add multiple users. Remember, everyone’s network needs are unique :-)
Using the desktop graphical tools.
Before you begin to use the graphical tools (system-config-samba) we will need to ‘fine-tune’ the Samba Server Settings.
To do this, open the dash and use the search bar to find Samba like so:
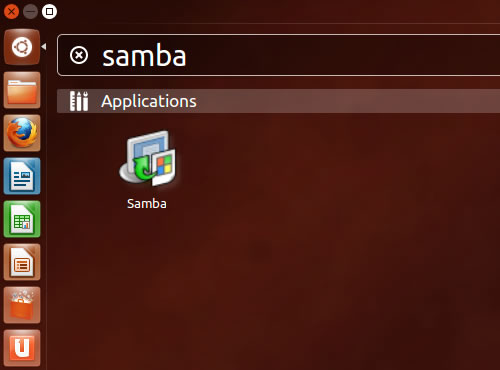
Launch the Samba configuration tool and choose, ‘Preferences > Server Settings’ like so:

In most cases the ‘default settings’ may be exactly what you need but in some instances you may need to make a few changes.
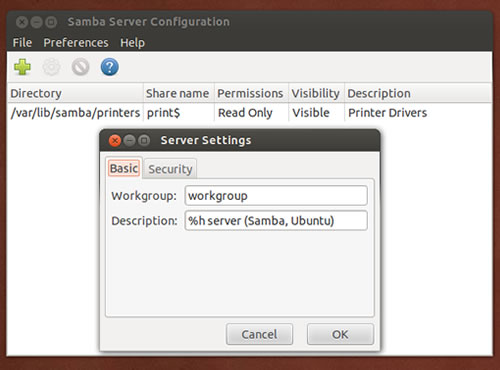
Complete the ‘basic’ tab settings and click ‘OK’ when done:
- Workgroup.This field should be the same value as that used by your Windows Workgroupi.e if your WIndows Users are members of the ‘Home’ workgroup, type ‘Home’ in this field.
- Description.This is the name of your computer as seen by Windows Users.i.e.
keep it simple, use a name similar to that of your actual computer name and do not use spaces on non-internet friendly characters.
As it is not advisable to allow ‘Guests’ there should be no reason to change the ‘security’ settings tab unless you wish to do so:
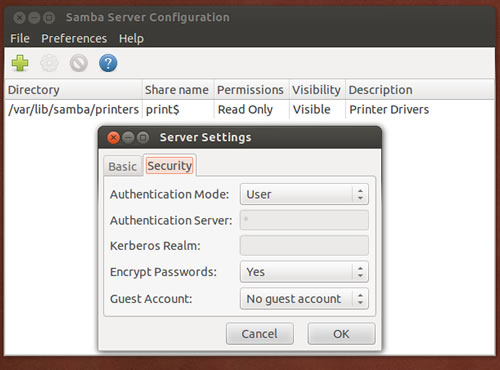
Now click ‘OK’ to close the ‘Server Settings’ window.
To manage your current users simply choose ‘Preferences > Samba Users’ like so:
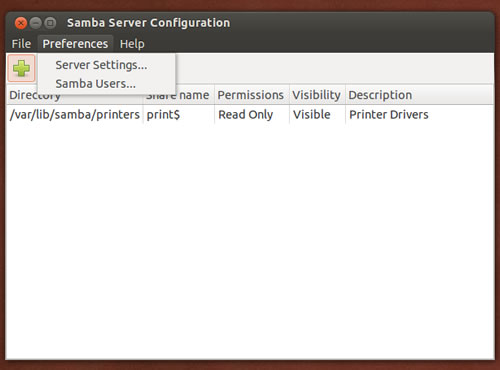
Now launch the ‘Samba Users’ dialogue box. Select your username and click ‘Edit User’ to launch the ‘Create New Samab User’ dialogue box.

Complete the fields as required:
- Windows Username. Confirm the username to be used by Windows users when accessing your share folder(s).
- Samba Password. Use this field to confirm the password to be used by Windows users when accessing your share folder(s).
- Confirm Samba Password. Use this field to re-confirm the password to be used by Windows users when accessing your share folder(s).
Although you may see ‘stars’ in the password field(s) prior to doing this. Delete them and re-type the password.
When complete, click ‘OK’ to close both dialogue boxes before restarting the Samba service like so.
Open Terminal and type:
sudo restart smbd && sudo restart nmbd
Adding a new (Linux) user account with the desktop graphical tools.
If you want to add a new Linux user account, simply:
- Open ‘System Settings’.
- Choose ‘User Accounts’ and unlock the panel using your administration password.
- Use the + (plus) icon to create a new user.
- Enter the new user’s full name (the username will be filled in automatically based on the full name).
As this folder is for ‘sharing purposes only’ do not assign ‘administrative rights’ to this user account.
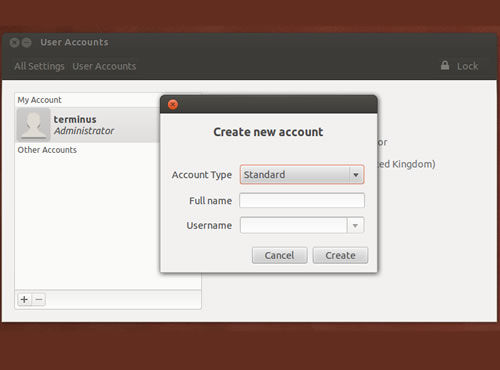
When finished, click <Create>.
As the account is initially disabled, we now need to set the users password.
To do this, simply:
- Ensure the ‘User Accounts’ panel is still unlocked.
- Click ‘Account Disabled’ and complete the resulting dialogue box.
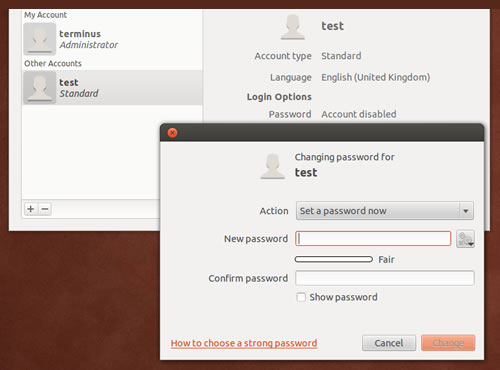
When finished, click ‘Change’.
If you return to the ‘Samba Users’ dialogue box and click ‘Add User’, your new user account should be found in the Unix Username drop-down box like so:
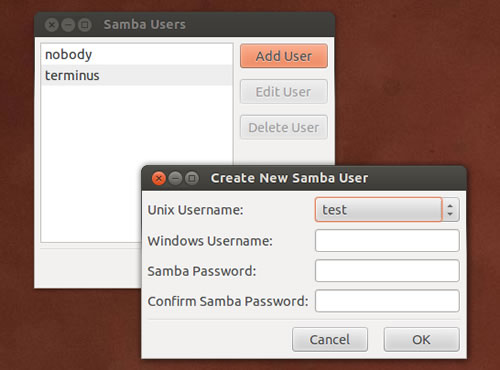
Simply complete the relevant details and click <OK> to finish.
When done, you will be able to assign this user account to specific folders like so:

More information on user accounts can be found here https://help.ubuntu.com/12.04/ubuntu-help/user-accounts.html.
Sharing folders with the graphical tools.
To share a folder with Samba, click the green ‘+’ (plus) icon to open a dialogue box called ‘Create Samba Share’ like so:
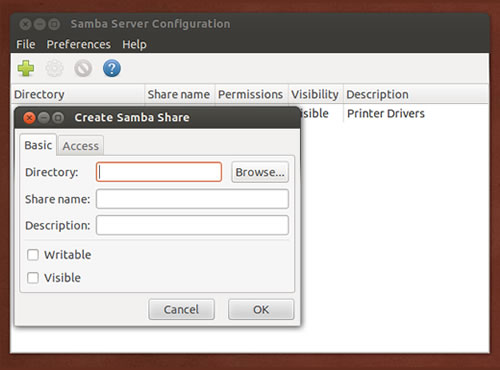
Complete the ‘basic’ tab with the required information.
- Directory. Click ‘Browse’ to locate the relevant folder you wish to share.
- Share Name. Use this field to specify a ‘human friendly’ name for your share folder.
- Description. Type a description of the ‘share folder’ in this field.
- Writable. Shared folders are ‘read-only’ by default, so place a tick in this box if you would like to enable ‘write’ access.
- Visible. Place a tick in this box if you want your share folder to be ‘visible’ on the network.
Following this, we now need to set the permissions for your new share folder.
To do this, simply click the ‘access’ tab in the same dialogue box like so:
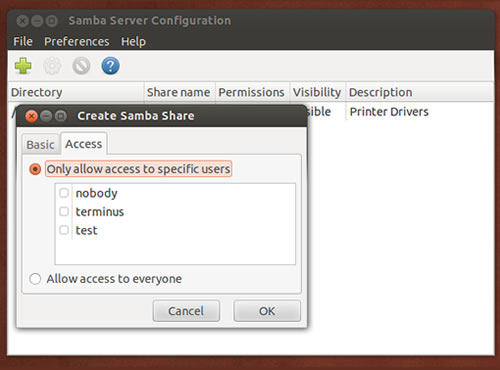
If you would like to restrict access to this folder:
- Select ‘Only allow access to specific users’.
- Use the tick boxes to confirm which users can access the folder in question.
If you would like everyone to access the folder:
- Select ‘Allow access to everyone’.
When complete, click ‘OK’ to close the dialogue box.
To remove any shared folder from Samba, simply choose the relevant folder in the configuration tool and click the ‘red icon’. Don’t worry, this action will not delete the folder or its contents.
And that’s it, your share folders are now active.
Configuring Samba on the command line
Using the graphical tools has its advantages, but if you really want to control every aspect of your Samba server, nothing beats the command line.
So let’s begin by making a backup of our original configuration file:
cp /etc/samba/smb.conf /etc/samba/smb.conf.bak
And open the content of the current configuration file like so:
sudo nano /etc/samba/smb.conf
We are now going to configure the Samba Server by using a basic example to get you started …
I am not going to explain every aspect of Samba (as most server administrators will want to read the official documentation found at http://www.samba.org/) so instead I have provided you with a template in order to get you up and running in no time at all. You should consider this to be a basic template only. It is not definitive by any means and nor do I expect you to replicate it but if you do use it – remember to change the values shown with values relevant to your specific needs or network requirements:
And here is the template:
[global]
    unix charset = UTF-8
    # -------------------------------------------
    # DEFINE YOUR WORKGROUP AND COMPUTER NAME HERE
    workgroup = YOUR-WORKGROUP-NAME
    server string = YOUR-COMPUTER-NAME
	  netbios name = YOUR-COMPUTER-NAME
    # -------------------------------------------
    dns proxy = no
    name resolve order = lmhosts wins bcast host
    # -------------------------------------------
    # IF YOU SET BIND INTERFACES TO YES, TO AVOID LOG ERRORS,
	  # MAKE SURE YOUR SAMBA SERVICE STARTS AFTER THE ETHERNET CARD IS SWITCHED ON
    # bind interfaces only = no
    # bind interfaces only = yes
    bind interfaces only = no

    # ADD THE ETHERNET CARD AND IP ADDRESSES YOU ALLOW
    interfaces = eth0 127.0.0.0/8 192.168.1.0/24
    # -------------------------------------------
    # SAMBA LOG FILES
    log file = /var/log/samba/log.%m
    max log size = 1000
    syslog only = no
    syslog = 0
    # -------------------------------------------
    panic action = /usr/share/samba/panic-action %d
    # LIMIT ACCESS TO USERS ONLY
    security = user
    # USING TDBSAM
    encrypt passwords = true
    passdb backend = tdbsam
    obey pam restrictions = yes
    unix password sync = yes
    passwd program = /usr/bin/passwd %u
    passwd chat = *Entersnews*spassword:* %nn *Retypesnews*spassword:* %nn *passwordsupdatedssuccessfully* .
    pam password change = yes
    map to guest = bad user
    usershare allow guests = no
    # -------------------------------------------
    # INCLUDE THIS SECTION TO DISABLE PRINTERS/CUPS ONLY
    #load printers = no
    #printing = bsd
    #printcap name = /dev/null
    #disable spoolss = yes
    # -------------------------------------------
    # DIRECTORIES
    # -------------------------------------------
    # ENABLE HOME FOLDER ACCESS
    [homes]
        comment = Home Directories
        browseable = no
        writable = yes
        valid users = %S
        valid users = MYDOMAIN%S
        create mask =0755
        directory mask =0755
    # -------------------------------------------
    # EXAMPLE FOLDER WITH LIMITED ACCESS, UNCOMMENT AND CUSTOMISE AS NECESSARY
    #[example]
    #   comment = example share folder on my-computer-name
    #   path = /foldername/foldername/
    #   browseable = yes
    #   guest ok = no
    #   writable = yes
    #   create mask = 0755
    #   directory mask = 0755
    #   valid users = @your-username
    #   force group = your-username-or-group
    #   force create mode = 0755
    # -------------------------------------------
To un-comment a line, simply remove the # (hash) symbol.
Either copy the content of this file to /etc/samba/smb.conf or simply work through the samba configuration file using my template as a guide. Don’t worry, there’s no rush …
When done, ‘save’ the file, ‘close’ it and restart the Samba service in order that it can apply the new settings by using:
sudo service smbd restart && sudo service nmbd restart
Creating (Linux) users and home folders on the command line
Although a complete tutorial on ‘working with files, directories and users’ is beyond the scope of this current article, adding a new user account and creating a home folder is a relatively simple task – just remember to replace my values with something relevant to your needs.
To create a new user with an associated home folder on your server or desktop, use:
sudo adduser new-username-here
Ubuntu will now ask you a few basic questions and then complete the task of [a] creating the new user, [b] creating a specific group for that user and then
And all with a single command :-)
To explain this, here is a step-by-step example with the resulting output. I am going to create a new user called ‘new-username-here’.
The process begins after I type the following command:
sudo adduser new-username-here
Ubuntu will now start the process:
Adding user `new-username-here' ...
Adding new group `new-username-here' (1004) ...
Adding new user `new-username-here' (1004) with group `new-username-here' ...
Creating home directory `/home/new-username-here' ...
Copying files from `/etc/skel' ...
At this point you will be asked to create a password:
Enter new UNIX password:
Retype new UNIX password:
passwd: password updated successfully
Changing the user information for new-username-here
At this point you will be asked to complete some user-based details:
(to leave a field blank, just press the <RETURN> key)
Enter the new value, or press ENTER for the default
	Full Name []: new-username-here
	Room Number []:
	Work Phone []:
	Home Phone []:
	Other []:
At this point you will be asked to confirm your instruction:
Is the information correct? [Y/n]
Wasn’t that easy :-)
Adding (Samba) users on the command line
Finally let’s create a Samba user based on the example above with the following command.
smbpasswd -a new-username-here
You will be asked to confirm a password, but it is as simple as that …
Remember, you will need to give the relevant username and password to your network user.
So until next time …
I hope you continue to enjoy using Ubuntu 12.04 LTS Precise Pangolin.
If you enjoyed reading this post, you’ll love Learnable; the place to learn fresh skills and techniques from the masters. Members get instant access to all of SitePoint’s ebooks and interactive online courses, like Ubuntu Linux.
Frequently Asked Questions (FAQs) about Ubuntu 12.04 LTS Precise Pangolin File Sharing with Samba
How can I ensure the security of my Samba file server?
Ensuring the security of your Samba file server is crucial. You can do this by setting up user authentication. This means that only authorized users will have access to the shared files. To set this up, you need to add users to the Samba server using the ‘smbpasswd’ command. You can also set up a guest account for users who don’t need to have full access to the server. Additionally, you can restrict access to specific IP addresses using the ‘hosts allow’ and ‘hosts deny’ options in the Samba configuration file.
How can I troubleshoot issues with my Samba server?
If you’re experiencing issues with your Samba server, there are several steps you can take to troubleshoot. First, check the Samba log files. These can provide valuable information about what’s going wrong. You can also use the ‘testparm’ command to check your Samba configuration for errors. If you’re still having trouble, you can increase the log level in the Samba configuration file to get more detailed information about the problem.
How can I share a printer using Samba?
Sharing a printer using Samba is a straightforward process. First, you need to install the printer on your Ubuntu system. Once that’s done, you can add the printer to the Samba configuration file using the ‘printers’ section. You’ll need to specify the path to the printer, as well as any access restrictions. After you’ve added the printer, you can access it from other computers on the network.
How can I access my Samba shares from a Windows computer?
To access your Samba shares from a Windows computer, you’ll need to map the network drive. You can do this from the ‘Computer’ or ‘This PC’ window. Click on ‘Map network drive’, then enter the IP address of your Ubuntu system and the name of the share. You’ll be prompted to enter your username and password. Once you’ve done that, you should be able to access your Samba shares.
How can I improve the performance of my Samba server?
There are several ways to improve the performance of your Samba server. One of the most effective is to use the ‘socket options’ setting in the Samba configuration file. This allows you to optimize the way Samba uses your network. You can also increase the ‘read raw’ and ‘write raw’ settings to improve file transfer speeds. Additionally, using a dedicated hard drive for your Samba shares can significantly improve performance.
How can I set up a Samba domain controller?
Setting up a Samba domain controller allows you to manage a network of computers from a central location. To do this, you’ll need to install the ‘samba’ and ‘samba-common-bin’ packages. Then, you can use the ‘smb.conf’ file to configure your domain controller. You’ll need to specify the workgroup, netbios name, and security settings, among other things.
How can I back up my Samba configuration?
Backing up your Samba configuration is a good idea in case you need to restore it later. You can do this by copying the ‘smb.conf’ file to a safe location. You can also use the ‘testparm’ command to check your configuration for errors before you back it up.
How can I set up a Samba file server on a virtual machine?
Setting up a Samba file server on a virtual machine is similar to setting it up on a physical machine. You’ll need to install the ‘samba’ and ‘samba-common-bin’ packages, then configure your Samba server using the ‘smb.conf’ file. You’ll also need to ensure that the virtual machine’s network settings allow it to communicate with the rest of your network.
How can I set up a Samba file server on a cloud server?
Setting up a Samba file server on a cloud server is a great way to share files across a distributed network. The process is similar to setting up a Samba server on a physical machine. You’ll need to install the ‘samba’ and ‘samba-common-bin’ packages, then configure your Samba server using the ‘smb.conf’ file. You’ll also need to ensure that your cloud server’s firewall settings allow Samba traffic.
How can I set up a Samba file server on a Raspberry Pi?
Setting up a Samba file server on a Raspberry Pi is a cost-effective way to share files on your network. You’ll need to install the ‘samba’ and ‘samba-common-bin’ packages, then configure your Samba server using the ‘smb.conf’ file. You’ll also need to ensure that your Raspberry Pi’s network settings allow it to communicate with the rest of your network.

