

Networking is often regarded to be complicated and very difficult to manage but as it forms an essential role in the day-to-day use of your computer the purpose of this article is to expose a few ‘tips and tricks’ that will serve to improve your computers connectivity and overall performance by showing you how easy it is to take control of Ubuntu 12.04, LTS Precise Pangolin.
So let’s get started …
Key Takeaways
- Discover your local IP address using graphical tools or command line methods like `ifconfig` for wired connections and `iwconfig` for wireless.
- Configure a static IP address through the Network Manager for an easy switch between static and DHCP settings, suitable for desktop and portable devices.
- Disable the Network Manager and manually set a static IP for enhanced performance, especially for wired connections.
- Add multiple IP addresses to a single Ethernet card by creating virtual network adapters, allowing for expanded network configuration on one device.
- Change your computer’s hostname via the command line to better identify your device on the network.
- Manage the hosts file to customize how your computer resolves specific domain names, improving site access speed or blocking sites.
What is my local IP address
It may be a easy question to begin with, but in a world of complexity it is often the simple questions that get overlooked.
Using the graphical tools:
Right click on the ‘networking icon’ in the top panel of the Ubuntu desktop and choose ‘Connection Information’ as shown below:
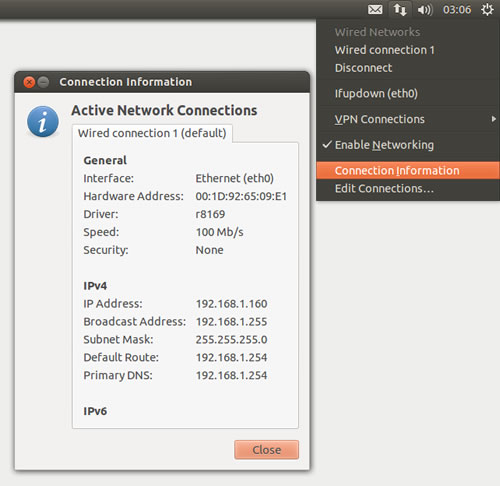
The resulting dialogue box will then provide feedback on your current settings.
Using the command line interface:
On the other hand, for those individuals who are beginning to enjoy the power of Terminal or for those of you who use a server (via the Console or Putty or similar).
If you have a wireless based connection, run:
iwconfig
If you have a ‘wired’ connection, run
ifconfig
The results for ‘ifconfig’ will look something like this:
eth0      Link encap:Ethernet  HWaddr 00:1d:92:65:09:e1
          inet addr:192.168.1.100  Bcast:192.168.1.255  Mask:255.255.255.0
          inet6 addr: fe80::21d:92ff:fe65:9e1/64 Scope:Link
          UP BROADCAST RUNNING MULTICAST  MTU:1500  Metric:1
          RX packets:510 errors:0 dropped:0 overruns:0 frame:0
          TX packets:315 errors:0 dropped:0 overruns:0 carrier:0
          collisions:0 txqueuelen:1000
          RX bytes:80353 (80.3 KB)  TX bytes:38731 (38.7 KB)
          Interrupt:42 Base address:0xa000

lo        Link encap:Local Loopback
          inet addr:127.0.0.1  Mask:255.0.0.0
          inet6 addr: ::1/128 Scope:Host
          UP LOOPBACK RUNNING  MTU:16436  Metric:1
          RX packets:108 errors:0 dropped:0 overruns:0 frame:0
          TX packets:108 errors:0 dropped:0 overruns:0 carrier:0
          collisions:0 txqueuelen:0
          RX bytes:8176 (8.1 KB)  TX bytes:8176 (8.1 KB)
And because the command line provides us with additional opportunities, if you would like to quickly identify all the available ethernet devices on your computer, you can run
ifconfig -a | grep eth
The result will look something like this:
eth0 Link encap:Ethernet HWaddr 00:1d:92:65:09:e1
Well done, but just before we finish-up I would like to take this opportunity to show you another useful command that can help identify all the network interfaces available to your system. Known as the ‘lshw’ command, this tool will not only detail your ethernet devices but it will also provide a plethora of information on your hardware’s ‘other’ capabilities.
To use this tool, simply run the following command and wait a few seconds whilst Ubuntu quieries your devices:
sudo lshw -class network
And the result will look something like this:
  *-network
       description: Ethernet interface
       product: RTL8111/8168B PCI Express Gigabit Ethernet controller
       vendor: Realtek Semiconductor Co., Ltd.
       physical id: 0
       bus info: pci@0000:02:00.0
       logical name: eth0
       version: 01
       serial: 00:1d:92:65:09:e1
       size: 100Mbit/s
       capacity: 1Gbit/s
       width: 64 bits
       clock: 33MHz
       capabilities: pm vpd msi pciexpress bus_master cap_list rom ethernet physical tp mii 10bt 10bt-fd 100bt 100bt-fd 1000bt 1000bt-fd autonegotiation
       configuration: autonegotiation=on broadcast=yes driver=r8169 driverversion=2.3LK-NAPI duplex=full firmware=N/A ip=192.168.1.160 latency=0 link=yes multicast=yes port=MII speed=100Mbit/s
       resources: irq:43 ioport:d800(size=256) memory:feaff000-feafffff memory:feac0000-feadffff
Sometimes you’ve just ‘gotta’ love the details, but now we know something about our computer we can begin to take control :-)
How do I create a static IP address with the Network Manager
The following instruction shows you how to create a fixed (or static) IP address with the Network Manager.
This approach is best suited to all desktop users who may require the need to keep the functionality of the Network Manager or for those that use netbooks, laptops and and other wireless connections that may require a DHCP based option in the future. Don’t worry, it is all very simple:
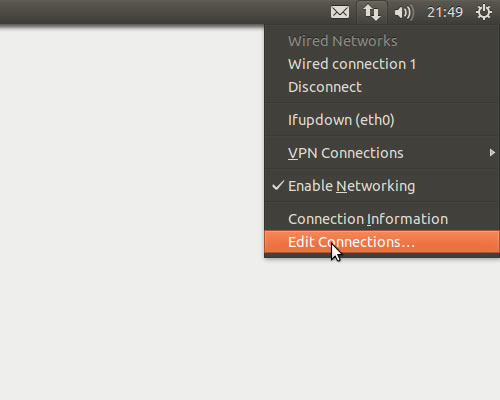
Click the network menu on the top panel (the ‘up/down’ arrows icon) and select ‘Edit Connections’.
Alternatively you can choose System Settings > Network > Choose your ‘Network Connection’ from the left hand panel and select ‘Options’.
Now choose the relevant connection and click edit.
For example, if you are using a ‘wired connection’, choose the ‘wired’ tab to find your connection.
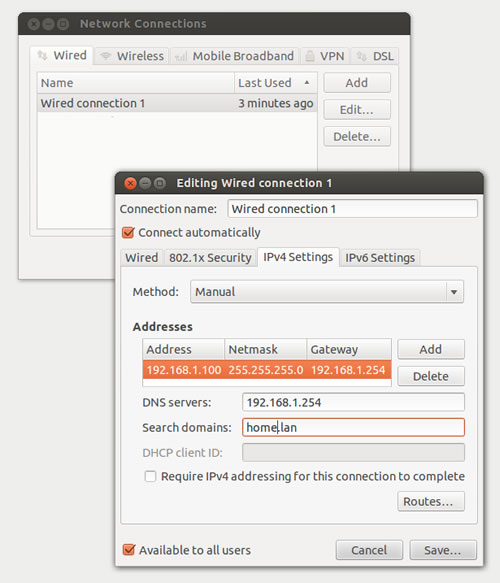
In the resulting dialogue box you should:
- Select the ‘IPv4 Settings’ tab and change the ‘Method’ to ‘Manual’.
- Click Add and complete each field with your IP address, network mask and default gateway.Always press the ‘Enter/Return’ when you’ve finished typing each address otherwise the dialogue will fail to accept your new settings and the ‘save’ button will remain inactive/greyed-out.
- Include the IP addresses of the DNS servers. Multiple addresses should be separated by commas.
- Click Save and close the remaining dialogue boxes.
And there you go …
If all is well you should be able to view web sites and/or view your local network but in some situations and depending on your network topology a reboot may be necessary.
To confirm your new settings, simply check your connection settings as shown previously (see above)
But what if I need DHCP again?
If you ever need to return to a dynamically assigned IP address simply re-run the previous steps. Find your current connection, select the ‘IPv4 Settings’ tab and change the ‘Method’ to ‘Automatic (DHCP)’. To finalise this reversal click save and reboot (depending on the network conditions and how the DHCP server is configured).
Disable the Network Manager and ‘hard-code’ a static IP address
This solution explains how to create a fixed (or static) IP address without using the Network Manager.
The Network Manager is a very nice feature, but only suitable for individuals who require dynamically assigned connections or those who require wireless connectivity. Yes, it is true to say that these are both very popular in homes and offices throught the world but for those of us who use and prefer the benefit of a ‘wired connection’ using the Network Manager does come at the cost of performance. So this solution uses the traditional approach to ‘hard-coding’ your network connection and it is most suitable to those individuals who demand maximum performance or absolute stability.
By using this approach you should note that we will not be removing the Network Manager, merely disabling it with the intention to capitalise on the performance gains by by-passing or side-stepping this device. These performance gains will not only be noticed in terms of network speed but also in terms of the computer in general.
Again, don’t worry, the process to disable the Network Manager is very simple but it will require us to run various ‘commands’ in Terminal in order to complete some steps.
So let’s begin by making a backup of our original file.
In Terminal type:
sudo cp /etc/NetworkManager/NetworkManager.conf /etc/NetworkManager/NetworkManager.conf.bak
This will serve to back-up our original file to ‘/etc/NetworkManager/NetworkManager.conf.bak’. Hopefully you will not need it, but if you ever need to restore the original file simply open Terminal and reverse the command like so: ‘sudo cp /etc/NetworkManager/NetworkManager.conf.bak /etc/NetworkManager/NetworkManager.conf’ and reboot.
And with the confidence that we are fully backed-up we shall now proceed to disable the Network Manager.
In Terminal, type:
sudo gedit /etc/NetworkManager/NetworkManager.conf
This will open the ‘NetworkManager.conf’ file in our text editor.
Now change:
managed=false
to
managed=true
So it looks like this:

When done, save the file and close it.
You can re-enable the network manager at any time by simply reversing the steps shown above or by restoring your back-up file. Remember to reboot in order to apply these changes.
Now we have successfully disabled the Network Manager we can proceed to create our Static IP address by making some direct changes to the ‘interface’ file; but with safety in mind let’s begin by making a backup of our original file.
In Terminal and type:
sudo cp /etc/network/interfaces /etc/network/interfaces.bak
This will back-up our original file to /etc/network/interfaces.bak. Again, it is not expected that we will need it but if you ever need to restore it open Terminal and reverse the command like so: sudo cp /etc/network/interfaces.bak /etc/network/interfaces
Now lets add our static IP address.
In Terminal type:
sudo gedit /etc/network/interfaces
Authenticate yourself in the usual way and then replace the file contents as shown below, where xxx represents values relevant to your needs:
auto lo
iface lo inet loopback

auto eth0
iface eth0 inet static
	address 	xxx.xxx.xxx.xxx
	netmask 	xxx.xxx.xxx.xxx
	network 	xxx.xxx.xxx.xxx
	broadcast 	xxx.xxx.xxx.xxx
	gateway 	xxx.xxx.xxx.xxx
And to help you out, here is an example with an explanation of the values concerned:
auto lo
iface lo inet loopback

auto eth0
iface eth0 inet static
	address 	192.168.1.100 	(this is my computers IP address)
	netmask 	255.255.255.0 	(this is my subnet mask)
	network 	192.168.1.0	(this is my network base address)
	broadcast 	192.168.1.255	(this is my broadcast address)
	gateway 	192.168.1.254	(this is my gateway/router's ip address)
When complete, simply save and close the file and reboot your computer to complete these steps.
We are re-booting our computer at this point in order to ‘dis-engage’ the Network Manager, and once complete you can always re-configure your IP address at any time by making the necessary changes to the ‘interfaces’ file (shown above) and using the following command to restart your networking service: ‘sudo /etc/init.d/networking restart’.
After you restart your computer you will discover (visually) that nothing has changed but as a consequence you should be experiencing a ‘more’ responsive computer and network connection.
Should you ever want to re-enable the Network Manager. Simply reverse the steps we have taken above and/or restore you back-up files and reboot and as we created them with the ‘cp’ or copy command – unless you delete them, your original backup files will always remain for future reference.
Create Virtual Network Adapters (add more than 1 IP address to a single ethernet card)
In some situations this can be very useful and as an extension to our previous solution of ‘disabling the network manager and hard-coding a static IP address’ I will now show you how to assign more than one IP address to the same ethernet card:
In Terminal type:
sudo gedit /etc/network/interfaces
Authenticate yourself and then replace the file contents like so, where xxx represents values relevant to your needs:
auto lo
iface lo inet loopback

auto eth0
iface eth0 static
	address 	xxx.xxx.xxx.xxx
	netmask 	xxx.xxx.xxx.xxx
	network 	xxx.xxx.xxx.xxx
	broadcast 	xxx.xxx.xxx.xxx
	gateway 	xxx.xxx.xxx.xxx
auto eth0:0
iface eth0:0 static
	address 	xxx.xxx.xxx.xxx
	netmask 	xxx.xxx.xxx.xxx
	gateway 	xxx.xxx.xxx.xxx
And to make this as simple as possible, here is an example:
auto lo
iface lo inet loopback

auto eth0
iface eth0 static
	address 	192.168.1.100
	netmask 	255.255.255.0
	network 	192.168.1.0
	broadcast 	192.168.1.255
	gateway 	192.168.1.254
auto eth0:0
iface eth0:0 static
	address 	192.168.1.101
	netmask 	255.255.255.0
	gateway 	192.168.1.254
By doing this I will be adding two IP addresses to my a single ethernet card. It will not only have the IP address of 192.168.1.100 but it will also have the alternative address of 192.168.1.101 (as a virtual instance).
The trick is to follow the virtual naming scheme (i.e. eth0:0, eth0:1, eth0:2 etc …) and to ensure that every instance maintains a unique IP address. In this way you can create as many ‘instances’ of an IP address as required.
To illustrate this point, let’s add a third IP address to our example:
auto lo
iface lo inet loopback

auto eth0
iface eth0 static
	address 	192.168.1.100
	netmask 	255.255.255.0
	network 	192.168.1.0
	broadcast 	192.168.1.255
	gateway 	192.168.1.254
auto eth0:0
iface eth0:0 static
	address 	192.168.1.101
	netmask 	255.255.255.0
	gateway 	192.168.1.254
iface eth0:1 static
	address 	192.168.1.102
	netmask 	255.255.255.0
	gateway 	192.168.1.254
When complete, remember to reboot your computer to apply the changes or open Terminal and type:
sudo /etc/init.d/networking restart
You can then run ‘ifconfig’ to view your new settings.
Have fun ..!
Change your computer’s hostname
You may like your current computer name, or you may want to change it.
In this short recipe I will show you how to view and change your computer name with relative ease …
In Terminal type:
sudo gedit /etc/hostname
The file will probably look something like this:
ubuntu-computername
To change the name of your computer, simply delete the existing content and replace as required.
Remember, the actual name can be anything your want as long as you remember some basic principles:
- Desktops generally use a singular name (as shown above) whereas all servers or ‘desktops acting as servers’ should be in the format of computername.computerdomain.suffix.
- On a local network computers should refrain from using the standard or typical internet based suffix or TLD unless your local DNS can account for such similarities.
- Use ‘internet friendly’ names and do not use a computer name that already exists on your network.
- Do not use spaces or non-internet friendly characters.
Once complete, simply choose ‘save’, ‘close’ the file and reboot your computer to see the changes.
Your new computer name will be in the top-left hand side of the login screen but if you missed this or need to confirm your current or new hostname at any time.
Open Terminal and type:
sudo hostname
And the result should reflect the changes you made …
Managing the Hosts file
The hosts file file consists of a list of IP addresses and corresponding hostnames. Most users may never need to touch this area of their computer but there maybe an occasion when you need to edit the hosts file on your machine. This can because of any number of reasons (i.e. reversing the effect of malicious activity) or it can be because your are trying to make your life that little ‘quicker’ buy ‘hard-coding’ the address of an internal or external web site. Similarly, if your network contains computers whose IP addresses that are not listed in an existing DNS record, then it is recommended that you add them to the hosts file. So with this in mind I will now show you how to manage you hosts file.
Before you begin, you can make a back-up of this file by simply typing the following command in to Terminal:
sudo cp /etc/hosts /etc/hosts.bak
Now, to proceed and customise your hosts file simply return to the command line and type:
sudo gedit /etc/hosts
A typical desktop file will look like this (simply substitue the example values with those relevant to your computer):
127.0.0.1			localhost
127.0.1.1			ubuntu-computername

# The following lines are desirable for IPv6 capable hosts
::1     ip6-localhost ip6-loopback
fe00::0 ip6-localnet
ff00::0 ip6-mcastprefix
ff02::1 ip6-allnodes
ff02::2 ip6-allrouters
However, having said that and just for the record, for the ‘server’ or ‘desktop server’ version of the same file should look more like this:
127.0.0.1       localhost.localdomain   localhost
192.168.1.100 	ubuntu-computername.ubuntu-domainname.lan  ubuntu-computername

# The following lines are desirable for IPv6 capable hosts
::1     localhost ip6-localhost ip6-loopback
fe00::0 ip6-localnet
ff00::0 ip6-mcastprefix
ff02::1 ip6-allnodes
ff02::2 ip6-allrouters
You will notice that my examples include the IPv6 instruction and this is entirely at your discretion as it depends on whether your network supports it.
For example, you may ignore these values (not include them or comment them out by placing a ‘hash’ character at the beginning of the line) like so if your computer does not use IPv6.
# The following lines are desirable for IPv6 capable hosts
#::1     ip6-localhost ip6-loopback
#fe00::0 ip6-localnet
#ff00::0 ip6-mcastprefix
#ff02::1 ip6-allnodes
#ff02::2 ip6-allrouters
Of course, disabling IPv6 is optional and can sometimes improve performance but if you are in doubt, simply ignore them (but as they sometimes say in ‘old blighty’ – ‘don’t fix what ain’t broke’).
So getting back on track …
In your hosts file you may want to include a list or pre-identified servers and workstations in order to speed-up name resolution like so:
192.168.1.200		servername1 www servername1.localdomain.lan
192.168.1.200		servername2 mail servername2.localdomain.lan
In my example I have included an alias in addition to the actual names – i.e. servername1 is also known as www and servername2 is also known as mail. You do not need to do this as my other examples will show.
Windows (and Mac) users should notice that this process very similar to customisng the ‘hosts’ file on any Windows/Mac based operating system and the resulting file could look like this:
127.0.0.1			localhost
127.0.1.1			ubuntu-computername

# PUT YOU COMMENT AFTER A HASH (#) FOR REFERENCE - NOT REQUIRED BUT USEFUL
192.168.1.200		www.website1.com
192.168.1.201		www.website2.com

# The following lines are desirable for IPv6 capable hosts
::1     ip6-localhost ip6-loopback
fe00::0 ip6-localnet
ff00::0 ip6-mcastprefix
ff02::1 ip6-allnodes
ff02::2 ip6-allrouters
Consequently, my computer will now use the IP address for www.website1.com instead of searching a DNS record thereby ensuring that my ability to view the website in question would be quicker than before.
Taking this one step further … and by giving it a little twist.
For those of you who wish to excercise some ‘parental power’ you could easily use this as a way to block direct access to some ‘unwanted web sites’ by sending someone who expects to go to www.website1.com to www.website2.com, like so:
#192.168.1.200	www.website1.com
192.168.1.201		www.website1.com
192.168.1.201		www.website2.com
192.168.1.202		www.website3.com
192.168.1.123		www.website4.com
192.168.1.167		www.website5.com
Notice I have commented out the real address of website1 with a hash (#) and that both website1 and website 2 now have the same IP address … (the IP address being the actual address of website2)
It isn’t a perfect of solution by any means but it is food for thought and can serve as a starting point for future development ;-)
How to re-configure DNS resolution
The purpose of this section is to show you how to configure the appropriate nameserver to use when resolving IP address to hostnames and vice versa. It is not intended to explain how to configure the system as a name server as this is something I will be covering in a future article. You should only affect this file if you are not using the Network Manager and want to use a static IP address.
The resolv.conf file is the resolver configuration file and it is used to configure workstation or server access to the Internet Domain Name System (DNS). This file defines which nameservers to use and in what order they are tried. You should therefore put the most reliable server first. It is convention that up to three name servers are supported. However, if no nameserver option is given, the resolver will attempt to connect to the name server on the local host.
Resolv.conf still does this, but with the release of the Precise Pangolin a few things have changed, and regardless as to whether you are running a desktop or a server your system is probably running the resolveconf program:
‘Resolveconf’ is a small program that resides in ‘/etc/resolvconf’ that dynamically modifies the nameserver information on boot. It is a useful tool, but for our purposes it can be disruptive, so we are going to work around it by simply adding a new entry to our ‘/etc/network/interfaces’ file:
In Terminal type:
sudo gedit /etc/network/interfaces
Now add the following nameserver line to your file, changing XXX to something more applicable to your needs:
dns-nameservers xxx.xxx.xxx.xxx xxx.xxx.xxx.xxx
Similar to the example shown above here is the new file using Google’s public nameservers:
auto lo
iface lo inet loopback
auto eth0
iface eth0 static
	address 	192.168.1.100
	netmask 	255.255.255.0
	network 	192.168.1.0
	broadcast 	192.168.1.255
	gateway 	192.168.1.254
        dns-nameservers 8.8.8.8 8.8.4.4
When complete, click ‘save’, then ‘close’ the file and reboot to apply the changes.
On reboot, you can see that the new nameserver information has now been applied to our ‘resolve.conf’ file by opening Terminal and typing:
cat /etc/resolv.conf
Which may look something like this:
# Dynamic resolv.conf(5) file for glibc resolver(3) generated by resolvconf(8)
#     DO NOT EDIT THIS FILE BY HAND -- YOUR CHANGES WILL BE OVERWRITTEN
nameserver 8.8.8.8
nameserver 8.8.4.4
nameserver 127.0.0.1
So having made your changes, to query the DNS capabilities of your system, simply return to the command line and type:
nslookup www.sitepoint.com
or alternatively try
dig www.sitepoint.com
And that’s it for now … but most of all, have fun :-)
So until next time …
I hope that you continue to enjoy using Ubuntu 12.04 LTS Precise Pangolin.
If you enjoyed reading this post, you’ll love Learnable; the place to learn fresh skills and techniques from the masters. Members get instant access to all of SitePoint’s ebooks and interactive online courses, like Ubuntu Linux.
Frequently Asked Questions (FAQs) about Ubuntu 12.04 LTS Networking Tips and Tricks
How Can I Configure a Static IP Address in Ubuntu 12.04 LTS?
Configuring a static IP address in Ubuntu 12.04 LTS involves editing the /etc/network/interfaces file. Open the terminal and type sudo nano /etc/network/interfaces. You will see something like this:auto loiface lo inet loopback
To set a static IP, add the following lines:auto eth0iface eth0 inet staticaddress 192.168.1.100netmask 255.255.255.0gateway 192.168.1.1dns-nameservers 8.8.8.8 8.8.4.4
Save and close the file. Restart the network with sudo /etc/init.d/networking restart.
How Do I Use NetworkManager in Ubuntu 12.04 LTS?
NetworkManager is a dynamic network control and configuration system that aims to keep network devices and connections up and active when they are usable. It’s primarily used for desktop environments, but can also be used in server installations for basic network configuration. To use NetworkManager, you need to install it first by typing sudo apt-get install network-manager in the terminal. Once installed, you can access it from the system tray.
How Can I Troubleshoot Network Issues in Ubuntu 12.04 LTS?
Troubleshooting network issues in Ubuntu 12.04 LTS can be done using various tools and commands. The ping command is a simple way to check if your computer can reach a specific IP address. The netstat command can be used to display network connections, routing tables, interface statistics, etc. The traceroute command can show the path that packets take to reach a network host. The nslookup command can be used to query the DNS to find domain names or IP addresses.
How Can I Set Up a VPN in Ubuntu 12.04 LTS?
Setting up a VPN in Ubuntu 12.04 LTS involves installing a VPN client and configuring it with your VPN provider’s details. OpenVPN is a popular VPN client that can be installed with sudo apt-get install openvpn. Once installed, you can configure it with your VPN provider’s .ovpn configuration file.
How Can I Monitor Network Traffic in Ubuntu 12.04 LTS?
Monitoring network traffic in Ubuntu 12.04 LTS can be done using various tools. iftop is a command-line tool that displays bandwidth usage on an interface. It can be installed with sudo apt-get install iftop. nethogs is another tool that breaks down network traffic per process. It can be installed with sudo apt-get install nethogs.
How Can I Configure DNS Settings in Ubuntu 12.04 LTS?
DNS settings in Ubuntu 12.04 LTS can be configured by editing the /etc/resolv.conf file. Open the file with sudo nano /etc/resolv.conf and add your DNS servers:nameserver 8.8.8.8nameserver 8.8.4.4
Save and close the file. Your DNS settings are now configured.
How Can I Secure My Network in Ubuntu 12.04 LTS?
Securing your network in Ubuntu 12.04 LTS involves various steps. Installing a firewall like UFW can help protect your network. It can be installed with sudo apt-get install ufw. Configuring secure SSH settings, disabling unused network services, and keeping your system updated are also important steps in securing your network.
How Can I Share Files Over the Network in Ubuntu 12.04 LTS?
File sharing over the network in Ubuntu 12.04 LTS can be done using Samba. Samba is a software suite that provides seamless file and print services to SMB/CIFS clients. It can be installed with sudo apt-get install samba.
How Can I Configure a Proxy Server in Ubuntu 12.04 LTS?
Configuring a proxy server in Ubuntu 12.04 LTS involves editing the /etc/environment file. Open the file with sudo nano /etc/environment and add your proxy server details:http_proxy="http://proxyserver:port/"https_proxy="http://proxyserver:port/"ftp_proxy="http://proxyserver:port/"
Save and close the file. Your proxy server is now configured.
How Can I Set Up a DHCP Server in Ubuntu 12.04 LTS?
Setting up a DHCP server in Ubuntu 12.04 LTS involves installing the dhcp3-server package and configuring it. Install it with sudo apt-get install isc-dhcp-server. Once installed, you can configure it by editing the /etc/dhcp/dhcpd.conf file.