

Key Takeaways
- Building an AR Android app with Vuforia and Unity involves using a marker-based approach, with an image recognized and tracked by a mobile device’s camera serving as the origin for augmentation.
- The process begins with creating a Vuforia Developer Portal account, generating a license key for the application, and setting up an image as a target. After creating a database, images are added to it, and the database is then downloaded for use in Unity.
- The Unity phase involves creating a new project, importing the Vuforia Unity packages, adding 3D models, setting up an ARCamera and adding the App License Key, and activating the Image_Targets Dataset. The AR app is then built for Android, with changes made in the Player Settings options before building and running.
- The AR app created in this tutorial is a simple one with animation, but no script writing. In the follow-up tutorial, cardboard support and additional Vuforia features will be added to the app. The source code is available on Github, and the apk can be downloaded for testing.
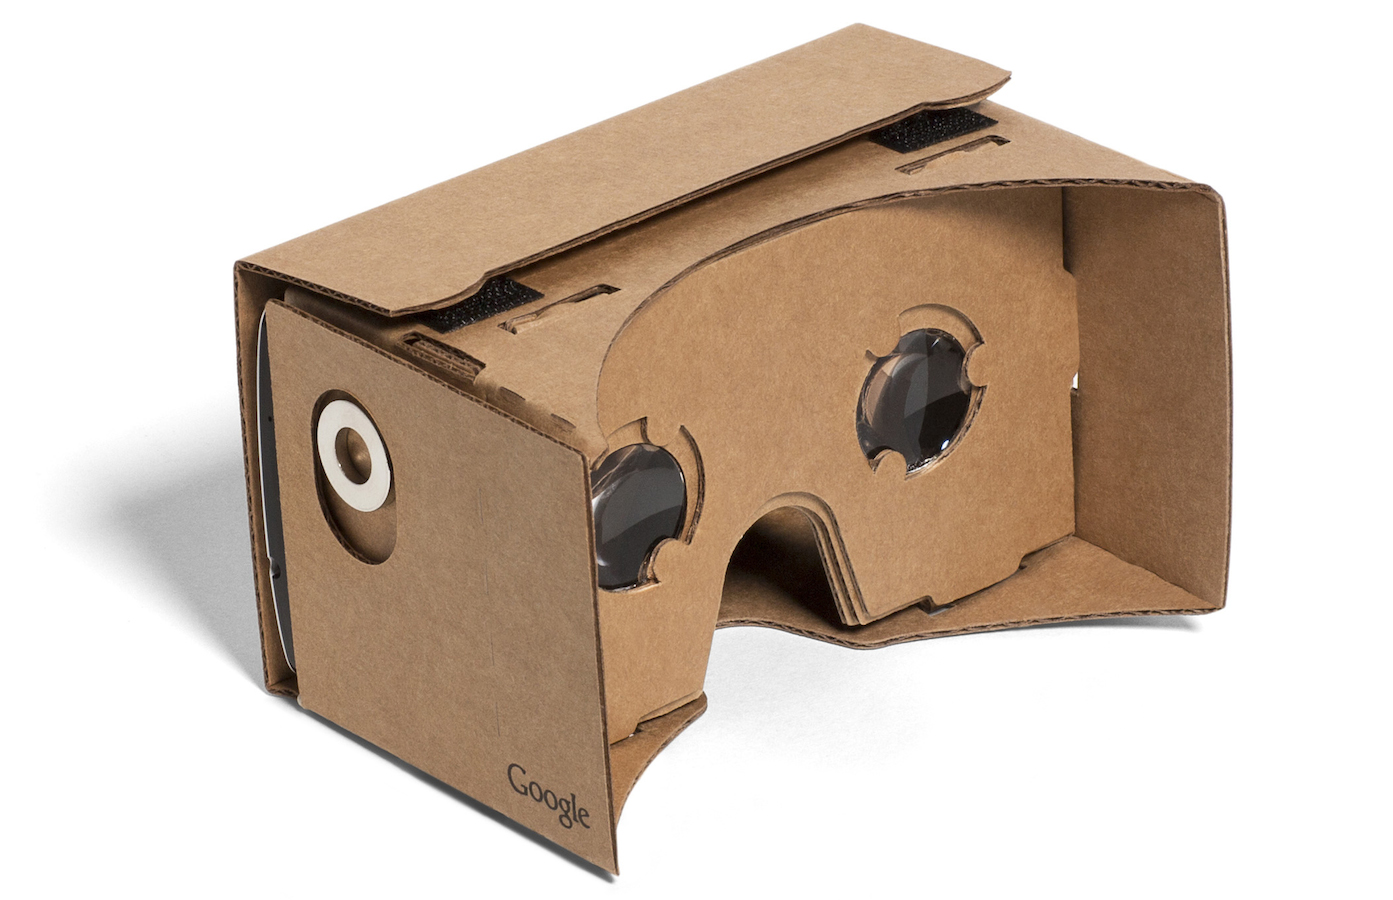
Virtual and Augmented Reality has been getting a lot of attention lately. Lots of really cool Head Mounted Devices (HMDs) like Oculus, Hololens, HTC Vive, FOVE, and Magic Leap have been coming up. The simplest and cheapest of all these HMDs is Google Cardboard, and it already has more than a million users worldwide.
Patrick has covered Building Google Cardboard VR Apps in Unity in his recent post. In the following two tutorials, we will be developing a basic Android Augmented Reality application for Google Cardboard using Unity3D. We will be using the Augmented Reality SDK named “Vuforia” to make this app.
The following software and the corresponding versions will be used in the following two posts:
- Vuforia 5
- Unity 3D 5.x
- Cardboard SDK version 0.5.x (needed for next tutorial)
- Android Studio and SDK tools (these need to be installed and set up for Unity builds to work. More information about this can be found in the “Integrating with Unity” section.)
Brief Overview
There are several approaches to making Augmented Reality apps. We will be using a marker based approach for making our AR app for mobile devices. In the next tutorial, we will be adding cardboard support.
Marker/Image Target – this is an image which is recognized and tracked by a mobile device’s camera. This acts as an origin for augmentation. Once recognized, content can be displayed with respect to it.
This tutorial will broadly have three parts:
- Getting started with Vuforia
- Integrating with Unity
- Demo (Fun part)
Getting started with Vuforia
To get started, we will need to go to Vuforia’s Developer Portal and create an account.
Once logged in, we can proceed to the “Develop” page. To use Vuforia with Unity, we will need to do two things:
-
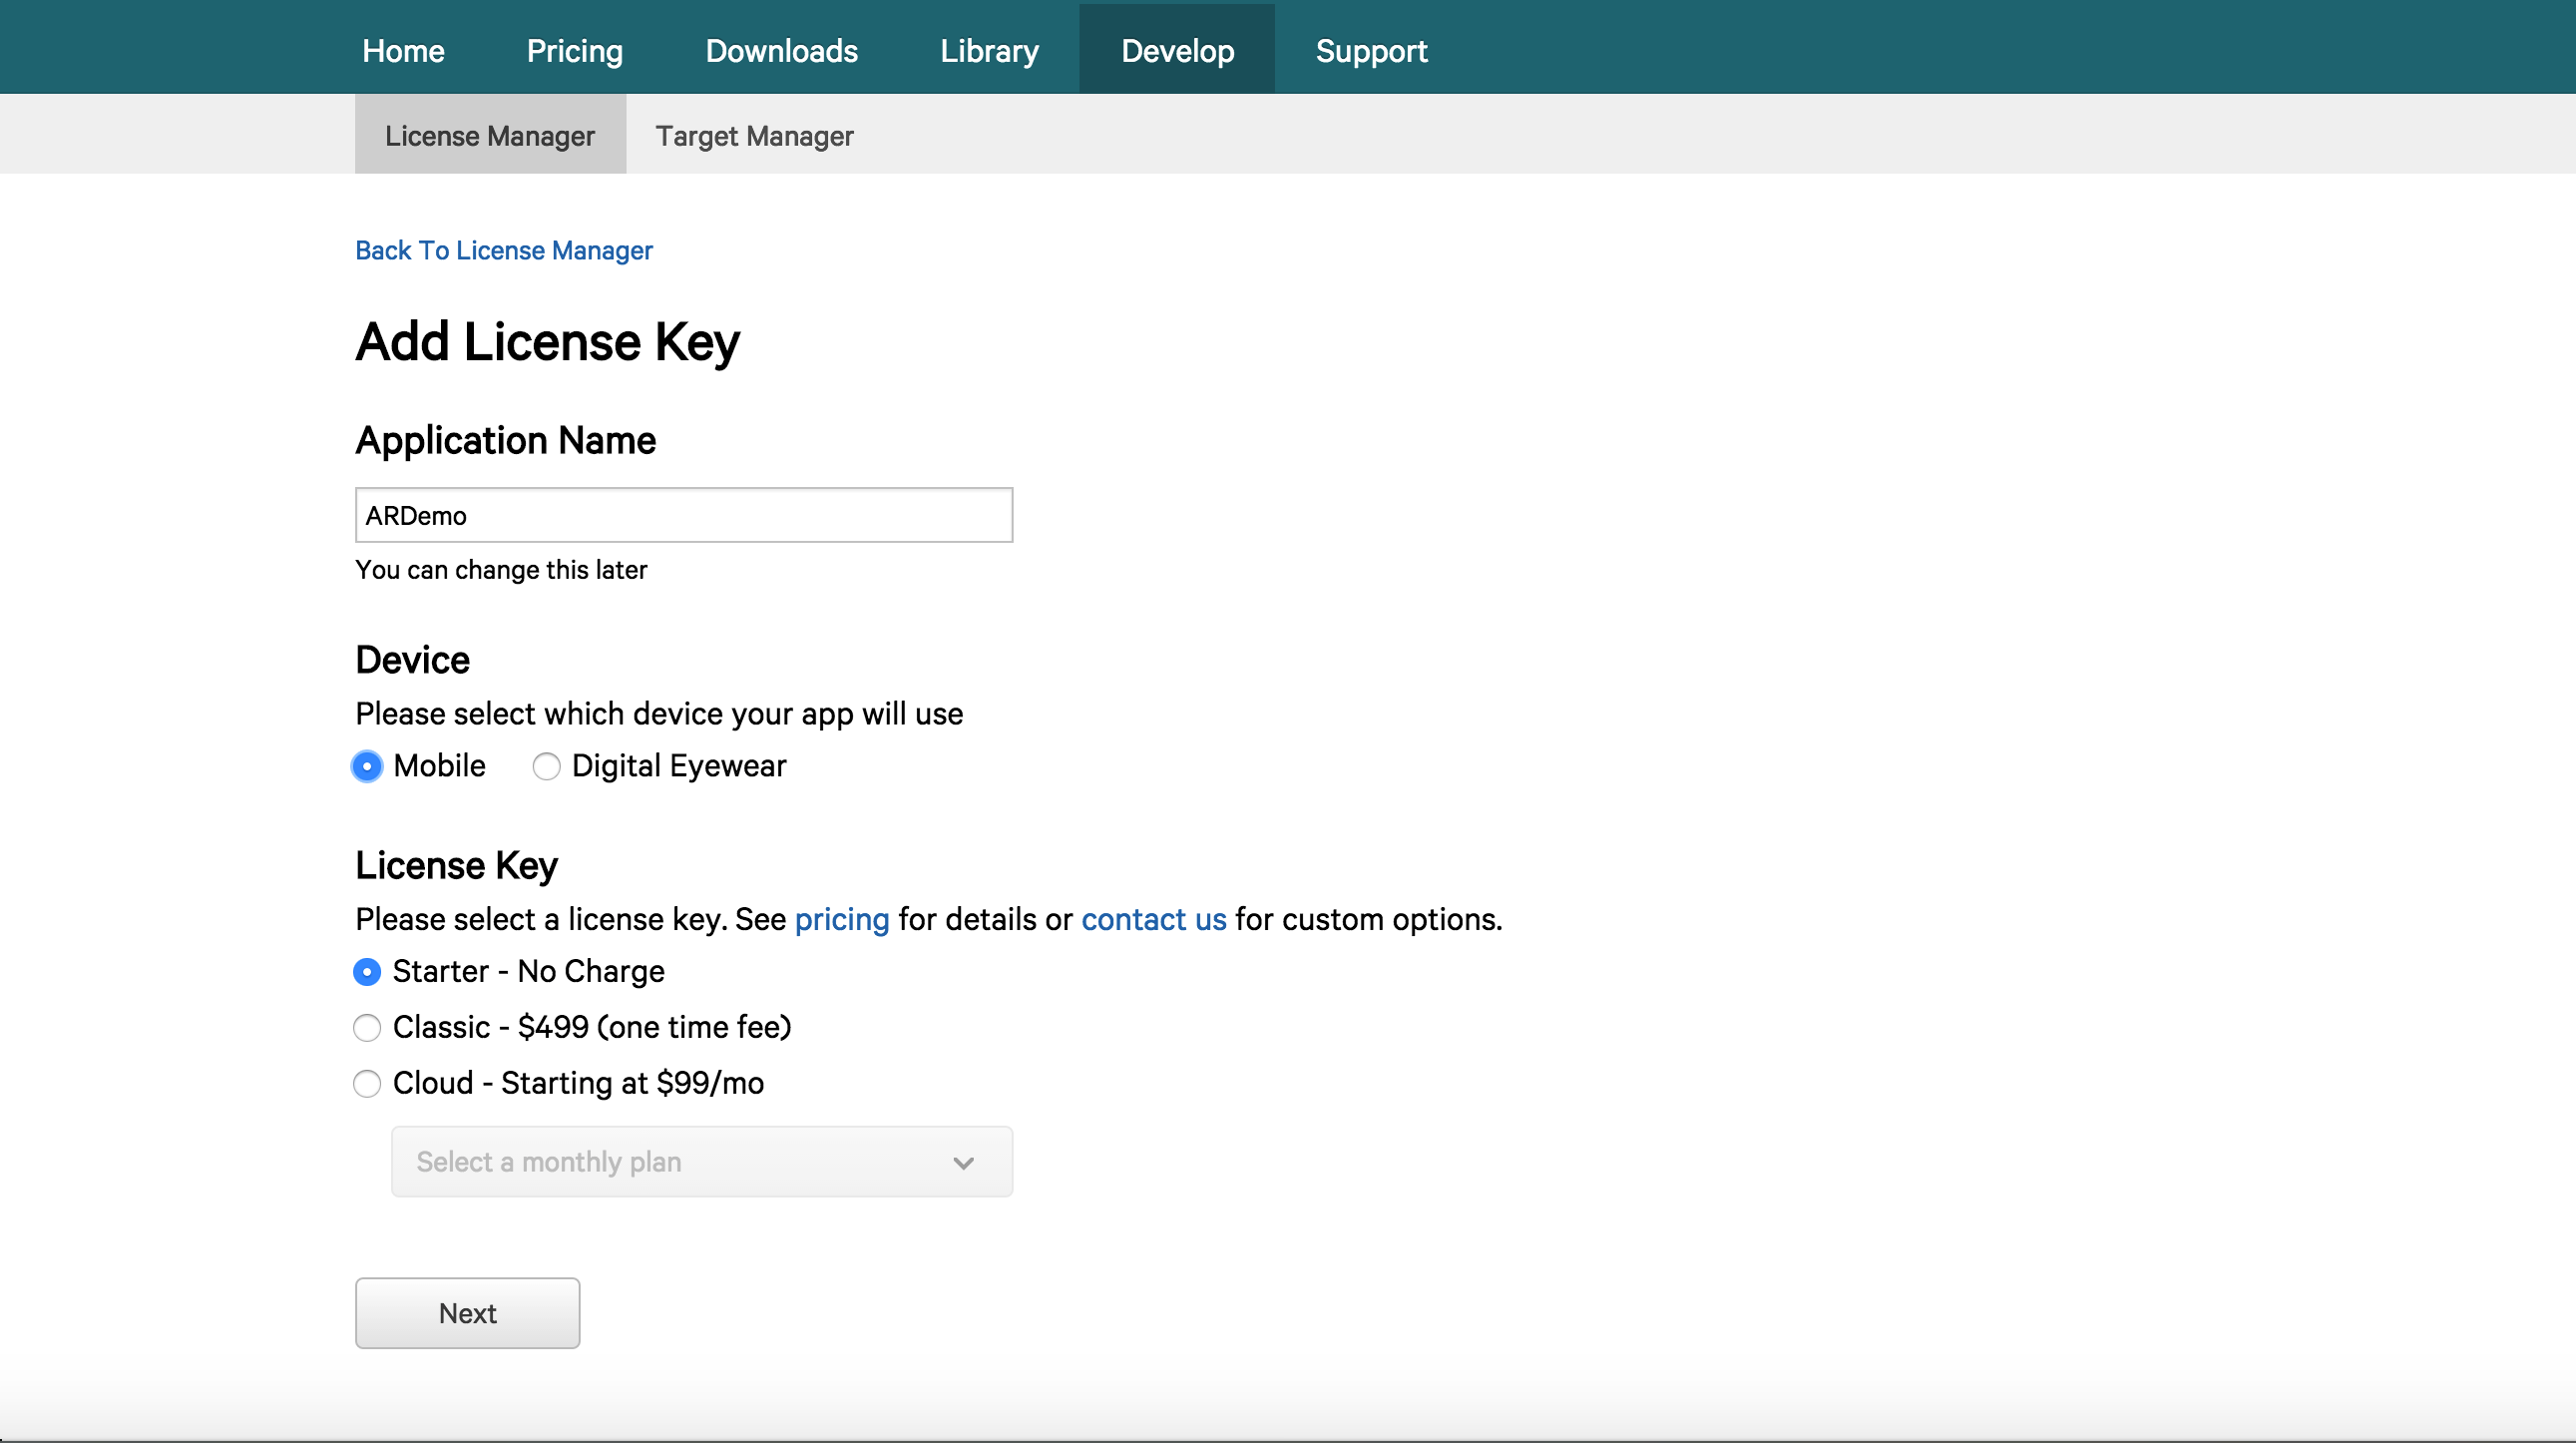
Create a license key for our application
A license key is a unique ID which is required to create an app in Unity which uses Vuforia. To create a license key, we need to head over to “Develop >> License Manager” and select “Add License Key”. We will be prompted with a page like this one:
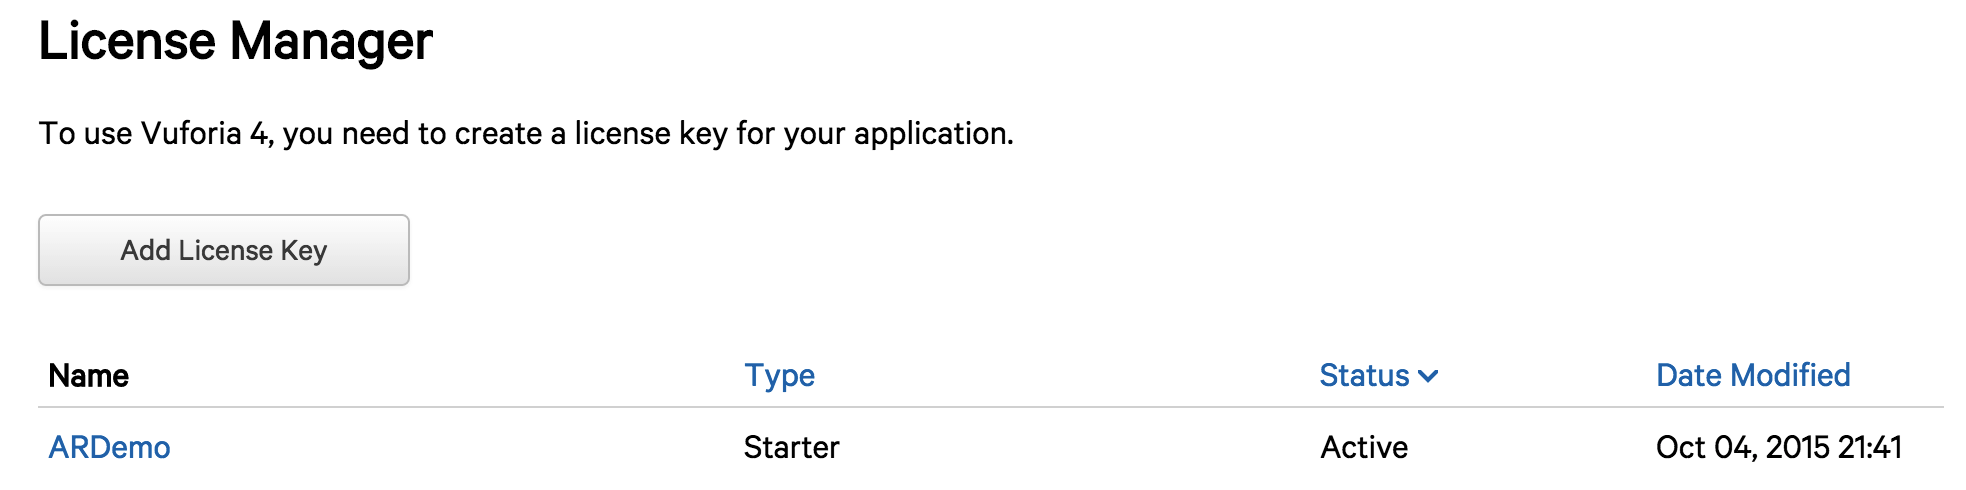
Once we fill in the details, we can select “Next” and then “Confirm”. This will direct us back to the “License Manager” page where the application’s name will appear.
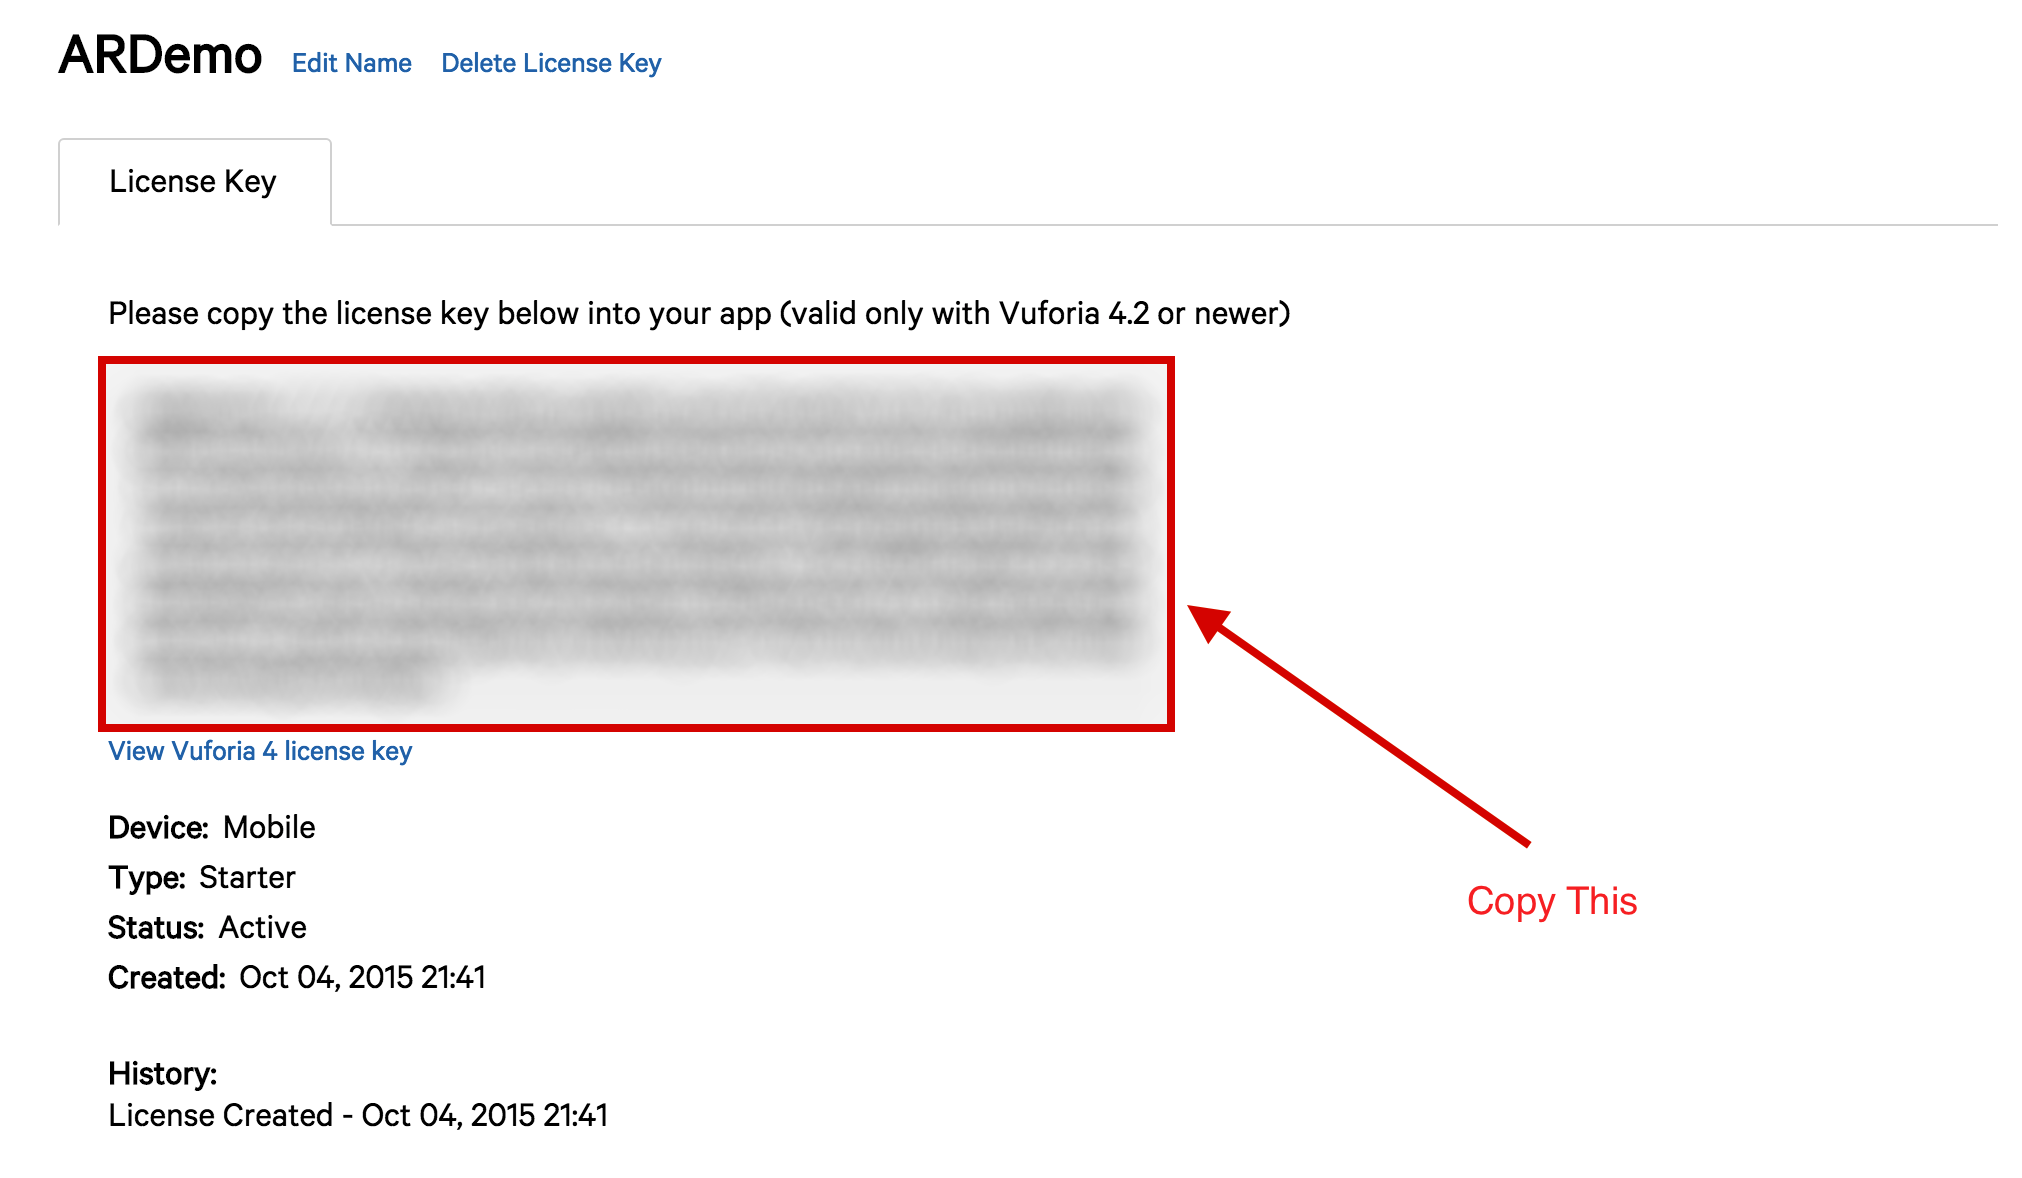
Once we select “ARDemo”, we will get the license key. This key will be used later in Unity.
-
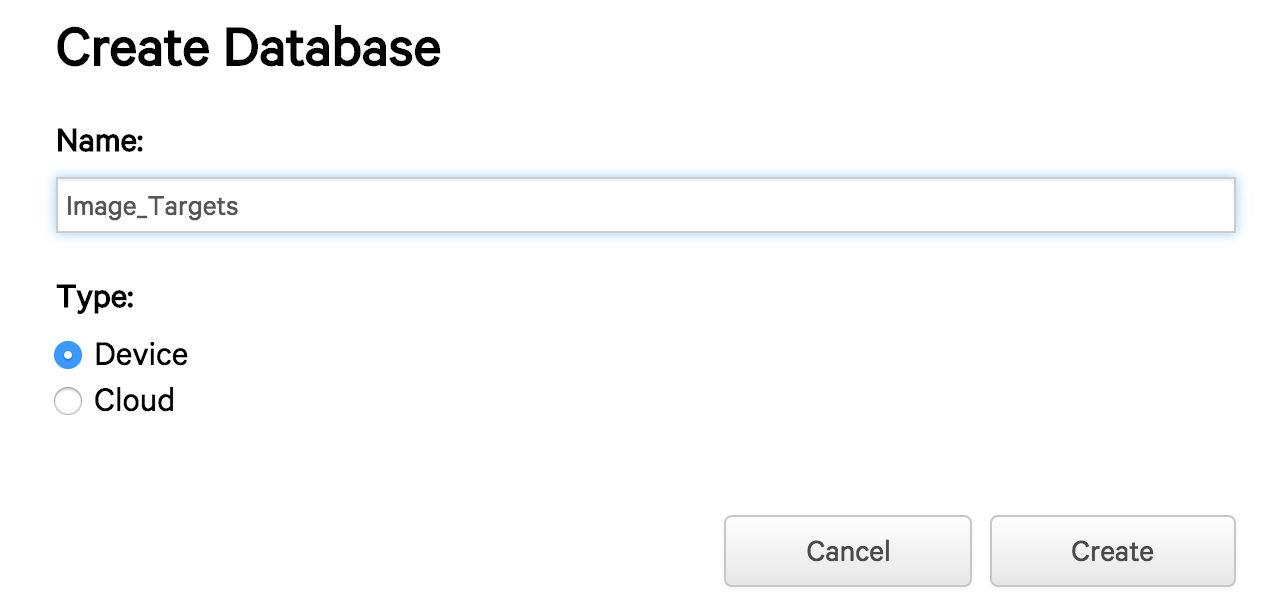
Create a Database and an Image Target
The next step is to set up an image as a target. We head over to “Develop >> Target Manager” and select “Add Database” and fill in the details:
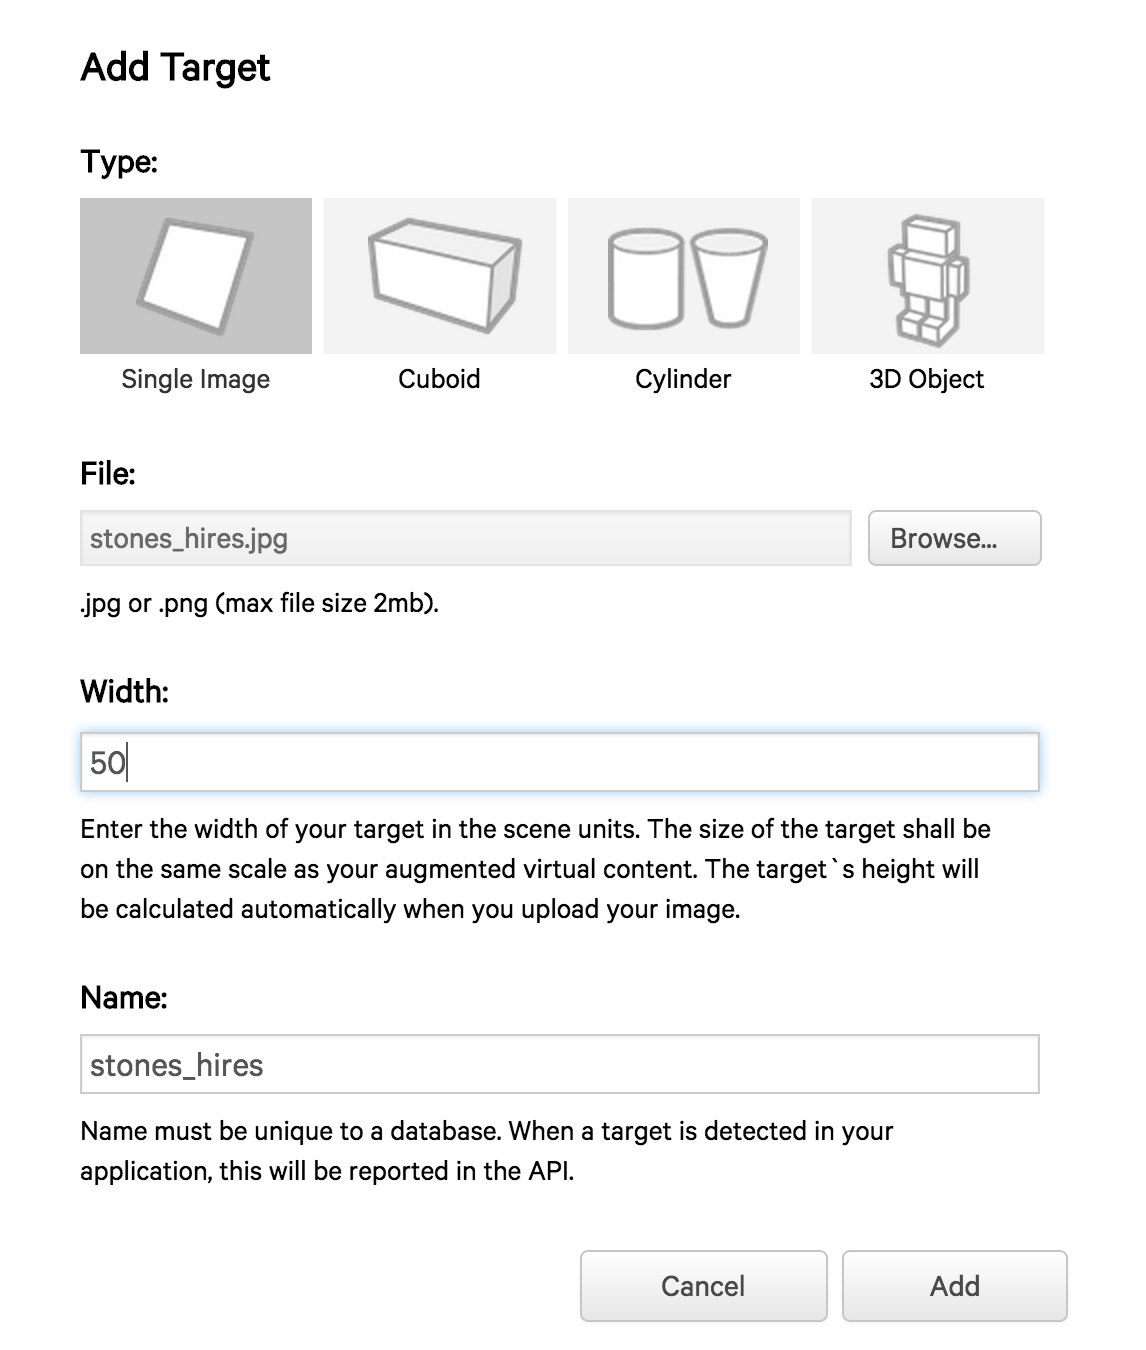
Next, we will need to add images to the newly made database. So, we select the database and click on “Add Target”. Vuforia supports various kinds of targets like single image, cylindrical, cuboidal, 3D image etc. For this tutorial, we will be using a single image target and the stones_hires image. Any arbitrary value can be selected for width, say 50.
After a short upload time, the target will be added and we will have a “Download Dataset” option.
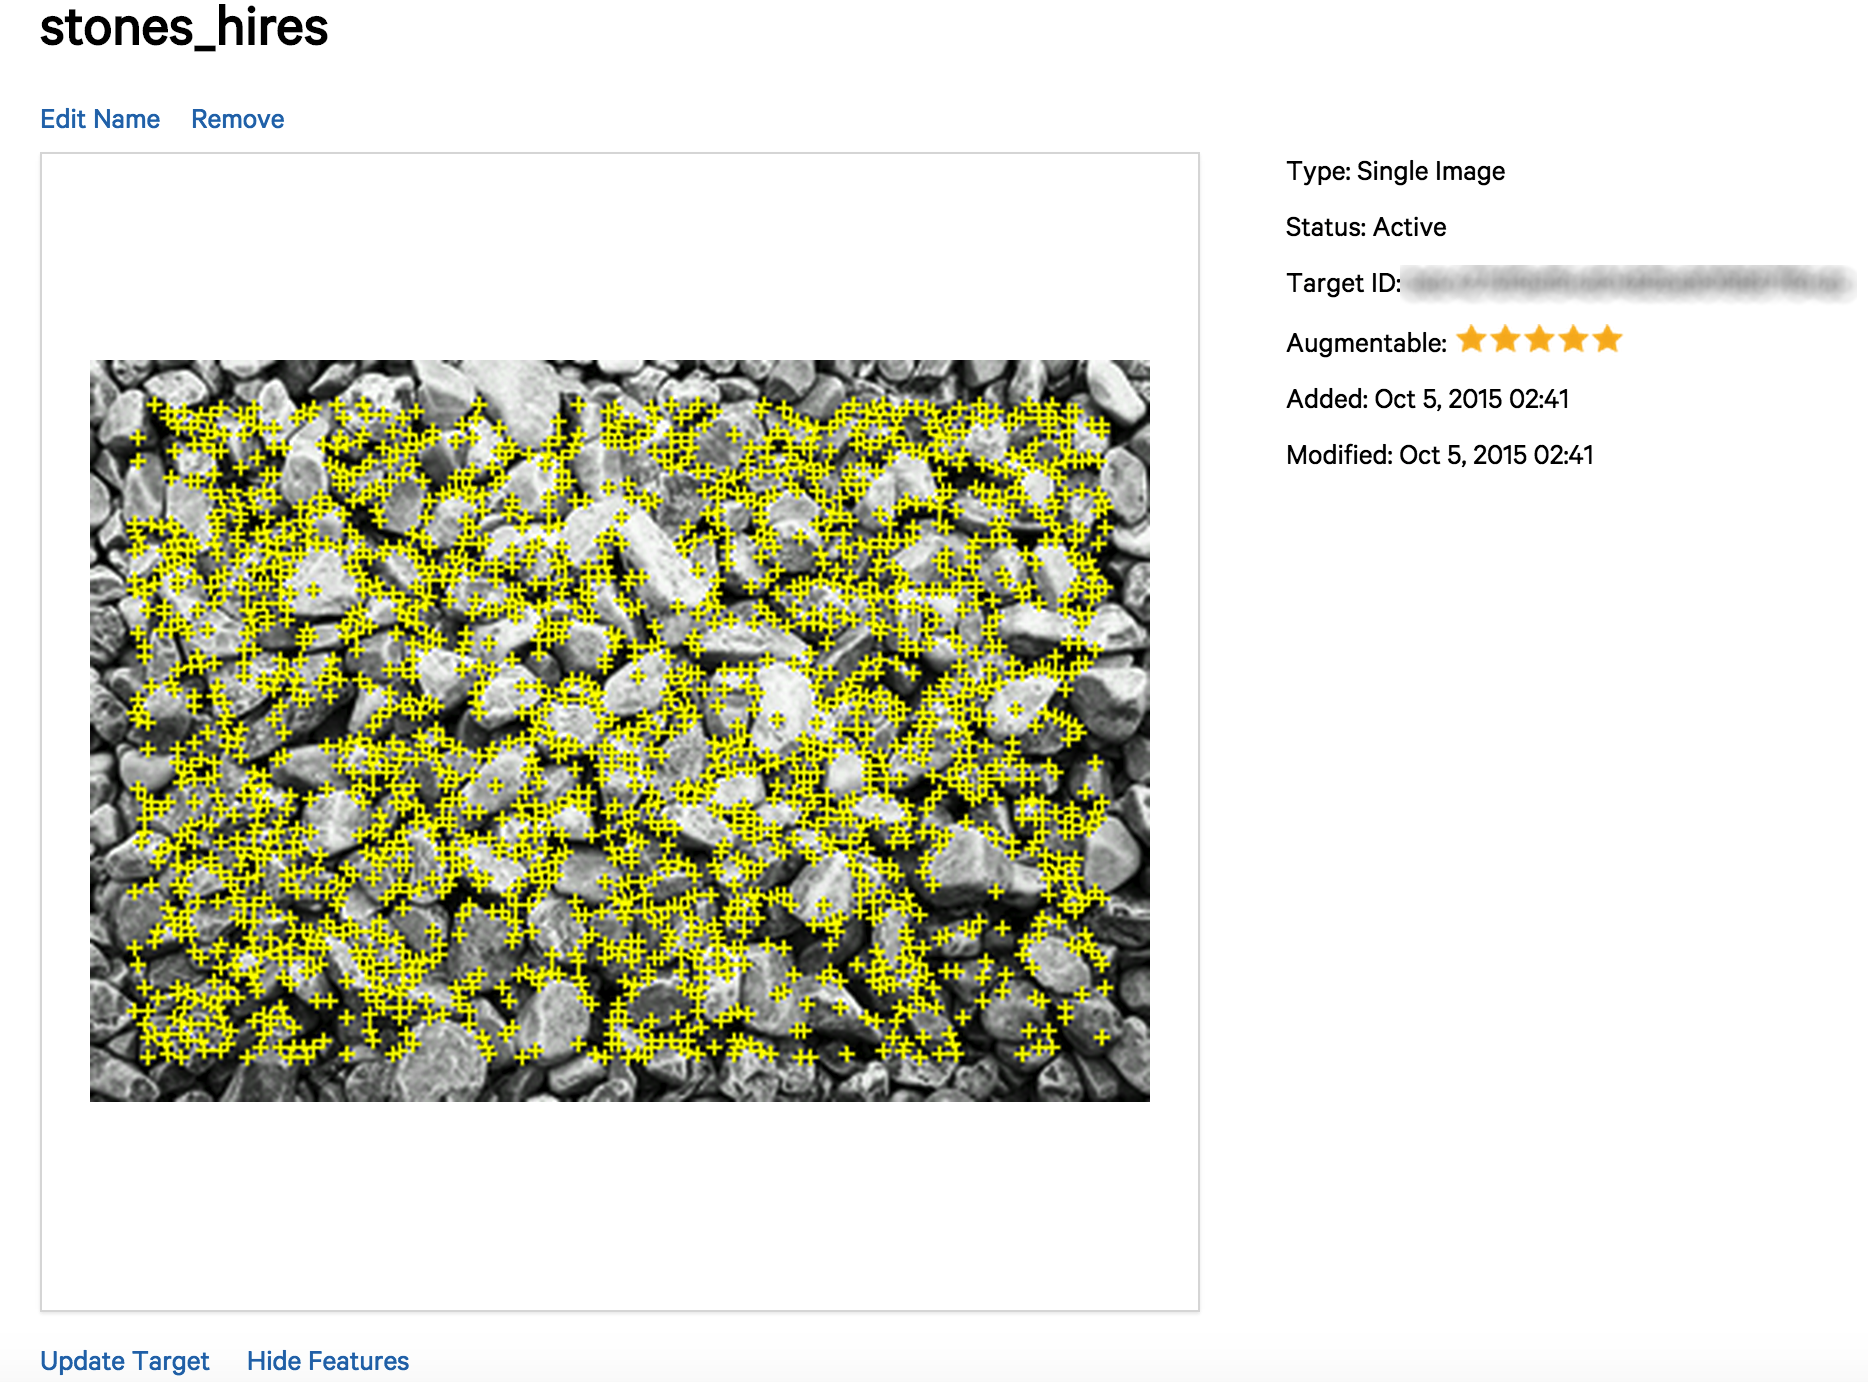
An important thing to note here is the “Rating”. A good rating means that it can be used for tracking, whereas a bad rating means that the image does not have enough feature points (interesting points in the image like edges, corners etc which are used for tracking in image processing).

We can also have a look at the feature points of our image by selecting “stones_hires >> Show features”
Let’s download the dataset by selecting “Download Dataset >> Unity editor”.
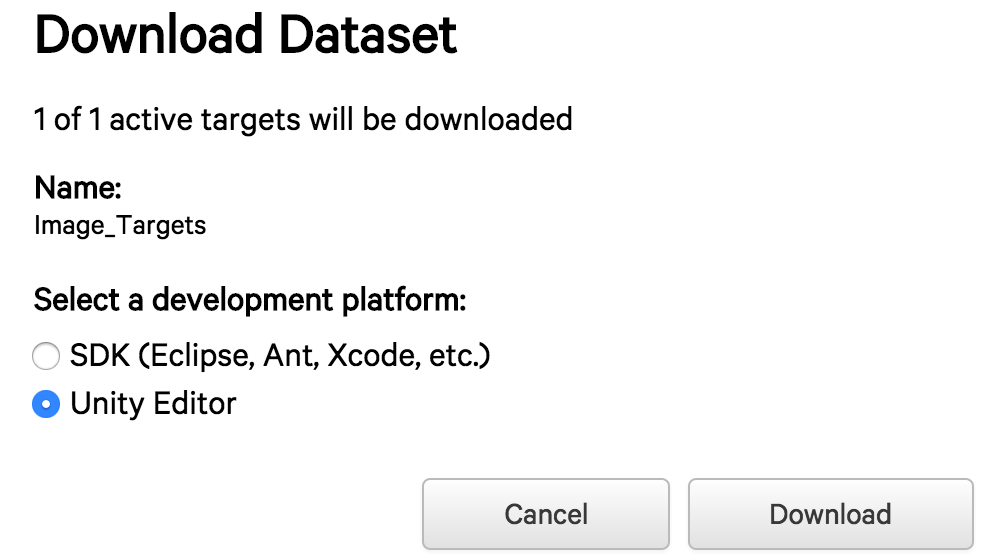
This will generate a Unity package containing trackable information about this trackable database.
Integrating with Unity
Unity is a powerful and widely used game engine. Recently, it has also been emerging as the game engine for HMDs. The tutorial assumes very basic knowledge of Unity. You can find some more interesting tutorials on Unity here.
Let’s start by creating a new Unity3D project by the name of “ARDemo”.
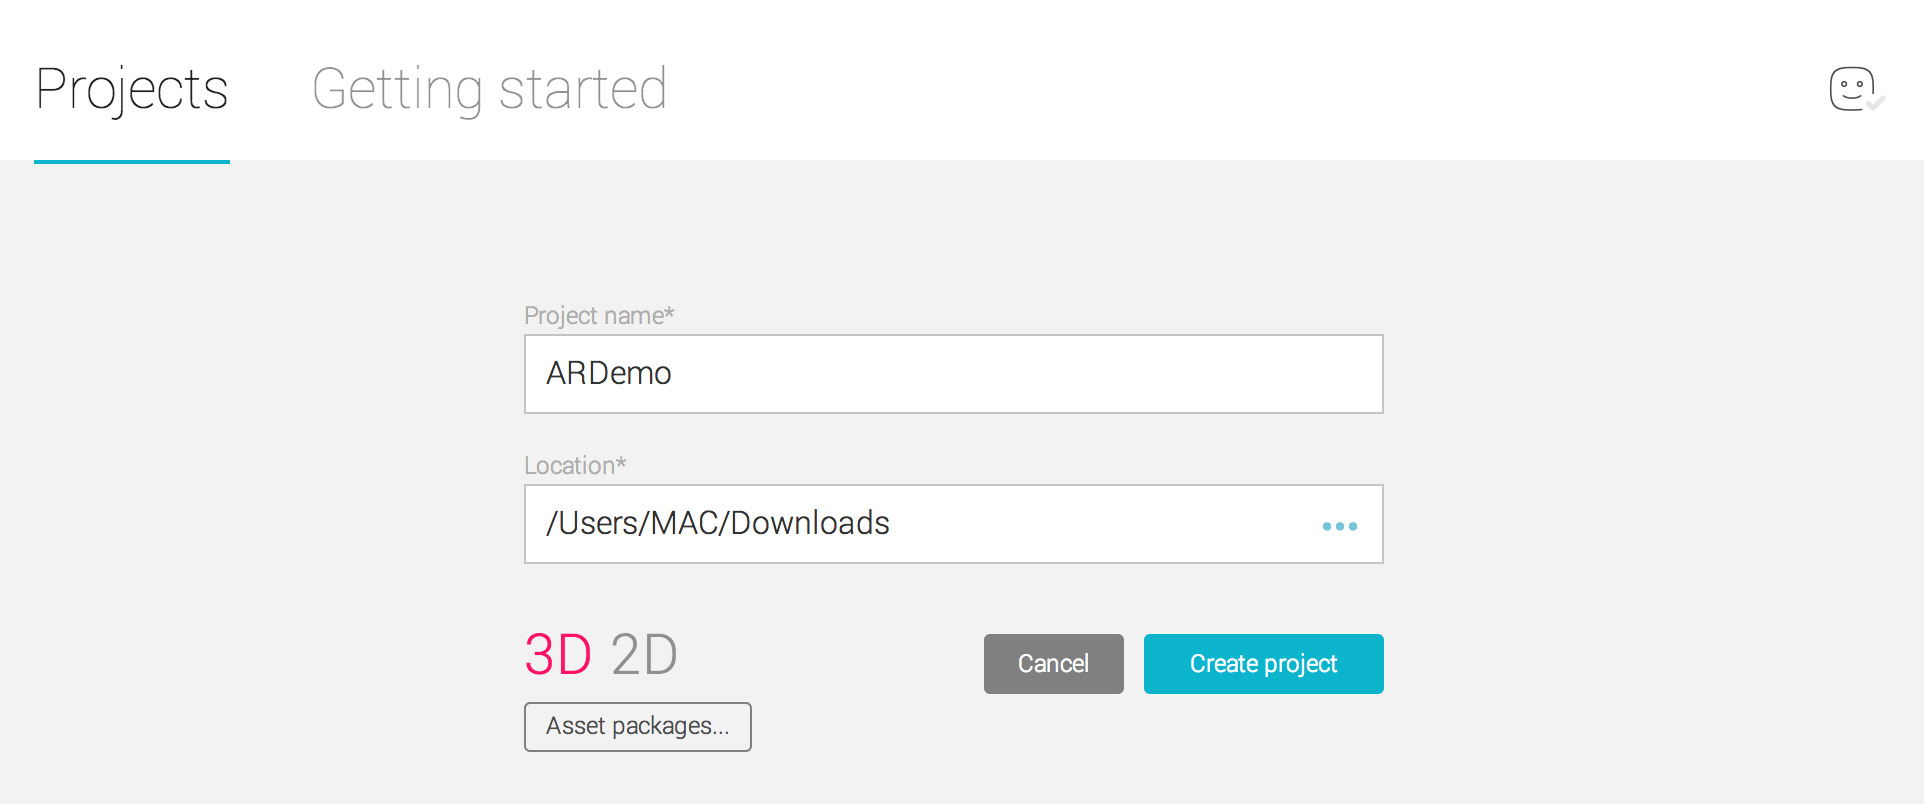
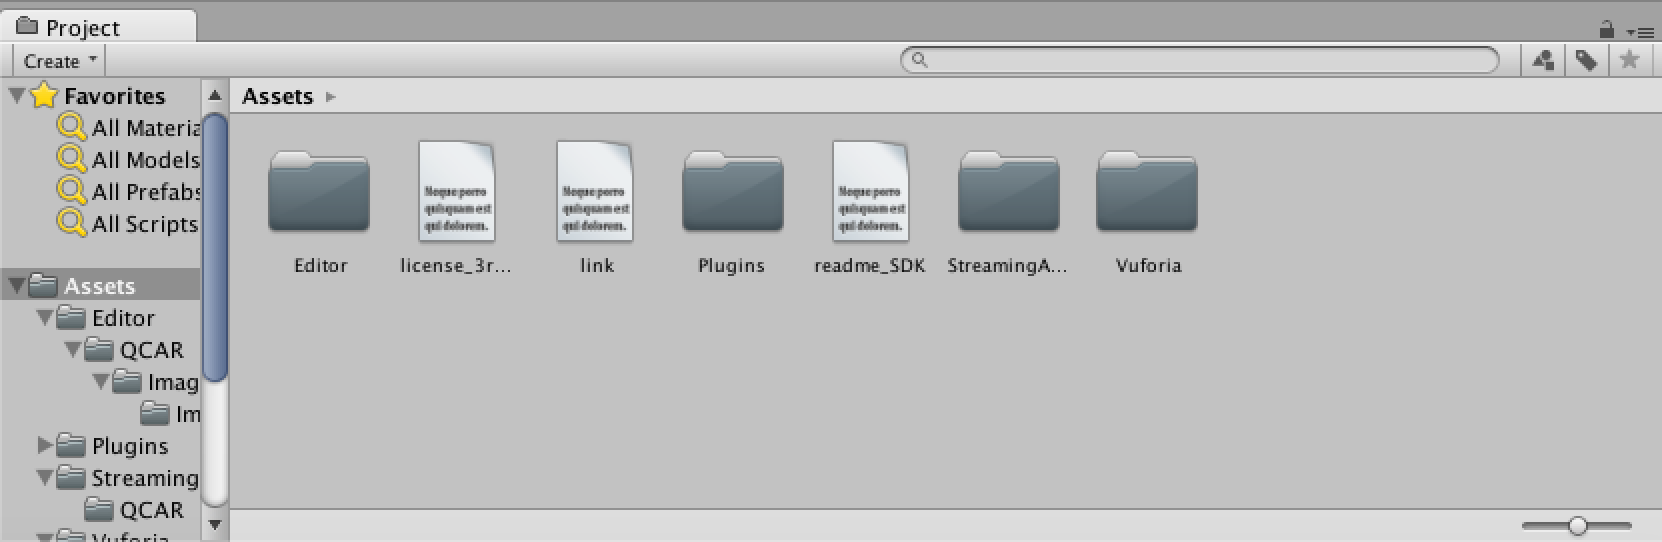
Next, we will have to import the Vuforia Unity packages. This can be done by going to “Assets >> Import Package >> Custom Package”. We will have two packages, one corresponding to our dataset (Image_Targets.unitypackage) and the other corresponding to Vuforia 5 SDK for Unity (vuforia-unity-5-0-5.unitypackage) which can be found here.
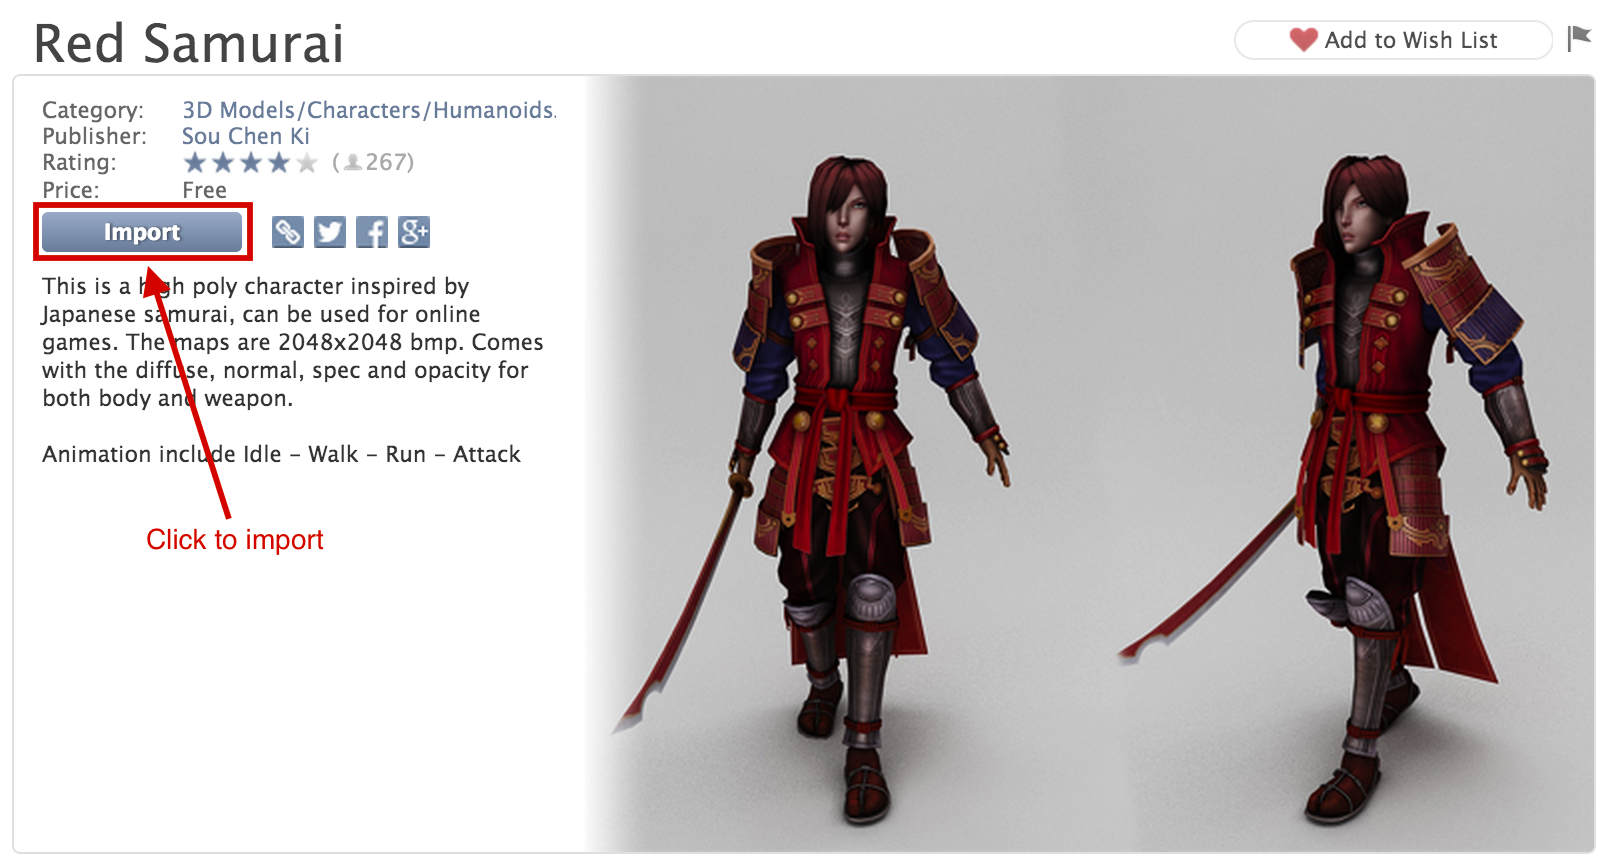
Time to add some 3D models to our project. Let’s proceed to “Window >> Asset Store”. Here we can find a Samurai model by the name of “Red Samurai”, for free. We will have to log in with our Unity Account to download and import this model.
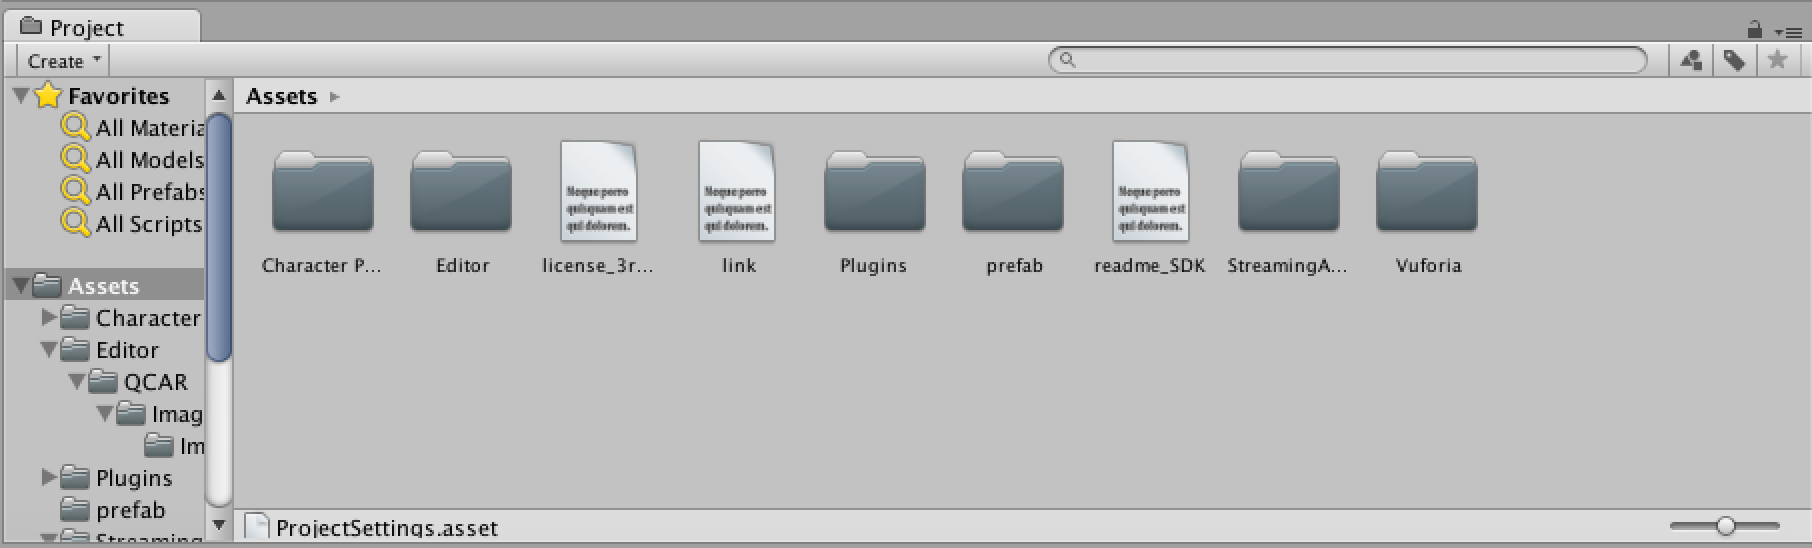
Once imported, our Assets folder will look like this:
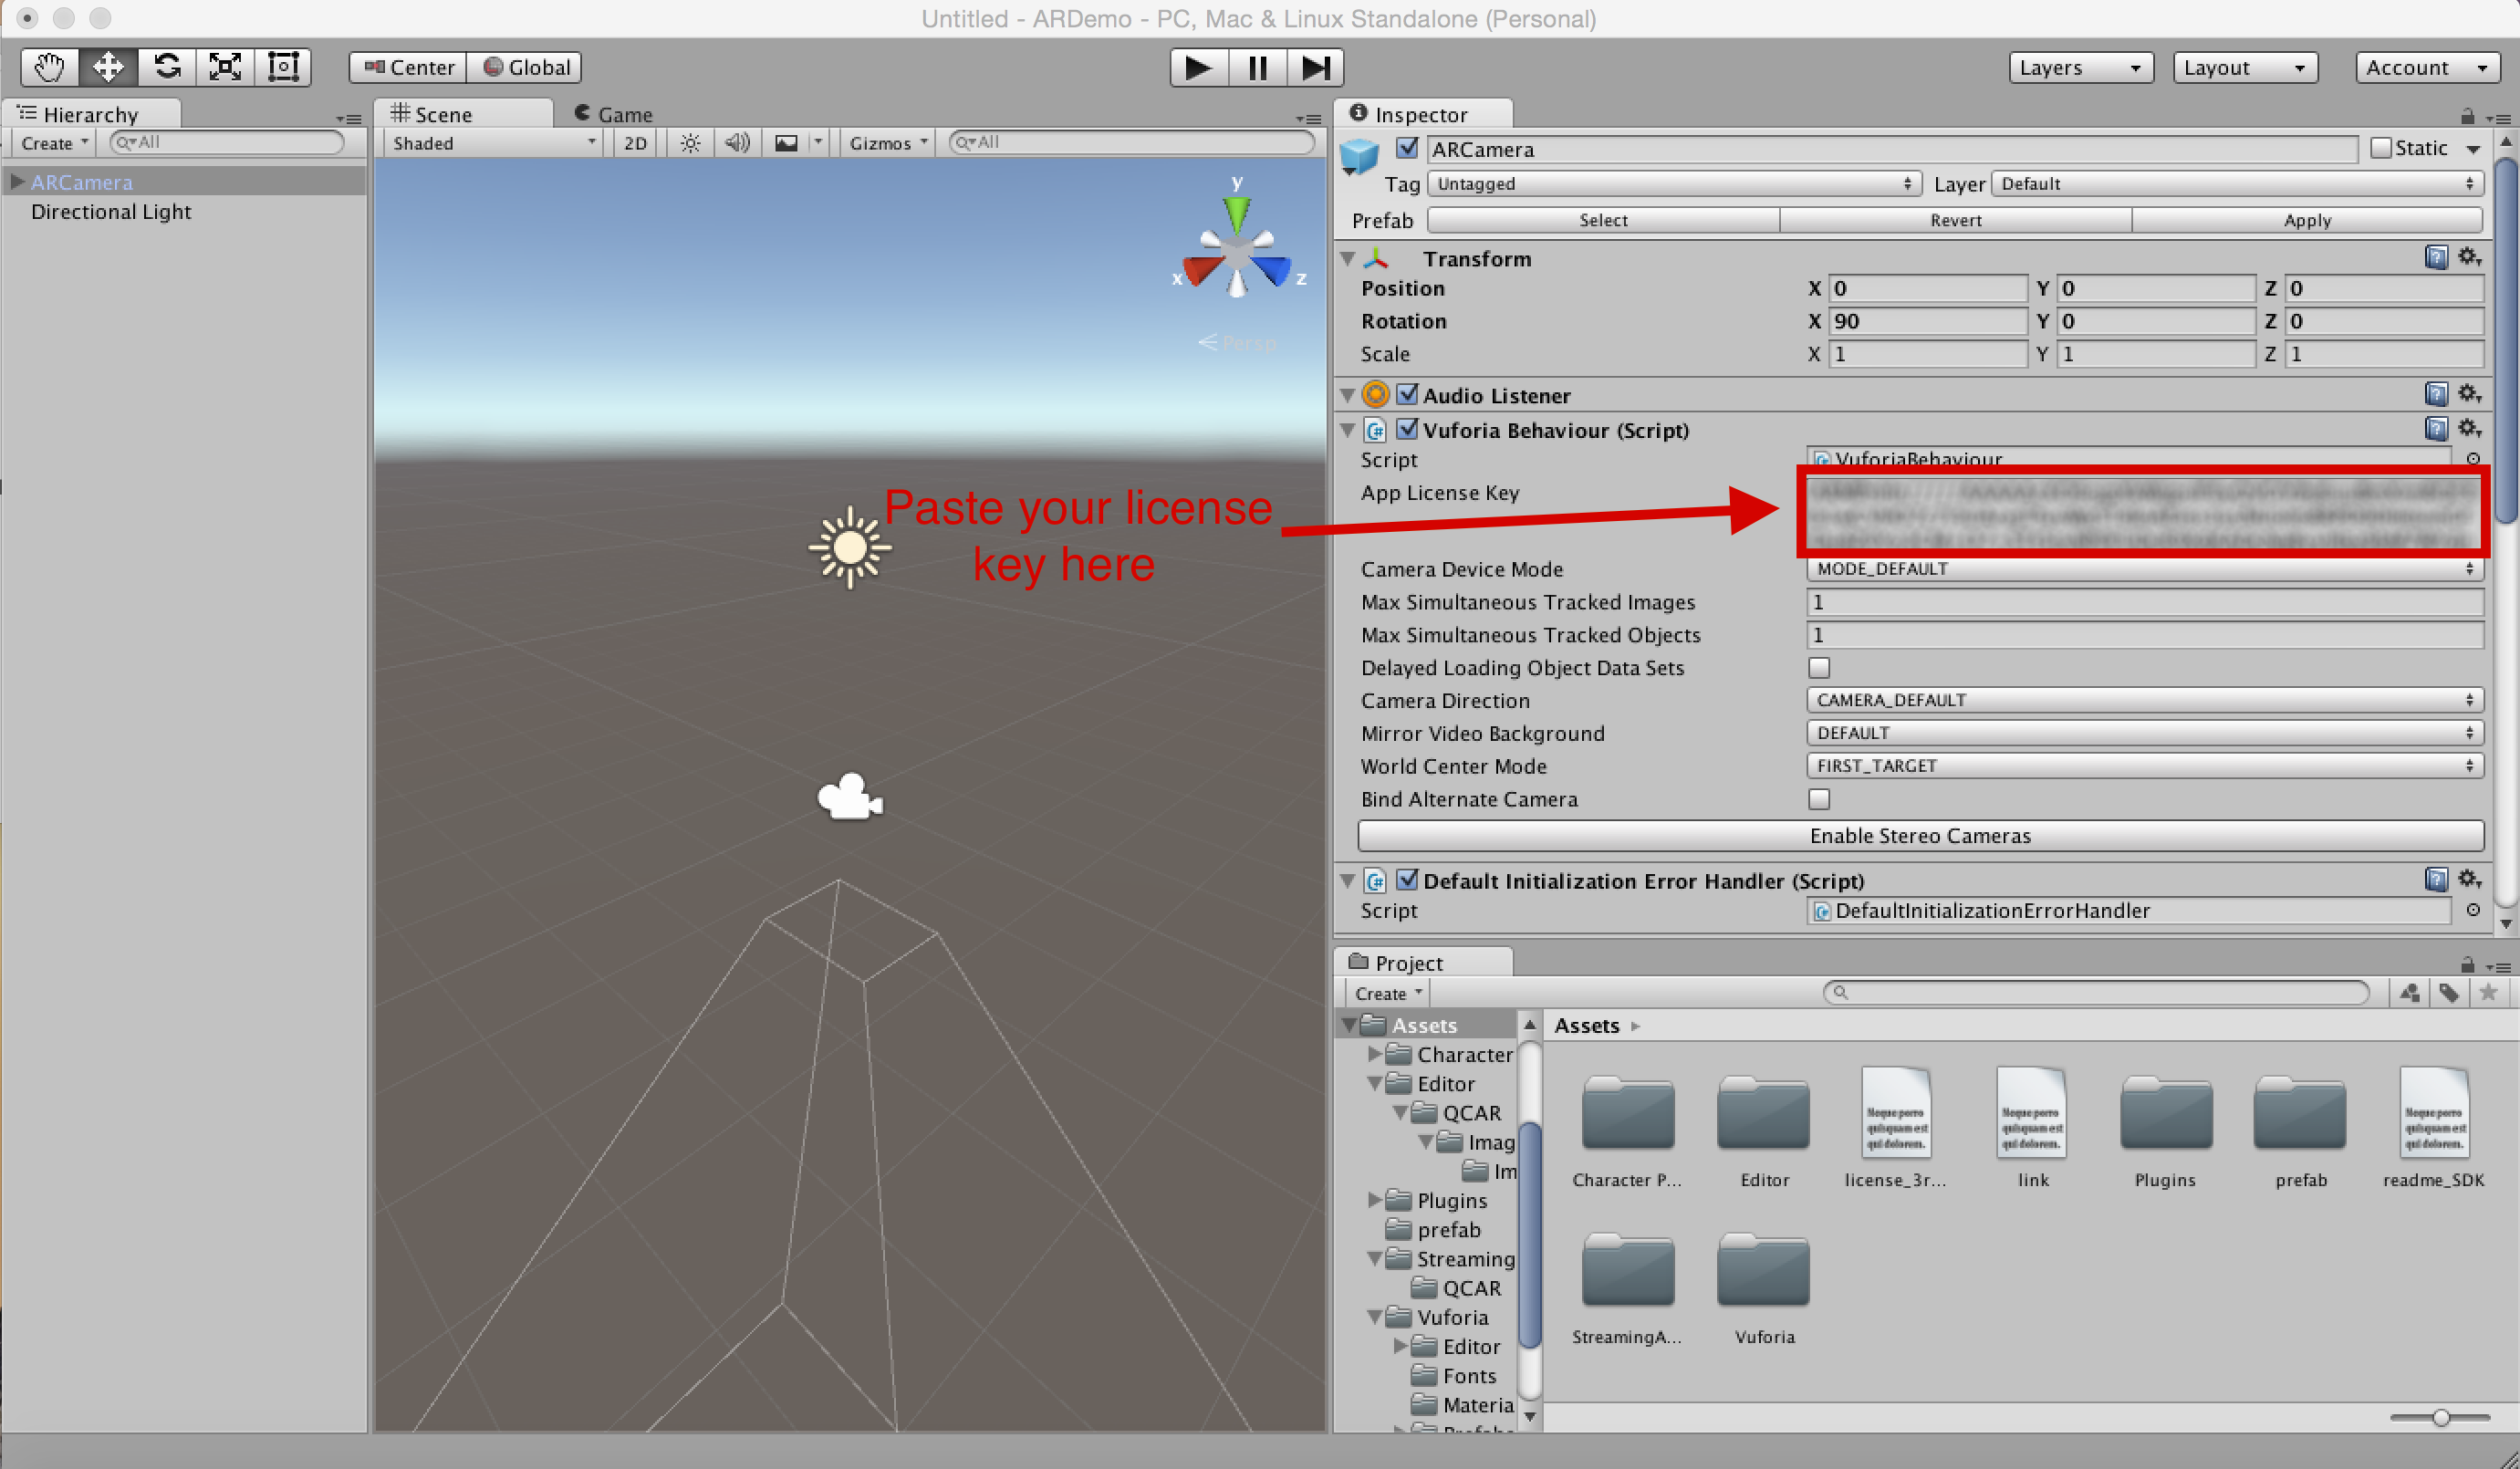
Next, we will have to add an ARCamera to our scene. “ARCamera” is an Augmented Reality camera prefab from Vuforia and is very similar to a regular camera. We can find this under “Assets >> Vuforia >> Prefabs” and drag it into our scene at X=0, Y=0, Z=0. Let’s also delete the Main Camera from the scene (it can be found under the Hierarchy Panel, “Right Click >> Delete”) as we already have an ARCamera.
For our ARCamera to run, we will have to add the App License Key. In the Inspector panel, we will have to paste the unique key we had previously received from Vuforia’s License Manager.
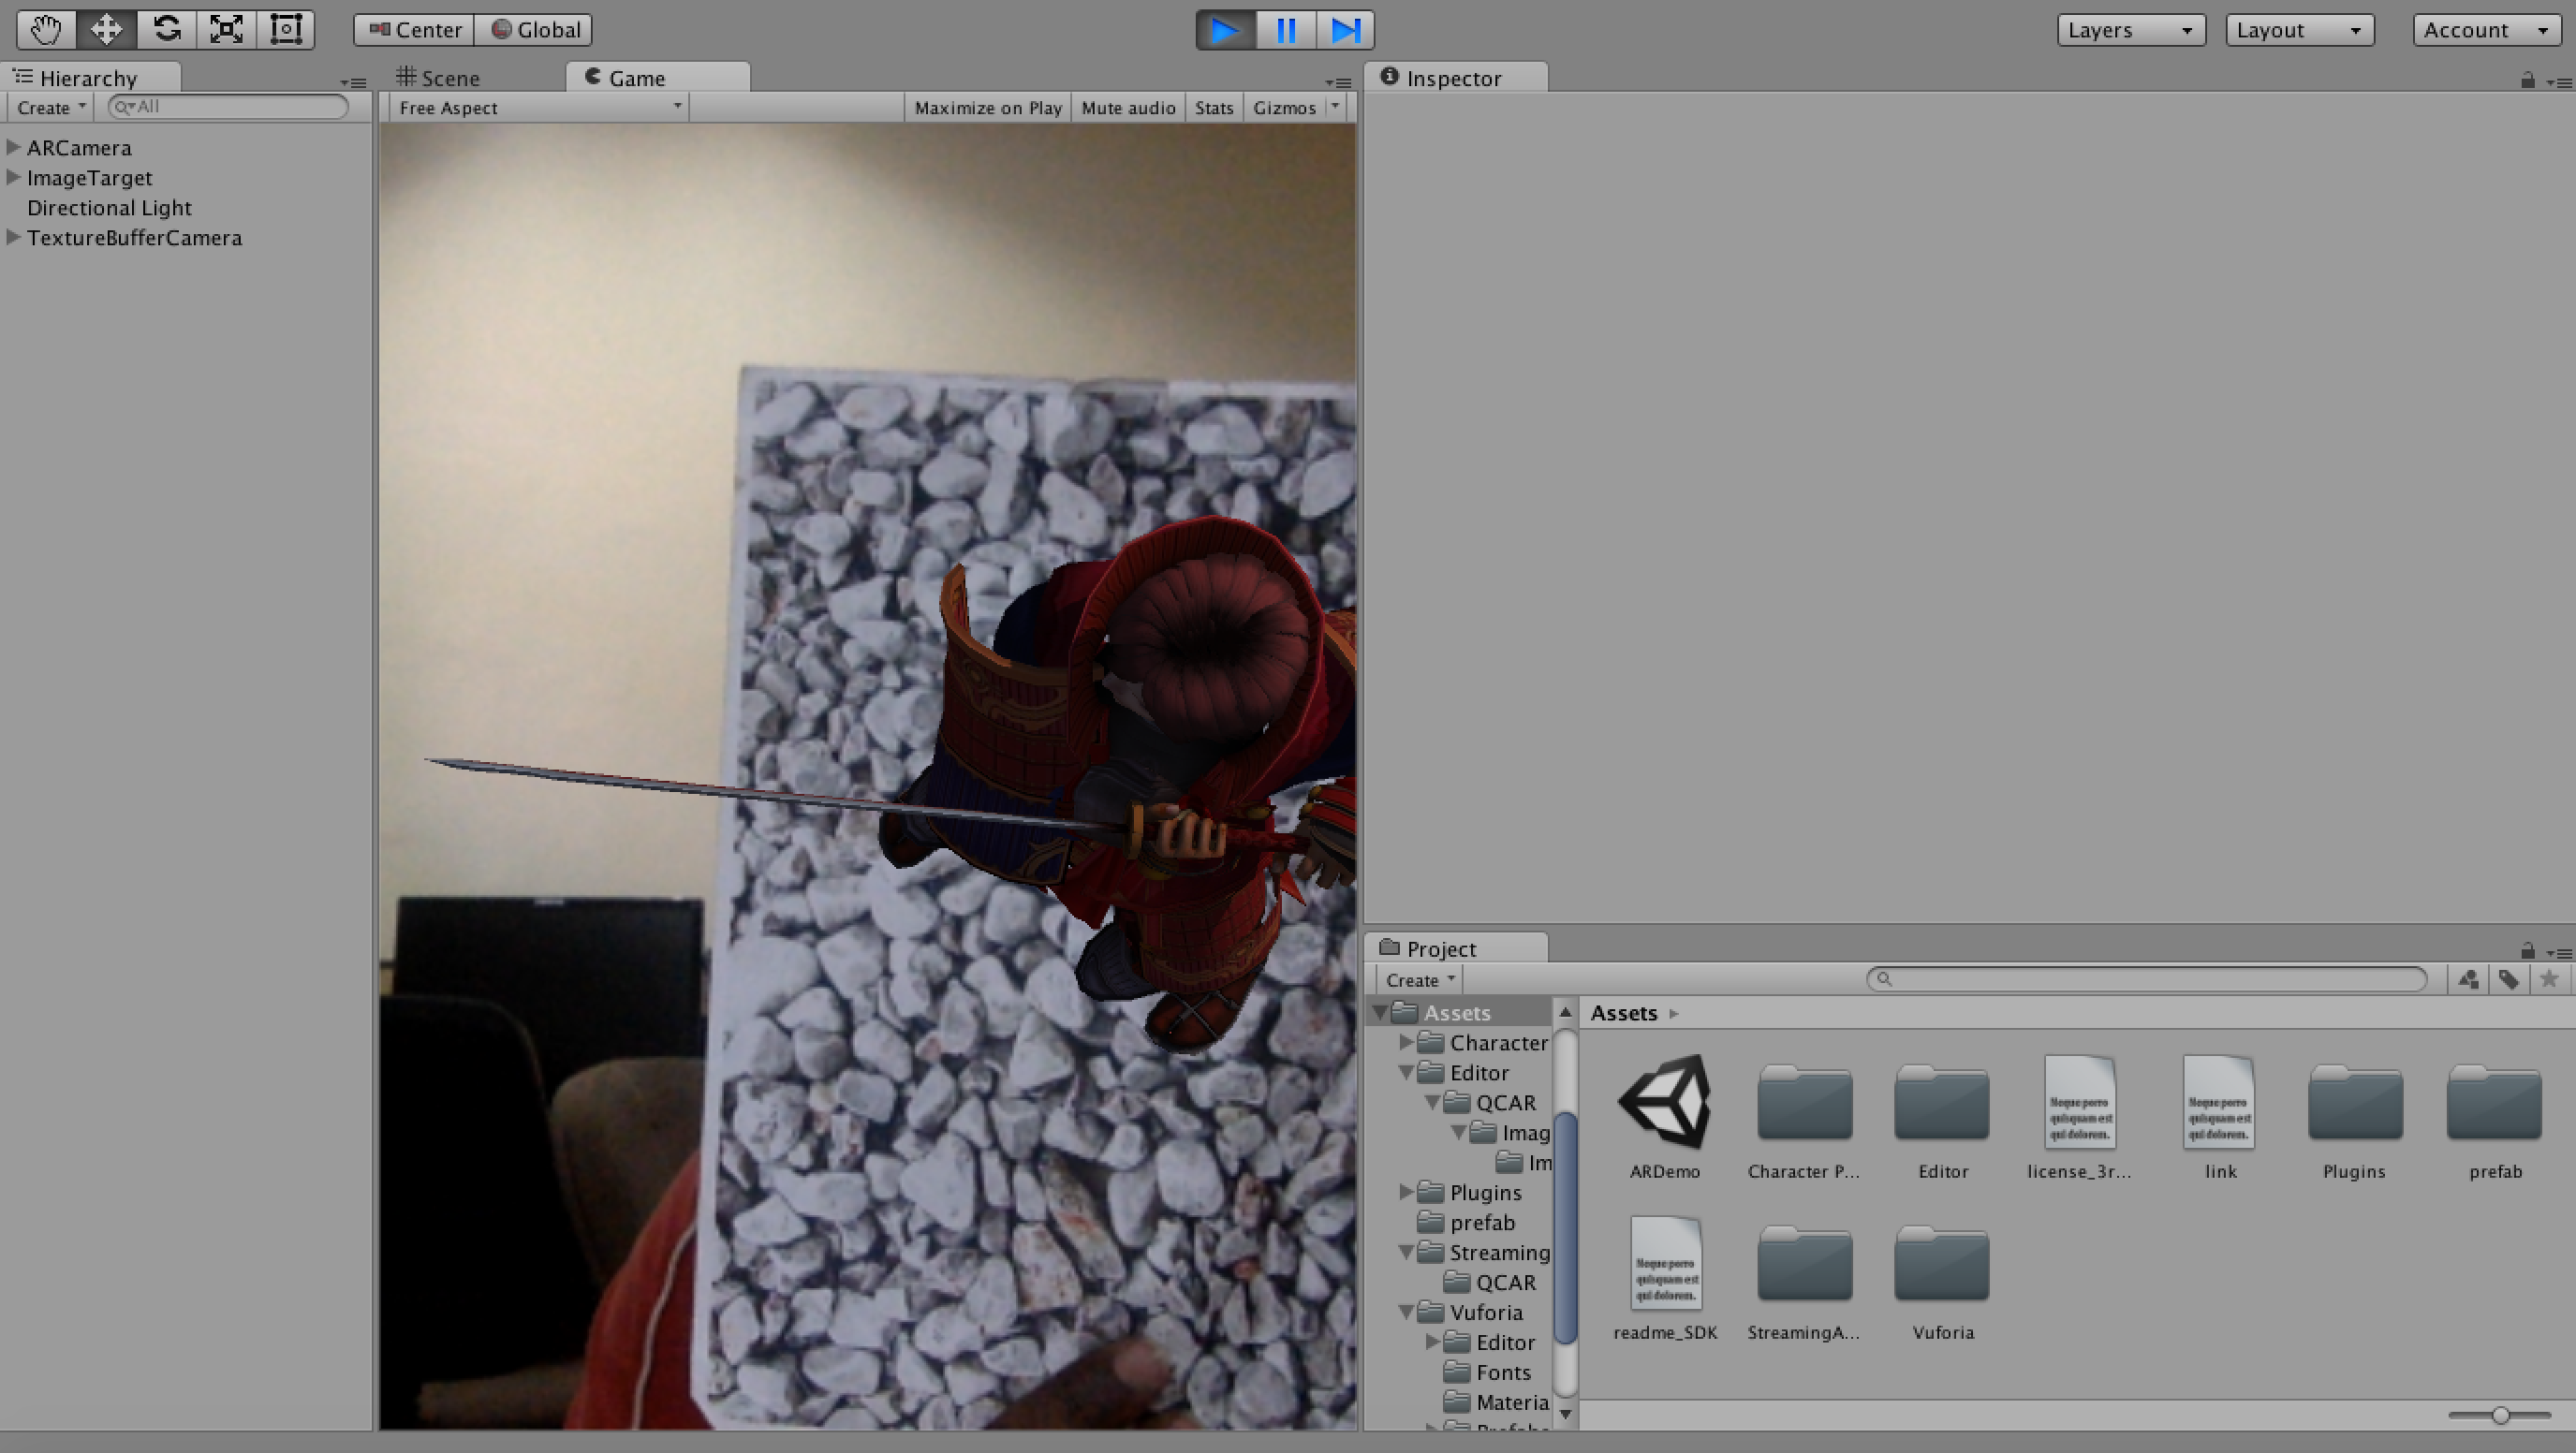
At this point in time if we press the Play button in the Unity Editor we should be able to see our WebCam feed in the Game View.
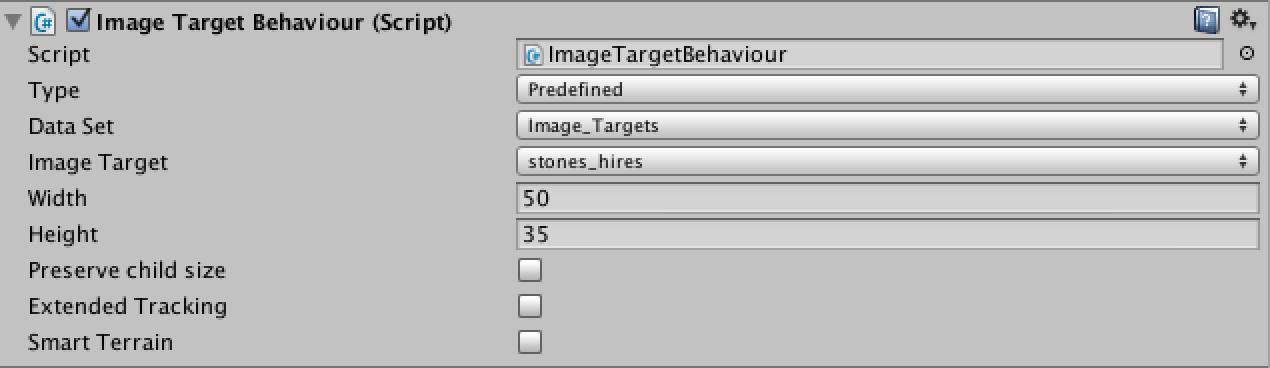
Next, let’s add the ImageTarget to our scene. It can be found under “Assets >> Vuforia >> Prefabs”. Let’s add it to our scene at X=0, Y=-50, Z=0. Now, in the Inspector panel for the Image Target we will have to make some changes. Under the “Image Target Behaviour (script)” we will have to change “Data Set” to “Image_Targets” and “Image Target” to “stones_hires”. Once done, the stone_hires image will appear in our Scene View.
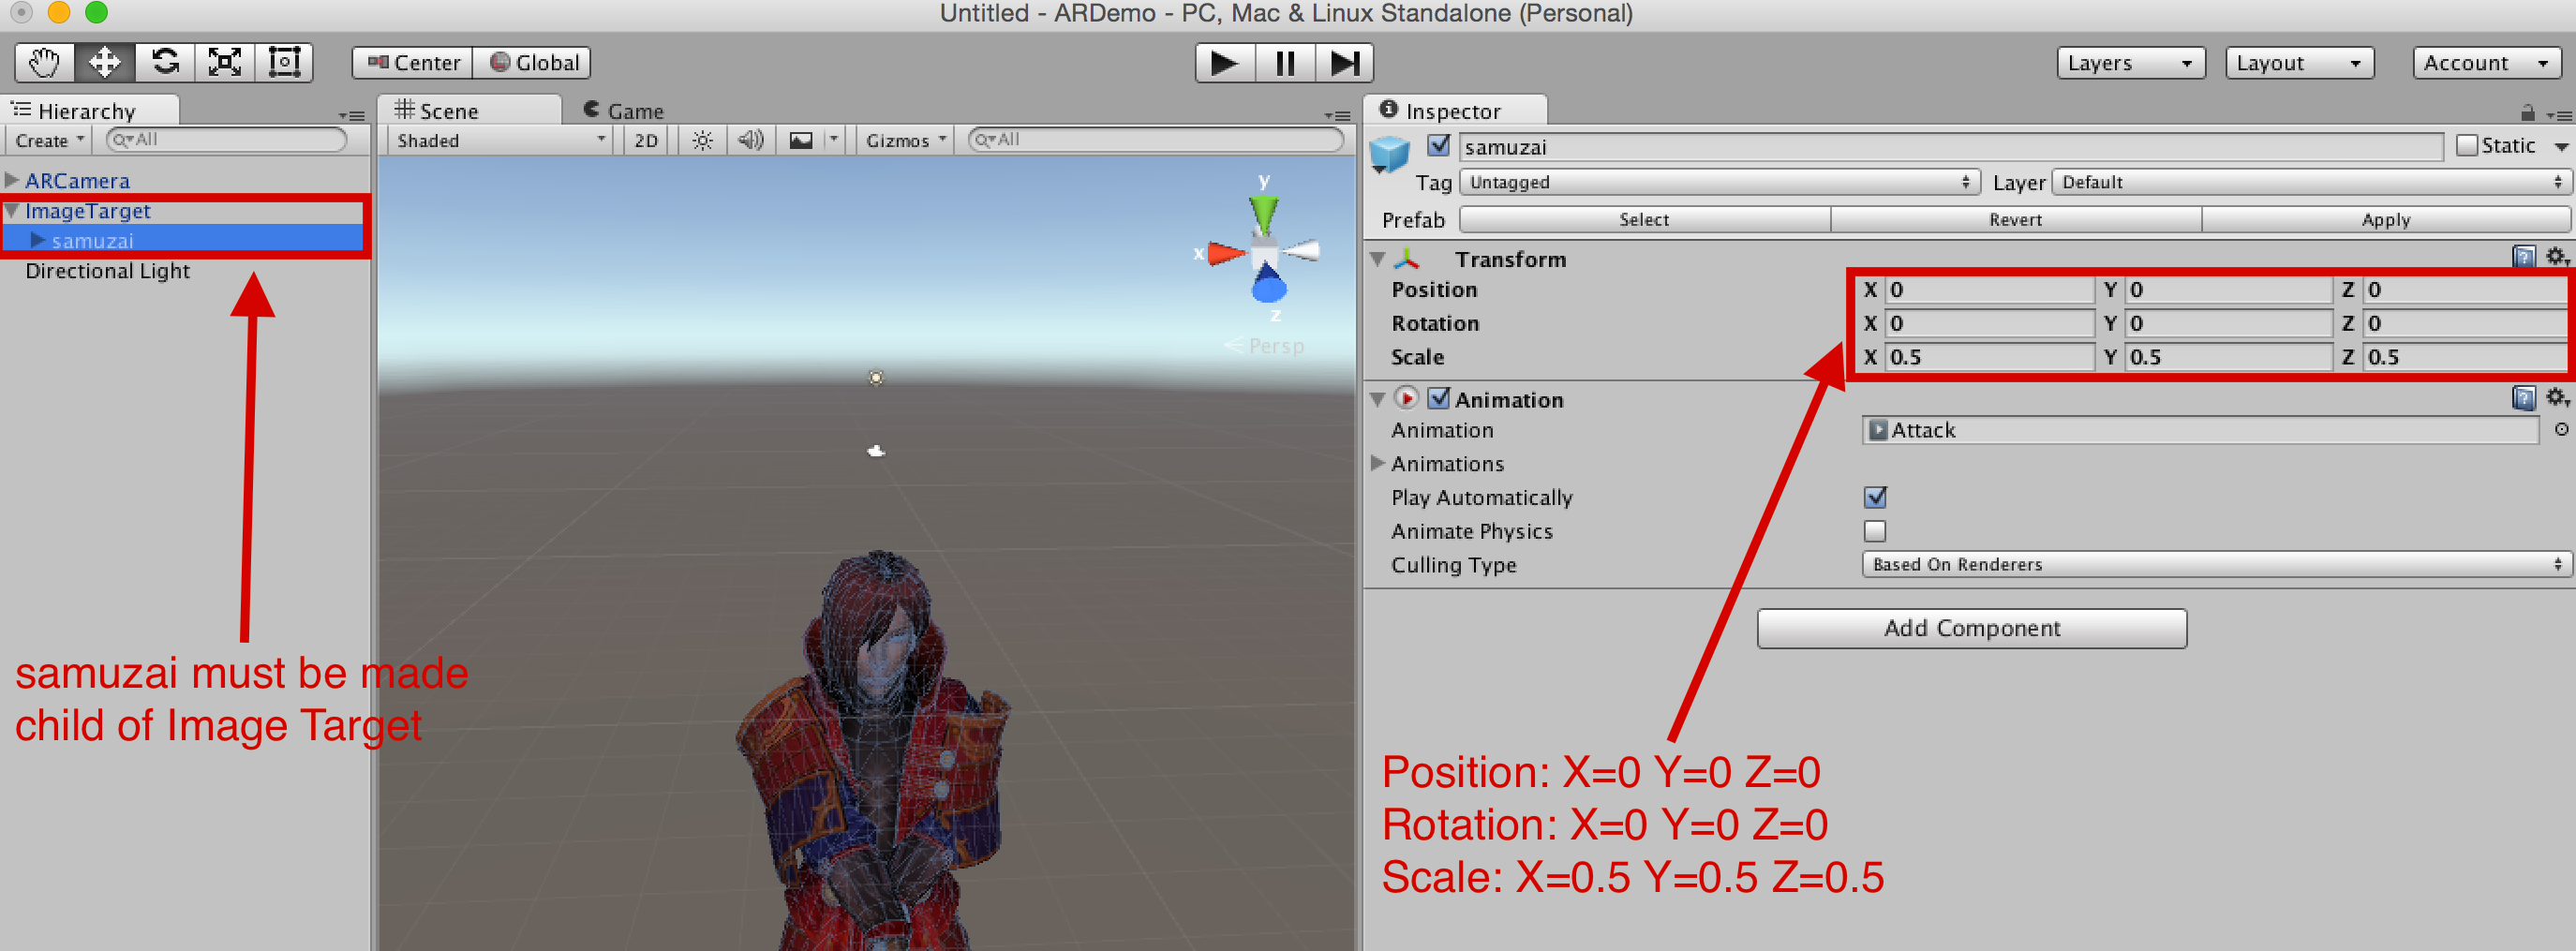
Next, let’s drag our Samurai onto the Scene. It can be found under “Assets >> prefab >> samuzai”. For the samurai to appear over ImageTarget, it needs to be made a child of ImageTarget (can be done by just dragging the samuzai prefab in the Hierarchy panel). Then, whenever the ImageTarget is detected by a mobile device’s camera, all the children of the target will also appear together. The scale of the samuzai needs to be changed to X=0.5, Y=0.5, Z=0.5.
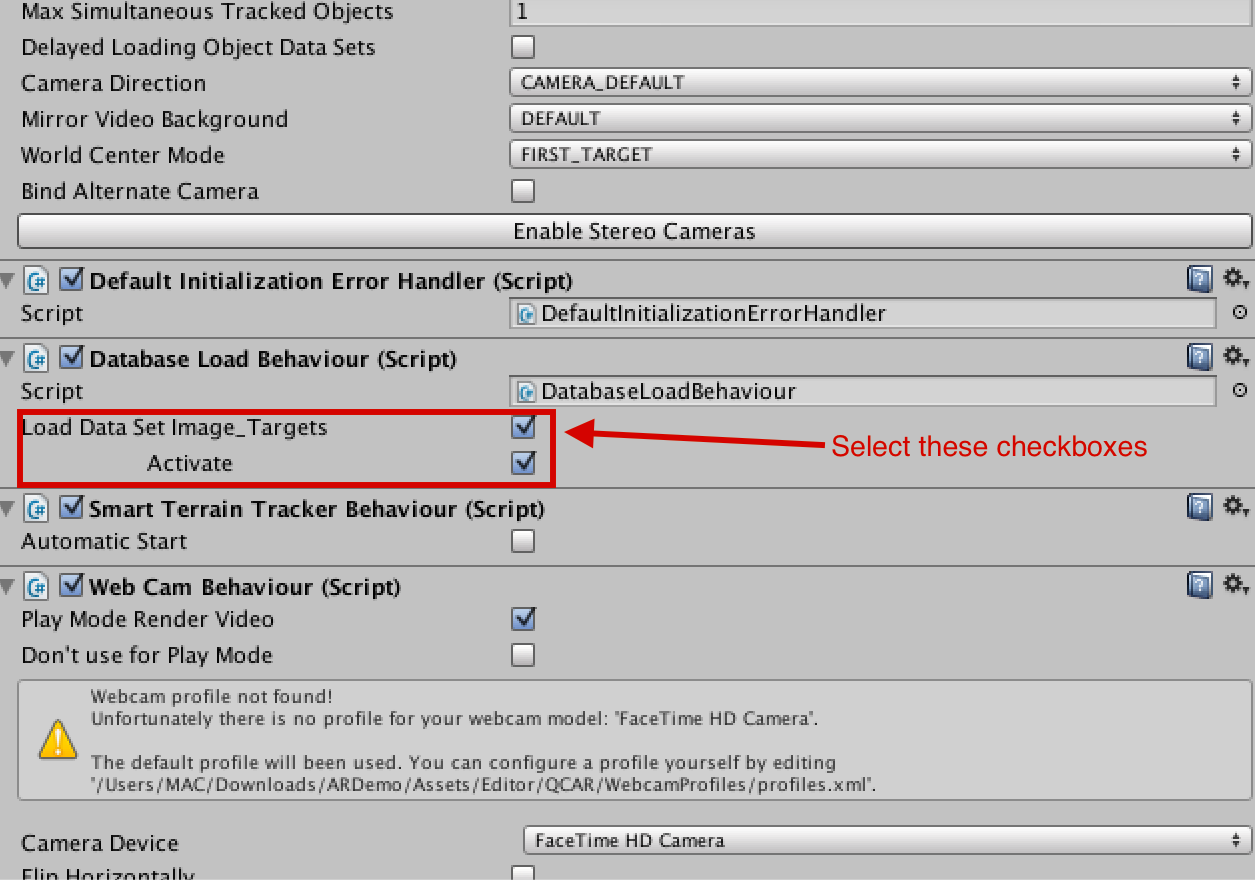
Now we need to activate the Image_Targets Dataset. This can be done by selecting “ARCamera”, and in the Inspector panel, under “Dataset Load Behaviour (Script)”, we need to select “Load Data Set Image_Targets” and then “Activate”.
At this point, if we select “Run” and point a print out of the image towards our webcam, we should see the samurai on it and doing “Attack animation” which is its default animation.
We are almost done. Let’s save the scene with the name “ARDemo”.
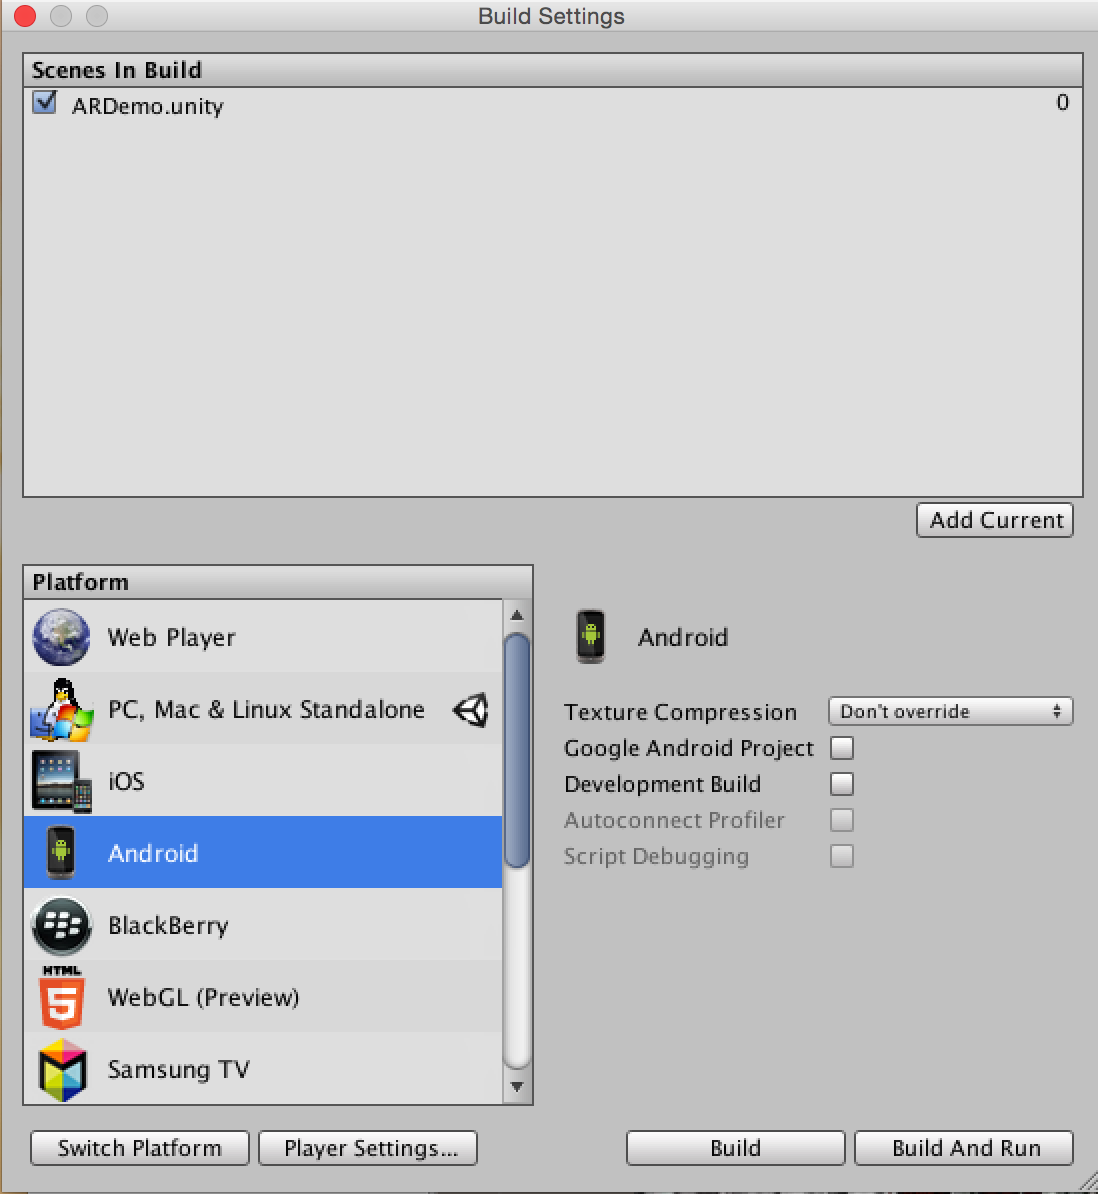
The last step is to build the project for Android. We need to go to “File >> Build Settings”. We need to add the current scene by selecting “Add Current”. Then, we need to select a platform (Android). Here, we will have multiple options:
- Google Android Project: This will allow us to export the current Unity project to Android Studio so it can be edited and used to add more elements.
- Development Build: Enabling this will enable Profiler functionality and also make the Autoconnect Profiler and Script Debugging options available.
We will be making a simple build as follows:
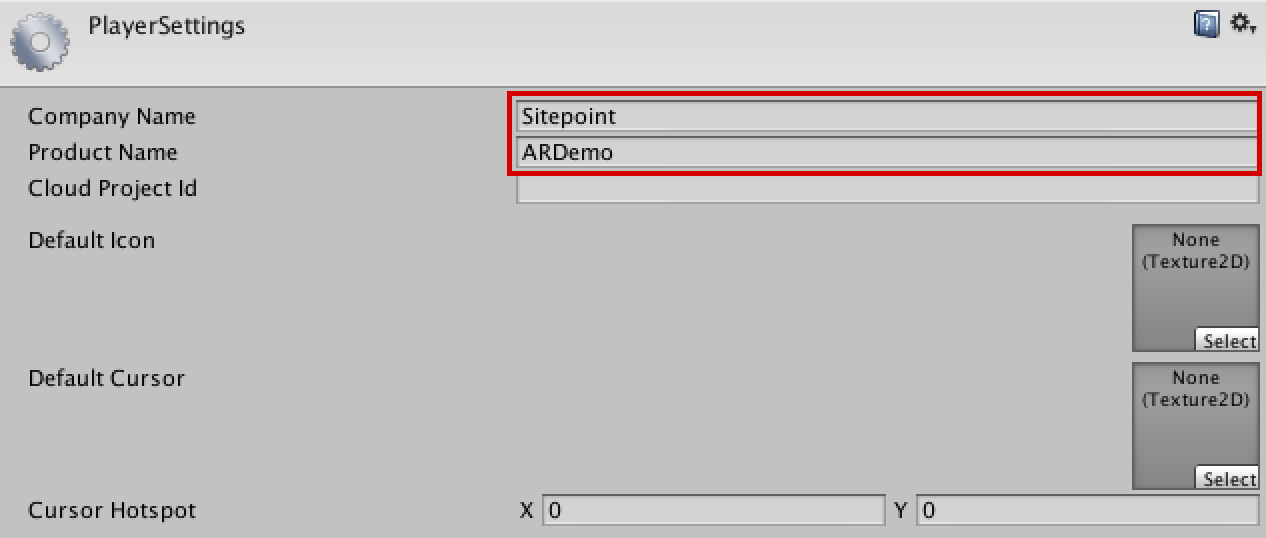
Before pressing the Build button, we need to make some more changes in the “Player Settings” options in the Inspector panel. Here, the company’s name needs to be changed; e.g. to “SitePoint”. Next, we need to change the Bundle Identifier under “Other Settings” say, to “com.SitePoint.ARDemo”.
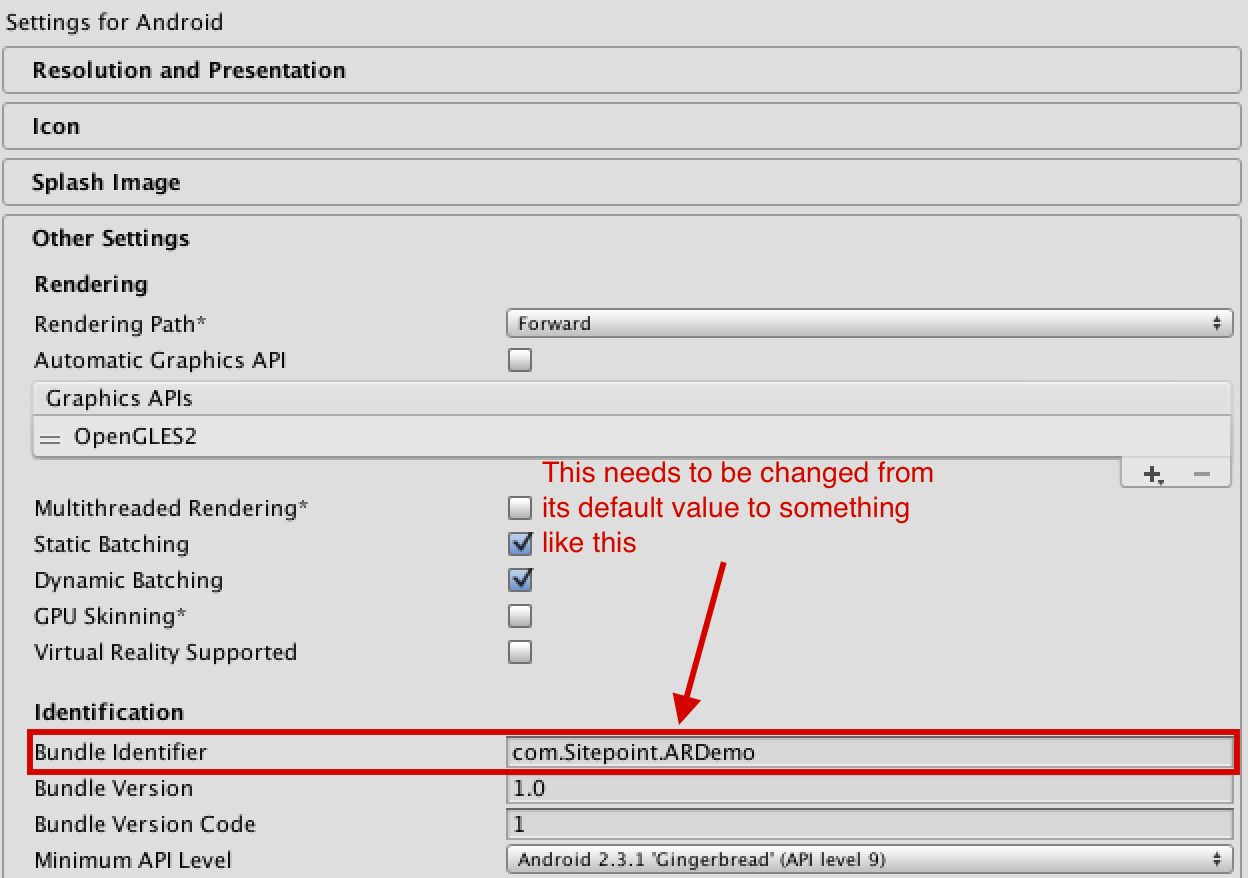
Now, we can proceed to “Build and Run”. Other changes like Minimum API Level etc. can be made as per additional requirements. We will need to connect an Android mobile device via USB and enable USB debugging.
We will also need to have an Android developer environment set up before we can test our Unity games on the device. This involves downloading and installing the Android SDK with the different Android platforms, and adding our physical device to our system (this is done a bit differently depending on whether we are developing on Windows or Mac).
Since, this is a complex process, a basic outline of the tasks that must be completed before we can run code on our Android device or in the Android emulator has been provided in the Unity docs. However, a more detailed guide can be found in the first part of Patrick’s tutorial on VR.
The Final Result (Demo)
Finally, the fun and magical part!
Once the app builds and runs on Android we can point the mobile device’s camera to the marker and watch the animation. This is how the animation looks in my Nexus 5.

The AR app will work even with a black and white image of the stones because the feature points will still remain (they usually depend on other factors like gradient, etc. instead of color).
Conclusion
Lots of really cool stuff can be done with Unity and Vuforia. In this tutorial, we have made a simple AR app with animation without writing a script! In the followup tutorial, we will be adding cardboard support and some more interesting Vuforia features to our app.
If you get stuck at any point or want to view the source code, you can find it on Github. You will just have to enter your Vuforia App License Key to build the app.
If want to download or test the app you can find the apk here.
If you make something cool out of this tutorial, or have any queries/feedback feel free to leave a note in the comments below!
Frequently Asked Questions (FAQs) on Building an AR Android App with Vuforia and Unity
What are the prerequisites for building an AR Android app with Vuforia and Unity?
To build an AR Android app with Vuforia and Unity, you need to have a basic understanding of Unity and C# programming. You also need to have Unity installed on your computer. Unity is a cross-platform game engine that you can use to create 3D, 2D, VR, AR and simulations. In addition, you need to have the Vuforia Engine, which is a software platform for creating Augmented Reality apps. You also need to have an Android device for testing the app.
How do I install Vuforia in Unity?
To install Vuforia in Unity, you need to go to the Unity Asset Store and search for Vuforia. Once you find it, click on the ‘Import’ button to add it to your project. After importing, you can enable Vuforia by going to the ‘Player Settings’ and then to the ‘XR Settings’ where you can check the ‘Vuforia Augmented Reality’ box.
How do I create a Vuforia account?
To create a Vuforia account, go to the Vuforia website and click on the ‘Sign Up’ button. Fill in the required details such as your name, email address, and password. After filling in the details, click on the ‘Create Account’ button. You will receive a confirmation email. Click on the link in the email to verify your account.
How do I create a Vuforia license key?
To create a Vuforia license key, log in to your Vuforia account and go to the ‘License Manager’ section. Click on the ‘Add License Key’ button. Choose the ‘Development’ option and fill in the required details. After filling in the details, click on the ‘Confirm’ button. You will receive a license key which you can use in your Unity project.
How do I add an image target in Vuforia?
To add an image target in Vuforia, go to the ‘Target Manager’ section in your Vuforia account and click on the ‘Add Target’ button. Choose the ‘Single Image’ option and upload the image you want to use as a target. After uploading the image, click on the ‘Add’ button. You can then download the target database and import it into your Unity project.
How do I add 3D models to my AR app?
To add 3D models to your AR app, you can use the ‘GameObject’ option in Unity. Go to the ‘GameObject’ menu, choose the ‘3D Object’ option and select the type of 3D model you want to add. You can then position and scale the model as needed.
How do I build and run my AR app on an Android device?
To build and run your AR app on an Android device, go to the ‘File’ menu in Unity and choose the ‘Build Settings’ option. Select ‘Android’ as the platform and click on the ‘Switch Platform’ button. Then click on the ‘Build and Run’ button. Connect your Android device to your computer and the app will be installed and run on your device.
How do I troubleshoot issues with my AR app?
If you encounter issues with your AR app, you can use the ‘Console’ window in Unity to view error messages and debug your app. You can also refer to the Vuforia and Unity documentation for troubleshooting tips.
How do I optimize my AR app for better performance?
To optimize your AR app for better performance, you can use techniques such as reducing the complexity of your 3D models, using lower resolution textures, and minimizing the use of transparent materials. You can also use the ‘Profiler’ tool in Unity to analyze the performance of your app and identify areas for improvement.
How do I publish my AR app on the Google Play Store?
To publish your AR app on the Google Play Store, you need to create a Google Play Developer account and pay a one-time registration fee. Then you can use the ‘Google Play Console’ to create a new app, upload your APK file, fill in the app details, set the price and distribution options, and submit the app for review. Once your app is approved, it will be published on the Google Play Store.

