
Key Takeaways
- Pure is a lightweight CSS framework that helps manage website elements for optimal display on all screen sizes and devices, including IE 7+, Firefox, Chrome, Safari, iOS 6.x, and Android 4.x. It is based on Normalize.css and includes six basic modules: Base, Grids, Forms, Buttons, Tables, and Menus.
- The Pure framework offers customization options such as the Skin Builder for creating color schemes and modifying features like border-radius and vertical padding, and the Grid Builder for creating a custom grid system. It also includes styles for menus, forms, buttons, and tables, and is responsive by default.
- Pure simplifies the creation of common website elements such as horizontal menus and grid structures. For instance, to create a horizontal menu, three classes (.pure-menu, .pure-menu-open, and .pure-menu-horizontal) are applied to the list wrapper. Grid structures are managed through classes applied to the container and grid units.
- Pure also facilitates the creation of responsive forms with various styles. For example, a stacked form, where input elements are below the labels, is created by adding two classes (.pure-form and .pure-form-stacked) to the
Introduction
Some of the most regular and frequent readers of the network might remember a previous series of mine entitled Build a Responsive, Mobile-Friendly Website From Scratch. It started with the creation of mockups and wireframes through to the adaptation of the layout according to the devices used. I decided to take up this small project to show you how to recreate the same web pages, style, and layouts in less time by using a simple CSS framework called “Pure“. In this short tutorial I will focus only on some of the elements that you can find on a website, showing in particular how to recreate the classical horizontal menu, a minimum grid structure with two columns and a simple form for contacts. Before going further, let me make a brief introduction about this recent and modern framework, singling out what are its main modules and explaining some of its main features.Pure: what is it?
Pure is a framework that helps you to manage all the elements of a website so that they’ll look great on all screen sizes, regardless of the device you have chosen to use. It works in IE 7+, Firefox, Chrome, Safari, iOS 6.x and Android 4.x. One of its main features is its weight. In fact, it is a light and complete library whose weight is only 4.4KB minified and gzipped and composed of six basic modules, that are:- Base
- Grids
- Forms
- Buttons
- Tables
- Menus
<link rel="stylesheet" href="http://yui.yahooapis.com/pure/0.3.0/pure-min.css"/>Task 1: Create the Horizontal Menu
Among the prebuilt common elements that you can find in a lot of websites on the web, there’s the very well known and used horizontal menu. As you could remember, in the third part of the article dedicated to the writing of a semantic HTML5 code, I have used the<nav> element, which is a semantic element used for declaring a navigational section of a website (that is, a section of a page that links to other pages or to parts within the page) and wrapped an unordered list containing the main links of our website. Once done this, I’ve applied the necessary rules in the CSS stylesheet in order to display it horizontally.
Now, what do we have to do to obtain the same result using the Pure library? To achieve this goal, the first step is to apply three classes to the list wrapper (<nav>), that are: .pure-menu, .pure-menu-open, and .pure-menu-horizontal
. The first one applies rules that are common to all menus in Pure; the second one (.pure-menu-open) is used to let the list items appear, while the third and last one is responsible for showing the list items on the same line.
Be careful that by default, the menu isn’t centered. In addition, to improve the user interface, we should highlight the list item that links to the current page. This is done by applying the .pure-menu-selected class to the <li> element you want to highlight. By doing so, the color of the text will turn from grey to black.
Once done, this should be your final code:
<nav id="main-menu" class="pure-menu pure-menu-open pure-menu-horizontal">
   <ul class="menu-list">
      <li class="pure-menu-selected"><a class="menu-item-link" href="#">Homepage</a></li>
      <li class="pure-menu-selected"><a class="menu-item-link" href="#">News</a></li>
      <li class="pure-menu-selected"><a class="menu-item-link" href="#">Graphics</a></li>
      <li class="pure-menu-selected"><a class="menu-item-link" href="#">Mobile</a></li>
      <li class="pure-menu-selected"><a class="menu-item-link" href="#">Web Design</a></li>
   </ul>
</nav>
Task 2: The Content Grid
After the menu, let’s see how we can manage the content part of our web page. In the simple homepage created for the previous series on RWD, we find a grid composed of two units: on the left there is a box dedicated to the screencasts’ sections, while on the right there’s a space designed to contain the last tweets of the author. Both the left and the right units occupy 50% of their space as long as the width of the screen is larger than 767px. On the contrary, if the screen’s width is equal to or smaller than that, the grid units are stacked and occupy 100% of the width available. When I listed the modules available in Pure, there was also the specific one for managing grids. To declare a responsive grid, you have to apply to the container a class called.pure-g-r. The grid units share a similar name, .pure-u-*-*, where the final part of the class specifies how much space the given unit will take up.
The grid system conceived by Pure is really useful because it will make you save a lot of time but, above all, avoid the management of “nasty” elements such as float, clear, and others used to create layouts. Furthermore, they will rescue you from all the problems and awkward situations tied to the managing of the responsive side of the layout.
That said, let’s see an example of how the Pure grid system works, implementing the situation described above:
<div class="pure-g-r">
      <aside id="video-box" class="pure-u-1-2 small-box shadow">
         <p>
            Screencast box
         </p>
      </aside>
      <aside id="twitter-box" class="pure-u-1-2 small-box shadow">
         <p>
            Twitter box
         </p>
      </aside>
   </div>
Task 3: A Responsive Contact Form
Although in this sample page I created there’s no form, I decided to study in detail and propose this other (surely useful) module of the Pure library, thanks to which you can display forms in several different types of styles. For this example, we’ll create a stacked form, where the input elements are below the labels. To go further, we have to add two classes to the<form> element: .pure-form and .pure-form-stacked.
Then we have to place both the label and the input tags within a wrapper, to which we’ll apply the .pure-control-group
class and then put all of these wrappers into a <fieldset> element. The submit and the reset button will have a wrapper as well, but their wrapper will have the class .pure-controls. For the submit button, we used the .pure-button-primary class to highlight it, belonging to the Buttons module and used to change the style of the button (you can find more info and examples in the appropriate section).
Here’s your final result:
<div class="pure-u-1-2">
   <form id="contact" name="contact" action="#" method="post" class="pure-form pure-form-stacked">
      <fieldset>
      <legend>A Stacked Form</legend>
            <label>Name:</label>
            <input type="text" name="name" placeholder="Name" />
            <label>Email</label>
            <input type="email" name="email" placeholder="Email" />
            <label>Subject</label>
            <input type="text" name="subject" placeholder="Subject" />
            <label>Message:</label>
            <textarea name="message" placeholder="Your message here..."></textarea>
         <div class="pure-controls">
            <input type="submit" class="pure-button pure-button-primary" value="Submit" />
            <input type="reset" class="pure-button" value="Reset" />
         </div>
      </fieldset>
   </form>
</div>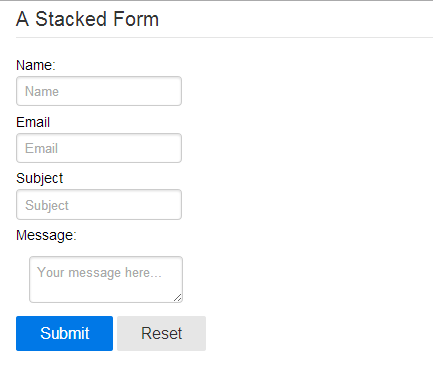
Conclusions
Through this simple and short tutorial you should have understood the great potential of this new and versatile framework. Take into account the possibility of using one or more of its modules in your next future projects, not only to save time, but also to practice coding with a different approach. If you want to know more about Pure, you can find further information on the website or visiting its repository on GitHub. You can find the whole code here.Frequently Asked Questions about PureBasic
What is PureBasic and why should I use it?
PureBasic is a programming language based on the BASIC programming language. It is designed to be simple to use, yet powerful enough for complex programming tasks. The main advantage of PureBasic is its simplicity. It has a straightforward syntax that is easy to understand, even for beginners. Moreover, it is a compiled language, which means that your code is converted into machine code before it is run, resulting in faster execution times. It also supports inline assembly, allowing you to write parts of your program directly in assembly language for maximum performance.
How do I get started with PureBasic?
To get started with PureBasic, you first need to download and install the PureBasic software from the official website. Once installed, you can start writing your first program. PureBasic has a built-in editor that you can use to write your code. It also includes a compiler that you can use to compile your code into an executable file.
What platforms does PureBasic support?
PureBasic supports multiple platforms including Windows, Linux, and MacOS. This means that you can write your code once and compile it for any of these platforms without any modifications. This cross-platform support makes PureBasic a versatile choice for developers.
Can I use PureBasic for commercial projects?
Yes, you can use PureBasic for commercial projects. The license for PureBasic allows you to distribute the programs you create without any additional fees or royalties. This makes it a cost-effective choice for small businesses and independent developers.
Does PureBasic support object-oriented programming?
PureBasic is primarily a procedural programming language, but it does have some support for object-oriented programming. You can define classes and create objects in PureBasic, but the support for object-oriented features is not as extensive as in languages like Java or C++.
How can I learn more about PureBasic?
There are many resources available to help you learn more about PureBasic. The official PureBasic website has a comprehensive documentation section that covers all aspects of the language. There are also many tutorials and examples available online that can help you get started.
What kind of programs can I write with PureBasic?
You can write a wide variety of programs with PureBasic. It is suitable for everything from small utility scripts to complex desktop applications. It has built-in support for graphics, sound, and network programming, making it a versatile choice for many different types of projects.
How do I debug my PureBasic programs?
PureBasic includes a built-in debugger that you can use to find and fix errors in your code. The debugger allows you to step through your code line by line, inspect the values of variables, and set breakpoints to pause execution at specific points.
Can I integrate PureBasic with other programming languages?
Yes, you can integrate PureBasic with other programming languages. You can call functions written in other languages from your PureBasic code, and you can also call PureBasic functions from code written in other languages. This allows you to leverage existing code and libraries in your PureBasic projects.
Is there a community of PureBasic developers?
Yes, there is a vibrant community of PureBasic developers. There are forums where you can ask questions, share your projects, and learn from other developers. The community is a great resource for anyone learning or working with PureBasic.
I have a Bachelor's degree in European languages, cultures, and literature from the University of Naples. I'm passionate about graphics and web design, and for several years I've been working on projects and designs for many companies. I'm a writer for the Audero User Group; my specialties are HTML, CSS, Web Design, and Adobe Photoshop.
