2D Animation Tutorial Using Spine for Mobile Apps
Key Takeaways
- Spine, a software by Esoteric Software, provides a solution to the problems of sprite sheets in mobile app animations. It uses a skeletal animation system, allowing developers to create more lifelike and efficient animations.
- The Spine software allows developers to create a skeleton, “dress it” with skin, apply keyframes and make an animation in a short time. The process is intuitive and user-friendly once the basics of the software are understood.
- For effective use of Spine, each animatable element should be drawn on its own layer. The software allows for the importation of images to ‘skin’ the bones of the skeleton, and these can be arranged and connected to create the desired animation.
- Once satisfied with the animation, it can be exported for use in mobile apps. However, a paid license is needed for this. Spine also has runtime libraries built by Esoteric Software to support the use of the animation in your app.
In the classic book by Disney animators Frank Thomas and Ollie Johnson, “The Illusion of Life”, the art of character animation is described as crafting,
“drawings that appear to think and make decisions and act of their own volition.”
Animation, especially of living things, seems like a major hurdle for the mobile app developer who needs to create people, insects, birds, and lifelike plants to bring their mobile games to life. Many turn to sprite sheets, using software such as Texture Packer to turn a series of drawings into a ‘moving picture’ much like the Disney animators did, frame by frame with each sprite moving slightly to give an illusion of a moving figure when played in sequence, like an old-fashioned flip book.
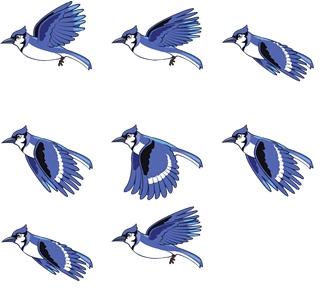
Sprite sheets, however, present some problems for mobile apps if they are at all complicated. First, they are difficult to edit and maintain, as to change any element of the sprite sheet means precisely replacing all elements of a sprite sheet. One mistake and the animation looks jerky and “unreal”.
Additionally, sprite sheets consume a certain amount of texture memory in your app. First, you will need a copy of each element of your animation embedded into your sprite sheet, there might be dozens of images packed into a .png file. Second, you might want to content-scale that sprite sheet so that it looks good on retina screens, so you will need a @2x version of it, using even more memory. For fast-moving games with many complex animations, sprite sheets can quickly become a maintenance and memory problem.
There must be a better way!
Enter Spine, the easy-to-use and well-designed software by Esoteric Software. Spine was created as a Kickstarter project and has quickly become a tool of choice for many developers of mobile games. As one Corona developer noted,
“…bought it after trying it for something like 2 seconds.. This is the coolest thing that happened for Corona based games since Corona!”
Instead of creating frame-by-frame animations, Spine works by creating skeletal animations. In short, you create a skeleton and “dress it” into a skin, apply keyframes, and create an animation in a short amount of time. It’s an intuitive process once you understand the basics of the software. In this tutorial, I’ll show how to create a simple two-part animation: a bee that has two states, fluttering, and pausing.
To begin, you need at least the trial version of Spine. Download it at esotericsoftware.com/spine-download. Note, you won’t be able to export any files to use in your mobile apps until you buy a version of the software, either the Essential version at $60 or the Professional at $249. Most of the functionality an Indie developer needs is included in Essential, so I recommend buying it if, after the trial version shows you Spine’s capabilities, you think you could use it in your projects.
You will need some art to begin your animation. If you create your own, make sure to draw each animatable element on its own layer in Pixelmator, Fireworks, or Photoshop. Heads, necks, arms, torso, and legs all need to be on their own individual layer. I visited VectorStock.com and bought an image of a bee. The download includes an Illustrator file that allows you to isolate the four elements of the bee I want to animate: head, torso, and two wings. I saved those elements as four separate .png files. It’s a good idea to place the elements of your animation into the folder that will be its final home in your app so that you don’t have to change paths to images later on.
Before you start, consider adding a placeholder of the basic image to Spine so that you get your bone placement right. You can import it with the image fragments and delete it at the end of the animation process. You might prefer to set its opacity low or colorize it to remind yourself to delete it later.
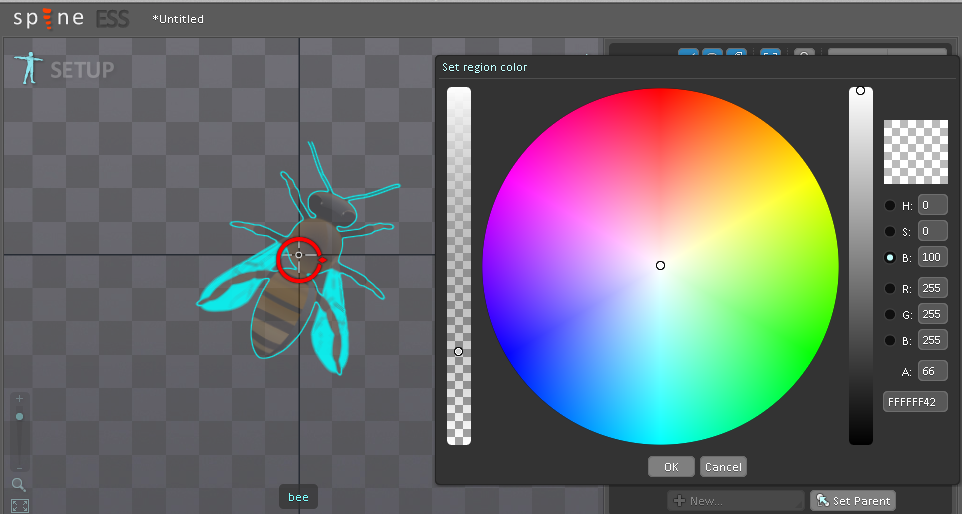
I started by creating a new ‘skeleton’ (Cmd+n / Ctrl+n) in Spine and drawing the four elements of the animation – head, body, and two wings. I named each ‘bone’ of the skeleton appropriately. To do this, make sure you are in the ‘Setup’ area of Spine (the ‘Setup’ text toggles if you click it, between the Setup and Animate states). Click ‘create’ in the toolbox and draw the bones onto the grid. If you get stuck, make sure your screen looks like the one below.

Once you’re satisfied with the way the bones look, you need to import the images that will ’skin’ the bones. If you tell Spine what folder to browse for, it will import the images you need for your animation. I named these images as well.
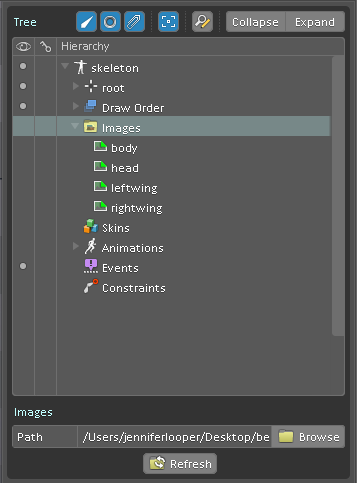
Drag the skin (images) from the right panel onto the bones. To make sure the elements are skinned in the right order, you can select one of the elements in the panel and click ‘+’ or ‘-‘ to move it above or below in the order of slots.
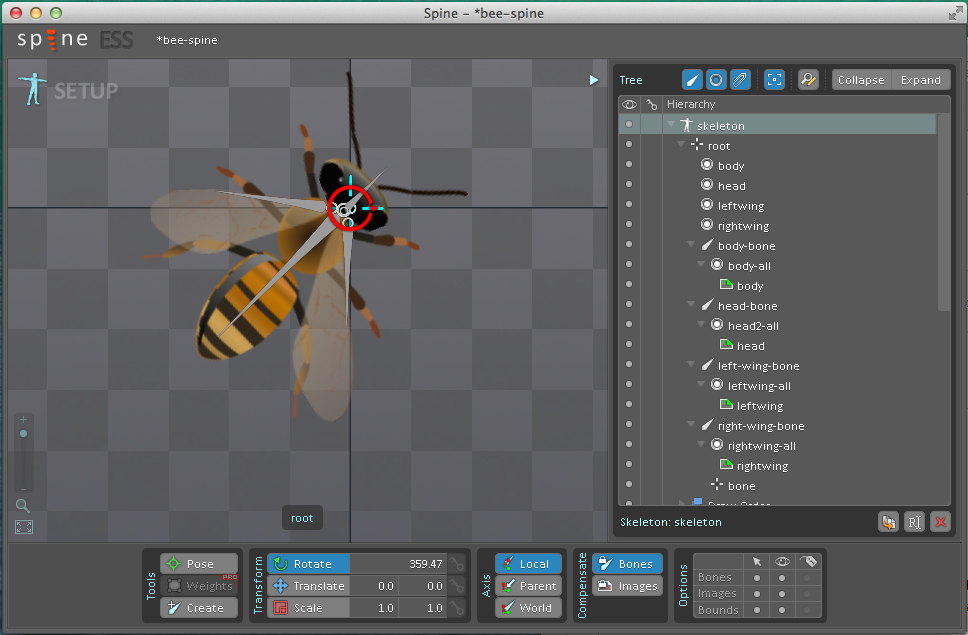
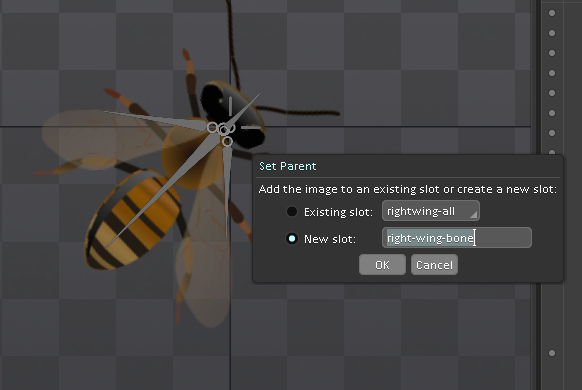
Next, connect the bones to the skin by selecting one of the elements of the skin you just imported and clicking ‘set parent’ in the right panel. Once a skin element is given a bone parent, you can arrange a pose by dragging the bone.
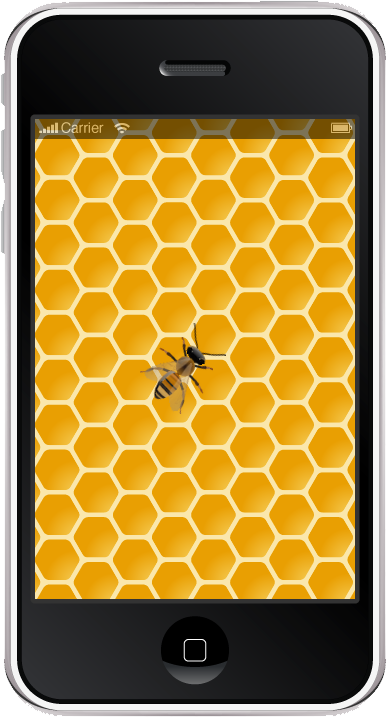
Now that the skins are arranged along with the bones, you are ready to animate! As a demo, I have created a ‘lazy bee’ game interface. This is a sample Corona SDK app where the bee rests on a honeycomb. Feed the bee ‘pollen’ by clicking on it and click on the honeycomb for the bee to fly to its new space. If you don’t feed the bee, it remains in ‘rest’ mode on the honeycomb, moving only slightly.
Click the left-hand ‘setup’ text to toggle to the animate screen. Here is where we start experiencing Flash déjà vu, as we will start assigning poses to keyframes. For ‘lazy bee’, I need to create two animations, one a ‘rest’ state with a pulsing wing movement, and a ‘flying’ state with a looping wing flutter and body wiggle effect.
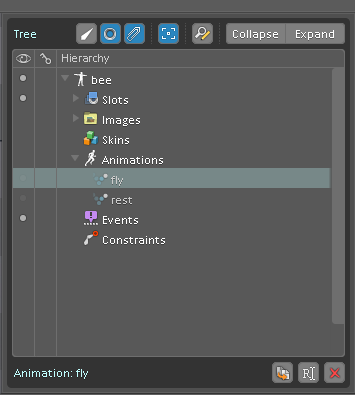
To do this, click on ‘Animations’ in the right hand tree and generate a new animation. Click keyframe 0 and select it as “Loop start” and 15 as “Loop end”. Then click each keyframe successively and move the bones (with the skin attached) very slightly to make the wings and body move. For the ‘fly’ animation, the wings move more dramatically and more quickly, a setting controlled via the ‘playback’ button. For the ‘rest’ animation, the wings move only a little and over only eight keyframes.
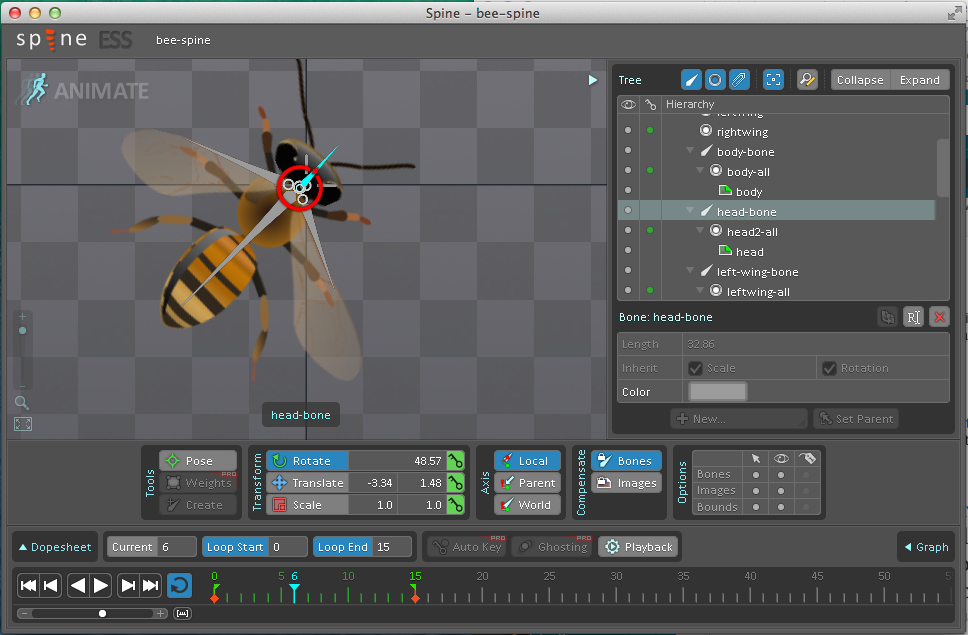
For each keyframe, rotate, translate (moved) or scale a particular bone, and then click the ‘key’ button next to the property to save the keyframe. Unchanged keyframe buttons start out as green, edited keyframes orange, and when changed and saved the button turns red. A good tip is to enable “Auto Key” so that Spine remembers your bone keyframes automatically.

Once you have saved all the motions, to playback the animation as a loop, click the ‘repeat’ button and then the ‘play’ button. This will show you if you have misplaced bones or anything that isn’t moving naturally. Make changes if necessary, keyframe by keyframe, making sure to save each edit via the keyframe button. View more fine-grained detail of the animation by clicking ‘dope sheet’. Change the speed of playback by editing it in the ‘playback’ area, accessible from the ‘playback’ button.
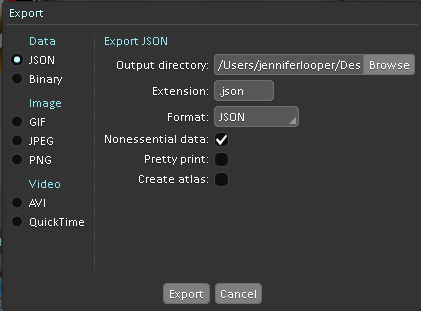
Satisfied with your animation? Now it’s time to export it. For this, you need a paid license. There are several options to export, and even a built-in texturepacking tool so that you can pack all of your images into one .png and generate an atlas, if you prefer to build sprites.
For my purposes, I saved the animations as a .json file. You can save it in ‘pretty print’ format to make it easier to read and debug.
To use your new animation in your mobile app, you need one of the runtimes built by Esoteric Software. I imported the Corona SDK runtime into my app.
The completed project is available on github. Once the .json file and images are accessible to your main codebase, you can add particle effects and buttons to can attach your animations to a given event (The below code is lua).
--include the Spine library

 local spine = require "spine-corona.spine”
 include the json file generated by Spine
 local json = spine.SkeletonJson.new()
 local skeletonData = json:readSkeletonDataFile("animations/bee.json")

 --draw the skeleton using the data

 local skeleton = spine.Skeleton.new(skeletonData)

 --dress the skeleton with the image files

 function skeleton:createImage (attachment)
         return display.newImageRect("animations/images/" .. [attachment.name](http://attachment.name) .. ".png",100,100)
end

--place the animation on the screen in the right position

skeleton.group.x = display.contentWidth/2
skeleton.group.y = display.contentHeight/2
skeleton.flipX = false
skeleton.flipY = false

--get ready to make it move

local stateData = spine.AnimationStateData.new(skeletonData)
local state = spine.AnimationState.new(stateData)

--set it to its ‘rest’ state

state:setAnimationByName(0, "rest", true, 0)
You can see the final product here:
In this tutorial, I’ve outlined the bare minimum you can do with Spine. I highly recommend it for use in your games and mobile apps when you need to liven up your interface with an animation. With this tool, complex animations become manageable for even the smallest Indie development shops.
With thanks to Laura Tallardy, Illustrator and Developer of Spine-animated apps. Check out her Spine animations in her latest app, Princess Puzzles, the app trailer can be found here
Frequently Asked Questions (FAQs) about 2D Animation Using Spine for Mobile Apps
What are the key features of Spine that make it suitable for 2D animation?
Spine is a powerful tool for 2D animation, particularly for mobile apps. It offers a range of features that make it stand out. Firstly, it has a streamlined workflow, allowing you to create animations by moving the skeletal attachments, which can be more efficient than traditional frame-by-frame animation. Secondly, Spine supports mesh deformation. This means you can create a mesh for your character and deform it, allowing for more complex and realistic movements. Lastly, Spine has runtime libraries that support many game toolkits and programming languages, making it highly versatile and adaptable for different projects.
How does Spine compare to other 2D animation software?
Spine stands out from other 2D animation software due to its focus on skeletal animation. While other software may rely on traditional frame-by-frame animation, Spine allows you to animate by moving the bones in your character’s skeleton. This can result in smoother, more natural movements. Additionally, Spine’s support for mesh deformation and its wide range of runtime libraries make it a versatile tool that can be used with many different game toolkits and programming languages.
Can I use Spine if I’m new to 2D animation?
Yes, Spine is designed to be user-friendly and accessible, even for those who are new to 2D animation. It offers a range of tutorials and resources to help you get started, and its intuitive interface makes it easy to learn the basics. However, like any software, it may take some time and practice to become proficient.
What types of projects is Spine best suited for?
Spine is particularly well-suited for projects that involve character animation for games. Its skeletal animation system allows for smooth, natural movements, making it ideal for animating characters. Additionally, its support for mesh deformation means it can handle more complex movements and shapes, making it a good choice for projects that require a high level of detail and realism.
How can I learn to use Spine effectively?
There are many resources available to help you learn to use Spine. The official Spine website offers a range of tutorials and guides, and there are also many video tutorials available on platforms like YouTube. Additionally, practicing regularly and experimenting with different features can help you become more proficient.
What are the system requirements for Spine?
Spine is a lightweight software that can run on most modern computers. The specific system requirements can vary depending on the complexity of your projects, but generally, you will need a computer with a decent processor, enough RAM to handle the software and your projects, and a graphics card that supports OpenGL 2.0 or later.
Can I use Spine for commercial projects?
Yes, you can use Spine for commercial projects. However, you should be aware that the software is not free, and you will need to purchase a license to use it commercially. The cost of a license can vary depending on the features you need.
Does Spine support collaboration between team members?
Spine does not have built-in collaboration features, but it does support version control systems like Git. This means you can easily share your projects with team members and collaborate on animations.
Can I import my own artwork into Spine?
Yes, you can import your own artwork into Spine. The software supports a range of file formats, including PNG, JPG, and PSD, so you can easily bring in your own images and use them in your animations.
What kind of support is available if I run into issues with Spine?
If you run into issues with Spine, there are several support options available. The official Spine website has a comprehensive documentation section, as well as a forum where you can ask questions and get help from the community. Additionally, the Spine team offers email support for more complex or specific issues.
Jen Looper is a Boston-based web and mobile developer, specializing in cross-platform educational and fitness apps for iOS, Android, Nook, Kindle and Windows phone. View her portfolio at www.ladeezfirstmedia.com.
Published in
·Android·App Development·Blogs·Entrepreneur·iOS·Marketing·Mobile·SEO & SEM·July 29, 2015
Published in
·Android·App Development·Design·iOS·Mobile·Mobile Web Development·Responsive Web Design·Wearables·September 2, 2014

