


Key Takeaways
- Dropwizard simplifies Java-based RESTful web service development by integrating well-tested libraries and frameworks, allowing developers to focus on specific functionalities.
- The tutorial demonstrates CRUD operations using an in-memory data store implemented with a `DummyEventRepository` class, avoiding the complexity of database setup.
- Key operations include retrieving all events and a single event by ID, creating new events with automatically assigned IDs, updating existing events, and deleting events using standard HTTP methods.
- The use of `Optional` in `EventRepository` methods enhances error handling by elegantly managing absent values, thus preventing `NullPointerExceptions`.
- The article encourages experimenting with the application and hints at future topics like pagination, advanced features, and testing within Dropwizard.
Table of Contents
Dropwizard is a Java framework for building RESTful web services. In essence, it is a glue framework which bundles together popular and battle-tested Java libraries and frameworks to make it easier to start building new RESTful web services. This post explores how to implement create, read, update, delete operations (CRUD) on a resource.
Last time we set out on a journey to build a simple RESTful web service with Dropwizard. The goal was to build a back-end for a hypothetical events application that would allow you to search for events based on your search criteria. It should be able to provide a list of events, add new events and modify existing ones. Make sure you read the previous post because we will be continuing were we left off. If you wish to follow along, clone the GitHub repository and check out the register-resource tag.
Quick recap
In the previous article we created a new Dropwizard project, added custom configuration, created a representation and a very basic resource. Because we didn’t have a data store in place, clients were only able to make a GET request to /events and receive hard-coded data. In this follow-up tutorial we’re going to expand the feature set of the application to meet the requirements we initially set.
Introducing a data store
This tutorial is going to cover how to implement CRUD functionality for our application. To keep things simple and not bog you down in database specifics, I’m not going to set one up. Instead we’re going to implement a very basic in-memory database backed by java.util.List.
To achieve better code reuse, it’s better to depend on abstractions, which in Java terms means not depending on concrete types. We will hence declare the public API of our in-memory data store in an interface.
Create a new interface in the com.mycompany.core package called EventRepository.
public interface EventRepository {

}
We will expand this interface throughout the rest of the article, adding methods as we need them.
Implementing EventRepository
We have created an interface that defines the public API of EventRepository. Now we need to come up with an implementation.
Note that the following class is by no means a solution that you’d deploy to production. For starters, because we’re going to store events in a list, we’re going to run into concurrency issues. The list is a shared resource which means it has to be thread safe. Since concurrency is not the topic of this article, pretend that you are the only user. The idea is not to worry about the storage of data but rather how to create methods in EventResource so we could meet the requirements we initially set.
Create a new class called DummyEventRepository in com.mycompany.core package and make it implement the EventRepository interface.
public class DummyEventRepository implements EventRepository {

    private static final String DATA_SOURCE = "dummy_data.json";

    private List<Event> events;

    public DummyEventRepository() {
        try {
            initData();
        } catch (IOException e) {
            throw new RuntimeException(
                    DATA_SOURCE + " missing or is unreadable", e);
        }
    }

    private void initData() throws IOException {
        URL url = Resources.getResource(DATA_SOURCE);
        String json = Resources.toString(url, Charsets.UTF_8);
        ObjectMapper mapper = new ObjectMapper();
        CollectionType type = mapper
                .getTypeFactory()
                .constructCollectionType(List.class, Event.class);
        events = mapper.readValue(json, type);
    }

}
When DummyEventRepository is instantiated, initData is called. This method reads a JSON file containing dummy data which will be used to populate our in-memory data store. The JSON file is read with Guava’s Resource class and is parsed with Jackson’s ObjectMapper class. Create a new JSON document called dummy_data.json and place it in src/main/resources. The following is the data I will be using.
[
    {
        "id": 1,
        "name": "Czech National Symphony Orchestra - I. Concert",
        "description": "PERFORMERS: Libor Pešek - conductor, Natalie Clein - violoncello",
        "location": "náměstí Republiky 5, Praha 1 - Staré Město, 110 00",
        "date": "2016-10-25T19:30+0200"
    },
    {
        "id": 2,
        "name": "Salsa Festival",
        "description": "World class shows & performances by some of the best artists in the world.",
        "location": "Copenhagen",
        "date": "2017-05-05T17:00+0200"
    },
    {
        "id": 3,
        "name": "National Restaurant Day",
        "description": "As autumn arrives the National Restaurant Day kicks off, awaiting the lovers of gastronomy for the 11th time.",
        "location": "Budapest, Hungary",
        "date": "2016-10-16T12:00+0200"
    },
    {
        "id": 4,
        "name": "UEFA Europa League: Austria Vienna vs. Roma",
        "description": "Don't miss this spectacular game and get tickets to see Austria Vienna v Roma now, before they run out.",
        "location": "Ernst-Happel Stadion, Vienna, Austria",
        "date": "2016-11-03T19:00+0200"
    }
]
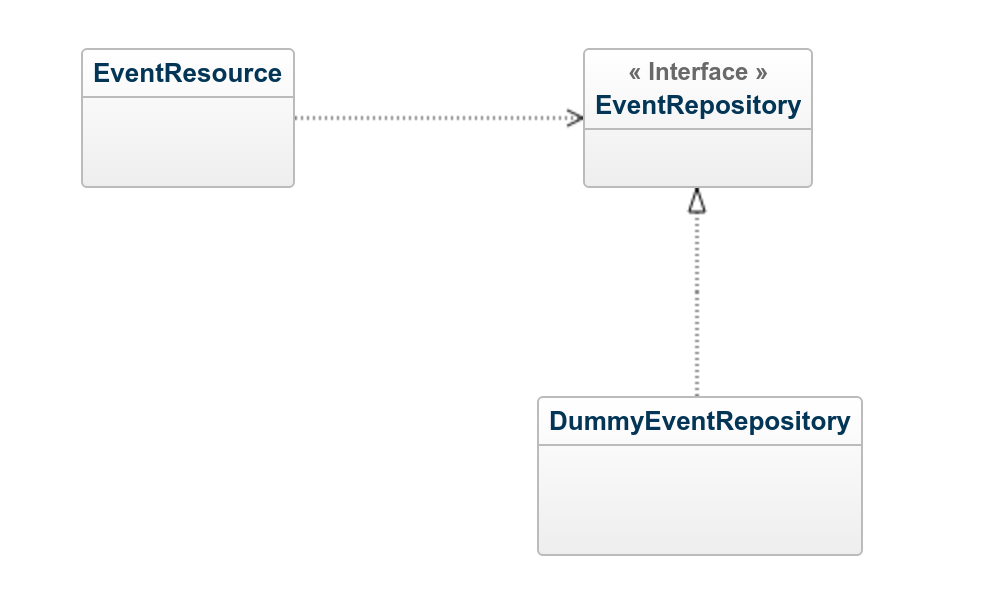
EventResource, EventRepository and DummyEventRepository
In the following diagram you can see the three types in action. EventResource is responsible for for handling HTTP requests. When it needs to access or modify data, it delegates this concern to an instance of EventRepository. DummyEventRepository is an implementation of EventRepository and it will act as an in-memory data store.
EventResource needs a reference to an implementation of EventRepository to do its job. I don’t want to instantiate DummyEventRepository in the EventResource class directly. This would be a violation of the dependency inversion principle. The less it knows about concrete implementations of other classes the better. Therefore I added a constructor parameter to the EventResource class which can be used to inject a concrete implementation of EventRepository.
private EventRepository repository;

public EventResource(EventRepository repository) {
    this.repository = repository;
}
Finally, we need to wire together our object graph. In our application’s run method, get a reference to an instance of DummyEventRepository and pass it to EventResource.
@Override
public void run(EventsConfiguration configuration,
        Environment environment) {
    //irrelevant code not shown
    EventRepository repository = new DummyEventRepository();
    EventResource eventResource = new EventResource(repository);
    environment.jersey().register(eventResource);
}
Retrieving all events
We can start using our newly created EventRepository by refactoring the allEvents method in EventResource class. At the moment it returns a list of events which are created on the fly. But it would make more sense if it returned all events from the in-memory data store. So let’s make the required modifications to make that happen.
Modify the EventRepository interface and declare a method for finding all events as well.
List<Event> findAll();
Create an implementation of the method declared in the interface in the DummyEventRepository class. Returning the list of events is all you need to do for now.
@Override
public List<Event> findAll() {
    return events;
}
Now modify EventResource to delegate the search of all events to an implementation of EventRepository.
@GET
public List<Event> allEvents() {
    return repository.findAll();
}
When running the application, instead of getting hard-coded data as we did in the previous post, you should see a list of events that are retrieved from EventRepository when visiting http://localhost:8080/api/events.
In reality, you don’t want to get all the data at once. There could be thousands of records and retrieving all of them would create unnecessary overhead. In the front-end, it is reasonable to show only a small selection of events. For example, when you do a Google search, you’ll get results that are distributed among multiple pages. This act is called pagination. Although an important feature, we’re going to cover it in a future article.
Retrieving a single event
In a RESTful API, retrieving a single resource is usually done via its ID. For example, if we’re interested in reading the state of an event with an ID of 123, we should make a GET request to /events/123. But how can we easily access the ID without doing complex string manipulation? The solution is the @PathParam annotation.
Let’s have look at how to use it in code. Add the following method to EventResource.
@GET
@Path("{id}")
public Event event(@PathParam("id") LongParam id) {
    //method body shown later
}
First we declare that this method should respond to GET requests that include an ID in the HTTP path. Remember that at the beginning of the EventResource class we used @Path("events") to indicate that the path of the resource starts with /events. Annotating a method with the @Path annotation adds another segment to the resource path. The curly braces around the id indicate that this should be treated as a path parameter. Using the LongParam type ensures that the value of the id read from the path must be of type Long. Otherwise Dropwizard will return an HTTP 400 response.
Finding an event by ID is relatively easy. Add another method to EventRepository interface.
Optional<Event> findById(Long id);
The method returns an Optional of type Event. I’m using Optionals to handle the possible case where the event with the given ID might not exist. The following is the implementation of this method in DummyEventRepository.
@Override
public Optional<Event> findById(Long id) {
    return events.stream().filter(e -> e.getId() == id).findFirst();
}
Now let’s get back to finishing the event method in the EventResource class. Since there is a possibility that the requested event does not exist, we should be ready to return an appropriate result to the client.
@GET
@Path("{id}")
public Event event(@PathParam("id") LongParam id) {
    return repository.findById(id.get())
            .orElseThrow(() ->
                    new WebApplicationException("Event not found", 404));
}
Using Optionals makes it really easy and concise to handle the case where the retrieved object might be null. In this example, if the event exists, it is returned to the client. Otherwise a new WebApplicationException, a run-time exception from JavaEE, is thrown. Dropwizard takes care of handling the exception and returns an error message to the client.
Creating a new Event
Creating a new event is done using the HTTP POST verb. To get things rolling, let’s first write the required code to add a new event to our data store. Because we currently store records in a list, the addition of a new event is straightforward.
Add a new method called save to the EventRepository interface. The repository will assign an ID to the event being saved and we want to communicate it back to the client. Therefore the return type should be set to Event.
Event save(Event event);
The following is an implementation of the save method which you should place in the DummyEventRepository class.
@Override
public Event save(Event event) {
    Optional<Long> maxId = events.stream()
            .map(Event::getId)
            .max(Long::compare);
    long nextId = maxId.map(x -> x + 1).orElse(1L);
    event.setId(nextId);
    events.add(event);
    return event;
}
As we’re trying to avoid using an actual database for demonstration purposes, we have to do some of the work ourselves that the database would otherwise do for us. For instance, when creating a new event, we don’t know it’s ID beforehand. Therefore I’m using the Streams API to find the current maximum ID value, increment it by one to get the next ID and assign it to the new event object. When there’s no events stored, a new event will get an ID of 1. Of course, databases do a much better job at generating the next value for an ID but since this little demo application is probably never going to see large amounts of data, it should be fine.
Once we’re done with the saving of a new event, let’s do the required modifications in the EventRepository class. Add the following method.
@POST
public Event create(Event event) {
    return repository.save(event);
}
To enable Jersey to receive an HTTP POST request, all we need to do is annotate a method with @POST in our resource class. Reading the request entity is done for you as well. Adding an argument of type Event to the method declaration informs Jersey to parse the body of the request and map it to an instance of Event. Keep in mind that no validation is performed. If none of the fields in the request body match the fields in the Event class, a new instance of Event will still be created but all of its instance fields will be null (except for id which is 0L since it is a primitive type).
For testing I’m going to use the curl command line utility.
curl -X POST http://localhost:8080/api/events \
    -d '{"name": "My Birthday", "description": "Time to celebrate!", "location": "My place", "date": "2016-10-27T19:00+0200"}' \
    -H "Content-Type: application/json"
The response to that command should be the following.
{
    "id":5,
    "name":"My Birthday",
    "description":"Time to celebrate!",
    "location":"My place",
    "date":"2016-10-27T20:00+0300"
}
The HTTP POST method is not idempotent. This means that if you execute the same request multiple times, you’re going to create new state on the server with each request.

Modifying an existing event
To update an existing event, we’re going to use the HTTP PUT method. PUT is an idempotent method which means that executing the same request multiple times does not create additional state on the server. As with retrieving a single event, we’re going to need to read the event’s ID from the path using the @PathParam annotation. Before we’re going to make the required modifications in our resource class, let’s implement the event update logic.
Declare an update method in EventRepository interface.
Optional<Event> update(Long id, Event event);
We should also communicate the updated entity back to the client. There is a possibility that the event with the given ID does not exist. Therefore I’m using Optional of type Event as the return type. To make updating an event easier, I created a new method updateExceptId that updates the name, description, location, and date of the event that it is called on to those of the one that was given to the method.
The following is the resulting implementation of the update method which you should place in DummyEventRepository.
@Override
public Optional<Event> update(Long id, Event event) {
    Optional<Event> existingEvent = findById(id);
    existingEvent.ifPresent(e -> e.updateExceptId(event));
    return existingEvent;
}
Next, you’ll see how to implement the method that should receive the PUT request in the EventResource class.
@PUT
@Path("{id}")
public Event update(@PathParam("id") LongParam id, Event event) {
    return repository.update(id.get(), event)
            .orElseThrow(() ->
                    new WebApplicationException("Event not found", 404));
}
Technically there should be nothing new for you by now. When we were looking at how to retrieve a single event, we looked at how to read the ID from the path using the @PathParam annotation. Later, when we implemented the addition of a new event, you saw how Jersey is able to map the JSON body into the Event entity.
Deleting an event
Although we did not set it as a goal in the initial requirements, let’s look at how to delete an event. The HTTP specification defines the DELETE method which is used to delete a resource. It is an idempotent operation.
First of all, I’m going to implement the deletion logic. Our repository interface is going to need an additional method.
void delete(Long id);
Next, we need to implement it in DummyEventRepository.
@Override
public void delete(Long id) {
    events.removeIf(e -> e.getId() == id);
}
Now let’s move on to implementing a REST endpoint for deleting an event. Add the following method to EventResource class.
@DELETE
@Path("{id}")
public Response delete(@PathParam("id") LongParam id) {
    repository.delete(id.get());
    return Response.ok().build();
}
Just like with reading a single event, we’re using the @PathParam annotation to get the ID of the event from the HTTP path. But what’s different now is the return type. Since there’s no event to return, the method has a return type of Response. This way we can send back an HTTP 200 OK response with no content.
Summary
Congratulations! Now you should have a good understanding of what Dropwizard is about. In the previous article, we looked at how to create a new Dropwizard application and configure it. Also a quick overview of the application structure was given. In this article you learned how to implement a simple RESTful API which enables you to create, read, update, and delete events. We have almost reached our goal. With the exception of search, we have implemented all the features we initially set out to accomplish. I encourage you to play with this application and implement a feature you think is missing.
Dropwizard has more advanced features we were not able to cover. For instance, every Dropwizard application has an admin interface which allows you to monitor your application using health checks. Additionally, a very important part of application development is testing. We’re going to have a look at these and much more in a future article.
Frequently Asked Questions (FAQs) about Getting Started with Dropwizard CRUD
What is the role of Dropwizard in the development of microservices?
Dropwizard is a Java framework that simplifies the development of high-performance RESTful web services, which are often used in the creation of microservices. It provides out-of-the-box support for sophisticated configuration, application metrics, logging, operational tools, and much more, allowing developers to focus on their application’s specific functionality. Dropwizard’s built-in modules make it easier to build lightweight, scalable, and robust microservices.
How do I set up a Dropwizard project?
Setting up a Dropwizard project involves several steps. First, you need to create a new Maven project and add Dropwizard dependencies to your pom.xml file. Then, you need to create a configuration class, a representation class, and a resource class. Finally, you need to create an application class that brings everything together and starts the application.
How can I create a RESTful API with Dropwizard?
Creating a RESTful API with Dropwizard involves defining a resource class. This class should contain methods that correspond to the HTTP methods you want your API to support (GET, POST, PUT, DELETE, etc.). Each method should be annotated with a JAX-RS annotation that corresponds to the HTTP method it represents. The method should also specify a path where the API can be accessed.
How do I handle database operations in Dropwizard?
Dropwizard provides built-in support for Hibernate, a popular Object-Relational Mapping (ORM) framework for Java. You can use Hibernate to map your Java classes to database tables and perform CRUD (Create, Read, Update, Delete) operations. To do this, you need to define a DAO (Data Access Object) class and use it in your resource class.
How can I validate input in Dropwizard?
Dropwizard uses Hibernate Validator, an implementation of the Java Bean Validation API, for input validation. You can use annotations like @NotNull, @Size, and @Pattern on your representation class’s fields to specify validation rules. If a client sends invalid data, Dropwizard will automatically return a 422 Unprocessable Entity response.
How can I test my Dropwizard application?
Dropwizard provides support for testing with JUnit and Mockito. You can write unit tests for your resource classes and use Dropwizard’s testing utilities to create a test environment for your application. This allows you to test your application’s behavior under different configurations and ensure that it works as expected.
How do I deploy a Dropwizard application?
A Dropwizard application can be packaged into a single, executable jar file using Maven. This jar file includes all the application’s dependencies, making it easy to deploy. You can run the jar file on any machine with a Java Runtime Environment (JRE) installed.
How can I monitor my Dropwizard application?
Dropwizard includes built-in support for metrics, which allow you to monitor your application’s performance and behavior. You can track things like request rates, response times, and error rates, and view this information in a human-readable format.
How can I secure my Dropwizard application?
Dropwizard provides support for authentication and authorization through its Auth module. You can use this module to protect your API endpoints and ensure that only authenticated and authorized users can access them.
Can I use Dropwizard with other Java frameworks?
Yes, Dropwizard is designed to work well with other Java frameworks. For example, you can use it with JDBI for database access, Guice for dependency injection, and Jersey for RESTful web services. This makes Dropwizard a flexible choice for building a variety of Java applications.