
Thanks to Vincent Quarles for kindly helping to peer review this article.
In this tutorial, we’ll finish the implementation of Save and Load functionality in our game. In the previous tutorial on Saving and Loading Player Game Data in Unity, we successfully saved and loaded player-related data such as statistics and inventory, but now we’ll tackle the most difficult part – world objects. The final system should be reminiscent of The Elder Scrolls games – each and every object saved exactly where it was, for indefinite amount of time.
If you need a project to practice on, here’s a version of the project we completed in the last tutorial. It has been upgraded with a pair of in-game interactable objects that spawn items – one potion and one sword. They can be spawned and picked up
(despawned), and we need to save and load their state correctly. A finished version of the project (with save system fully implemented) can be found at the bottom of this article.
Download the Project Starting Files
Project GitHub Page
Project ZIP Download
Key Takeaways
- Utilize a delegate-event system to notify objects when to save their state, enhancing the modularity and flexibility of your save/load system.
- Implement a Level Master object to manage the spawning and despawning of objects, ensuring that world objects maintain their state across game sessions.
- Use serializable classes to save object properties like position, which can be easily expanded or modified for different types of objects.
- Ensure proper subscription and unsubscription to save events in object scripts to avoid errors and manage game state effectively.
- Develop a robust system for saving and loading using binary formatting to handle complex data structures and ensure data integrity.
- Test and expand the system to include new object types and functionalities, demonstrating the system’s adaptability and scalability for different game development needs.
Implementation Theory
We need to break down the system of saving and loading objects before we implement it. First and foremost, we need some sort of Level master
object that will spawn and despawn objects. It needs to spawn saved objects in the level (if we are loading the level and not starting anew), despawn picked up objects, notify the objects that they need to save themselves, and manage the lists of objects. Sounds like a lot, so let’s put that into a flowchart:
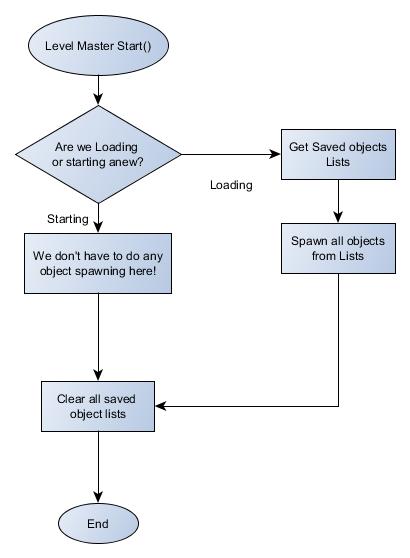
Basically, the entirety of the logic is saving a list of objects to a hard drive – which, the next time the level is loaded, will be traversed, and all objects from it spawned as we begin playing. Sounds easy, but the devil is in the details: how do we know which objects to save and how do we spawn them back?
Delegates and Events
In the previous article, I mentioned we’ll be using a delegate-event system for notifying the objects that they need to save themselves. Let’s first explain what delegates and events are.
You can read the Official Delegate documentation and the Official Events documentation. But don’t worry: even I don’t understand a lot of the technobabble in official documentation, so I’ll put it in plain English:
Delegate
You can think of a delegate as a function blueprint. It describes what a function is supposed to look like: what its return type is and what arguments it accepts. For example:
public delegate void SaveDelegate(object sender, EventArgs args);This delegate describes a function that returns nothing (void) and accepts two standard arguments for a .NET/Mono framework: a generic object which represents a sender of the event, and eventual arguments which you can use to pass various data. You don’t really have to worry about this, we can just pass (null, null) as arguments, but they have to be there.
So how does this tie in with events?
Events
You can think of an event as a box of functions
. It accepts only functions that match the delegate (a blueprint), and you can put and remove functions from it at runtime however you want.
Then, at any time, you can trigger an event, which means run all the functions that are currently in the box – at once. Consider the following event declaration:
public event SaveDelegate SaveEvent;This syntax says: declare a public event (anybody can subscribe to it – we’ll get to that later), which accepts functions as described by SaveDelegate delegate (see above), and it’s called SaveEvent.
Subscribe and unsubscribe
Subscribing to an event basically means ‘putting a function in the box’. The syntax is quite simple. Let’s suppose our event is declared in our well-known GlobalObject class and that we have some Potion object class named PotionDroppable
that needs to subscribe to an event:
//In PotionDroppable's Start or Awake function:
GlobalObject.Instance.SaveEvent += SaveFunction;

//In PotionDroppable's OnDestroy() function:
GlobalObject.Instance.SaveEvent -= SaveFunction;

//[...]
public void SaveFunction (object sender, EventArgs args)
{
 //Here is code that saves this instance of an object.
}
Let’s explain the syntax here. We first need to have a function that conforms to the described delegate standards. In the object’s script, there is such a function named SaveFunction. We’ll write our own later, but for now let’s just assume that it’s a working function for saving the object to a hard drive so it can be loaded later.
When we have that, we’re simply putting that function in the box at the Start or Awake of the script and removing it when it’s destroyed. (Unsubscribing is quite important: if you try to call a function of a destroyed object you’ll get null reference exceptions at runtime). We do this by accessing the declared Event object, and using an addition operator followed by function name.
Note: We’re not calling a function using brackets or arguments; we’re simply using the function’s name, nothing else.
So let’s explain what all this ultimately does in some example flow of the game.
Logic Flow
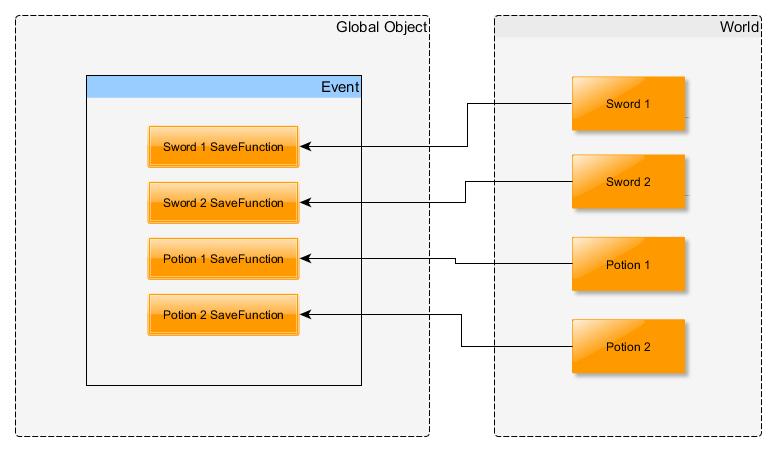
Let’s assume that, through the flow of the game, the player’s actions have spawned two swords and two potions in the world (for example, the player opened a chest with loot).
These four objects register their functions in the Save event:
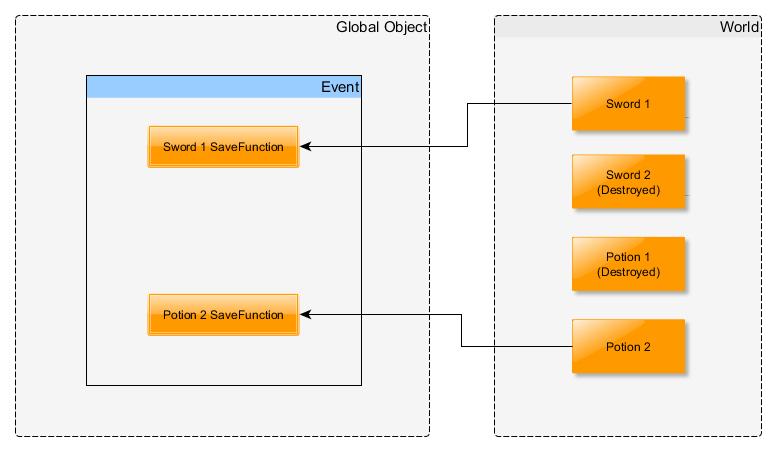
Now let’s assume the player picks up one sword and one potion from the world. As the objects are ‘picked up’, they’re effectively triggering a change in the player’s inventory and then destroying themselves (kind of ruins the magic, I know):
And then, suppose the player decides to save the game – maybe they really need to answer that phone which rang out three times now (hey, you made a great game):
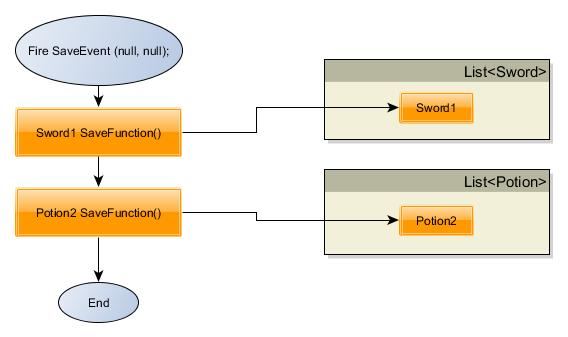
Basically, what happens is the functions in the box get triggered one by one, and the game’s not going anywhere until all functions are done. Every object that ‘saves itself’ is basically writing down itself in a list – which, on the next game Load, will be inspected by Level Master object and all objects that are in the list will be Instantiated (spawned). That’s it, really: if you’ve followed the article so far, you’re basically ready to start implementing it right away. Nevertheless, we’re going to some concrete code examples here, and as always, there will be a finished project waiting for you at the end of the article if you wish to see how the whole thing is supposed to look.
Code
Let’s first go over the existing project and familiarize ourselves with what’s inside already.
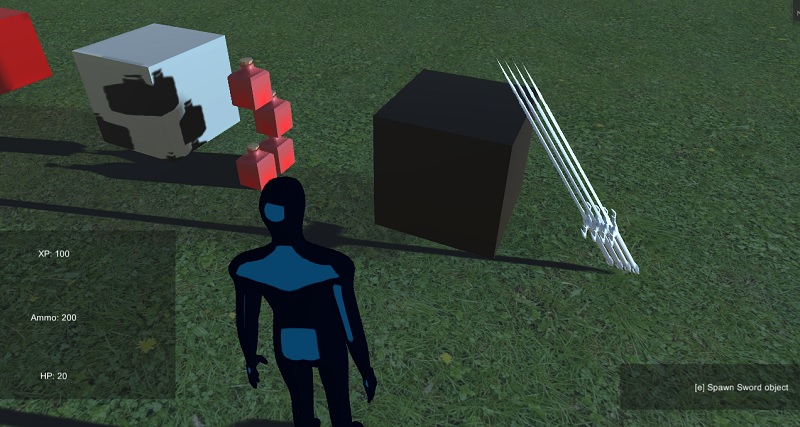
As you can see, we have these beautifully designed boxes which act as spawners for the two objects we already mentioned. There’s a pair in each of the two scenes. You can immediately see the problem: if you transition the scene or use F5/F9 to Save/Load, the spawned objects will disappear.
The box spawners and the spawned objects themselves use a simple interactable interface mechanic which provides us with the ability to recognize a raycast to those objects, write text on screen, and interact with them using the [E] key.
Not much more is present. Our tasks here are:
- Make a list of Potion objects
- Make a list of Sword objects
- Implement a global Save event
- Subscribe to the event using a saving function
- Implement a Level Master object
- Make Level Master spawn all saved objects if we’re loading a game.
As you can see, this is not exactly as trivial as one might hope such a fundamental function would be. In fact, no existing game engine out there (CryENGINE, UDK, Unreal Engine 4, others) really has a simple Save/Load function implementation ready to go. This is because, as you might imagine, save mechanics are really specific to each game. There’s more to just object classes that usually need saving; it’s world states such as completed/active quests, faction friendliness/hostility, even current weather conditions in some games. It gets quite complex, but with the right foundation of the saving mechanics, it gets easy to simply upgrade it with more functionality.
Object Class Lists
Let’s get started with the easy stuff first – the object lists. Our player’s data is saved and loaded via simple representation of the data in the Serializables class.
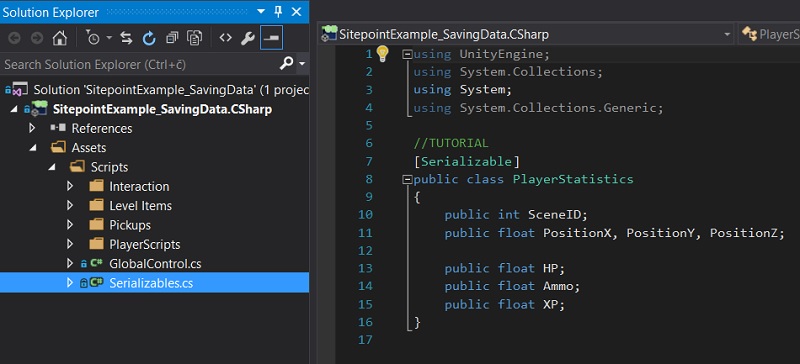
In similar fashion, we need some serializable classes which will represent our objects. To write them, we need to know which properties we need to save – for our Player we had a lot of stuff to save. Luckily, for the objects, you’re rarely going to need more than their world position. In our example, we only need to save the Position of the objects and nothing else.
To nicely structure our code, we’ll begin with a simple classes at the end of our Serializables:
[Serializable]
public class SavedDroppablePotion
{
    public float PositionX, PositionY, PositionZ;
}

[Serializable]
public class SavedDroppableSword
{
    public float PositionX, PositionY, PositionZ;
}
You may be wondering why we’re not simply using a base class. The answer is that we could, but you never really know when you need to add or change specific item properties that need saving. And besides, this is far easier for code readability.
By now, you may have noticed I’m using the term Droppable
a lot. This is because we need to differentiate between droppable (spawnable) objects, and Placeable objects, which follow different rules of saving and spawning. We’ll get to that later.
Now, unlike Player’s data where we know there’s really only one player at any given time, we can have multiple objects like Potions. We need to make a dynamic list, and denote to which scene does this list belong: we can’t spawn Level2’s objects in Level1. This is simple to do, again in Serializables. Write this below our last class:
[Serializable]
public class SavedDroppableList
{
    public int SceneID;
    public List<SavedDroppablePotion> SavedPotions;
    public List<SavedDroppableSword> SavedSword;

    public SavedDroppableList(int newSceneID)
    {
        this.SceneID = newSceneID;
        this.SavedPotions = new List<SavedDroppablePotion>();
        this.SavedSword = new List<SavedDroppableSword>();
    }
}
The best place to make instances of these lists would be our GlobalControl class:
public List<SavedDroppableList> SavedLists = new List<SavedDroppableList>();
Our lists are pretty much good to go for now: we’ll access them from a LevelMaster object later when we need to spawn items, and save/load from from Hard Drive from within GlobalControl, like we already do with player data.
Delegate and the Event
Ah, finally. Let’s implement the famous Event stuff.
In GlobalControl:
    public delegate void SaveDelegate(object sender, EventArgs args);
    public static event SaveDelegate SaveEvent;
As you can see, we’re making the event a static reference, so it’s more logical and easier to work with later.
One final note regarding Event implementation: only the class which contains the event declaration can fire an event. Anybody can subscribe to it by accessing GlobalControl.SaveEvent +=..., but only GlobalControl class can fire it using SaveEvent(null, null);. Attempting to use GlobalControl.SaveEvent(null, null); from elsewhere will result in compiler error!
And that’s it for the Event implementation! Let’s subscribe some stuff to it!
Event Subscription
Now that we have our event, our objects need to subscribe to it, or, in other words, start listening
to an event and react when it fires.
We need a function that will run when an event fires – for each object. Let’s head over to PotionDroppable script in Pickups
folder. Note: Sword doesn’t have its script set up yet; we’ll make it in a moment!
In PotionDroppable, add this:
public void Start()
    {
        GlobalControl.SaveEvent += SaveFunction;
    }

public void OnDestroy()
{
    GlobalControl.SaveEvent -= SaveFunction;
}

public void SaveFunction(object sender, EventArgs args)
{

}
We correctly did the subscribe and unsubscribe to an event. Now the question remains, how to save this object in the list, exactly?
We first need to make sure we have a list of objects initialized for the current scene.
In GlobalControl.cs:
public void InitializeSceneList()
    {
        if (SavedLists == null)
        {
            print("Saved lists was null");
            SavedLists = new List();
        }

        bool found = false;

        //We need to find if we already have a list of saved items for this level:
        for (int i = 0; i < SavedLists.Count; i++)
        {
            if (SavedLists[i].SceneID == SceneManager.GetActiveScene().buildIndex)
            {
                found = true;
                print("Scene was found in saved lists!");
            }
        }

        //If not, we need to create it:
        if (!found)
        {
            SavedDroppableList newList = new SavedDroppableList(SceneManager.GetActiveScene().buildIndex);
            SavedLists.Add(newList);

            print("Created new list!");
        }
    }
This function needs to be fired once per level. Problem is, our GlobalControl carries through the levels and its Start and Awake functions only fire once. We’ll get around that by simply calling this function from our Level Master object which we’ll create in a moment.
We are going to need a small helper function to return the current active scene list as well. In GlobalControl.cs:
public SavedDroppableList GetListForScene()
    {
        for (int i = 0; i < SavedLists.Count; i++)
        {
            if (SavedLists[i].SceneID == Application.loadedLevel)
                return SavedLists[i];
        }

        return null;
    }
Now we’re sure we always have a list to save our items to. Let’s go back to our Potion script:
public void SaveFunction(object sender, EventArgs args)
    {
        SavedDroppablePotion potion = new SavedDroppablePotion();
        potion.PositionX = transform.position.x;
        potion.PositionY = transform.position.y;
        potion.PositionZ = transform.position.z;

GlobalControl.Instance.GetListForScene().SavedPotions.Add(potion);
    }
This is where all our syntactic sugar coating really shines. This is very readable, easy to understand and easy to change for your own needs when you need it! In short, we create a new ‘potion’ representation, and save it in the actual list.
Creating a Level Master Object
First, a small bit of preparation. Within our existing project, we have a global variable that tells us if the scene is being loaded. But we don’t have such variable to tell us if the scene is being transitioned by using the door. We expect for all the dropped objects to still be there when we return to the previous room, even if we didn’t save/load our game anywhere in between.
To do that, we need to make small change to Global Control:
public bool IsSceneBeingTransitioned = false;In TransitionScript:
public void Interact()
    {
        //Assign the transition target location.
        GlobalControl.Instance.TransitionTarget.position = TargetPlayerLocation.position;

        //NEW:
        GlobalControl.Instance.IsSceneBeingTransitioned = true;
        GlobalControl.Instance.FireSaveEvent();

        Application.LoadLevel(TargetedSceneIndex);
    }
We’re ready to make a LevelMaster object that will work normally.
Now we only need to read the lists and spawn the objects from them when we’re loading a game. This is what the Level Master object will do. Let’s create a new Script and call it LevelMaster
:
public class LevelMaster : MonoBehaviour
{

    public GameObject PotionPrefab;
    public GameObject SwordPrefab;

    void Start ()
    {
        GlobalControl.Instance.InitializeSceneList();

        if (GlobalControl.Instance.IsSceneBeingLoaded || GlobalControl.Instance.IsSceneBeingTransitioned)
        {
            SavedDroppableList localList = GlobalControl.Instance.GetListForScene();

            if (localList != null)
            {
                print("Saved potions count: " + localList.SavedPotions.Count);

                for (int i = 0; i < localList.SavedPotions.Count; i++)
                {
                    GameObject spawnedPotion = (GameObject)Instantiate(PotionPrefab);
                    spawnedPotion.transform.position = new Vector3(localList.SavedPotions[i].PositionX,
                                                                    localList.SavedPotions[i].PositionY,
                                                                    localList.SavedPotions[i].PositionZ);
                }

            }
            else
                print("Local List was null!");
        }
    }

}
That’s a lot of code, so let’s break it down.
The code runs only at the start, which we use to initialize the saved lists in GlobalControl if needed. Then, we ask the GlobalControl if we’re loading or transitioning a scene. If we’re starting the scene anew (like New Game or such), it doesn’t matter – we spawn no objects.
If we are loading a scene, we need to fetch our local copy of the list of saved objects (just to save a bit of performance on repeated accessing of GlobalControl, and to make syntax more readable).
Next, we simply traverse the list and spawn all potion objects inside. The exact syntax for spawning is basically one of the Instantiate method overloads. We must cast the result of the Instantiate method into GameObject
(for some reason, the default return type is simple Object) so that we can access its transform, and change its position.
This is where the object is spawned: if you need to change any other values at spawn-time, this is the place to do it.
We need to put our level master in each scene and assign the valid Prefabs to it:

Now we’re only missing one crucial piece: we need to actually fire the event, serialize the Lists down to the hard drive and read from them. We’ll simply do that in our existing Save and Load functions in GlobalControl:
 public void FireSaveEvent()
    {
        GetListForScene().SavedPotions = new List<SavedDroppablePotion>();
        GetListForScene().SavedSword = new List<SavedDroppableSword>();
        //If we have any functions in the event:
        if (SaveEvent != null)
            SaveEvent(null, null);
    }

    public void SaveData()
    {
        if (!Directory.Exists("Saves"))
            Directory.CreateDirectory("Saves");

        FireSaveEvent();

        BinaryFormatter formatter = new BinaryFormatter();
        FileStream saveFile = File.Create("Saves/save.binary");
        FileStream SaveObjects = File.Create("saves/saveObjects.binary");

        LocalCopyOfData = PlayerState.Instance.localPlayerData;

        formatter.Serialize(saveFile, LocalCopyOfData);
        formatter.Serialize(SaveObjects, SavedLists);

        saveFile.Close();
        SaveObjects.Close();

        print("Saved!");
    }

    public void LoadData()
    {
        BinaryFormatter formatter = new BinaryFormatter();
        FileStream saveFile = File.Open("Saves/save.binary", FileMode.Open);
        FileStream saveObjects = File.Open("Saves/saveObjects.binary", FileMode.Open);

        LocalCopyOfData = (PlayerStatistics)formatter.Deserialize(saveFile);
        SavedLists = (List<SavedDroppableList>)formatter.Deserialize(saveObjects);

        saveFile.Close();
        saveObjects.Close();

        print("Loaded");
    }
This also appears to be a lot of code, but the majority of that was already there. (If you followed my previous tutorial, you’ll recognize the binary serialization commands; the only new thing here is the FireSaveEvent function, and one additional file that saves our lists. That’s it!
Initial Testing
If you run the project now, the potion objects will be correctly saved and loaded each time do you hit F5 and F9, or walk through the door (and any combination of such).
However, there’s one more problem to solve: we’re not saving the swords.
This is simply to demonstrate how to add new savable objects to your project once you have similar foundations built.
Expanding the System
So let’s say you already have a new object-spawning system in place – like we already do with the sword objects. They are currently not interactable much (beyond basic physics), so we need to write a script similar to the Potion one which will enable us to ‘pick up’ a sword and make it save correctly.
The prefab of the sword that’s currently being spawned can be found in the Assets > Prefabs folder.
Let’s make it work. Go to Assets > Scripts > Pickups and there you’ll see PotionDroppable
script. Next to it, create a new SwordDroppable script:
public class SwordDroppable : MonoBehaviour, IInteractable
{
public void Start()
{
GlobalControl.SaveEvent += SaveFunction;
}
public void OnDestroy()
{
GlobalControl.SaveEvent -= SaveFunction;
}
public void SaveFunction(object sender, EventArgs args)
{
SavedDroppableSword sword = new SavedDroppableSword();
sword.PositionX = transform.position.x;
sword.PositionY = transform.position.y;
sword.PositionZ = transform.position.z;
GlobalControl.Instance.GetListForScene().SavedSword.Add(sword);
}
public void Interact()
{
Destroy(gameObject);
}
public void LookAt()
{
HUDScript.AimedObjectString = "Pick up: Sword";
}
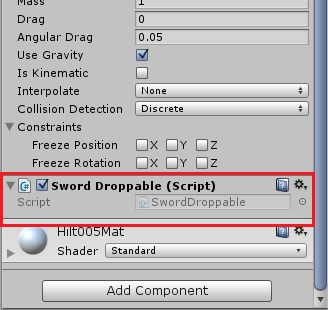
}Do not forget the ‘Interactable’ interface implementation. It’s very important: without it your sword will not be recognized by the camera raycast and will remain uninteractable. Also, double check that the Sword prefab belongs to Items layer. Otherwise, it will again be ignored by the raycast. Now add this script to the Sword prefab’s first child (which actually has the Mesh renderer and other components):
Now, we need to spawn them. In Level Master, under our for loop that spawns the Potions:
for (int i = 0; i < localList.SavedSword.Count; i++)
                {
                    GameObject spawnedSword = (GameObject)Instantiate(SwordPrefab);
                    spawnedSword.transform.position = new Vector3(localList.SavedSword[i].PositionX,
                                                                    localList.SavedSword[i].PositionY,
                                                                    localList.SavedSword[i].PositionZ);
                }
… and that’s it. Whenever you need a new item type saved:
- add in Serializables class
- create script for item that subscribes to Save event
- add Instantiate logic in Level Master.
Conclusion
For now, the system is quite crude: there are multiple save files on the hard drive, the object’s rotation isn’t saved (swords, player, etc.), and logic for positioning a player during scene transitions (but not loading) is a bit quirky.
These are all now minor problems to solve once the solid system is in place, and I invite you to try to tinker around with this tutorial and finished project to see if you can improve the system.
But even as it is, it’s already quite a reliable and solid method for doing Save/Load mechanics in your game – however much it may differ from these example
projects.
As promised, here is the finished project, should you need it for reference, or because you got stuck somewhere. The save system is implemented as per this tutorial’s instructions and with same naming scheme.
Download the Finished Project:
Project GitHub Page
Project ZIP Download
Frequently Asked Questions (FAQs) about Mastering Save and Load Functionality in Unity 5
What is the best way to implement a save system in Unity 5?
The best way to implement a save system in Unity 5 is by using the PlayerPrefs class. PlayerPrefs is a simple way to store and retrieve data between game sessions. It allows you to save and load data in the form of integers, floats, and strings. However, it’s important to note that PlayerPrefs is not secure and should not be used for sensitive data. For more complex or secure data, you may want to consider using a binary formatter or a JSON serializer.
How can I save game states and settings in Unity 5?
Saving game states and settings in Unity 5 can be achieved using PlayerPrefs, JSON serialization, or binary formatting. PlayerPrefs is the simplest method, allowing you to save and load integers, floats, and strings. JSON serialization is a bit more complex but allows for more flexibility and security. Binary formatting is the most secure method but also the most complex.
How does the execution order affect the save and load functionality in Unity 5?
The execution order in Unity 5 determines the sequence in which scripts are run. This can significantly impact the save and load functionality. For instance, if a script that loads data is executed before the script that saves data, the game might load outdated data. Therefore, it’s crucial to ensure that scripts related to saving and loading data are correctly ordered in the execution order.
How can I secure my save data in Unity 5?
Securing save data in Unity 5 can be achieved by using binary formatting or encryption. Binary formatting converts your data into a binary format that is not easily readable. Encryption adds an extra layer of security by encoding your data in a way that can only be decoded with a specific key.
What are the limitations of using PlayerPrefs for save and load functionality in Unity 5?
While PlayerPrefs is a simple and convenient way to implement save and load functionality in Unity 5, it has several limitations. Firstly, it only supports integers, floats, and strings. Secondly, it’s not secure and can be easily manipulated. Lastly, PlayerPrefs has a size limit, which can be a problem for games with a large amount of data.
How can I save and load complex data structures in Unity 5?
Saving and loading complex data structures in Unity 5 can be achieved using JSON serialization or binary formatting. JSON serialization allows you to convert complex data structures into a string format that can be easily saved and loaded. Binary formatting is a more secure method that converts your data into a binary format.
Can I save and load data across different platforms in Unity 5?
Yes, you can save and load data across different platforms in Unity 5. However, the method you choose for saving and loading data may affect cross-platform compatibility. For instance, PlayerPrefs is cross-platform compatible, but binary formatting may not be compatible across all platforms.
How can I troubleshoot issues with save and load functionality in Unity 5?
Troubleshooting issues with save and load functionality in Unity 5 can be done by checking the execution order of your scripts, ensuring your data is being correctly serialized or formatted, and testing your game on the platforms you intend to release it on.
How can I optimize the save and load functionality in Unity 5 for better performance?
Optimizing the save and load functionality in Unity 5 can be achieved by minimizing the amount of data you save and load, using efficient data structures, and ensuring your scripts are well-optimized.
How can I implement autosave functionality in Unity 5?
Implementing autosave functionality in Unity 5 can be done by creating a script that automatically saves your game at regular intervals or at specific events. This script should use the same methods for saving data as your manual save system.