

In this tutorial, you will begin to learn plugin development for WordPress. The example plugin will have an admin page with a basic form element and a submit button, and will perform the simple task of creating bulk categories in one go.
A lot of times, when developing a website or blog on WordPress, you would need to create a lot of categories. In these instances, it can become a pain to create categories one by one. So, in this tutorial you will learn to build a plugin which allows a list of comma separated categories to be copy pasted into a text area. And on clicking a button, all the categories are loaded into the WordPress categories section in a single go. So, this will prevent the need to sit and click on the Add New Category button for every category that has to be created.
Requirements:
- You will need a local installation of WordPress (or a development server of some kind)
- You will need to know basic HTML and PHP
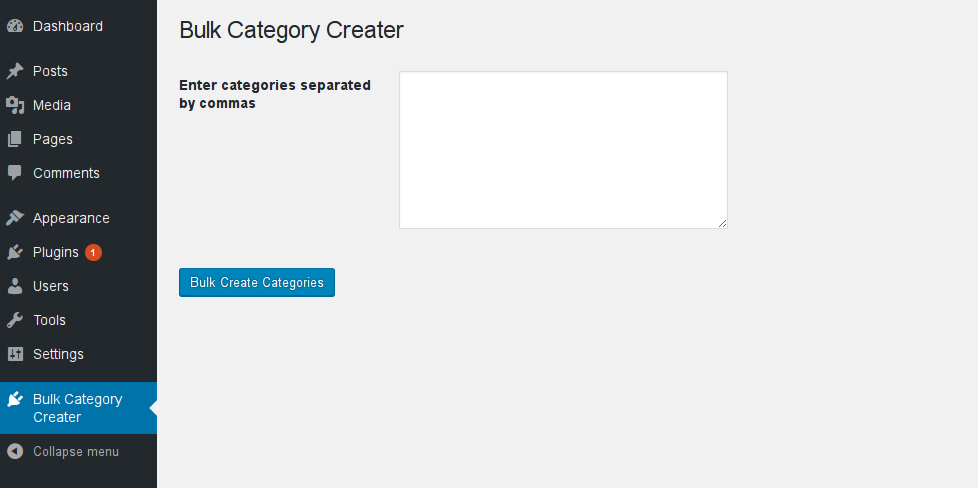
What are you going to build (Preview of the final stage of what you are going to create)
Key Takeaways
- Learn to develop a WordPress plugin that simplifies the process of creating multiple categories at once, enhancing efficiency and user experience.
- Understand the fundamental structure and necessary code for setting up a WordPress plugin, including directory creation and basic PHP file setup.
- Gain insights into WordPress hooks like Actions and Filters, which are crucial for modifying WordPress behavior through plugins.
- Follow a step-by-step guide to create an admin page for the plugin, allowing bulk category creation through a simple form submission.
- Explore the complete functionality of the Bulk Category Creator plugin, from setting up the admin menu to writing the PHP function that processes and creates categories based on user input.
A Brief Note About WordPress Plugins
Plugins in WordPress are basically PHP scripts which allow you to change or add new features to your existing WordPress installation. It could be something really simple, like the “Hello Dolly” plugin, or something really advanced like the Jetpack or Google Analytics plugins.
So, why should you build a plugin?
Most WordPress developers are aware that they should not hack WordPress core files to suit their needs. It creates updating issues, and could be insecure. But if altering WordPress core code is not a good option, how else will you add new features to your WordPress website? The answer, of course, is via plugins. An added benefit to learning how to create plugins is that you get to learn more about WordPress itself, and how it works. That in turn will make you a better WordPress Developer.
Learning Plugin Development
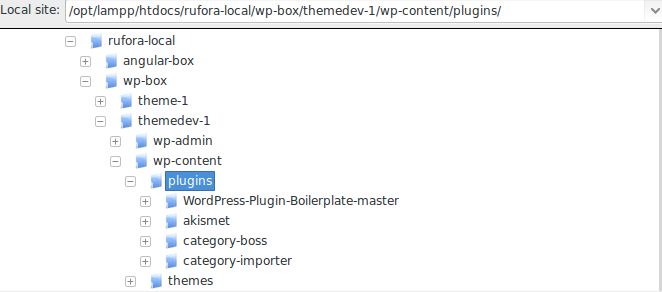
In order to create a plugin, you have to create a particular folder structure for your plugin. Every plugin has a directory name and one or more PHP files inside it.
Inside your WordPress directory structure, you will find a directory called wp-content. Inside the wp-content will be a directory called plugins.
Your folder structure would look similar to this:
First Steps – Creating Your Files
The very first step in creating a plugin is to navigate to the wp-content directory of your WordPress installation and inside the directory navigate to the plugins directory. Inside the plugins directory create a new directory called bulk-category-creator.
Once, you have created the directory, create a file named bulk-category-creator.php. Make sure that the directory name and the PHP file name are the same.
Now, open your text editor and copy paste the following code into it
<?php
   /*
   Plugin Name: Bulk Category Creator
   Plugin URI: http://www.ruforaweb.com
   Description: A plugin to bulk-create categories in one go
   Version: 1.0
   Author: Vishnu Ajit
   Author URI: http://twitter.com/vishnuajith310
   License: GPL2
   */
Every plugin has a section of code comments at the top containing a description, version information, author name and licensing information. This is usually found in the header of the plugin’s main file. In our case, it is found in bulk-category-creator.php.
This section is the metadata of the plugin. Let us dissect the example metadata line by line.
- Plugin Name: Here is the name given to the plugin, in our case we call it the Bulk Category Creator
- Plugin URI: This is a link to where the plugin can be found on the internet for download purposes. It can be found in the WordPress.org archives or in another location.
- Description: This is the section where you can describe what actions the plugin performs.
- Version: Specifies the version of the plugin
- Author: Name of the author or developer who created this plugin
- Author URI: Link to the author’s address on the internet
- License: The license under which this plugin is released
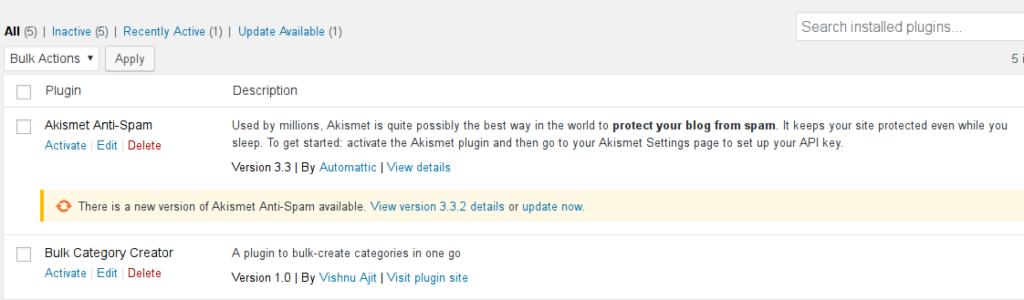
Navigate to your Admin Dashboard > Plugins > Installed Plugins and you should see your plugin in the list.
Code Layout – Bulk Category Creator Plugin
Before jumping into coding our plugin, let us understand some basic WordPress hooks.
Basically, in WordPress there are two main types of hooks: Actions and Filters. Since, this is a basic plugin development tutorial, we shall not go into too much detail, but basically this is how they differ.
- Actions: Actions are used when you add something when an event has occurred. Example: an action to tweet an article when a new post has been published.
- Filters: Filters are used when you have to change some data or process it.
Now that you are familiar with the basics, let us start coding our plugin.
add_action('admin_menu', 'rfr_CategoryCreatorMenu');This line of code hooks the admin_menu to the function rfr_CategoryCreatorMenu
The admin_menu function is used to add submenu or menu options to our WordPress Admin Dashboard. Once that has been done, write down the next snippet of code.
<?php
   /*
   Plugin Name: Bulk Category Creator
   Plugin URI: http://www.ruforaweb.com
   Description: A plugin to bulk-create categories in one go
   Version: 1.0
   Author: Vishnu Ajit
   Author URI: http://twitter.com/vishnuajith310
   License: GPL2
   */

add_action('admin_menu', 'rfr_CategoryCreatorMenu');

function rfr_CategoryCreatorMenu()
{

    add_menu_page('Bulk Category Creator Plugin','Bulk Category Creator','administrator', __FILE__, 'rfr_CategorySettingsPage' , 'dashicons-admin-plugins');

    add_action('admin_init', 'rfr_RegisterPluginSettings');

}
If you observe the above snippet carefully, you shall see that we have added a function rfr_CategoryCreatorMenu to our code. Let us dissect the lines of code one by one.
We have used the name rfr_CategoryCreatorMenu in our code. You may notice the prefix rfr_ that I have used. Always, when creating custom plugins for WordPress, make sure your functions have unique names. Along with making the code cleaner, this resolves conflicts which may arise due to different plugins using the same name. So, always ensure that your functions are prefixed by a unique name. In this case I have used rfr_ as my prefix; you can use whatever you want. You can use the first three letters of your name or your company name, for example.
Okay, now inside the rfr_CategoryCreatorMenu function we have added a add_menu_page function.
The add_menu_page function adds a top level menu page. This function has a number of parameters passed into it.
- First parameter: This is the content of the title of the plugin page.
- Second Parameter: This is the name of the Plugin as it appears in the Admin Dashboard. In our case, it shows Bulk Category Creator
- Third parameter: This is the permission restriction for the plugin. In our case only administrators can access or use our plugin.
- Fourth parameter: This is the slug used to refer to this menu
- Fifth parameter: This is the function which should be invoked in order to display the contents of the page.
- Sixth parameter: This is the URL to the icon to be displayed besides our menu in the Admin Dashboard. In our case we have added ‘dashicons-admin-plugin’ which is part of an icon-set that comes along with WordPress. Refer https://developer.wordpress.org/resource/dashicons for more icons that come along with the default WordPress bundle.
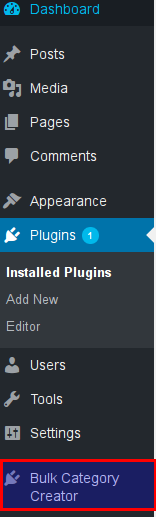
Now, if you observe your Admin Dashboard, you can see that a new Menu called the Bulk Category Creator has been created.
Next, We have to add another hook to our admin_init action.
add_action(‘admin_init’, ‘rfr_RegisterPluginSettings’);We shall come back to it in a moment.
Now the next part is to design the frontend of the admin dashboard. You might have noticed that, in the add_menu_page function we have pointed to a function rfr_CategorySettingsPage.
Let us define this function
function rfr_CategorySettingsPage() {
?>
<div class="wrap">
<h1>Bulk Category Creator</h1>

<form method='post'><input type='hidden' name='form-name' value='form 1' />
    <?php settings_fields( 'rfr-bulk-category-creator-group' ); ?>
    <?php do_settings_sections( 'rfr-bulk-category-creator-group' ); ?>
    <table class="form-table">
        <tr valign="top">
        <th scope="row">Enter categories separated by commas</th>
        <td>
        <textarea cols="50" rows="8" name="options_textarea"></textarea>
        </td>
        </tr>
    </table>

    <?php submit_button('Bulk Create Categories'); ?>

</form>

<?php } ?><
This is where we define the frontend for the plugin’s admin page.
Basically, it consists of a form with a textarea. It is into this textarea that we are going to paste our categories in a comma separated list.
This section is just basic HTML where a form is defined, and inside a table layout, a textarea has been specified. Just ensure that you do not forget to write the settings_fields and do_settings_sections just below the form declaration.
Now, if you try navigating to our newly created menu “Bulk Category Creator” you can see the following:
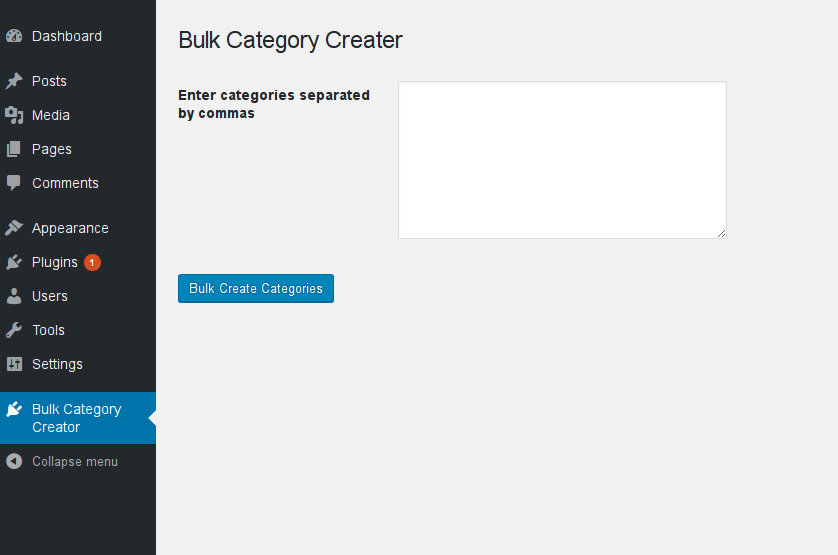
Tada! We have successfully created the frontend of our plugin. We have added an HTML form element to our plugin’s dashboard.
Now, the only thing left to do is to code the necessary programming which allows us to import bulk categories on a single attempt.
function rfr_RegisterPluginSettings() {
    //register our settings

    register_setting( 'rfr-bulk-category-creator-group', 'options_textarea' );

    rfr_CreateCategories();

}

function rfr_CreateCategories()
{

    $returnedStr = esc_attr($_POST['options_textarea'] );

    $trimmed = trim($returnedStr);

    $categories_array = explode(',',$trimmed);

    foreach ($categories_array as $key => $value)
    {

        $catString = $value.'';

        $term = term_exists($value,'category');
        if($term==0 || $term==null)
        {
            create_category($value);

        }

    }

}

function create_category($value)
{
    $trimmedValue = trim($value);
    $hyphenatedValue = str_replace(" ", "-", $trimmedValue);

    wp_insert_term(
        $trimmedValue,
        'category',
        array(
            'description' => $trimmedValue,
            'slug'=> $hyphenatedValue
            )
        );
}
The above content is basic PHP, but let us look into it in detail:
$returnedStr = esc_attr($_POST['options_textarea'] );

$trimmed = trim($returnedStr);

$categories_array = explode(',',$trimmed);
$returnedStr receives the value submitted from the textarea inside the form element.
$trimmed trims off the empty spaces on the left and right sides of the string.
The PHP explode function is used to convert the comma separated values into the $categories_array variable.
Next, we use a foreach loop to browse the contents of the $categories_array variable.
foreach ($categories_array as $key => $value)
{
    $catString = $value.'';

    $term = term_exists($value,'category');
    if($term==0 || $term==null)
    {
        create_category($value);

    }
}
Here, we loop inside each variable that is present inside the $categories_array
$catString gets the value of $value. The suffix .' ' is added to make sure the value is a string.
In the next line $term = term_exists($value, ‘category’);
We have used a WordPress hook term_exists to make sure that existing category names are not re-added to the category list. So, for instance if a category called “tall” is already present, if we try adding “tall” into the bulk category creator textarea, it wont be re-added to the list of categories.
In the next line, we have used conditional checking to make sure already existing categories are not re-added to our list of categories
The line if($term ==0 || $term == null) ensures that.
Next, we pass the value to our create_category function:
function create_category($value)
{
    $trimmedValue = trim($value);
    $hyphenatedValue = str_replace(" ", "-", $trimmedValue);

    wp_insert_term(
        $trimmedValue,
        'category',
        array(
            'description' => $trimmedValue,
            'slug'=> $hyphenatedValue
            )
        );

}
Inside this function we do the following:
$trimmedValue = trim($value);
We pass the $value to our PHP trim function to trim whitespaces off our value.
We also create a hyphenated value for use in our slug by writing:
$hyphenatedValue = str_replace(" ", "-", $trimmedValue);
Here, we use the PHP function str_replace to replace the spaces in between our words with hyphens. For example, if the category we added is “Must Watch” we get the $hyphenatedValue as “Must-Watch”.
Next, we use another WordPress hook the wp_insert_term to add our trimmed value, the taxonomy, and an array consisting of the description and our hyphenated slug.
The function wp_insert_term function has 3 parameters.
- First parameter : the value to be inserted
- Second parameter: The taxonomy required. In our case ‘category’
- Third parameter: An array consisting of the description and our slug
The complete code is listed below
< ?php
   /*
   Plugin Name: Bulk Category Creator
   Plugin URI: http://www.ruforaweb.com
   Description: A plugin to bulk-create categories in one go
   Version: 1.0
   Author: Vishnu Ajit
   Author URI: http://twitter.com/vishnuajith310
   License: GPL2
   */

add_action('admin_menu', 'rfr_CategoryCreatorMenu');

function rfr_CategoryCreatorMenu()
{

    add_menu_page('Bulk Category Creator Plugin','Bulk Category Creator','administrator', __FILE__, 'rfr_CategorySettingsPage' , 'dashicons-admin-plugins');

    add_action('admin_init', 'rfr_RegisterPluginSettings');

}

function rfr_RegisterPluginSettings() {
    //register our settings

    register_setting( 'rfr-bulk-category-creator-group', 'options_textarea' );

    rfr_CreateCategories();

}

function rfr_CreateCategories()
{

        $returnedStr = esc_attr($_POST['options_textarea'] );

        $trimmed = trim($returnedStr);

        $categories_array = explode(',',$trimmed);

    foreach ($categories_array as $key => $value)
    {

        $catString = $value.'';

        $term = term_exists($value,'category');
        if($term==0 || $term==null)
        {
            create_category($value);

        }

    }

}

function create_category($value)
{
    $trimmedValue = trim($value);
    $hyphenatedValue = str_replace(" ", "-", $trimmedValue);

    wp_insert_term(
        $trimmedValue,
        'category',
        array(
            'description' => $trimmedValue,
            'slug'=> $hyphenatedValue
            )
        );

}

function rfr_CategorySettingsPage() {
?>
<div class="wrap">
<h1>Bulk Category Creator</h1>

<form method='post'><input type='hidden' name='form-name' value='form 2' />
    < ?php settings_fields( 'rfr-bulk-category-creator-group' ); ?>
    < ?php do_settings_sections( 'rfr-bulk-category-creator-group' ); ?>
    <table class="form-table">

        <tr valign="top">
        <th scope="row">Enter categories separated by commas</th>
        <td>
        <textarea cols="50" rows="8" name="options_textarea"></textarea>
        </td>
        </tr>
    </table>

    < ?php submit_button('Bulk Create Categories'); ?>

</form>
</div>
< ?php } ?>
Now, navigate to Admin Dashboard > Bulk Categories Creator and enter a list of categories.
In this example, I’m adding Tall, Medium, Short, and Ultra Short into the textarea.
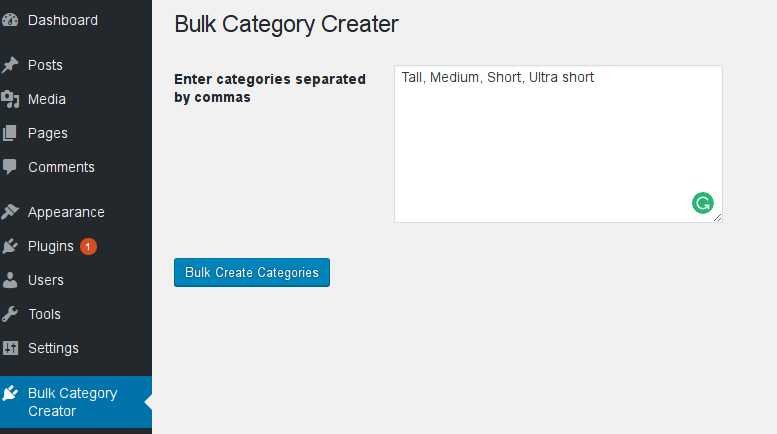
Now, click on Bulk Create Categories
Then, navigate to Admin Dashboard > Posts > Categories and you can see that our categories have been added to the list of Categories.
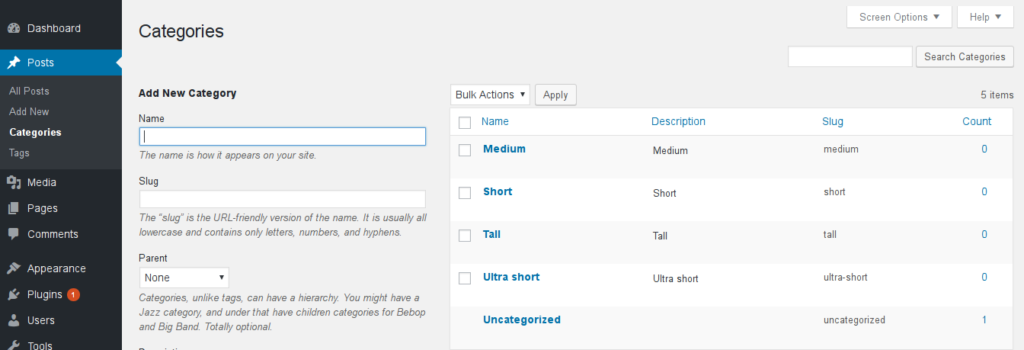
Success! Our list of categories have now been created in one go. Note that under the slug section our category ‘ultra short’ has been hyphenated into ‘ultra-short’.
So, in our tutorial, you have successfully created your first WordPress Plugin, the Bulk Category Creator Plugin. If you have followed through this tutorial, you should now have a working WordPress plugin!
If you want to distribute this plugin to your friends, just compress the plugin directory to a .zip file and you are done.
Thank you for following this tutorial! If you have questions or comments, leave them in the comments section below!
Frequently Asked Questions about Bulk Category Creator Plugin Development
What is the Bulk Category Creator plugin and how does it work?
The Bulk Category Creator plugin is a powerful tool designed to help WordPress users create multiple categories or pages in bulk. This plugin works by allowing users to input a list of category names or page titles, and then automatically generates these categories or pages on their WordPress site. This can save a significant amount of time and effort, especially for users who need to create a large number of categories or pages at once.
How do I install and activate the Bulk Category Creator plugin?
Installing and activating the Bulk Category Creator plugin is a straightforward process. First, download the plugin from the WordPress plugin directory or the plugin’s official website. Then, navigate to your WordPress dashboard, go to the ‘Plugins’ section, and click on ‘Add New’. Upload the plugin file and click ‘Install Now’. Once the plugin is installed, click ‘Activate’ to start using it.
Can I use the Bulk Category Creator plugin to create custom post types?
Yes, the Bulk Category Creator plugin supports the creation of custom post types. This means you can use it to create a variety of content types, such as blog posts, product pages, portfolio items, and more. Simply specify the custom post type when creating your bulk categories or pages.
Is the Bulk Category Creator plugin compatible with all WordPress themes?
The Bulk Category Creator plugin is designed to be compatible with most WordPress themes. However, compatibility can vary depending on the specific features and coding standards of each theme. If you encounter any issues, it’s recommended to contact the plugin developer or your theme developer for assistance.
How can I troubleshoot issues with the Bulk Category Creator plugin?
If you’re experiencing issues with the Bulk Category Creator plugin, there are several steps you can take to troubleshoot. First, ensure that the plugin is up-to-date and that it’s compatible with your version of WordPress. If the issue persists, try deactivating other plugins to see if there’s a conflict. If you’re still having trouble, reach out to the plugin developer for support.
Can I use the Bulk Category Creator plugin on multiple websites?
Yes, the Bulk Category Creator plugin can be used on multiple websites. However, each website will require its own separate installation and activation of the plugin.
Does the Bulk Category Creator plugin support multilingual websites?
The Bulk Category Creator plugin does not natively support multilingual websites. However, it can be used in conjunction with a multilingual plugin to create categories or pages in different languages.
Can I customize the layout and design of the categories or pages created with the Bulk Category Creator plugin?
The layout and design of the categories or pages created with the Bulk Category Creator plugin will depend on your WordPress theme. The plugin itself does not provide options for customizing the layout or design.
Is the Bulk Category Creator plugin SEO-friendly?
The Bulk Category Creator plugin does not directly affect SEO. However, by allowing you to create multiple categories or pages quickly and efficiently, it can help you improve your site’s organization and usability, which can indirectly benefit your SEO.
Is there a limit to the number of categories or pages I can create with the Bulk Category Creator plugin?
There is no set limit to the number of categories or pages you can create with the Bulk Category Creator plugin. However, keep in mind that creating a large number of categories or pages at once can put a strain on your server resources, so it’s recommended to use this feature responsibly.