

In this article, we look at HTML form fields and the validation options offered by HTML5. We’ll also look at how these can be enhanced through the use of CSS and JavaScript.
Key Takeaways
- HTML5 enhances form validation by introducing new input types and attributes that automate many validation processes, reducing the need for extensive JavaScript.
- Constraint validation in HTML5 allows browsers to automatically check user input against specified rules before form submission, enhancing user experience and data integrity.
- Client-side validation, while helpful for catching common errors, must be supplemented with server-side validation to ensure data security and integrity.
- Custom JavaScript inputs should be avoided when possible, as they complicate accessibility and may conflict with native browser functions.
- CSS can be used to style input fields based on their validation state, with pseudo-classes like :valid and :invalid, allowing for dynamic feedback on user inputs.
- The Constraint Validation API in HTML5 enables custom validation scenarios that HTML alone cannot handle, such as comparing two fields or asynchronous checks, enhancing form functionality and user interaction.
What is Constraint Validation?
Every form field has a purpose. And this purpose is often governed by contraints — or the rules governing what should and shouldn’t be entered into each form field. For example, an email field will require a valid email address; a password field might require certain types of characters and have a minimum number of required characters; and a text field might have a limit on how many characters can be entered.
Modern browsers have the ability to check that these constraints are being observed by users, and can warn them when those rules have been breached. This is known as contstraint validation.
Client-side vs Server-side Validation
The majority of JavaScript code written in the early years of the language handled client-side form validation. Even today, developers spend significant time writing functions to check field values. Is this still necessary in modern browsers? Probably not. In most cases, it really depends on what you’re trying to do.
But first, here’s a big warning message:
Client-side validation is a nicety which can prevent common data-entry errors before an app wastes time and bandwidth sending data to a server. It’s not a substitute for server-side validation!
Always sanitize data server-side. Not every request will come from a browser. Even when it does, there’s no guarantee the browser validated the data. Anyone who knows how to open a browser’s developer tools can also bypass your lovingly crafted HTML and JavaScript.
HTML5 Input Fields
HTML offers:
<textarea>for multiline text boxes<select>for a drop-down list of options<button>for … buttons
But you’ll use <input> most often:
<input type="text" name="username" />
The type attribute sets the control type, and there’s a large choice of options:
type |
description |
|---|---|
button |
a button with no default behavior |
checkbox |
a check/tick box |
color |
a color picker |
date |
a date picker for the year, month, and day |
datetime-local |
a date and time picker |
email |
an email entry field |
file |
a file picker |
hidden |
a hidden field |
image |
a button which displays the image defined by the src attribute |
month |
a month and year picker |
number |
a number entry field |
password |
a password entry field with obscured text |
radio |
a radio button |
range |
a slider control |
reset |
a button that resets all form inputs to their default values (but avoid using this, as it’s rarely useful) |
search |
a search entry field |
submit |
a form submission button |
tel |
a telephone number entry field |
text |
a text entry field |
time |
a time picker with no time zone |
url |
a URL entry field |
week |
a week number and year picker |
The browser falls back to text if you omit the type attribute or it doesn’t support an option. Modern browsers have good support for all types, but old browsers will still show a text entry field.
Other useful <input> attributes include:
| attribute | description |
|---|---|
accept |
file upload type |
alt |
alternative text for the image types |
autocomplete |
hint for field auto-completion |
autofocus |
focus field on page load |
capture |
media capture input method |
checked |
checkbox/radio is checked |
disabled |
disable the control (it won’t be validated or have its value submitted) |
form |
associate with a form using this ID |
formaction |
URL for submission on submit and image buttons |
inputmode |
data type hint |
list |
ID of <datalist> autocomplete options |
max |
maximum value |
maxlength |
maximum string length |
min |
minimum value |
minlength |
minimum string length |
name |
name of control, as submitted to server |
pattern |
a regular expression pattern, such as [A-Z]+ for one or more uppercase characters |
placeholder |
placeholder text when the field value is empty |
readonly |
the field is not editable, but it will still be validated and submitted |
required |
the field is required |
size |
the size of the control (often overridden in CSS) |
spellcheck |
set true or false spell-checking |
src |
image URL |
step |
incremental values in numbers and ranges |
type |
field type (see above) |
value |
the initial value |
HTML Output Fields
As well as input types, HTML5 provides read-only outputs:
output: a text result of a calculation or user actionprogress: a progress bar withvalueandmaxattributesmeter: a scale which can change between green, amber, and red depending on the values set for thevalue,min,max,low,high, andoptimumattributes.
Input Labels
Fields should have an associated <label>, which you can wrap around the element:
<label>your name <input type="text" name="name" /><label>
Or link the field’s id to the label using a for attribute:
<label for="nameid">your name</label>
<input type="text" id="nameid" name="name" />
Labels are important for accessibility. You may have encountered forms which use a placeholder to save screen space:
<input type="text" name="name" value="" placeholder="your name" />
The placeholder text disappears once the user types something — even a single space. It’s better to show a label than force the user remember what the field wanted!
Input Behaviors
Field types and constraint attributes change the browser’s input behavior. For example, a number input shows a numeric keyboard on mobile devices. The field may show a spinner and keyboard up/down cursor presses will increment and decrement values.
Most field types are obvious, but there are exceptions. For example, credit cards are numeric, but the increment/decrement spinner is useless and it’s too easy to press up or down when entering a 16-digit number. It’s better to use a standard text type, but set the inputmode attribute to numeric, which shows an appropriate keyboard. Setting autocomplete="cc-number" also suggests any pre-configured or previously entered card numbers.
Using the correct field type and autocorrect offers benefits which would be difficult to achieve in JavaScript. For example, some mobile browsers can:
- import credit card details by scanning a card using the camera
- import one-time-codes sent by SMS
Automatic Validation
The browser ensures an input value adheres with the constraints defined by the type, min, max, step, minlength, maxlength, pattern, and required attributes. For example:
<input type="number" min="1" max="100" required />
Attempting to submit an empty value prevents form submission and shows the following message in Chrome:
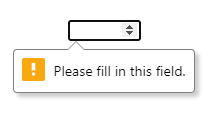
The spinners will not permit values outside the 1 to 100 range. Similar validation messages appear if you type a string which is not a number. All without a single line of JavaScript.
You can stop browser validation by:
- adding a
novalidateattribute to the<form>element - adding a
formnovalidateattribute to the submission button or image
Creating Custom JavaScript Inputs
If you’re writing a new JavaScript-based date entry component, please stop and step away from your keyboard!
Writing custom input controls is difficult. You have to consider the mouse, keyboard, touch, speech, accessibility, screen dimensions, and what happens when JavaScript fails. You’re also creating a different user experience. Perhaps your control is superior to the standard date picker on desktop, iOS, and Android, but the unfamiliar UI will confuse some users.
There are three primary reasons developers choose to create JavaScript-based inputs.
1. Standard controls are difficult to style
CSS styling is limited and often requires hacks, such as overlaying an input with its label’s ::before and ::after pseudo-elements. The situation is improving, but question any design which prioritizes form over function.
2. Modern <input> types are not supported in old browsers
In essence, you’re coding for Internet Explorer. IE users won’t get a date picker but can still enter dates in YYYY-MM-DD format. If your client insists, then load a polyfill in IE only. There’s no need to burden modern browsers.
3. You require a new input type which has never been implemented before
These situations are rare, but always start with appropriate HTML5 fields. They’re fast, and they work even before the script has loaded. You can progressively enhance fields as necessary. For example, a sprinkling of JavaScript can ensure a calendar event’s end date occurs after a starting date.
In summary: avoid re-inventing HTML controls!
CSS Validation Styling
You can apply the following pseudo-classes to input fields to style them according to the current state:
| selector | description |
|---|---|
:focus |
the field with focus |
:focus-within |
an element contains a field with focus (yes, it’s a parent selector!) |
:focus-visible |
an element has focus owing to keyboard navigation, so a focus ring or more evident styling is necessary |
:required |
a field with a required attribute |
:optional |
a field without a required attribute |
:valid |
a field that has passed validation |
:invalid |
a field that has not passed validation |
:user-valid |
a field that has passed validation after the user has interacted with it (Firefox only) |
:user-invalid |
a field that hasn’t passed validation after the user has interacted with it (Firefox only) |
:in-range |
the value is within range on a number or range input |
:out-of-range |
the value is out of range on a number or range input |
:disabled |
a field with a disabled attribute |
:enabled |
a field without a disabled attribute |
:read-only |
a field with a read-only attribute |
:read-write: |
a field without a read-only attribute |
:checked |
a checked checkbox or radio button |
:indeterminate |
an indeterminate checkbox or radio state, such as when all radio buttons are unchecked |
:default |
the default submit button or image |
You can style an input’s placeholder text with the ::placeholder pseudo-element:
/* blue placeholder on email fields */
input[type="email"]::placeholder {
  color: blue;
}
The selectors above have the same specificity, so the order can be important. Consider this example:
input:invalid { color: red; }
input:enabled { color: black; }
Invalid inputs have red text, but it’s only applied to inputs with a disabled attribute — so all enabled inputs are black.
The browser applies validation styles on page load. For example, in the following code every invalid field is given a red border:
:invalid {
  border-color: #900;
}
The user is confronted by a daunting set of red boxes before they interact with the form. Showing validation errors after the first submit or as a value is changed would offer a better experience. That’s where JavaScript steps in …
JavaScript and the Constraint Validation API
The Constraint Validation API provides form customization options which can enhance the standard HTML field checking. You could:
- stop validation until the user interacts with a field or submits the form
- show error messages with custom styling
- provide custom validation that’s impossible in HTML alone. This is often necessary when you need to compare two inputs — such as when you enter an email address or a telephone number, check “new” and “confirm” password fields have the same value, or ensure one date comes after another.
Form Validation
Before using the API, your code should disable default validation and error messages by setting the form’s noValidate property to true (the same as adding a novalidate attribute):
const myform = document.getElementById('myform');
myform.noValidate = true;
You can then add event handlers — such as when the form submits:
myform.addEventListener('submit', validateForm);
The handler can check the whole form is valid using the checkValidity() or reportValidity() methods, which return true when all the form’s inputs are valid. (The difference is that checkValidity() checks whether any inputs are subject to constraint validation.)
The Mozilla docs explain:
An
invalidevent is also triggered on every invalid field. This does not bubble: handlers must be added to every control that uses it.
// validate form on submission
function validateForm(e) {

  const form = e.target;

  if (form.checkValidity()) {

    // form is valid - make further checks

  }
  else {

    // form is invalid - cancel submit
    e.preventDefault();

  }

};
A valid form could now incur further validation checks. Similarly, an invalid form could have invalid fields highlighted.
Field Validation
Individual fields have the following constraint validation properties:
-
willValidate: returnstrueif the element is a candidate for constraint validation. -
validationMessage: the validation message. This will be an empty string if the field is valid. -
valitity: a ValidityState object. This has avalidproperty settruewhen the field is valid. If it’sfalse, one or more of the following properties will betrue:ValidityState description .badInputthe browser cannot understand the input .customErrora custom validity message has been set .patternMismatchthe value does not match the specified patternattribute.rangeOverflowthe value is greater than the maxattribute.rangeUnderflowthe value is less than the minattribute.stepMismatchthe value does not fit stepattribute rules.tooLongthe string length is greater than the maxlengthattribute.tooShortthe string length is less than the minlengthattribute.typeMismatchthe value is not a valid email or URL .valueMissinga requiredvalue is empty
Individual fields have the following constraint validation methods:
setCustomValidity(message): sets an error message for an invalid field. An empty string must be passed when the field is valid or the field will remain invalid forever.checkValidity(): returnstruewhen the input is valid. Thevalitity.validproperty does the same thing, butcheckValidity()also triggers aninvalidevent on the field which could be useful.
The validateForm() handler function could loop through every field and apply an invalid class to its parent element where necessary:
function validateForm(e) {
  const form = e.target;
  if (form.checkValidity()) {
    // form is valid - make further checks
  }
  else {
    // form is invalid - cancel submit
    e.preventDefault();
    // apply invalid class
    Array.from(form.elements).forEach(i => {
      if (i.checkValidity()) {
        // field is valid - remove class
        i.parentElement.classList.remove('invalid');
      }
      else {
        // field is invalid - add class
        i.parentElement.classList.add('invalid');
      }
    });
  }
};
Assume your HTML defined an email field:
<div>
  <label for="email">email</label>
  <input type="email" id="email" name="email" required />
  <p class="help">Please enter a valid email address</p>
</div>
The script applies an invalid class to the <div> when the email is not specified or is invalid. CSS can show or hide the validation message when the form’s submitted:
.help { display: none; }
.invalid .help { display: block; }
.invalid label, .invalid input, .invalid .help {
  color: red;
  border-color: red;
}
Creating a Custom Form Validator
The following demonstration shows an example contact form which requires a username and either an email address, a telephone number, or both:
See the Pen
Constraint Validation API example by SitePoint (@SitePoint)
on CodePen.
It’s implemented using a generic form validation class named FormValidate. A form element is passed when instantiating an object. An optional second parameter can be set:
trueto validate each field as the user interacts with itfalse(the default) to validate all fields after the first submit (field-level validation occurs after that)
// validate contact form
const contactForm = new FormValidate(document.getElementById('contact'), false);
An .addCustom(field, func) method defines custom validation functions. The following code ensures either the email or tel fields are valid (neither have required attributes):
// custom validation - email and/or telephone
const
  email = document.getElementById('email'),
  tel = document.getElementById('tel');

contactForm.addCustom(email, f => f.value || tel.value);
contactForm.addCustom(tel, f => f.value || email.value);
A FormValidate object monitors both of the following:
focusoutevents, which then check an individual field- form
submitevents, which then check every field
Both call the .validateField(field) method, which checks whether a field passes standard constraint validation. When it does, any custom validation functions assigned to that field execute in turn. All must return true for the field to be valid.
Invalid fields have an invalid class applied to the field’s parent element, which displays a red help message using CSS.
Finally, the object calls a custom submit function when the whole form is valid:
// custom submit
contactForm.submit = e => {
  e.preventDefault();
  alert('Form is valid!\n(open the console)');
  const fd = new FormData(e.target);
  for (const [name, value] of fd.entries()) {
    console.log(name + ': ' + value);
  }
}
Alternatively, you can use a standard addEventListener to handle form submit events, since FormValidate prevents further handlers running when the form is invalid.
Form Finesse
Forms are the basis of all web applications and developers spend considerable time manipulating user input. Constraint validation is well supported: browsers can handle most checks and show appropriate input options.
Recommendations:
- Use the standard HTML input types where possible. Set
min,max,step,minlength,maxlength,pattern,required,inputmode, andautocompleteattributes as appropriate. - If necessary, use a little JavaScript to enable custom validation and messages.
- For more complex fields, progressively enhance the standard inputs.
Finally: forget Internet Explorer!
Unless your clients are predominantly IE users, there’s no need to implement your own fallback validation functions. All HTML5 input fields work in IE but may require more user effort. (For example, IE won’t detect when you enter an invalid email address.) You still have to validate data on the server, so consider using that as the basis of IE error checking.
Frequently Asked Questions (FAQs) on HTML Forms and Constraint Validation
What is the importance of HTML form validation?
HTML form validation is a crucial aspect of web development. It ensures that the data entered by users into a form meets certain criteria before it’s sent to the server. This not only maintains the integrity of the data but also enhances user experience by providing immediate feedback on the correctness of the data entered. Without form validation, there’s a risk of receiving incorrect, incomplete, or even malicious data, which can lead to various issues including data corruption, security breaches, and system crashes.
How does HTML5 improve form validation?
HTML5 introduces several new form elements and attributes that make form validation much easier and more efficient. For instance, it provides new input types such as email, URL, and number, which automatically validate the input data based on the type. It also introduces new attributes like required, pattern, and min/max that allow you to specify various constraints on the input data. Moreover, HTML5 provides a built-in validation API that enables you to perform custom validation using JavaScript.
Can I perform form validation without JavaScript?
Yes, you can perform basic form validation using HTML5 alone. HTML5 provides several new input types and attributes that allow you to specify various constraints on the input data. For instance, you can use the required attribute to make a field mandatory, the pattern attribute to enforce a specific format, and the min/max attributes to set a range for numerical input. However, for more complex validation, you may still need to use JavaScript.
How can I customize the error messages in HTML5 form validation?
HTML5 provides a validation API that allows you to customize the error messages. You can use the setCustomValidity method of the ValidityState object to set a custom error message for a field. This method takes a string argument, which becomes the field’s validation message when the field is invalid. You can call this method in response to the invalid event, which is fired when a field fails validation.
How can I disable HTML5 form validation?
You can disable HTML5 form validation by adding the novalidate attribute to the form element. When this attribute is present, the browser will not perform any validation on the form when it’s submitted. This can be useful if you want to handle validation entirely on the server-side or using custom JavaScript.
How can I validate multiple fields together in HTML5?
HTML5 does not provide a built-in way to validate multiple fields together. However, you can achieve this using JavaScript. You can write a custom validation function that checks the values of multiple fields and sets a custom validity message if they don’t meet the required criteria. You can call this function in response to the form’s submit event or the fields’ input/change events.
How can I validate a field based on the value of another field in HTML5?
HTML5 does not provide a built-in way to validate a field based on the value of another field. However, you can achieve this using JavaScript. You can write a custom validation function that checks the value of one field against the value of another field and sets a custom validity message if they don’t match. You can call this function in response to the fields’ input/change events.
How can I perform asynchronous validation in HTML5?
HTML5 does not support asynchronous validation out of the box. However, you can achieve this using JavaScript. You can write a custom validation function that performs an asynchronous operation, such as an AJAX request, and sets a custom validity message based on the result. You can call this function in response to the fields’ input/change events or the form’s submit event.
How can I style the error messages in HTML5 form validation?
The appearance of the error messages in HTML5 form validation is determined by the browser and cannot be directly styled using CSS. However, you can create custom error messages using JavaScript and style them as you like. You can use the validation API to determine when a field is invalid and display a custom error message accordingly.
How can I test the validation of an HTML form?
You can test the validation of an HTML form by entering various types of data into the fields and trying to submit the form. You should test with both valid and invalid data to ensure that the validation works correctly in all cases. You can also use automated testing tools or libraries to perform more comprehensive testing.