The WordPress Template Hierarchy

Key Takeaways
- WordPress themes, which are collections of template files, determine the design of a website. These templates interact with a database to display content when a visitor requests it. The order in which these files are used to render a page is known as the ‘template hierarchy’.
- The template hierarchy is crucial in determining which template files are loaded within a WordPress theme. WordPress uses this hierarchy to decide what type of page is being requested (e.g., search page, category page, home page) and then selects the appropriate template to generate the content.
- WordPress has a strict naming convention for theme files. If WordPress can’t find a template file with a matching name, it moves down to the next file in the hierarchy. If no matching template file is found, WordPress uses index.php, the theme’s home page template file.
- Only two files, index.php and style.css, are required for a WordPress theme to work. The index.php file processes every WordPress query and structures the site, while style.css handles the visual design. However, a theme typically includes many other template files for different types of content.
WordPress themes allow you to change the design of your website, providing control over the look and feel. They are essentially collections of different template files that work together and produce the overall design of your website.
Before you dive deeper into WordPress themes, it is important that you have an understanding of how WordPress operates and how the different pages of your website are created. WordPress interacts with a database to store your content. That means whenever you create a new post or page, the content of your post or page lives in a database and it’s only displayed using templates when the visitor asks for that particular content.
A WordPress theme is a collection of templates (CSS and PHP files) that WordPress uses to display the database content. WordPress will look for files in a theme to use to render the current page in a specific order. This is called a ‘template hierarchy’, that is used to create and extend WordPress themes.
WordPress themes decide how your content should be displayed on your website. A template in WordPress is a single file that determines what a specific page or set of pages look like on the front end of your website. When you change your theme, you are changing the way the content is displayed without changing the content itself.
WordPress themes use different templates files to generate a complete web page. For example, when you access a WordPress website, you can actually see multiple different template files combined together to create one complete page.
For instance, if you will look at an index page, like the front page of a blog, you will usually see a header created by the header.php template, content created by index.php, sidebar created by sidebar.php and the footer created by footer.php
.
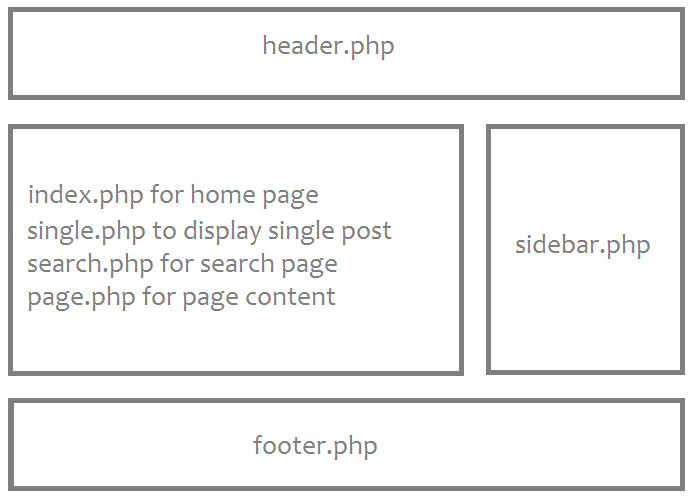
However, if you access a single page, you will still see the same header, same sidebar and same footer but the content would be created by single.php instead. The question is how do you know which of these template files kick in and at what point? That’s where the WordPress template hierarchy comes in.
The WordPress template hierarchy determines in what order your template files are loaded within your WordPress theme. WordPress searches for these files, to determine how to load your site.
If you open the ‘Twenty Fifteen’ (one of the default WordPress themes) theme folder, there are more than 15 templates files. These include template files for 404, archive, author-bio, comments and content-link just to name a few. WordPress will use the Query String information contained within each link on your website to decide which template or set of templates will be used to display the page.
WordPress decides what type of page (search page, category page or home page for example) is being requested and then chooses the appropriate template suggested by the WordPress Template hierarchy to generate the content.
Naming Convention
WordPress has a special and strict naming convention associated with theme files, so all themes share a fairly commonly named set of files in the back end. For example, to easily manage your content you can create header.php and footer.php files. These template files must be named header.php and footer.php.
WordPress looks for template files with specific names in the current theme’s directory to determine which template to use, most commonly the first matching template file is used. If WordPress cannot find a template file with a matching name, it skips down to the next file name in the hierarchy. If WordPress fails to find any matching template file, it will use index.php (the theme’s home page template file).
So when you are editing template files what you have to think about is what type of content this is, then edit the appropriate template file for that type of content. The same applies to when you’re creating WordPress themes from scratch.
Minimum Theme Requirements
The only files that are required for a WordPress theme to work are index.php and style.css. The index.php is the main and only file that will process every WordPress query, as well as the structure of the site.
The minimum files required for a WordPress theme to work and to be visible in the WordPress dashboard for activation are index.php and style.css.
If index.php or style.css are missing, you will see following error.
The following themes are installed but are incomplete. Themes must have a style-sheet and a template.
-
style.css(required) -
index.php(required) -
functions.php(optional) -
screenshot.png(optional)
This separation greatly increases efficiency. Combining everything into one big single file index.php might technically work, but it wouldn’t be pretty, and would cause endless issues down the line. Also editing a theme would be a nightmare!
Here is the list of the theme files recognized by WordPress.
-
style.css -
rtl.css -
index.php -
comments.php -
front-page.php -
single.php -
page.php -
author.php -
archive.php
There are many other files as well, you can view the template files list for more details.
Twenty Fifteen Template Hierarchy Example
Suppose you have activated the Twenty Fifteen theme and a user visits the page yoursite.com/author/tahir/. First, WordPress will search for the template labeled author-tahir.php but author-tahir.php is not available. WordPress will then look for author.php, if it also does not exist, it will look for archive.php. This file is available in Twenty Fifteen theme. If you delete or rename archive.php then WordPress will use index.php to render the page.
Each time a user visits your website, WordPress moves up the template hierarchy until it finds a template file that matches. This has everything to do with how these files are named.
The ‘What The File’ Plugin
To find out what file and template WordPress is using to display page content you are currently viewing, you can use the very handy What The File Plugin. This is a free plugin developed by Barry Kooij.
This plugin adds an option to your toolbar showing what file and templates are being used. I installed the ‘What The File Plugin’ for testing purposes on my local server and found it worked great.
To test which files WordPress uses if a specific file isn’t available, I renamed two files (in the Twenty Fifteen Theme). In the screenshot below you can see which files WordPress uses to display content.
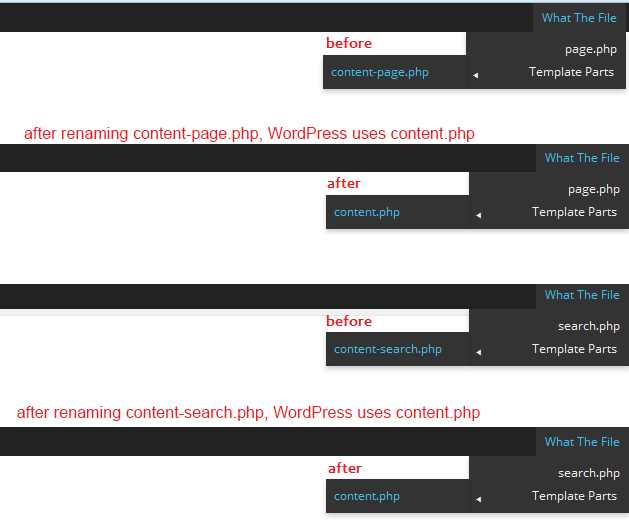
You can see the Twenty Fifteen theme uses the content-search.php file to display search results. If you delete or rename content-search.php, WordPress will use content.php to display search results instead.
The ‘What The File’ plugin also allows you to click the file name directly to edit it through the theme editor. This plugin requires WordPress 3.1 or higher, it worked fine with WordPress 4.1 as well.
Useful Resources
If you’re interested in learning more about the WordPress template hierarchy and theme development in general, I’d recommend the following resources:
Frequently Asked Questions about WordPress Template Hierarchy
What is the significance of the WordPress template hierarchy?
The WordPress template hierarchy is a crucial aspect of WordPress theme development. It defines the way WordPress chooses which template file to use to display a certain type of content. WordPress follows a specific order of preference, looking for template files in a specific sequence. If the first file is not found, it moves on to the next one, and so on. This hierarchy allows developers to have precise control over the layout and design of different sections of a WordPress site.
How does the WordPress template hierarchy work?
The WordPress template hierarchy works based on a priority system. When a page is requested, WordPress first determines what type of content is being requested (e.g., a single post, a page, a category archive, etc.). It then looks for the template file that corresponds to that content type in the active theme’s directory, following a specific order. If it doesn’t find a specific match, it moves down the hierarchy to a more general template file.
What is the difference between a template and a template part in WordPress?
A template in WordPress is a PHP file that controls how a particular page on your website is displayed. It includes the HTML structure of the page and PHP code to include other template files or to retrieve content from the database. On the other hand, a template part is a chunk of reusable code that can be included in multiple templates. It’s a way to avoid repeating the same code in multiple places.
How can I customize the WordPress template hierarchy?
Customizing the WordPress template hierarchy involves creating or modifying template files in your theme. You can create a new template file for a specific type of content by following the naming conventions of the template hierarchy. For example, to create a custom template for single posts, you could create a file named single.php in your theme’s directory. You can also modify existing template files, but be aware that these changes may be overwritten if you update your theme.
What is the role of the index.php file in the WordPress template hierarchy?
The index.php file is the most general and last file in the WordPress template hierarchy. If WordPress can’t find a template file that matches the current content type, it will fall back to using index.php. This file is required in all WordPress themes, and it ensures that WordPress can always display something, even if no other template files are present.
How can I create a custom template for a specific category in WordPress?
To create a custom template for a specific category, you can create a new template file in your theme and name it category-slug.php or category-ID.php, where slug is the slug of the category and ID is its ID. WordPress will automatically use this template to display the category archive page.
What is the difference between home.php and front-page.php in the WordPress template hierarchy?
In the WordPress template hierarchy, home.php is used to display the blog posts index, whether it’s the site’s front page or a separate page. On the other hand, front-page.php is used to display the site’s front page, whether it’s a static page or the blog posts index. If your theme has both files, front-page.php will take precedence.
How can I create a custom template for a custom post type in WordPress?
To create a custom template for a custom post type, you can create a new template file in your theme and name it single-post_type.php, where post_type is the name of your custom post type. WordPress will automatically use this template to display single posts of the custom post type.
What is the role of the functions.php file in the WordPress template hierarchy?
The functions.php file is not part of the template hierarchy, but it plays a crucial role in WordPress theme development. This file is used to add features and functionality to a WordPress theme. It can be used to define custom functions, register sidebars, add theme support for certain features, and more.
How can I create a custom template for a specific tag in WordPress?
To create a custom template for a specific tag, you can create a new template file in your theme and name it tag-slug.php or tag-ID.php, where slug is the slug of the tag and ID is its ID. WordPress will automatically use this template to display the tag archive page.
Tahir Taous is founder of Just Learn WordPress, a training site where you can learn how to create and manage websites with WordPress, WordPress essential training, theme development courses free video tutorials and articles.

Published in
·Business·Career Advancement·Email Marketing·Entrepreneur·Entrepreneurship·Entrepreneurship·Freelancing·Marketing·September 4, 2015

Published in
·automation·Debugging & Deployment·Miscellaneous·Patterns & Practices·PHP·Testing·July 20, 2017