Getting Started with React: A Beginner’s Guide


React is a remarkable JavaScript library that’s taken the development community by storm. In a nutshell, it’s made it easier for developers to build interactive user interfaces for web, mobile and desktop platforms. Today, thousands of companies worldwide are using React, including big names such as Netflix and Airbnb.
In this guide, I’ll introduce you to React and several of its fundamental concepts. We’ll get up and running quickly with the Create React App tool, then we’ll walk step-by-step through the process of building out a simple React application. By the time you’re finished, you’ll have a good overview of the basics and will be ready to take the next step on your React journey.
Prerequisites
Before beginning to learn React, it makes sense to have a basic understanding of HTML, CSS and JavaScript. It will also help to have a basic understanding of Node.js, as well as the npm package manager.
To follow along with this tutorial, you’ll need both Node and npm installed on your machine. To do this, head to the Node.js download page and grab the version you need (npm comes bundled with Node). Alternatively, you can consult our tutorial on installing Node using a version manager.
Key Takeaways
- React is a JavaScript library focused on building user interfaces and is used widely by companies like Netflix and Airbnb.
- Before starting with React, a basic understanding of HTML, CSS, JavaScript, Node.js, and npm is essential.
- React applications are structured around reusable components, which can be either class-based or function-based, with the latter becoming more common due to hooks.
- The Virtual DOM in React improves performance by updating the HTML DOM efficiently based on changes to the state of UI components.
- JSX is a syntax extension used in React to write HTML-like code within JavaScript files, which enhances the development experience and readability.
- React components can be styled directly with inline styles or external CSS, and they can be either stateless (presentational) or stateful (container) components.
What is React?
React is a JavaScript library for building UI components. Unlike more complete frameworks such as Angular or Vue, React deals only with the view layer, so you’ll need additional libraries to handle things such as routing, state management, and so on. In this guide, we’ll focus on what React can do out of the box.
React applications are built using reusable UI components that can interact with each other. A React component can be class-based component or a so-called function component. Class-based components are defined using ES6 classes, whereas function components are basic JavaScript functions. These tend to be defined using an arrow function, but they can also use the function keyword. Class-based components will implement a render function, which returns some JSX (React’s extension of Regular JavaScript, used to create React elements), whereas function components will return JSX directly. Don’t worry if you’ve never heard of JSX, as we’ll take a closer look at this later on.
React components can further be categorized into stateful and stateless components. A stateless component’s work is simply to display data that it receives from its parent React component. If it receives any events or inputs, it can simply pass these up to its parent to handle.
A stateful component, on the other hand, is responsible for maintaining some kind of application state. This might involve data being fetched from an external source, or keeping track of whether a user is logged in or not. A stateful component can respond to events and inputs to update its state.
As a rule of thumb, you should aim to write stateless components where possible. These are easier to reuse, both across your application and in other projects.
Understanding the Virtual DOM
Before we get to coding, you need to be aware that React uses a virtual DOM to handle page rendering. If you’re familiar with jQuery, you know that it can directly manipulate a web page via the HTML DOM. In a lot of cases, this direct interaction poses few if any problems. However, for certain cases, such as the running of a highly interactive, real-time web application, performance can take quite a hit.
To counter this, the concept of the Virtual DOM (an in-memory representation of the real DOM) was invented, and is currently being applied by many modern UI frameworks including React. Unlike the HTML DOM, the virtual DOM is much easier to manipulate, and is capable of handling numerous operations in milliseconds without affecting page performance. React periodically compares the virtual DOM and the HTML DOM. It then computes a diff, which it applies to the HTML DOM to make it match the virtual DOM. This way, React ensures that your application is rendered at a consistent 60 frames per second, meaning that users experience little or no lag.
Start a Blank React Project
As per the prerequisites, I assume you already have a Node environment set up, with an up-to-date version of npm (or optionally Yarn).
Next, we’re going to build our first React application using Create React App, an official utility script for creating single-page React applications.
Let’s install this now:
npm i -g create-react-app
Then use it to create a new React app.
create-react-app message-app
Depending on the speed of your internet connection, this might take a while to complete if this is your first time running the create-react-app command. A bunch of packages get installed along the way, which are needed to set up a convenient development environment — including a web server, compiler and testing tools.
If you’d rather not install too many packages globally, you can also npx, which allows you to download and run a package without installing it:
npx i -g create-react-app
Running either of these commands should output something similar to the following:
...
Success! Created react-app at C:\Users\mike\projects\github\message-app
Inside that directory, you can run several commands:

  yarn start
    Starts the development server.

  yarn build
    Bundles the app into static files for production.

  yarn test
    Starts the test runner.

  yarn eject
    Removes this tool and copies build dependencies, configuration files
    and scripts into the app directory. If you do this, you can’t go back!

We suggest that you begin by typing:

  cd message-app
  yarn start

Happy hacking!
Once the project setup process is complete, execute the following commands to launch your React application:
cd message-app
npm start
You should see the following output:
....

Compiled successfully!

You can now view react-app in the browser.

  Local:            http://localhost:3000
  On Your Network:  http://192.168.56.1:3000

Note that the development build is not optimized.
To create a production build, use yarn build.
Your default browser should launch automatically, and you should get a screen like this:
Now that we’ve confirmed our starter React project is running without errors, let’s have a look at what’s happened beneath the hood. You can open the folder message-app using your favorite code editor. Let’s start with package.json file:
{
  "name": "message-app",
  "version": "0.1.0",
  "private": true,
  "dependencies": {
    "@testing-library/jest-dom": "^4.2.4",
    "@testing-library/react": "^9.3.2",
    "@testing-library/user-event": "^7.1.2",
    "react": "^16.13.1",
    "react-dom": "^16.13.1",
    "react-scripts": "3.4.3"
  },
  "scripts": {
    "start": "react-scripts start",
    "build": "react-scripts build",
    "test": "react-scripts test",
    "eject": "react-scripts eject"
  },
  "eslintConfig": {
    "extends": "react-app"
  },
  "browserslist": {
    "production": [
      ">0.2%",
      "not dead",
      "not op_mini all"
    ],
    "development": [
      "last 1 chrome version",
      "last 1 firefox version",
      "last 1 safari version"
    ]
  }
}
As you can see, Create React App has installed several dependencies for us. The first three are related to the React Testing Library which (as you might guess) enables us to test our React code. Then we have react and react-dom, the core packages of any React application, and finally react-scripts, which sets up the development environment and starts a server (which you’ve just seen).
Then come four npm scripts, which are used to automate repetitive tasks:
startstarts the dev serverbuildcreates a production-ready version of your apptestruns the tests mentioned aboveejectwill expose your app’s development environment
This final command is worth elaborating on. The Create React App tool provides a clear separation between your actual code and the development environment. If you run npm run eject, Create React App will stop hiding what it does under the hood and dump everything into your project’s package.json file. While that gives you a finer grained control over your app’s dependencies, I wouldn’t recommend you do this, as you’ll have to manage all the complex code used in building and testing your project. If it comes to it, you can use customize-cra to configure your build process without ejecting.
Create React App also comes for support with ESLint (as can be seen from the eslintConfig property) and is configured using react-app ESLint rules.
The browserslist property of the package.json file allows you to specify a list of browsers that your app will support. This configuration is used by PostCSS tools and transpilers such as Babel.
One of the coolest features you’ll love about Create React App is that it provides hot reloading out of the box. This means any changes we make on the code will cause the browser to automatically refresh. Changes to JavaScript code will reload the page, while changes to CSS will update the DOM without reloading.
For now, let’s first stop the development server by pressing Ctrl + C. Once the server has stopped, delete everything except the serviceWorker.js and setupTests.js files in the src folder. If you’re interested in finding out what service workers do, you can learn more about them here.
Other than that, we’ll create all the code from scratch so that you can understand everything inside the src folder.
Introducing JSX Syntax
Defined by the React docs as a “syntax extension to JavaScript”, JSX is what makes writing your React components easy. Using JSX we can pass around HTML structures, or React elements as if they were standard JavaScript values.
Here’s a quick example:
import React from 'react';

export default function App() {
  const message = <h1>I'm a heading</h1>;  //JSX FTW!
  return ( message );
}
Notice the line const message = <h1>I'm a heading</h1>;. That’s JSX. If you tried to run that in a web browser, it would give you an error. However, in a React app, JSX is interpreted by a transpiler, such as Babel, and rendered to JavaScript code that React can understand.
Note: you can learn more about JSX in our tutorial “An Introduction to JSX”.
In the past, React JSX files used to come with a .jsx file extension. Nowadays, the Create React App tool generates React files with a .js file extension. While the .jsx file extension is still supported, the maintainers of React recommend using .js. However, there’s an opposing group of React developers, including myself, who prefer to use the .jsx extension, for the following reasons:
- In VS Code, Emmet works out of the box for
.jsxfiles. You can, however, configure VS Code to treat all.jsfiles asJavaScriptReactto make Emmet work on those files. - There are different linting rules for standard JavaScript and React JavaScript code.
However, for this tutorial, I’ll abide by what Create React App gives us and stick with the .js file ending.
Hello, World! in React
Let’s get down to writing some code. Inside the src folder of the newly created message-app, create an index.js file and add the following code:
import React from 'react';
import ReactDOM from 'react-dom';

ReactDOM.render(<h1>Hello World</h1>, document.getElementById('root'));
Start the development server again using npm start or yarn start. Your browser should display the following content:

This is the most basic “Hello World” React example. The index.js file is the root of your project where React components will be rendered. Let me explain how the code works:
- Line 1: The React package is imported to handle JSX processing.
- Line 2: The ReactDOM package is imported to render the root React component.
- Line 3: Call to the render function, passing in:
<h1>Hello World</h1>: a JSX elementdocument.getElementById('root'): an HTML container (the JSX element will be rendered here).
The HTML container is located in the public/index.html file. On line 31, you should see <div id="root"></div>. This is known as the root DOM node because everything inside it will be managed by the React virtual DOM.
While JSX does look a lot like HTML, there are some key differences. For example, you can’t use a class attribute, since it’s a JavaScript keyword. Instead, className is used in its place. Also, events such as onclick are spelled onClick in JSX. Let’s now modify our Hello World code:
const element = <div>Hello World</div>;
ReactDOM.render(element, document.getElementById('root'));
I’ve moved the JSX code out into a constant variable named element. I’ve also replaced the h1 tags with div tags. For JSX to work, you need to wrap your elements inside a single parent tag.
Take a look at the following example:
const element = <span>Hello,</span> <span>Jane</span>;
The above code won’t work. You’ll get a syntax error indicating you must enclose adjacent JSX elements in an enclosing tag. Something like this:
const element = <div>
    <span>Hello, </span>
    <span>Jane</span>
    </div>;
How about evaluating JavaScript expressions in JSX? Simple. Just use curly braces like this:
const name = "Jane";
const element = <p>Hello, {name}</p>
… or like this:
const user = {
  firstName: 'Jane',
  lastName: 'Doe'
}
const element = <p>Hello, {user.firstName} {user.lastName}</p>
Update your code and confirm that the browser is displaying “Hello, Jane Doe”. Try out other examples such as { 5 + 2 }. Now that you’ve got the basics of working with JSX, let’s go ahead and create a React component.
Declaring React Components
The above example was a simplistic way of showing you how ReactDOM.render() works. Generally, we encapsulate all project logic within React components, which are then passed to the ReactDOM.render function.
Inside the src folder, create a file named App.js and type the following code:
import React, { Component } from 'react';

class App extends Component {

  render(){
    return (
      <div>
        Hello World Again!
      </div>
    )
  }
}

export default App;
Here we’ve created a React Component by defining a JavaScript class that’s a subclass of React.Component. We’ve also defined a render function that returns a JSX element. You can place additional JSX code within the <div> tags. Next, update src/index.js with the following code in order to see the changes reflected in the browser:
import React from 'react';
import ReactDOM from 'react-dom';

import App from './App';

ReactDOM.render(<App/>, document.getElementById('root'));
First we import the App component. Then we render App using JSX format, like so: <App/>. This is required so that JSX can compile it to an element that can be pushed to the React DOM. After you’ve saved the changes, take a look at your browser to ensure it’s rendering the correct message.
Next, we’ll look at how to apply styling.
Styling JSX Elements
There are various ways to style React components. The two we’ll look at in this tutorial are:
- JSX inline styling
- External Stylesheets
Below is an example of how we can implement JSX inline styling:
// src/App.js

render() {
  const headerStyle = {
    color: '#ff0000',
    textDecoration: 'underline'
  }
  return (
    <div>
      <h1 style={headerStyle}>Hello World Again!</h1>
    </div>
  )
}
React styling looks a lot like regular CSS, but there are some key differences. For example, headerStyle is an object literal. We can’t use semicolons like we normally do. Also, a number of CSS declarations have been changed in order to make them compatible with JavaScript syntax. For example, instead of text-decoration, we use textDecoration. Basically, use camel case for all CSS keys except for vendor prefixes such as WebkitTransition, which must start with a capital letter.
We can also implement styling this way:
// src/App.js

return (
  <div>
    <h1 style={{color:'#ff0000', textDecoration: 'underline'}}>Hello World Again!</h1>
  </div>
)
The second method is using external stylesheets. By default, external CSS stylesheets are already supported. If you want to use a preprocessor such as Sass, please consult the documentation to find out how to configure it.
Inside the src folder, create a file named App.css and type the following code:
h1 {
  font-size: 4rem;
}
Add the following import statement to src/App.js at the top of the file:
import './App.css';
After saving, you should see the text content on your browser dramatically change in size. You can also use CSS classes like this:
.header-red {
  font-size: 4rem;
  color: #ff0000;
  text-decoration: underline;
}
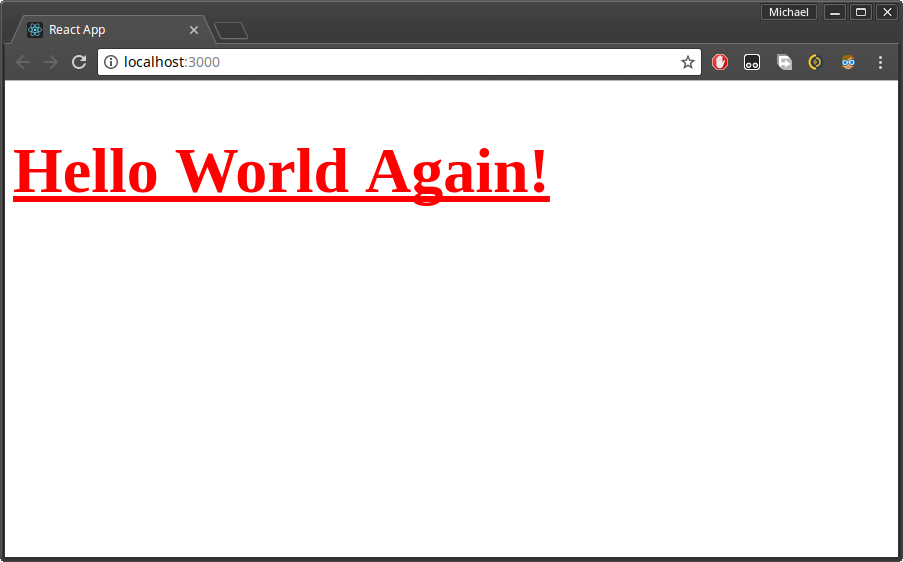
Update src/App.js as follows:
<h1 className="header-red">Hello World Again!</h1>
We can’t use HTML’s class attribute since it’s a reserved JavaScript keyword. Instead, we use className. Below should be your expected output.
Now that you’ve learned how to add styling to your React project, let’s go ahead and learn about stateless and stateful React components.
Stateless vs Stateful Components
A stateless component, also known as a dumb component, is simply a component that displays information. It doesn’t contain any logic to manipulate data. It can receive events from the user, which are then passed up to the parent container for processing.
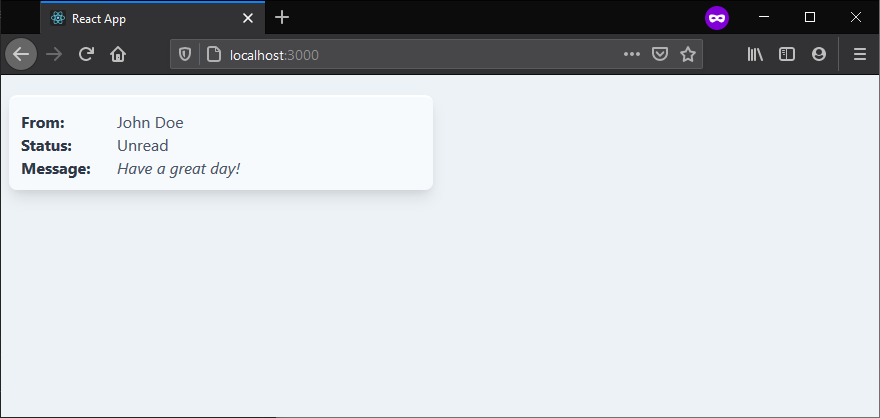
Create the file message-view.js and copy the following example code into it. This is a perfect example of a dumb component (although technically it’s more of a static component):
import React from 'react';

class MessageView extends React.Component {
  render() {
    return(
      <div className="message">
        <div className="field">
          <span className="label">From: </span>
          <span className="value">John Doe</span>
        </div>
        <div className="field">
          <span className="label">Status: </span>
          <span className="value"> Unread</span>
        </div>
        <div className="field content">
          <span className="label">Message: </span>
          <span className="value">Have a great day!</span>
        </div>
      </div>
    )
  }
}

export default MessageView;
Next, add some basic styling to src/App.css with the following code:
body {
  background-color: #EDF2F7;
  color: #2D3748;
  font-family: -apple-system, BlinkMacSystemFont, 'Segoe UI', Roboto, Oxygen, Ubuntu, Cantarell, 'Open Sans', 'Helvetica Neue', sans-serif;
}

h1 {
  font-size: 2rem;
}

.container {
  width: 800px;
  margin: 0 auto;
}

.message {
  background-color: #F7FAFC;
  width: 400px;
  margin-top: 20px;
  border-top: solid 2px #fff;
  border-radius: 8px;
  padding: 12px;
  box-shadow: 0 10px 15px -3px rgba(0, 0, 0, 0.1), 0 4px 6px -2px rgba(0, 0, 0, 0.05);
}

.field{
  display: flex;
  justify-content: flex-start;
  margin-top: 2px;
}

.label {
  font-weight: bold;
  font-size: 1rem;
  width: 6rem;
}

.value {
  color: #4A5568;
}

.content .value {
  font-style: italic;
}
Finally, modify src/App.js so that the entire file looks like this:
import React, { Component } from 'react';

import './App.css';
import MessageView from './message-view';

class App extends Component {
  render(){
    return (
      <MessageView />
    )
  }
}

export default App;
By now, the code should be pretty self explanatory, as I’ve already explained the concepts involved so far. Take a look at your browser now, and you should have the following result:
We mentioned before that React offers both class-based and function components. We can rewrite MessageView using functional syntax like this:
import React from 'react';

export default function MessageView() {
  return (
    <div className="message">
      <div className="field">
        <span className="label">From: </span>
        <span className="value">John Doe</span>
      </div>
      <div className="field">
        <span className="label">Status: </span>
        <span className="value"> Unread</span>
      </div>
      <div className="field content">
        <span className="label">Message: </span>
        <span className="value">Have a great day!</span>
      </div>
    </div>
  );
}
Take note that I’ve removed the Component import, as this isn’t required in the functional syntax. This style might be confusing at first, but you’ll quickly learn it’s faster to write React components this way.
Also, with the advent of React hooks, this style of writing React components is becoming increasingly popular.
Passing Data via Props
You’ve successfully created a stateless React Component. It’s not complete, though, as there’s a bit more work that needs to be done for it to be properly integrated with a stateful component or container. Currently, the MessageView is displaying static data. We need to modify it so that it can accept input parameters. We do this using something called props — data which we’re going to pass down from a parent component.
Start off by altering the MessageView component like so:
import React from 'react';

class MessageView extends React.Component {
  render() {
    const message = this.props.message;

    return(
      <div className="message">
        <div className="field">
          <span className="label">From: </span>
          <span className="value">{message.from}</span>
        </div>
        <div className="field">
          <span className="label">Status: </span>
          <span className="value">{message.status}</span>
        </div>
        <div className="field content">
          <span className="label">Message: </span>
          <span className="value">{message.content}</span>
        </div>
      </div>
    )
  }
}

export default MessageView;
The main thing to be aware of here is how we’re defining the message variable. We’re assigning it a value of this.props.message, which we’ll pass down from a stateful parent component. In our JSX we can then reference our message variable and output it to the page.
Now let’s create a parent component for our MessageView. Make a new file message-list.js and add the following code:
import React, { Component } from 'react';
import MessageView from './message-view';

class MessageList extends Component {
  state = {
    message: {
      from: 'Martha',
      content: 'I will be traveling soon',
      status: 'read'
    }
  }

  render() {
    return(
      <div className="container">
        <h1>List of Messages</h1>
        <MessageView message={this.state.message} />
      </div>
    )
  }
}

export default MessageList;
Here, we’re using state to store an object containing our message. Part of the magic of React is that when the state object changes, the component will re-render (thus updating the UI).
Then, in our JSX, we’re passing the message property of our state object to the MessageView component.
The final step is to update our App component to render our new stateful MessageList component, as opposed to the stateless MessageView component:
import React, { Component } from 'react';
import MessageList from './message-list';

import './App.css';

class App extends Component {
  render(){
    return (
      <MessageList />
    )
  }
}

export default App;
After saving the changes, check your browser to see the result.

Take a moment to make sure you understand what’s happening. We’re declaring a state object in our (stateful) MessageList component. A message property of that object contains our message. In our render function, we can pass that message to our (stateless) child component using something called props.
In the (stateless) MessageView component, we can access the message using this.props.message. We can then pass this value along to our JSX to render to the page.
Phew!
Prop Checking
As your application grows and data is being passed back and forth as props, it will be useful to validate that components are receiving the type of data they’re expecting.
Luckily, we can do this with the prop-types package. To see a quick example of this in action, change our MessageView component as follows:
import React from 'react';
import PropTypes from 'prop-types';

class MessageView extends Component {
  // This stays the same
]

MessageView.propTypes = {
  message: PropTypes.object.isRequired
}

export default MessageView;
This will cause your React app to complain if the message prop is missing. It will also cause it to complain if the component receives anything other than an object.
You can try this out by changing the parent component’s state like so:
 state = {
  message: 'Not an object!'
}
Go back to your browser and open the console. You should see the following logged to the console:
Warning: Failed prop type: Invalid prop `message` of type `string` supplied to `MessageView`, expected `object`.
    in MessageView (at message-list.js:13)
    in MessageList (at App.js:9)
    in App (at src/index.js:6)
Component Reuse
Now let’s see how we can display multiple messages using MessageView instances. This is where React starts to shine, as it makes code reuse incredibly easy (as you’ll see).
First, we’ll change state.message to an array and rename it to messages. Then, we’ll use JavaScript’s map function to generate multiple instances of the MessageView component, each corresponding to a message in the state.messages array.
We’ll also need to populate a special attribute named key with a unique value such as id. React needs this in order to keep track of what items in the list have been changed, added or removed.
Update the MessageList code as follows:
class MessageList extends Component {
  state = {
    messages:  [
      {
        _id: 'd2504a54',
        from: 'John',
        content: 'The event will start next week',
        status: 'unread'
      },
      {
        _id: 'fc7cad74',
        from: 'Martha',
        content: 'I will be traveling soon',
        status: 'read'
      },
      {
        _id: '876ae642',
        from: 'Jacob',
        content: 'Talk later. Have a great day!',
        status: 'read'
      }
    ]
  }

  render() {
    const messageViews = this.state.messages.map(
      message => <MessageView key={message._id} message={message} />
    )

    return(
      <div className="container">
        <h1>List of Messages</h1>
        {messageViews}
      </div>
    )
  }
}
Check your browser to see the results:
As you can see, it’s easy to define building blocks to create powerful and complex UI interfaces using React.
Refactor to Use React Hooks
Hooks are a recent edition to React, but they’re taking the React world by storm. In simplistic terms, they make it possible to take a React function component and add state (and other features) to it.
I’m going to finish this tutorial by refactoring our MessageView component to make it a function component, which manages its state with React hooks. Please note this is only possible when using React v16.8 and above.
import React, { useState } from 'react';
import MessageView from './message-view';

export default function MessageList () {
  const initialValues = [
    {
      _id: 'd2504a54',
      from: 'John',
      content: 'The event will start next week',
      status: 'unread'
    },
    {
      _id: 'fc7cad74',
      from: 'Martha',
      content: 'I will be traveling soon',
      status: 'read'
    },
    {
      _id: '876ae642',
      from: 'Jacob',
      content: 'Talk later. Have a great day!',
      status: 'read'
    }
  ];

  const [messages] = useState(initialValues);
  const messageViews = messages.map(
    message => <MessageView key={message._id} message={message} />
  );

  return (
    <div className="container">
      <h1>List of Messages</h1>
      {messageViews}
    </div>
  );
}
In the above example, I’ve replaced the state object with the useState React hook. As the name suggests, this allows you to manage a component’s state.
Using hooks will help you avoid something called prop drilling when working on large projects. Prop drilling sees you passing props through multiple components (that ultimately have no need of that data) just to reach a deeply nested component.
We can also convert our MessageView component to a function component:
import React from 'react';
import PropTypes from 'prop-types';

const MessageView = ({ message }) => {
  const { from, status, content } = message;

  return(
    <div className="message">
      <div className="field">
        <span className="label">From: </span>
        <span className="value">{from}</span>
      </div>
      <div className="field">
        <span className="label">Status: </span>
        <span className="value">{status}</span>
      </div>
      <div className="field content">
        <span className="label">Message: </span>
        <span className="value">{content}</span>
      </div>
    </div>
  );
};

MessageView.propTypes = {
  message: PropTypes.object.isRequired
}

export default MessageView;
Notice how we now receive the message prop in our component:
const MessageView = ({ message }) => {
  ...
}
This utilizes a technique called object destructuring, which allows you to extract individual items from arrays or objects and place them into variables using a shorthand syntax.
We employ the same technique here, to grab the values we need from the message object and avoid prefixing everything with message:
const { from, status, content } = message;
And that’s the lot!
I don’t want to go into React hooks any further in this article, but just make you aware that they exist and that they’re becoming increasingly popular among the React community. If you’d like to learn more about hooks, please read our guide to getting started with React Hooks.
Demo
Here’s a live demo you can play with:
Where to Go from Here
We’ve now come to the end of this introductory guide. There’s a lot more React concepts that I haven’t been able to cover, such as data fetching, error handling, routing, working with forms, debugging. The list goes on …
The good news is that we have a lot of awesome React content on SitePoint Premium, as well as many great articles on our blog. I encourage you to check them out and build something great.
Frequently Asked Questions (FAQs) about Getting Started with React
What are the prerequisites for learning React?
Before you start learning React, it’s important to have a solid understanding of JavaScript, as React is a JavaScript library. You should be comfortable with concepts like ES6 features, closures, asynchronous programming, and this keyword. HTML and CSS knowledge is also essential as you’ll be working with JSX, which is a syntax extension for JavaScript that resembles HTML. Familiarity with Node.js and npm (Node Package Manager) is also beneficial as they are often used in React development for package management and executing scripts.
How do I set up my development environment for React?
To set up your development environment for React, you’ll need to install Node.js and npm first. Once installed, you can create a new React application by using the Create React App command-line tool. It sets up your development environment so you can use the latest JavaScript features, provides a nice developer experience, and optimizes your app for production. You’ll also need a text editor like Visual Studio Code and a web browser for testing your application.
What is JSX and why is it important in React?
JSX stands for JavaScript XML. It is a syntax extension for JavaScript, developed by Facebook, which allows us to write HTML in React. JSX makes it easier to write and add HTML in React. Without it, your JavaScript code will be hard to read and write. It also helps in making the code modular, easier to understand and maintain.
What are components in React?
Components are the building blocks of any React application. A component in React is a reusable piece of code that controls a part of the UI. Each component is independent and can be composed to make complex UIs. React components are typically written in JSX and can maintain their own state and props.
What is the difference between state and props in React?
In React, state and props are both JavaScript objects. While both of them hold information that influences the output of render, they are different in their functionality with respect to component. Props (short for properties) are a way of passing data from parent to child components, they are read-only and should not be changed by child components. On the other hand, state is managed within the component and can be changed within the component.
How does React handle events?
React events are named using camelCase, rather than lowercase. With JSX you pass a function as the event handler, rather than a string. For example, the HTML click event is written in JSX as onClick. React also has a synthetic event system which means it has its own event system which is fully compatible with the W3C event system.
What is the significance of keys in React?
Keys in React are used for identifying unique Virtual DOM Elements with their corresponding data driving the render. They help React to optimize the rendering by recycling existing DOM elements. Keys must be a unique number or string, using duplicate keys can break your app.
What is the context API in React?
The Context API is a component structure provided by React which enables us to share specific forms of data across all levels of the application. It’s aimed at solving the problem of prop drilling.
What is Redux and how is it related to React?
Redux is a predictable state container designed to help you write JavaScript apps that behave consistently across client, server, and native environments and are easy to test. While it’s mostly used as a state management tool with React, you can use it with any other JavaScript framework or library.
What are hooks in React?
Hooks are a new addition in React 16.8 that let you use state and other React features without writing a class. Hooks are functions that let you “hook into” React state and lifecycle features from function components. They do not work inside classes — they let you use React without classes.
I write clean, readable and modular code. I love learning new technologies that bring efficiencies and increased productivity to my workflow.