

Key Takeaways
- The tutorial demonstrates how to build a cipher machine using JavaScript, specifically the Caesar cipher, which shifts each letter in a message along a set number of places.
- The process involves creating a standard HTML page with a form for entering the message and an input field for the shift value, as well as a div element to display the encrypted message.
- The JavaScript code includes creating an array of the alphabet, accessing the form and div elements using the Document Object Model (DOM), and creating an event handler for when the submit button is pressed.
- The encrypt function is used to apply the Caesar cipher to the input message, shifting the position of each character in the alphabet by the specified shift value and returning the encrypted character. The function is designed to handle non-alphabet characters and case sensitivity.
I was overjoyed recently when I read the news that the British mathematician, Alan Turing will feature on the Bank of England’s new £50 note. Turing occupies a special place in the hearts of computer nerds for effectively writing the blueprints for the computer. He also helped to break the notoriously difficult naval Enigma code used by the Nazi U-boats in World War II. In honor of this I decided a quick tutorial to build a cipher machine using the JavaScript skills that are covered in my book JavaScript Novice To Ninja.
The cipher we’ll be using is the Caesar cipher, named after the Roman emperor, Julius Caesar. It is one of the most simple ciphers there are and simply shifts each letter along a set number of places. For example, the phrase ‘Hello World’ would become ‘KHOOR ZRUOG’ using a shift of 3 (which it is the shift that Julius Caesar is thought to have used).
You can see an example of the finished code here. Have a play around at writing some secret messages to get a feel for how it works.
To get started, fire up your favorite text editor and save the following as caesar.html:
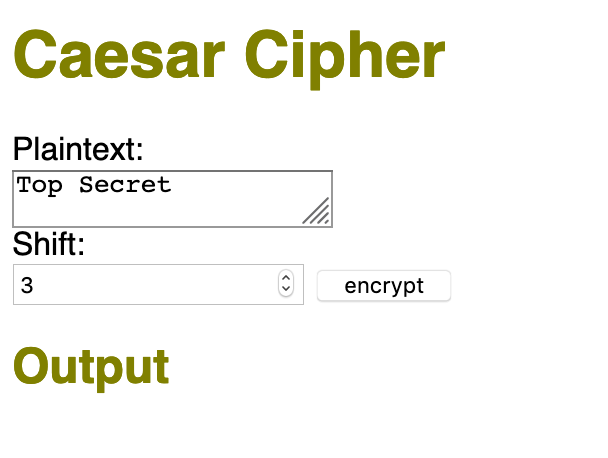
<!doctype html>
<html lang='en'>
<head>
  <meta charset='utf-8'>
  <title>Caesar Cipher</title>
</head>
<body>
  <h1>Caesar Cipher</h1>
  <form>
    <label>Plaintext:</label>
    <textarea name='plaintext'>Top Secret</textarea>
    <label>Shift:</label>
    <input type='number' name='shift' value='5' min='1' max='26'>
  <input type='submit' value='encrypt'>
  </form>
  <h2>Output</h2>
  <div id='output'>
  </div>
<script src='main.js'></script>
</body>
</html>
This is a standard HTML page that contains a form with a text area for entering our message. There’s also an input field with a type attribute of number which most browsers will display with stepper arrows, allowing users to increase or decrease the value. We can also limit the values from 1 to 26 and set the default to be 3 (in honor of Caesar). There’s also an empty div element at the bottom with an id of output which we’ll use to display the encrypted message.
Forms are covered in chapter 8 of the book.
Now let’s get on and write the JavaScript code to do the encrypting!
Create a file called main.js and save it in the same folder as the caesar.html file.
We’ll start by creating a global variable called alphabet. This will be an array that stores every letter of the alphabet:
const alphabet = [
  'A','B','C','D','E','F',
  'G','H','I','J','K','L',
  'M','N','O','P','Q','R',
  'S','T','U','V','W','X',
  'Y','Z'
];
This array will be useful for locating where letters are in the alphabet and shifting them along a set number of places. It also means that we can use alternative alphabets by simply updating this variable.
Variables are covered in chapter 1 of the book, and arrays are covered in chapter 3.
Now we need a way of accessing the various parts of the page. For this, we’ll use the Document Object Model, or DOM:
const form = document.forms[0];
const output = document.getElementById('output');
This code uses global variables to reference the form element and the div element that will display the encrypted message. This will make it easier for us to refer to these elements in the code later.
The DOM is covered in chapter 6 of the book.
When someone enters the message they want to encrypt, they press the submit button and it will display the encrypted message. We need to use an event handler that will fire when the submit button is pressed and give us access to what has been written in the textarea.
form.addEventListener ('submit',event => {
  event.preventDefault();
  output.innerHTML = [... form.plaintext.value ].map(char => encrypt(char)).join('');
}
);
Events are covered in chapter 7 of the book.
There’s quite a bit going on inside this event handler, so let’s have a more detailed look at each line:
event.preventDefault();
This is used to prevent the default behaviour of submitting the form, as we don’t actually want it to be submitted to a server.
output.innerHTML = [... form.plaintext.value ].map(char => encrypt(char)).join('');
This line updates the innerHTML property of the output div with the encrypted message. The message contained inside the textarea can be accessed using form.plaintext.value. This is a string containing various characters that were entered by the user. We convert this string into the encrypted message by chaining a number of methods together.
First of all, we use the spread operator ... to turn the string into an array. Then we use the map method to iterate over each character and apply the encrypt function to transform it into another character.
Finally, we use the join('') method to convert the array back into a string that can be displayed in the output div.
All that’s left to do is for us to write the encrypt() function that is used by the map method in the event handler above. This is the code that will apply the Caesar cipher:
function encrypt(char) {
  const shift = Number(form.shift.value);
  if (alphabet.includes(char.toUpperCase()))
 {
    const position = alphabet.indexOf(char.toUpperCase());
    const newPosition = (position + shift)%26;
    return alphabet[newPosition]
  }
  else { return char }
  }
This function accepts a character as an argument and then returns the encrypted character.
Functions are covered in chapter 4 of the book.
It starts by assigning the value of the shift input field from the form to the the variable shift. This can be accessed using the code form.shift.value. All values entered in a form are submitted as strings, so we need to change the type of this variable to a number using the Number() function. This will then allow us to perform arithmetic and other number methods with it.
Next we have a conditional statement that checks if the argument is part of the alphabet. This uses the includes() array method, which returns true if the argument is in the array. Notice that we also use the toUpperCase() method to ensure that the character is an upper-case letter, as all the letters in the alphabet array are upper-case.
If the character is in the alphabet array, then we can proceed and encrypt it. If it isn’t, then we simply return the character as it is (this allows us to deal with spaces and punctuation marks).
The encryption code returns an element from the alphabet array:
{
    const position = alphabet.indexOf(char.toUpperCase());
    const newPosition = (position + shift)%26;
    return alphabet[newPosition]
  }
First of all, we use the indexOf() array method to find out the index of the character in the alphabet array. This is stored in the variable position. Next we find the position of the encrypted character, by adding the value of shift to the index. We also use the modular operator, %, to use arithmetic ‘mod 26’. This means that any value that is over 25, will ‘loop back’ to the start of the array, 26 will go to 0, 27 to 1, 28 to 2 etc. This means that The letter ‘X’ with a shift of 3 will go back to the start of the alphabet and map to ‘A’. This value is stored in the newPosition variable.
Then we simply return the character in the alphabet array that corresponds to this new position by providing the newPosition variable as the index to the alphabet array.
And that’s all the code we need! Have a go at typing a message into the textarea, hit ‘submit’ and you’ll see your secret message appear below.
The beauty of using a separate encrypt() function is that we can update this to use a different encryption method at any time without having to change any other part of the code.
The Caesar cipher is probably one of the most basic ciphers, although it was the basis of the Enigma code. Perhaps you could experiment with using different ciphers in the encrypt() function and maybe even update it to mimic an Enigma machine?
Frequently Asked Questions (FAQs) about Building a Cipher Machine with JavaScript
What is a Caesar Cipher and how does it work?
A Caesar Cipher is one of the simplest and most widely known encryption techniques. It is a type of substitution cipher where each letter in the plaintext is ‘shifted’ a certain number of places down the alphabet. For example, with a shift of 1, A would be replaced by B, B would become C, and so on. The method is named after Julius Caesar, who apparently used it to communicate with his generals.
How can I implement a Caesar Cipher in JavaScript?
Implementing a Caesar Cipher in JavaScript involves creating a function that takes a string and a shift value as parameters. The function should iterate over each character in the string, determine its position in the alphabet, and then shift it by the specified amount. If the shift takes a character beyond ‘Z’, it should wrap around to the start of the alphabet.
How can I handle non-alphabet characters in my Caesar Cipher implementation?
Non-alphabet characters can be handled by checking if the current character is a letter before attempting to shift it. If it’s not a letter, you can simply append it to the output string without shifting. This can be done using a regular expression to test if the character matches the pattern for a letter.
How can I handle case sensitivity in my Caesar Cipher implementation?
To handle case sensitivity, you can convert the entire input string to either upper case or lower case before processing it. Alternatively, you can check the case of each character individually and shift it within its own case range. This would involve determining separate shift values for upper case and lower case letters.
How can I decrypt a message encrypted with a Caesar Cipher?
Decrypting a message encrypted with a Caesar Cipher involves shifting the characters in the opposite direction. If you know the shift value used for encryption, you can simply subtract it from each character’s position instead of adding it. If you don’t know the shift value, you can try all possible values (1 to 25) and see which one produces a meaningful output.
How can I optimize my Caesar Cipher implementation for performance?
There are several ways to optimize a Caesar Cipher implementation for performance. One way is to pre-calculate and store the shifted values for each letter in an array or object, so you don’t have to calculate them each time. Another way is to use a StringBuilder or similar data structure to build the output string, instead of concatenating strings, which can be slow.
Can I use a Caesar Cipher for secure encryption?
While a Caesar Cipher is a fun and educational exercise, it is not suitable for secure encryption. It is extremely vulnerable to frequency analysis, as the most common letters in the plaintext (like ‘E’ in English) will also be the most common letters in the ciphertext. For secure encryption, you should use a modern encryption algorithm like AES.
How can I extend my Caesar Cipher implementation to support other types of ciphers?
You can extend your Caesar Cipher implementation to support other types of ciphers by abstracting the shifting logic into a separate function. This function can take the current character and shift value as parameters, and return the shifted character. You can then replace this function with different implementations for different types of ciphers.
How can I test my Caesar Cipher implementation to ensure it’s working correctly?
You can test your Caesar Cipher implementation by encrypting a known plaintext with a known shift value, and checking if the output matches the expected ciphertext. You can also test the decryption function by reversing the process. For more thorough testing, you can use a testing framework like Jest to write automated tests.
How can I handle special characters in different languages in my Caesar Cipher implementation?
Handling special characters in different languages can be tricky, as they may not fit into the simple 26-letter model of the Caesar Cipher. One approach is to create a custom alphabet string that includes all the characters you want to support, and use the index of each character in this string for the shifting operation.