

Alpha Channels and Selections
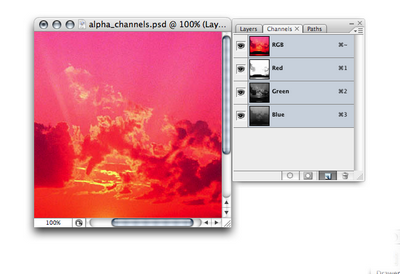
You can use alpha channels to create selections and save them for later use. If you open the Channels palette, you’ll see several channels, displayed in a similar way to layers in the Layers palette. By default, you’ll see the color channels, which represent how much of each color is represented in the document. You can click the Create New Channel icon at the bottom of the palette to create your own alpha channel.
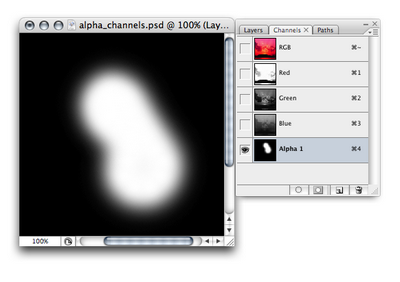
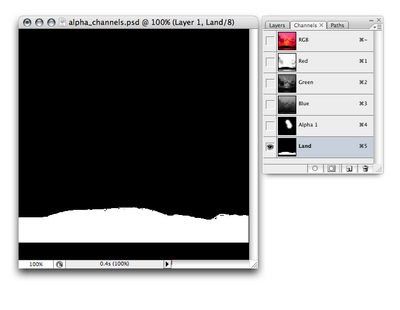
You can then use any of Photoshop’s painting or drawing tools to create a grayscale image that will represent your selection — white areas represent selected areas, black areas represent deselected areas, and grays represent the levels of transparency in the selection.
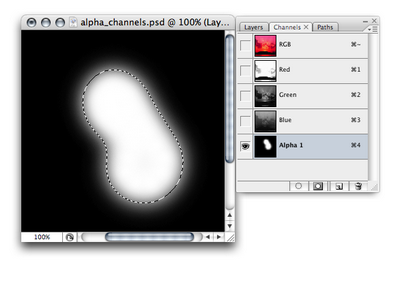
To turn your alpha channel masterpiece into a selection, simply hold down Ctrl and click the channel’s thumbnail (hold Command and click if you’re on a Mac).
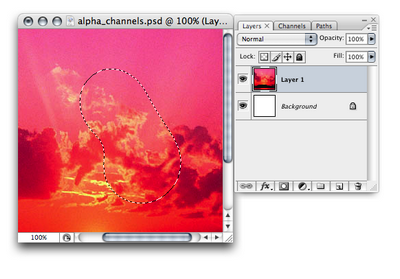
To return to the normal image view, click on the Layers palette tab, and select any layer. Your selection will still be visible.
You can also create your own alpha channels from existing selections — a capability that can be very useful! For example, let’s say you’ve created a selection of an island silhouette like the one shown in the example below. You have a feeling that you’ll be reselecting this island pretty often, but you’d rather not recreate the selection each time. No problem! Once the selection has been made, use Select > Save Selection. Name your selection (in this example, Land), and click OK.
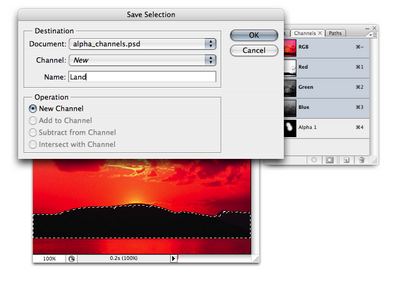
If you go to the Channels palette, you’ll see a new selection at the bottom of the list, named Land in the following image — that’s your saved selection. Now you can reload your Land selection as many times as you need to!
The History Palette
The History palette is your key to time travel (in Photoshop, anyway). It lists the most recent steps that you’ve made, and allows you to undo your actions by rolling your image back to a previous state. You can set the number of steps that are stored in the memory by selecting Edit > Preferences > Performance (Photoshop > Preferences > Performance on a Mac) and changing the value in the History States text box.
Like most of Photoshop’s other tools, the History palette has a set of useful keyboard shortcuts for quick access:
- Ctrl-Z (Command-Z on a Mac) lets you undo and redo the previous step.
- Ctrl-Alt-Z (Command-Option-Z) steps back through the History palette.
- Shift-Alt-Z (Shift-Option-Z) steps forward through the History palette.
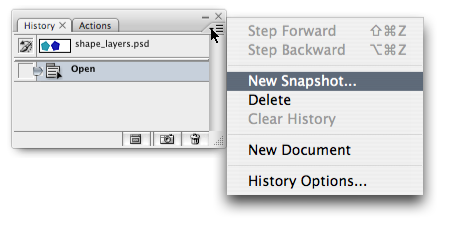
As only a limited number of history states are available, there may be cases in which you want to save a”snapshot” of your document so that you can revert back to it later if required. To do so, click on the small triangle on the top-right of the History palette and choose New Snapshot…. You can save a snapshot of the whole document, the current layer, or merged layers.
When Photoshop Stops Working
Woah! Photoshop stops working? That certainly doesn’t sound too promising! Before you panic, let me explain. Given the multitude of powerful features and fantastic tools it offers, it’s no wonder that, on occasion, Photoshop can exhaust itself. It may start behaving a bit erratically, and might even freeze, crash, or automatically exit during startup. If you find yourself in this situation, the first thing to do is reset the preferences file. The preferences file (which you can customize by going to Edit > Preferences on a PC, or Photoshop > Preferences on a Mac) holds Photoshop settings and can often become corrupted.
The location of the preferences file depends on the operating system and version of Photoshop you are using. For Photoshop CS3, the preferences file is named Adobe Photoshop CS3 Prefs.psp.The preference file for other versions of Photoshop will have a similar name.
Backing Up Your Preferences File
It’s a good idea to back up your preferences file by copying and pasting it into a location outside of the Photoshop settings folder. Then, if the preferences file Photoshop is using becomes corrupted, you can copy your backup back into the settings folder to replace the corrupted file, without losing any of your settings.
To reset the preferences file, locate the current preferences file, delete it (while Photoshop is closed), and restart Photoshop — it will recreate the preferences file using default settings. Creativepro.com provides a detailed tutorial that explains how to find and replace your preferences file, and includes preference filenames for different versions of Photoshop.
If Photoshop continues to act up, restart it while holding down the Shift-Ctrl-Alt keys (Shift-Command-Option on a Mac), and click OK when asked if you wish to delete the Photoshop settings file. Unfortunately, this will also delete your custom actions, tools, and other settings, but the good news is that it should fix your Photoshop problems.
Summary
This chapter provided an overview of the Photoshop and Fireworks interfaces and common tools, and also explained a few basic tasks such as creating new documents and saving files for the Web. You also took a quick tour of handy keyboard shortcuts and other time-saving tips. Even if you haven’t used Photoshop before, you now have the tools that you’ll need to work with the examples we’ll discuss throughout the rest of this book.
Go to page: 1 | 2 | 3 | 4 | 5 | 6
And if you enjoyed reading this post, you’ll love Learnable; the place to learn fresh skills and techniques from the masters. Members get instant access to all of SitePoint’s ebooks and interactive online course Foundations of Photoshop.
Comments on this article are closed. Have a question about Photoshop? Why not ask it on our forums?
Frequently Asked Questions about Getting Started with Photoshop
How do I create an alpha channel from a selection in Photoshop?
Creating an alpha channel from a selection in Photoshop is a straightforward process. First, make a selection of the area you want to create an alpha channel for. You can do this using any of the selection tools available in Photoshop, such as the Marquee or Lasso tools. Once you have your selection, go to the Channels panel. If it’s not visible, you can find it under Window > Channels. At the bottom of the Channels panel, click on the ‘Save selection as channel’ button. This will create a new alpha channel based on your selection.
What is the purpose of using alpha channels in Photoshop?
Alpha channels in Photoshop are used for creating and storing selections that you want to use repeatedly. They allow you to save your selection and then load it at any time, which can be a huge time-saver when working on complex projects. Alpha channels can also be used to control the transparency of different areas in an image, allowing for more complex layering and compositing effects.
How can I save my selections using alpha channel masks?
To save your selections using alpha channel masks, first make a selection using any of the selection tools. Then, go to the Channels panel and click on the ‘Save selection as channel’ button at the bottom. This will create a new alpha channel based on your selection. You can then load this selection at any time by Ctrl-clicking (or Command-clicking on a Mac) on the alpha channel in the Channels panel.
Can I edit an alpha channel in Photoshop?
Yes, you can edit an alpha channel in Photoshop. To do this, go to the Channels panel and click on the alpha channel you want to edit. You can then use any of the painting or editing tools to modify the alpha channel. Remember that white areas in an alpha channel represent selected areas, black areas represent deselected areas, and gray areas represent partially selected areas.
How can I view an alpha channel in Photoshop?
To view an alpha channel in Photoshop, go to the Channels panel and click on the alpha channel you want to view. This will display the alpha channel in the main image window. Remember that white areas represent selected areas, black areas represent deselected areas, and gray areas represent partially selected areas.
Can I delete an alpha channel in Photoshop?
Yes, you can delete an alpha channel in Photoshop. To do this, go to the Channels panel, right-click (or Control-click on a Mac) on the alpha channel you want to delete, and select ‘Delete Channel’.
How can I rename an alpha channel in Photoshop?
To rename an alpha channel in Photoshop, go to the Channels panel, double-click on the alpha channel you want to rename, and enter the new name in the dialog box that appears.
Can I duplicate an alpha channel in Photoshop?
Yes, you can duplicate an alpha channel in Photoshop. To do this, go to the Channels panel, right-click (or Control-click on a Mac) on the alpha channel you want to duplicate, and select ‘Duplicate Channel’.
How can I load a selection from an alpha channel in Photoshop?
To load a selection from an alpha channel in Photoshop, go to the Channels panel and Ctrl-click (or Command-click on a Mac) on the alpha channel you want to load the selection from.
Can I use alpha channels to create complex selections in Photoshop?
Yes, you can use alpha channels to create complex selections in Photoshop. By saving different parts of your image as separate alpha channels, you can combine them to create complex selections. This can be a huge time-saver when working on complex projects.

