

Key Takeaways
- Photoshop allows for extensive layer management with features such as renaming, adjusting opacity, duplicating, selecting multiple layers, linking/unlinking layers, and rearranging layers.
- Photoshop provides quick keyboard shortcuts for most tools, which can significantly speed up work processes. Tooltips can help users learn these shortcuts.
- The Photoshop toolbox includes a variety of tools for different purposes, like the Marquee tools for creating rectangular or elliptical selections and the Lasso tools for freeform selections.
- Selection tools in Photoshop are crucial for editing specific areas of an image. Users can add, subtract, or intersect selections using different key combinations. Selections can also be moved pixel by pixel or copied/cut into their own layers.
Layer Shortcuts and Tasks
- Rename layers by double-clicking on the layer name.
- Change the transparency of a layer by changing its opacity with the Opacity slider, or typing a value into the Opacity box (which is visible when you have the Selection, Move, or Crop tools selected).
- Duplicate a selected layer by pressing Ctrl-J (Command-J on a Mac). You can also duplicate a layer by dragging it while pressing the Alt (Option) key.
- Select multiple layers by holding down Ctrl (Command on a Mac) and clicking the layer names. This forms a temporary link between the selected layers that allows you to move them as one unit, delete them all, and so on.
- You can also link layers together. Select layers by clicking on them while holding down Shift or Ctrl (Command on a Mac). Once you have selected all the layers you wish to link, click the Link Layers button at the bottom-left of the Layers palette (signified by the chain). Linking layers allows the link relationship to remain even after you select a different layer (unlike the process of simply selecting multiple layers).
- To unlink all the layers, select one of the linked layers and go to Layer > Unlink Layers. To unlink a single layer, select the layer you wish to remove from the link and click its corresponding link icon; the other layers will stay linked. To temporarily unlink a layer, hold down Shift and click on its link icon (a red “X” will appear over the link icon). Reactivate the link by holding down Shift and clicking the link icon again.
- Rearrange layers by dragging the layer above or below other layers. Use the “move down” shortcut Ctrl-[ (Command-[ on a Mac) and the “move up” shortcut Ctrl-] (Command-]) to move selected layers up and down. Shift-Ctrl-[ and Shift-Ctrl-] (Shift-Command-[ and Shift-Command-] on a Mac) will bring layers to the very top or the very bottom of the stack.
- Select a layer by using the keyboard shortcuts Alt-[ and Alt-] (Option-[ and Option-] on a Mac). These keystrokes let you move up and down through the layers in the Layers palette.
- Create a new layer by pressing Shift-Ctrl-N (Shift-Command-N on a Mac). This will bring up the New Layer dialog box. Want to create new layers quickly without having to deal with the dialogue box? Simply press Shift-Ctrl-Alt-N (Shift-Command-Option-N).
Merge a layer into the one beneath it by pressing Ctrl-E (Command-E). If you have selected layers, this shortcut will merge those selected layers together.
Quick Keyboard Shortcuts
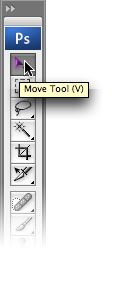
Naturally, most of the tools in the toolbox have a keyboard shortcut. You can learn each tool’s shortcut by hovering your cursor over a tool for a few seconds: a tooltip box will appear, displaying the name of the tool and its shortcut. If additional tools are available in the flyout menu, you can cycle through them by pressing Shift-[keyboard shortcut]. Keyboard shortcuts can save you valuable time — pressing “V” to bring up the Move Tool is certainly a lot quicker than moving the cursor over to the toolbox to select it. It may not seem all that significant right now, but the time you take to access tools will add up over the course of a project! For your convenience, whenever I mention a tool, I’ll list its shortcut in parentheses, e.g., the Move Tool (V).
Photoshop Toolbox
You’ve probably been hanging out to get stuck into the very nifty Photoshop toolbox. In this section, I’ll introduce some of the most frequently used tools found in the toolbox. I’ll discuss some of the other tools in later chapters as we apply them to solutions.

You’ll notice that some of the tool icons have small black triangles in their bottom right-hand corners. These icons contain hidden treasures! The triangle indicates that there are more related tools available; if you click on the tool icon and hold it down, a “flyout” menu will appear,displaying the additional tools.
Secret Selections
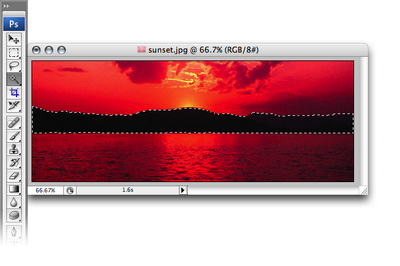
Selections can have varying levels of transparency, known as the degree of opacity. It’s actually possible to make a selection with an opacity of 100% in one area, but only 20% in another area. If a selection contains any pixels for which the opacity is more than 50%, they will be displayed with a border of dotted lines. Photoshop won’t visibly outline areas with less than 50% opacity (though they will still be selected). Selection tools automatically select at 100% opacity. We’ll learn about creating transparent selections using Quick Masks and alpha channels later in this chapter.
Selection Tools
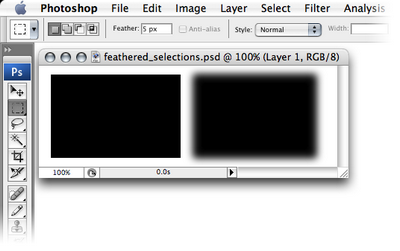
You can use the selection tools to select certain areas of your document for editing. If you use a selection tool, only the area that’s selected will be affected by any changes you make. You can “feather” selections (specify a fuzzy radius for them) using the Feather field in the options bar. The example at the top of the next page shows two rectangles: one created by filling in a selection with a feather of zero pixels, and one that’s created by filling in the same selection with a feather of five pixels.
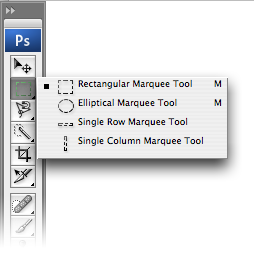
Marquee tools (M) are used to create rectangular or elliptical selections, including selections that are “single row” (one pixel tall, stretching across the entire width of the document) and “single column” (one pixel wide, stretching through the entire height of the document). To make single-row or single-column selections, click with the appropriate tool on the image area where you want to select a row or column.
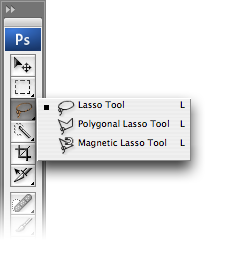
You can use the Lasso tools (L) to create freeform selections. The Lasso Tool comes in three different forms:
- Lasso Tool (L) – Click and drag the Lasso Tool to draw aselection area. Releasing the mouse buttonwill close the selection by joining the start and end points with a straight line.
- Polygonal Lasso Tool (L) – Click at different points to create vertices of a polygonal shape. Close the selection by moving your cursor to the beginning and clicking once, or pressing the Enter key.
No Selection Sometimes Equals All Selected
If you’ve made a selection, only the pixels within the selection are active and can be worked on. Some tools can be used without making a selection at all. However, be aware that if you have not made a specific selection, Photoshop will assume that you are working on the entire layer and any changes you make will affect all pixels in the layer.
- Magnetic Lasso Tool (L) – If you think you need help with making your selection, try the Magnetic Lasso Tool. Photoshop will attempt to make a “smart” selection by following the edges of contrast and color difference. Click once near the “edge” of an object and follow around it — Photoshop will automatically lay down a path. You can also click as you follow the line to force points to be created on the path. Close the selection by pressing the Enter key or clicking at a point near the beginning of the selection.
Magic Wand
The Magic Wand Tool (W) selects areas of similar color. You can change the tolerance (how close the color values should be to the sampled color in order to be selected) of a Magic Wand selection, and choose whether you want the selection to be contiguous (pixels that are touching) or not (in which case, matching colors across the entire document will be selected).
Selection Shortcuts and Tasks
Hold the Shift key to add another selection to the first. Hold the Alt key (Option key on a Mac) to subtract your new selection from the first. Hold Shift-Alt (Shift-Option) to select the intersection of your first and second selections. Use the arrow keys to move the selection pixel by pixel. If you feel that this doesn’t move your selection quickly enough, hold down Shift and use the arrow keys to move the selection ten pixels at a time. Press Ctrl-J (Command-J on a Mac) to copy the selection into its own layer. To cut the selection into its own layer, press Shift-Ctrl-J (Shift-Command-J). If this seems familiar to you, it’s because I mentioned earlier how to copy a layer using the same keyboard shortcut. Now that you know that not selecting anything sometimes means that everything is selected, it makes sense that simply by selecting a layer in the Layers palette, you can copy the entire layer by pressing Ctrl-J (Command-J). To deselect a selected area, click outside of it with one of the Marquee tools, or press Ctrl-D (Command-D on a Mac). To reactivate your last selection, press Shift-Ctrl-D (Shift-Command-D).
Go to page: 1 | 2 | 3 | 4 | 5 | 6
And if you enjoyed reading this post, you’ll love Learnable; the place to learn fresh skills and techniques from the masters. Members get instant access to all of SitePoint’s ebooks and interactive online course Foundations of Photoshop.
Comments on this article are closed. Have a question about Photoshop? Why not ask it on our forums?
Frequently Asked Questions (FAQs) about Getting Started with Photoshop
How can I customize my workspace in Photoshop?
Photoshop allows you to customize your workspace according to your needs. You can move the panels, create new ones, or remove the ones you don’t need. To do this, go to the ‘Window’ menu and select ‘Workspace’. From there, you can choose a preset workspace or create a new one. You can also save your current workspace by selecting ‘New Workspace’ from the ‘Workspace’ menu.
What is the Polygonal Lasso Tool and how do I use it?
The Polygonal Lasso Tool is a selection tool in Photoshop that allows you to create polygonal (multi-sided) selections. To use it, select the tool from the toolbox, then click on the canvas to set the starting point of your selection. Click again to create the first segment of your selection. Continue clicking to create additional segments. To close the selection, either double-click or click on the starting point.
How can I manage selections in Photoshop?
Managing selections in Photoshop is crucial for editing specific areas of an image. You can add to a selection, subtract from a selection, or intersect with a selection. To add to a selection, hold down the Shift key and drag or click. To subtract from a selection, hold down the Alt (Windows) or Option (Mac) key and drag or click. To intersect with a selection, hold down the Shift and Alt (Windows) or Shift and Option (Mac) keys and drag or click.
What are the different Photoshop tools and their functions?
Photoshop has a wide range of tools for different purposes. The Move Tool is used to move objects in a layer, the Marquee Tools are used for making rectangular, elliptical, single row, and single column selections. The Lasso Tools are used for making freehand, polygonal (straight-edged), and magnetic (snap-to) selections. The Quick Selection Tool is used to quickly “paint” a selection using an adjustable round brush tip.
How can I prepare for the Photoshop G Metrix Exam?
The Photoshop G Metrix Exam tests your knowledge and skills in using Adobe Photoshop. To prepare for the exam, familiarize yourself with the Photoshop interface and tools, practice using the different features and functions, and study the different techniques for editing and enhancing images. You can also use study guides and flashcards to help you review the material.
How can I use the Brush Tool in Photoshop?
The Brush Tool in Photoshop is used for painting and drawing on an image. To use it, select the tool from the toolbox, choose a brush size and hardness from the options bar, set the blending mode and opacity, and then start painting on the canvas.
What are the different selection tools in Photoshop?
Photoshop has several selection tools, including the Marquee Tools, Lasso Tools, Quick Selection Tool, Magic Wand Tool, and the Pen Tool. These tools allow you to select specific areas of an image for editing.
How can I use layers in Photoshop?
Layers in Photoshop allow you to work on different parts of an image without affecting the other parts. You can create a new layer, duplicate a layer, delete a layer, hide or show a layer, and rearrange layers. To access the Layers panel, go to the ‘Window’ menu and select ‘Layers’.
How can I use the Clone Stamp Tool in Photoshop?
The Clone Stamp Tool in Photoshop is used for duplicating or removing parts of an image. To use it, select the tool from the toolbox, hold down the Alt (Windows) or Option (Mac) key and click on the area you want to clone, then release the key and click on the area where you want to paste the cloned pixels.
How can I save my work in Photoshop?
To save your work in Photoshop, go to the ‘File’ menu and select ‘Save’. You can choose to save your work as a Photoshop (.PSD) file, which retains the layers and other information, or as a JPEG, PNG, or other image file, which flattens the image.

