
This post was updated in November 2016 to reflect changes in the Retrofit Library.
The Android multimedia framework provides extensive support for playing a variety of common media types, allowing you to integrate audio, video and images into applications. You can play audio or video from media files stored in an application’s resources (raw resources), from standalone files in the filesystem, or from a data stream arriving over a network connection. In this article, we’ll look at how to use the media framework to play streamed audio. We’ll look at two major classes in the media framework – MediaPlayer (The primary API for playing sound and video) and AudioManager (Manages audio sources and audio output on a device) and use them in creating a simple audio player which allows the user to browse and play content from SoundCloud.
Key Takeaways
- Register a SoundCloud Developer account and obtain a Client ID to access the SoundCloud API for your app.
- Utilize Android Studio and add necessary libraries like Gson, Retrofit, and Picasso to handle JSON parsing, API communications, and image loading respectively.
- Implement Retrofit to simplify HTTP requests, fetching data from SoundCloud, and parsing it into Java objects using Gson.
- Design the user interface using ListView for displaying tracks and customize row layouts with Picasso for image handling.
- Use MediaPlayer and AudioManager for audio playback functionality, integrating controls for play, pause, and track selection within the app.
- Employ the Singleton pattern to optimize performance by reusing Retrofit and SCService instances across network requests.
Getting Started
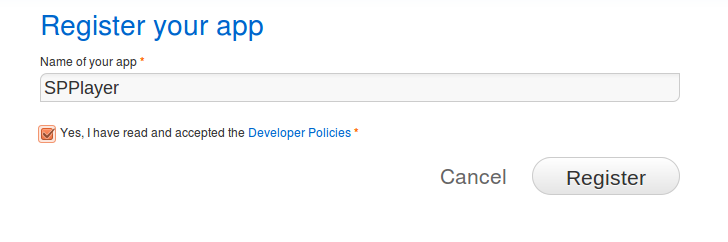
As mentioned, we are going to create an app that accesses the SoundCloud API, so first you need to register an account on the SoundCloud Developer portal at developers.soundcloud.com. Once you’ve created an account, click on the Register a New App link on the right side of that page.

On the screen that follows, name your app. We’ll name our app SPPlayer.
On the next page, you’ll be shown your app’s details. Leave the page open as you’ll need to copy the Client ID shown into the Android app.
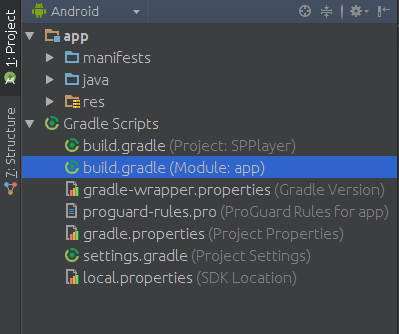
With that set up, we’ll now create the Android app. Create a new Android project (I’m using Android Studio. If you’re using Eclipse, some steps taken in the tutorial will be different, for example adding libraries. You can find help online on how to use Eclipse.).
Create a new project and name the app SPPlayer. Set your own company domain and click on Next. On the next screen I left the Minimum SDK at the default of API 15. Choose the Empty Activity template on the next screen and on the last screen click Finish.
Next open your app’s build.gradle file and add the gson, retrofit, converter-gson and picasso libraries.
Add the following dependencies to the file.
compile 'com.google.code.gson:gson:2.8.0'
compile 'com.squareup.retrofit2:retrofit:2.1.0'
compile 'com.squareup.retrofit2:converter-gson:2.1.0'
compile 'com.squareup.picasso:picasso:2.5.2'
I will go through why we use the libraries as we progress through the tutorial.
When you change the build.gradle file, a message will let you know that a Sync is needed for the IDE to work correctly. Click on Sync Now to the right of that message. Gradle will fetch the dependencies added. You’ll need an internet connection for Gradle to fetch them.
To start off, create a class that will hold some configuration data like the client ID and base URL for the SoundCloud endpoints. Create a class named Config and modify it as shown
package com.echessa.spplayer;

/**
 * Created by echessa on 11/26/16.
 */
public class Config {

    public static final String CLIENT_ID = "YOUR_CLIENT_ID";
    public static final String API_URL = "https://api.soundcloud.com";
}
Replace the SoundCloud app client ID with your own.
The API_URL constant holds the base URL for API endpoints as stated in this SoundCloud HTTP API Reference. If you want to know what can be done with the API, the reference guide is a good resource to read.
Next create a Track object that will hold the data for each audio file fetched from SoundCloud. Create a class called Track and add the following fields and getter methods.
package com.echessa.spplayer;

import com.google.gson.annotations.SerializedName;

/**
 * Created by echessa on 11/26/16.
 */
public class Track {

    @SerializedName("title")
    private String mTitle;

    @SerializedName("id")
    private int mID;

    @SerializedName("stream_url")
    private String mStreamURL;

    @SerializedName("artwork_url")
    private String mArtworkURL;

    public String getTitle() {
        return mTitle;
    }

    public int getID() {
        return mID;
    }

    public String getStreamURL() {
        return mStreamURL;
    }

    public String getArtworkURL() {
        return mArtworkURL;
    }

}
In the above code, we create four fields that will hold the track data we are interested in. To know what data a call to the API will receive, you can try out following URL in your browser. It fetches a single track’s data in JSON format.
http://api.soundcloud.com/tracks/13158665.json?client_id=YOUR_CLIENT_IDIn the Track class, notice the @SerializedName annotations on each field and the gson import. The Gson library is an open source library from Google that serializes and deserializes Java objects to (and from) JSON. Above, it’ll take the JSON fetched and map it to the object’s fields, otherwise you would have to write a lot more code to grab the data from JSON and create a Track object with it. This is why we don’t use any setters in the class, Gson will set the fields automatically when a Track object is created.
Note: I won’t be mentioning the imports needed after each code addition. If an import is required, the IDE will prompt you to add it, and you can also set up the IDE so that it resolves imports automatically. I will only mention imports if there is an import conflict to let you know the right class to use.
Open the AndroidManifest.xml file and add the following permission.
<uses-permission android:name="android.permission.INTERNET"/>Next add an Interface to the project called SCService. Modify it as shown.
package com.echessa.spplayer;

import java.util.List;

import retrofit2.Call;
import retrofit2.http.GET;
import retrofit2.http.Query;

/**
 * Created by echessa on 11/26/16.
 */

public interface SCService {

    @GET("/tracks?client_id=" + Config.CLIENT_ID)
    Call<List<Track>> getRecentTracks(@Query("created_at") String date);
}
Here we use the Retrofit library in the interface. Retrofit is an open source library from Square which simplifies HTTP communication by turning remote APIs into declarative, type-safe interfaces. Methods declared on the interface represent a single remote API endpoint. Annotations describe how the method maps to an HTTP request.
The library makes downloading JSON or XML data from a web API straightforward. Once the data is downloaded, it is parsed into a Plain Old Java Object (POJO) which must be defined for each resource in the response.
The above code will get a list of tracks from SoundCloud. We add a @Query annotation to add more parameters to the URL that will be called. Here we specify a created_at at parameter that will be used by the SoundCloud API to filter the results returned; the API will only return back tracks created from the specified date.
To test that this works place the following into the onCreate(Bundle) method in MainActivity.java after the call to setContentView(R.layout.activity_main);.
Retrofit retrofit = new Retrofit.Builder()
        .baseUrl(Config.API_URL)
        .addConverterFactory(GsonConverterFactory.create())
        .build();

SCService scService = retrofit.create(SCService.class);
scService.getRecentTracks("last_week").enqueue(new Callback<List<Track>>() {
    @Override
    public void onResponse(Call<List<Track>> call, Response<List<Track>> response) {
        if (response.isSuccessful()) {
            List<Track> tracks = response.body();
            showMessage(tracks.get(0).getTitle());
        } else {
            showMessage("Error code " + response.code());
        }
    }

    @Override
    public void onFailure(Call<List<Track>> call, Throwable t) {
        showMessage("Network Error: " +  t.getMessage());
    }
});
The above first instantiates a Retrofit object with a call to a few functions. When instantiating the object, baseUrl() and build() must be called and baseUrl() must be called before build(). Other methods are optional.
baseUrl() sets the API’s base URL and build() creates a Retrofit instance with the configured values. In the above, we include addConverterFactory() which adds a converter factory for serialization and deserialization of objects. Our project will be handling JSON data so we use the GsonConverterFactory which is able to encode and decode objects to and from JSON. There are other Converter modules available, and you can use more than one according to your app’s needs. When using more than one converter, the order in which they are specified matters. Retrofit will try to parse the data it gets with the first specified converter, and it will only move on to the next converter if the previous one fails to parse the data. The following is a list of available converters.
- Gson:
com.squareup.retrofit2:converter-gson:2.1.0 - Simple XML:
com.squareup.retrofit2:converter-simplexml:2.1.0 - Jackson:
com.squareup.retrofit2:converter-jackson:2.1.0 - Protobuf:
com.squareup.retrofit2:converter-protobuf:2.1.0 - Moshi:
com.squareup.retrofit2:converter-moshi:2.1.0 - Wire:
com.squareup.retrofit2:converter-wire:2.1.0 - Scalars:
com.squareup.retrofit2:converter-scalars:2.1.0
You can also create your own converter by extending the Converter.Factory abstract class.
Retrofit is the class that transforms an API interface into an object that makes network requests. To use our SCService we create a Retrofit object and then use it to create an instance of the interface.
In the above code the Retrofit class generates an implementation of the SCService interface. Each call on the generated SCService makes a HTTP request to the remote web server.
We call the SCService getRecentTracks() function passing it the string last_week that will be used as the value of the query parameter created_at. SoundCloud expects a date formatted as yyyy-mm-dd hh:mm:ss for this parameter, but it also specifies some special values that can be used to specify the date. The available options are: last_year, last_two_weeks, last_week, last_day and last_hour.
To execute the request to the server, you can either make a synchronous call using call.execute() or an asynchronous one using call.enqueue(new Callback<>() {}). We use the latter, passing it a Callback function that will be called when a response is returned. In the callback, we get the tracks returned and display the title of the first track in the list if the request was successful; otherwise we display an error message to the user.
Right here you can see the advantage of using Retrofit. When a response returns from the server, its response.body() can be assigned to List<Track> tracks which willl automatically parse the JSON data from the server and convert it into Track objects. Without Retrofit, you would have to write code that performs the parsing.
The above implementation isn’t the best way to make HTTP requests. We’ll be making several calls to the server and using the above, we’ll be creating a Retrofit and SCService each time a request is made and those are expensive operations, so overall performance will be affected. We’ll therefore use the Singleton pattern so that Retrofit and SCService are created only once and used whenever needed. We’ll do this shortly. For now, add the following function to the class which is called to display Toast messages to the user.
private void showMessage(String message) {
    Toast.makeText(MainActivity.this, message, Toast.LENGTH_LONG).show();
}
Run the app. You should see a Toast message that will show the title of the first track fetched. I got:
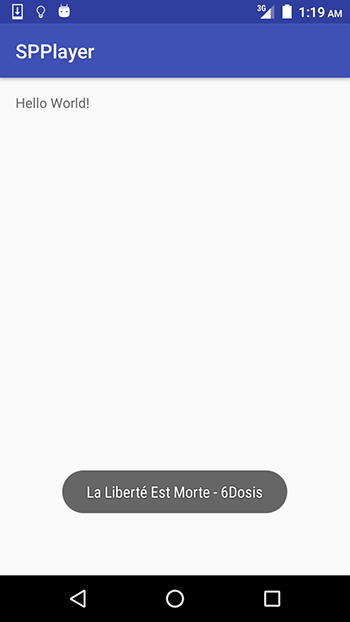
Now we’ll improve the app’s performance by adhering to the Singleton pattern.
Add the following class to the project.
package com.echessa.spplayer;

import retrofit2.Retrofit;
import retrofit2.converter.gson.GsonConverterFactory;

/**
 * Created by echessa on 11/26/16.
 */

public class SoundCloud {

    private static final Retrofit RETROFIT = new Retrofit.Builder()
            .baseUrl(Config.API_URL)
            .addConverterFactory(GsonConverterFactory.create())
            .build();
    private static final SCService SERVICE = RETROFIT.create(SCService.class);

    public static SCService getService() {
        return SERVICE;
    }
}
This creates the Retrofit and SCService objects as we had done previously, then it includes a function that will return the service. Since RETROFIT and SERVICE are final and static, they will only be created once and reused each time a SoundCloud object is created.
Now you can use this in the code we placed in onCreate(Bundle) in the MainActivity class.
SCService scService = SoundCloud.getService();
scService.getRecentTracks("last_week").enqueue(new Callback<List<Track>>() {
    @Override
    public void onResponse(Call<List<Track>> call, Response<List<Track>> response) {
        if (response.isSuccessful()) {
            List<Track> tracks = response.body();
            showMessage(tracks.get(0).getTitle());
        } else {
            showMessage("Error code " + response.code());
        }
    }

    @Override
    public void onFailure(Call<List<Track>> call, Throwable t) {
        showMessage("Network Error: " +  t.getMessage());
    }
});
If you run the app, you should be able to see the title of the first returned track, just like before.
Now that we can get data back from the server, we need to create a list that will display the data.
Add a layout file by right-clicking on the Layout folder and selecting New -> Layout resource file. Name it tracklistrow and add the following to the track_list_row.xml file.
<?xml version="1.0" encoding="utf-8"?>
<RelativeLayout xmlns:android="http://schemas.android.com/apk/res/android"
android:orientation="vertical"
android:paddingLeft="@dimen/activity_vertical_margin"
android:paddingRight="@dimen/activity_vertical_margin"
android:layout_width="match_parent"
android:layout_height="@dimen/row_height">

<ImageView
    android:id="@+id/track_image"
    android:layout_centerVertical="true"
    android:padding="@dimen/image_padding"
    android:layout_width="@dimen/image_size"
    android:layout_height="@dimen/image_size"/>
<TextView
    android:layout_centerVertical="true"
    android:id="@+id/track_title"
    android:layout_marginLeft="@dimen/activity_vertical_inner_margin"
    android:layout_width="wrap_content"
    android:layout_height="wrap_content"
    android:textAppearance="@style/TextAppearance.AppCompat.Body2"/>

</RelativeLayout>
The above creates the layout we’ll use for each row in the track list. We’ll show an image of the track’s album art and the title of the track.
Modify activity_main.xml as shown.
<?xml version="1.0" encoding="utf-8"?>
<RelativeLayout xmlns:android="http://schemas.android.com/apk/res/android"
    xmlns:tools="http://schemas.android.com/tools"
    android:layout_width="match_parent"
    android:layout_height="match_parent"
    tools:context=".MainActivity">

    <ListView
        android:id="@+id/track_list_view"
        android:layout_width="match_parent"
        android:layout_height="match_parent"/>

</RelativeLayout>
This adds a ListView to the activity.
Add the following to the dimens.xml file. Don’t replace the other values that are in that file, we still use them.
<dimen name="row_height">72dp</dimen>
<dimen name="image_padding">4dp</dimen>
<dimen name="image_size">48dp</dimen>
<dimen name="activity_vertical_inner_margin">56dp</dimen>
Next create the following custom adapter that will be used for the list view.
package com.echessa.spplayer;

import android.content.Context;
import android.view.LayoutInflater;
import android.view.View;
import android.view.ViewGroup;
import android.widget.BaseAdapter;
import android.widget.ImageView;
import android.widget.TextView;
import com.squareup.picasso.Picasso;
import java.util.List;

/**
 * Created by echessa on 11/26/16.
 */
public class SCTrackAdapter extends BaseAdapter {

    private Context mContext;
    private List<Track> mTracks;

    public SCTrackAdapter(Context context, List<Track> tracks) {
        mContext = context;
        mTracks = tracks;
    }

    @Override
    public int getCount() {
        return mTracks.size();
    }

    @Override
    public Track getItem(int position) {
        return mTracks.get(position);
    }

    @Override
    public long getItemId(int position) {
        return position;
    }

    @Override
    public View getView(int position, View convertView, ViewGroup parent) {

        Track track = getItem(position);

        ViewHolder holder;
        if (convertView == null) {
            convertView = LayoutInflater.from(mContext).inflate(R.layout.track_list_row, parent, false);
            holder = new ViewHolder();
            holder.trackImageView = (ImageView) convertView.findViewById(R.id.track_image);
            holder.titleTextView = (TextView) convertView.findViewById(R.id.track_title);
            convertView.setTag(holder);
        } else {
            holder = (ViewHolder) convertView.getTag();
        }

        holder.titleTextView.setText(track.getTitle());

        // Trigger the download of the URL asynchronously into the image view.
        Picasso.with(mContext).load(track.getArtworkURL()).into(holder.trackImageView);

        return convertView;
    }

    static class ViewHolder {
        ImageView trackImageView;
        TextView titleTextView;
    }

}
The above adapter uses the ViewHolder design pattern which improves a list view’s performance.
When scrolling through a ListView, your code might call findViewById() frequently which can slow down performance. Even when the Adapter returns an inflated view for recycling, you still need to look up the elements and update them. A way around repeated use of findViewById() is to use the ViewHolder design pattern.
A ViewHolder object stores each of the component views inside the tag field of the Layout, so you can immediately access them without the need to look them up repeatedly.
In the above code, we create a class to hold the set of views: static class ViewHolder. Then in getView(int, View, ViewGroup) we populate the ViewHolder and store it inside the layout. After this, each view can now be accessed without the need for the look-up, saving valuable processor cycles.
We set the text of the track list row to be the track’s title and fetch the track’s image using the Picasso library. The Picasso library, also from Square, is an image downloading and caching library for Android. Other than downloading and caching images, you can do some transformations on an image with it, like set size and crop. You can also use it to set a placeholder image that will show while images load and an ‘error’ image that will show if loading fails. In the above code, we use it to load the image from the given url and place it into the track list row’s imageview.
In MainActivity.java add the following class variables.
private List<Track> mListItems;
private SCTrackAdapter mAdapter;
Make the following modifications to onCreate(Bundle) and add the loadTracks(List<Track>) method shown below.
@Override
protected void onCreate(Bundle savedInstanceState) {
    super.onCreate(savedInstanceState);
    setContentView(R.layout.activity_main);

    mListItems = new ArrayList<Track>();
    ListView listView = (ListView)findViewById(R.id.track_list_view);
    mAdapter = new SCTrackAdapter(this, mListItems);
    listView.setAdapter(mAdapter);

    SCService scService = SoundCloud.getService();
    scService.getRecentTracks("last_week").enqueue(new Callback<List<Track>>() {
        @Override
        public void onResponse(Call<List<Track>> call, Response<List<Track>> response) {
            if (response.isSuccessful()) {
                List<Track> tracks = response.body();
                loadTracks(tracks);
            } else {
                showMessage("Error code " + response.code());
            }
        }

        @Override
        public void onFailure(Call<List<Track>> call, Throwable t) {
            showMessage("Network Error: " +  t.getMessage());
        }
    });
}

private void loadTracks(List<Track> tracks) {
    mListItems.clear();
    mListItems.addAll(tracks);
    mAdapter.notifyDataSetChanged();
}
In the above code, we create a list view and an instance of SCTrackAdapter and set it as the list view’s adapter. We then get recent tracks from the API and call loadTracks(List<Track>) where the we add the tracks to the array list used by the adapter and notify the adapter of the change.
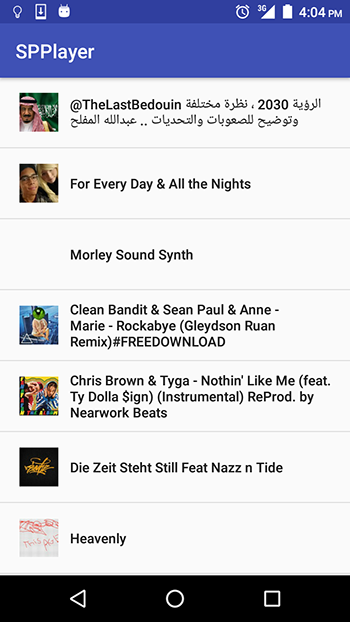
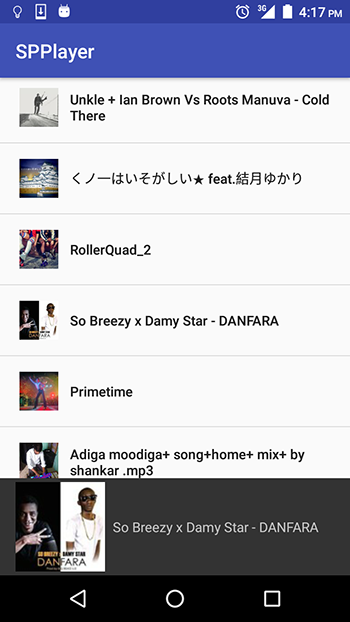
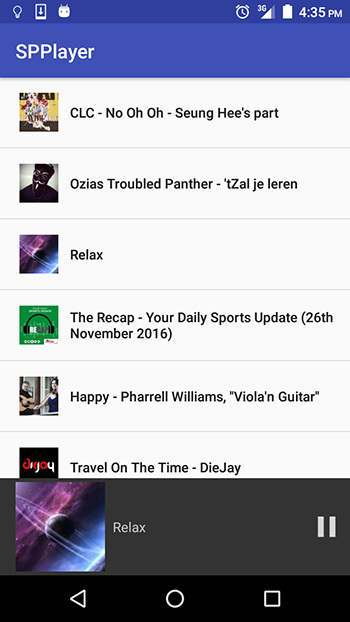
Run the app and the list will load with recent tracks from SoundCloud and the album artwork will show to the left of the list. For Tracks with no album artwork, you can specify an image to be shown using Picasso. Refer to the documentation to see what else the library offers.
When you select an item on the list, nothing happens. We want the selected track to be played.
First we’ll add a toolbar to the bottom of the screen which will show the selected track and controls for play and pause. Modify activity_main.xml as shown.
<LinearLayout xmlns:android="http://schemas.android.com/apk/res/android"
    xmlns:tools="http://schemas.android.com/tools"
    android:layout_width="match_parent"
    android:layout_height="match_parent"
    android:orientation="vertical"
    tools:context=".MainActivity">

    <ListView
        android:id="@+id/track_list_view"
        android:layout_weight="100"
        android:layout_width="match_parent"
        android:layout_height="0dp"/>

    <android.support.v7.widget.Toolbar
        android:background="#333333"
        android:theme="@style/Base.ThemeOverlay.AppCompat.Dark.ActionBar"
        android:layout_width="match_parent"
        android:layout_height="100dp">

        <ImageView
            android:id="@+id/selected_track_image"
            android:layout_width="92dp"
            android:layout_height="92dp"/>

        <TextView
            android:id="@+id/selected_track_title"
            android:paddingLeft="8dp"
            android:layout_width="wrap_content"
            android:layout_height="wrap_content"/>

        <ImageView
            android:id="@+id/player_control"
            android:layout_gravity="right"
            android:layout_width="@dimen/image_size"
            android:layout_height="@dimen/image_size"/>

    </android.support.v7.widget.Toolbar>

</LinearLayout>
Here we add a toolbar to the layout that is positioned at the bottom of the screen. The toolbar has an ImageView that will display the track album artwork, a TextView that will display the title of the track and another ImageView that will display play and pause icons.
In MainActivity.java add the following class variables.
private TextView mSelectedTrackTitle;
private ImageView mSelectedTrackImage;
Add the following into onCreate(Bundle) below the listView.setAdapter(mAdapter); statement.
mSelectedTrackTitle = (TextView)findViewById(R.id.selected_track_title);
mSelectedTrackImage = (ImageView)findViewById(R.id.selected_track_image);

listView.setOnItemClickListener(new AdapterView.OnItemClickListener() {
    @Override
    public void onItemClick(AdapterView<?> parent, View view, int position, long id) {
        Track track = mListItems.get(position);

        mSelectedTrackTitle.setText(track.getTitle());
        Picasso.with(MainActivity.this).load(track.getArtworkURL()).into(mSelectedTrackImage);

    }
});
This sets the toolbar’s image view and text view with the selected track’s data.
Run the app and on selecting a track from the list, the toolbar will update with the track’s information.
Now for the final step of playing the selected track.
Add the following to the class.
private MediaPlayer mMediaPlayer;
private ImageView mPlayerControl;
Then add the following after the statement that assigns the mSelectedTrackImage variable.
mPlayerControl = (ImageView)findViewById(R.id.player_control);Add the following into onCreate(Bundle) after the setContentView(R.layout.activity_main); statement.
mMediaPlayer = new MediaPlayer();
mMediaPlayer.setAudioStreamType(AudioManager.STREAM_MUSIC);
mMediaPlayer.setOnPreparedListener(new MediaPlayer.OnPreparedListener() {
    @Override
    public void onPrepared(MediaPlayer mp) {
        togglePlayPause();
    }
});
In the above, we instantiate mMediaPlayer and set the audio stream type for it. The MediaPlayer class can be used to control playback of audio/video files and streams. We then register a callback that will be invoked when the media source is ready for playback. The callback makes a call to the function below.
Add the following function to the class.
private void togglePlayPause() {
    if (mMediaPlayer.isPlaying()) {
        mMediaPlayer.pause();
        mPlayerControl.setImageResource(R.drawable.ic_play);
    } else {
        mMediaPlayer.start();
        mPlayerControl.setImageResource(R.drawable.ic_pause);
    }
}
The above makes a check to see if the media player is playing. If so, it pauses it and changes the player control icon to the Play icon. If the media player wasn’t playing, it starts playing and changes the icon to the Pause icon.
To get the icons used, download the Assets folder and paste the drawable folders to your project’s res folder. The icons are from Google’s Material Design Icons repository.
Next add the following to the list view’s onItemClick(AdapterView<?>, View, int, long) method after the statement that sets the toolbar’s image using Picasso.
if (mMediaPlayer.isPlaying()) {
    mMediaPlayer.stop();
    mMediaPlayer.reset();
}

try {
    mMediaPlayer.setDataSource(track.getStreamURL() + "?client_id=" + Config.CLIENT_ID);
    mMediaPlayer.prepareAsync();
} catch (IOException e) {
    e.printStackTrace();
}
When an item is selected, a check is made to see if the player is playing. If a track had been playing, it’s stopped and the media player is reset before the selected track can be played. Next we set the media player’s data source, which is the full URL of the streamed audio file. Then we prepare the player for playback asynchronously. You can either call prepare() or prepareAsync() here, but for streams, you should call prepareAsync() which returns immediately, rather than blocking until enough data has buffered. For files, it’s OK to call prepare() which blocks until MediaPlayer is ready for playback.
Then add the following after the statement that initializes mPlayerControl.
mPlayerControl.setOnClickListener(new View.OnClickListener() {
    @Override
    public void onClick(View v) {
        togglePlayPause();
    }
});
The above sets an on click listener to the player control image view that toggles the player’s play/pause state.
Run the app and you should be able to play a selected audio file, switch to another track by making a new selection and pause the playback by tapping Pause in the toolbar.
When the audio file completes playing, the toolbar’s icon will keep on showing the Pause icon. We want the toolbar’s icon to change to Play when a track completes playing. To do this, we’ll set an on completion listener on the media player to detect when it’s done and change the toolbar’s icon.
Add the following below the call to mMediaPlayer.setOnPreparedListener().
mMediaPlayer.setOnCompletionListener(new MediaPlayer.OnCompletionListener() {
    @Override
    public void onCompletion(MediaPlayer mp) {
        mPlayerControl.setImageResource(R.drawable.ic_play);
    }
});
Run the app and now the toolbar icon should change once a track completes playing.
Finally, add the following to the file. This releases the media player when the activity is destroyed. We don’t want to be holding onto any resources when they aren’t in use.
@Override
protected void onDestroy() {
    super.onDestroy();

    if (mMediaPlayer != null) {
        if (mMediaPlayer.isPlaying()) {
            mMediaPlayer.stop();
        }
        mMediaPlayer.release();
        mMediaPlayer = null;
    }
}
That brings us to the end of the tutorial. We’ve created a simple audio player and seen how to use the MediaPlayer class to play streamed audio. You can download the completed project from GitHub here. Remember to paste in your SoundCloud Client ID in the Config.java class.
Frequently Asked Questions (FAQs) on Developing a Music Streaming Android App
What are the key features to include in a music streaming Android app?
A music streaming Android app should have several key features to ensure a seamless user experience. These include a user-friendly interface, a robust search engine for easy music discovery, playlist creation, and social sharing capabilities. The app should also support offline listening and high-quality audio streaming. Additionally, integrating features like personalized recommendations, radio stations, and podcasts can enhance the user experience.
How can I ensure high-quality audio streaming in my Android app?
High-quality audio streaming can be achieved by using advanced audio codecs like AAC and OGG. These codecs provide superior sound quality while consuming less bandwidth. Additionally, you can implement adaptive bitrate streaming (ABR) which automatically adjusts the quality of a video stream in real time according to network conditions.
How can I implement offline listening in my music streaming app?
Offline listening can be implemented by allowing users to download songs for offline playback. This feature requires storage permissions and a method to download and store songs securely on the device. You can use Android’s DownloadManager API to handle downloads and storage.
How can I create personalized recommendations in my music streaming app?
Personalized recommendations can be created using machine learning algorithms that analyze user behavior and preferences. You can use Google’s Firebase ML Kit, which provides several pre-trained models for common use cases, or you can train your own model using TensorFlow.
How can I integrate social sharing features in my music streaming app?
Social sharing features can be integrated using Android’s Intent system, which allows apps to share data with each other. You can create an Intent to share a song or playlist, and Android will display a list of apps that can handle the Intent, such as social media apps or messaging apps.
How can I implement a robust search engine in my music streaming app?
A robust search engine can be implemented using Elasticsearch, a highly scalable open-source full-text search and analytics engine. It allows users to search for songs, artists, albums, and playlists, and it can handle complex queries and filters.
How can I create radio stations in my music streaming app?
Radio stations can be created by grouping songs together based on certain criteria, such as genre, mood, or artist. You can use machine learning algorithms to automatically generate radio stations based on user preferences.
How can I integrate podcasts into my music streaming app?
Podcasts can be integrated by adding a separate section for podcasts in the app. You can use a podcast API like ListenNotes to fetch podcast data, and you can use Android’s MediaPlayer API to play podcasts.
How can I ensure a user-friendly interface in my music streaming app?
A user-friendly interface can be ensured by following Android’s Material Design guidelines, which provide comprehensive advice on app design. The interface should be intuitive and easy to navigate, with clear labels and consistent design elements.
How can I monetize my music streaming app?
There are several ways to monetize a music streaming app. You can offer a freemium model, where users can listen to music for free with ads, or pay for a premium subscription without ads. You can also offer in-app purchases for additional features or content.