WP API and OAuth – Using WordPress without WordPress

In this tutorial, we’ll learn how to install and use WP-API with OAuth – a WordPress plugin which uses REST-like API endpoints to allow reading of WP content to unauthenticated users, and writing of WP content to users who authenticate via OAuth (or via Cookies for themes and plugins).
![]()
Using the plugin isn’t very straightforward, and the prerequisite list is quite long, so this post was written to make it simple and relatively approachable (as long as you’re in control of your own server).
The tutorial assumes basic familiarity with the terminal, and with Vagrant for ease of development.
Key Takeaways
- The WP-API and OAuth WordPress plugin uses REST-like API endpoints to allow unauthenticated users to read WP content and authenticated users to write WP content.
- The WP-API, a REST-like set of endpoints built into WP as a plugin, makes the internals of a WordPress installation accessible to the outside. For example, posts can be retrieved in JSON format by pinging /wp-json/posts.
- The OAuth1 plugin is used for authentication, which requires the wp-cli upgrade for using WP commands from the terminal. However, it’s noted that WordPress’s approach is outdated, using 3-legged OAuth rather than the simpler, UI-less 2-legged OAuth flow.
- The tutorial demonstrates how to use WP-API and OAuth to allow an external application to authenticate with a WordPress site and submit a post via the API. The process involves setting up a new Guzzle client, authenticating with WP API over OAuth, and creating a sample post in the WP app.
Installing
As usual, we’ll be using SitePoint’s trusty Homestead Improved instance to get a fresh environment up and running:
git clone https://github.com/swader/homestead_improved hi_wp_github
cd hi_wp_github
sed -i '' "s@map\: \.@map\: $PWD@g" Homestead.yaml
That last line is a shortcut that makes the current folder of the host machine shared into the VM’s Code folder. I also changed the sites block to:
sites:

    - map: test.app

      to: /home/vagrant/Code/wptest
Remember to have test.app (or the URL you choose) in your /etc/hosts file, as per instructions.
Next, we get a new instance of WP up and running. Since Homestead has MySQL pre-installed, this is a piece of cake.
cd ~/Code
wget https://wordpress.org/latest.tar.gz
tar -xvzf latest.tar.gz
mv wordpress wptest
cd wptest
cp wp-config-sample.php wp-config.php
After we update wp-config.php accordingly and set up our keys and database credentials, the WP instance is ready and can be finalized by running it in the browser.
WP-API
Despite the flak it’s taken over the years (a large part of it fired from my own Dual Flak Cannons), WP really is trying to get with the times while still accommodating their old, technically inept userbase.
One such effort is the WP-API, a REST-like set of endpoints built into WP as a plugin so that the internals of a WordPress installation can become accessible to the outside. For example, getting your posts in JSON format is as simple as pinging /wp-json/posts.
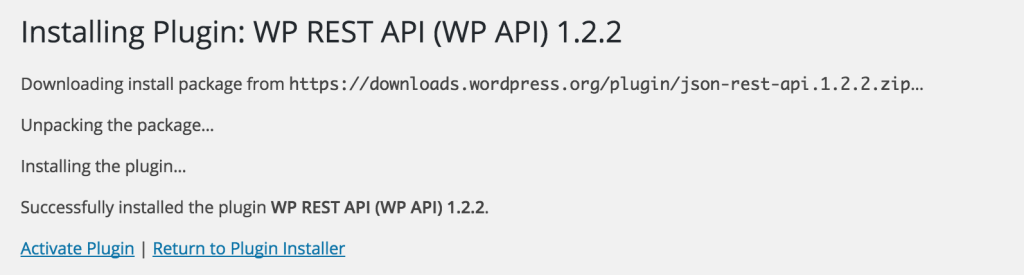
It can be easily installed via the default plugin manager – the stable version is 1.2.* at the time of this writing – so let’s do that.
If we test immediately after installation, the URL /wp-json/posts should produce a JSON array of the initial “Hello World” post. However, the actual submission process (updating and posting) isn’t as simple.
OAuth – Server
Unfortunately, as with all things WP, even their attempts to be modern are already out of date.
As such, they use OAuth1 rather than OAuth2 for authentication. For that, we’ll need the OAuth1 plugin installed. For that, though, we need the wp-cli upgrade, a way to use WP commands from the terminal:
curl -O https://raw.githubusercontent.com/wp-cli/builds/gh-pages/phar/wp-cli.phar
chmod +x wp-cli.phar
sudo mv wp-cli.phar /usr/local/bin/wp
Then, we grab the OAuth plugin:
cd ~/Code/wptest
git clone https://github.com/WP-API/OAuth1 wp-content/plugins/oauth-server
Activate the plugin (which should now appear in the Plugins list) and back in the terminal run:
wp oauth1 addThis should produce a key / secret combination that can be used for OAuth authentication:
ID: 4

Key: xOp1fGMgouBl

Secret: Sk7YcM48qsmcDPp2NSmna3kMEfTtDNfxpy43xjWp1mSP7ytw
Aside from being out of date with their protocol approach, there’s also the problem of us having to use 3-legged OAuth rather than something simpler, UI-less like 2-legged OAuth flow. For differences, read this extensive guide. Hopefully, that’ll improve later.
The good news, though, is that if you’re the owner of the WP site and you’re enabling OAuth API access for others – you’re done! It’s up to them to develop a client, and that’s what we’ll do next.
OAuth – Client
To test submissions into WP via WP-API, we need an “app” to serve as the “submitter”. For that, we make a new project in another folder in the virtual machine – perfect for testing. First, we edit the virtual machine’s Homestead.yaml file to include a new site:
sites:

    - map: test.app

      to: /home/vagrant/Code/wptest

    - map: test2.app

      to: /home/vagrant/Code/submitter
Then, we exit the VM with exit and re-provision with vagrant provision and then re-renter the VM with vagrant ssh. Now that our submitter virtual host is defined, let’s add a simple index.php file into it, and a (for now) empty callback.php file.
mkdir ~/Code/submitter
touch ~/Code/submitter/index.php
touch ~/Code/submitter/callback.php
touch ~/Code/submitter/credentials.php
cd ~/Code/submitter
The credentials file should hold the keys we got from the WP app:
// credentials.php
<?php
return [
    'consumer_key' => 'xOp1fGMgouBl',
    'consumer_secret' => 'Sk7YcM48qsmcDPp2NSmna3kMEfTtDNfxpy43xjWp1mSP7ytw'
];
We’ll also need some packages installed:
composer require --dev symfony/var-dumper
composer require guzzlehttp/guzzle:~5
VarDumper is there to help us debug, and Guzzle 5 is there to help us issue requests at the WP-API. We could use a generic OAuth client, but why not use Guzzle’s?
composer require guzzlehttp/oauth-subscriberNote that the submitter we’ll be building below is just a demo script, and should only be used as inspiration for implementing OAuth+WP-API in your own application, not as a full application demo.
One more thing – by default, WordPress blocks login redirections to external sites (those differing in domain) so a new filter needs to be added which will allow this. Back in the WP app’s sources, open default-filters.php and add the following somewhere into the file:
add_filter( 'allowed_redirect_hosts' , 'my_allowed_redirect_hosts' , 10 );
function my_allowed_redirect_hosts($content){
    $content[] = 'test2.app';
    return $content;
}
Naturally, replace test2.app with your own URL if you used a different one.
Authentication – Leg 1
Authenticating with WP API over OAuth is something that’s completely missing from the docs, but that’s because OAuth authentication is something that’s quite specific and almost identical across projects. That doesn’t mean it’s simple, though. We’ll mostly be following the procedure from this post, in one way or another.
Give the index.php file the following contents:
<?php
require_once 'vendor/autoload.php';
session_start();
use GuzzleHttp\Client;
use GuzzleHttp\Subscriber\Oauth\Oauth1;
$client = new Client([
    'defaults' => ['auth' => 'oauth']
]);
$oauth = new Oauth1(include 'credentials.php');
$client->getEmitter()->attach($oauth);
$callback = 'http://test2.app/callback.php';
$req = $client->createRequest("POST", 'http://test.app/oauth1/request',
    ['body' => ['oauth_callback' => $callback]]);
try {
    $res = $client->send($req);
    parse_str($res->getBody());
    $_SESSION['oauth_token'] = $oauth_token;
    $_SESSION['oauth_token_secret'] = $oauth_token_secret;
    header("Location: http://test.app/oauth1/authorize?oauth_token={$oauth_token}&oauth_callback=".$callback);
} catch (\Exception $e) {
    dump($e);
}
First, we define a new Guzzle client and set its default auth mode as Oauth. Then, we set up a new OAuth1 client instance and give it the key and secret we got before by running wp oauth1 add. We use this instance as an emitter and create a POST request from it (also defining a callback – the URL to which WP is supposed to redirect us once we authorize it), which is then sent to our WP app.
In the try/catch block, we turn the response into two strings: $oauth_token and $oauth_token_secret, both of which we need to continue the auth process. We save them into the session, and go on to step 2: the callback.php file.
Authentication – Leg 2
For the second leg of the 3-legged OAuth flow, we need to build the callback.php file.
When we log into WP and Authorize our submitter app, WP sends us back to the callback URL we provided. It’ll also send along some additional params: oauth_token, oauth_verifier and wp_scope.
We use the verifier and the oauth_token to send a request to the /access endpoint and get an access token (the secret) which will finally let us do operations on the database.
<?php
require_once 'vendor/autoload.php';
session_start();
use GuzzleHttp\Client;
use GuzzleHttp\Exception\ClientException;
use GuzzleHttp\Subscriber\Oauth\Oauth1;
$authToken = $_GET['oauth_token'];
$authVerifier = $_GET['oauth_verifier'];
$client = new Client(['defaults' => ['auth' => 'oauth']]);
$oauth = new Oauth1(
    array_merge(include 'credentials.php',
        ['token' => $_SESSION['oauth_token']])
);
$client->getEmitter()->attach($oauth);
if ($authToken == $_SESSION['oauth_token']) {
    $req = $client->createRequest("POST", 'http://test.app/oauth1/access',
        ['body' => ['oauth_verifier' => $authVerifier]]);
    try {
        $res = $client->send($req);
        $params = (string)$res->getBody();
        parse_str($params);
        $_SESSION['oauth_token'] = $oauth_token;
        $_SESSION['oauth_token_secret'] = $oauth_token_secret;
        header("Location: makepost.php");
    } catch (ClientException $e) {
        dump((string)$e->getResponse()->getBody());
    } catch (\Exception $e) {
        dump($e);
    }
}
Authentication – Leg 3
Finally, let’s create a file makepost.php which we’ll use to create a sample post in our WP app – if that goes through, it means everything is working just fine.
<?php
require_once 'vendor/autoload.php';
session_start();
use GuzzleHttp\Client;
use GuzzleHttp\Exception\ClientException;
use GuzzleHttp\Subscriber\Oauth\Oauth1;
$client = new Client([
'defaults' => ['auth' => 'oauth']
]);
$array = array_merge(include 'credentials.php', [
'token' => $_SESSION['oauth_token'],
'token_secret' => $_SESSION['oauth_token_secret']
]);
$oauth = new Oauth1($array);
$client->getEmitter()->attach($oauth);
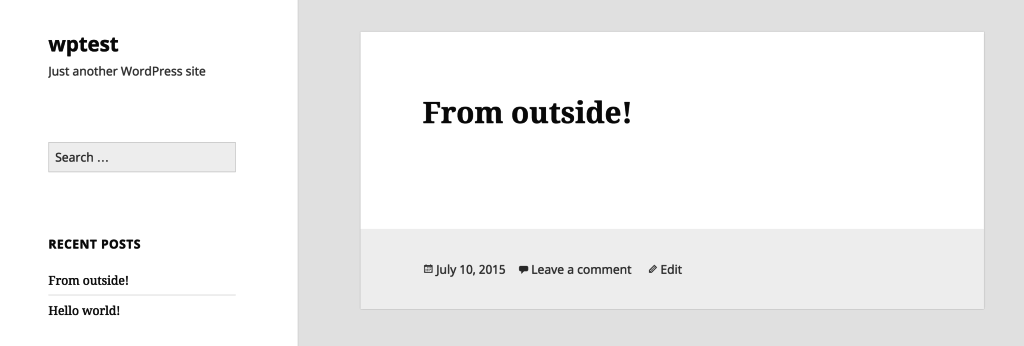
$post = [
'title' => 'From outside!',
'content' => 'This post was submitted via the API!!!',
'status' => 'publish'
];
$req = $client->createRequest("POST", 'http://test.app/wp-json/posts',
['json' => $post]);
try {
$res = $client->send($req);
dump((string)$res->getBody());
} catch (ClientException $e) {
dump((string)$e->getResponse()->getBody());
} catch (\Exception $e) {
dump($e);
}We’ve got a simple “post” in the form of an array with three fields, and defaulting to “publish” mode so we can immediately see it on the home page of our WP app, without having to go into the editor and publish it manually.
After execution, the post should be visible on the home screen of our WP app:
Of course, the three files above (index.php, callback.php, makepost.php) are examples of OAuth use, and should probably be turned into something more reusable and coherent, but for purely testing if the integration works, they’re just fine. Fear not, though – we’ll be upgrading this significantly in an upcoming post.
Conclusion
In this tutorial, we installed and activated WP-API and WP-Oauth, in an attempt to make our WP installation accessible to the outside (authenticated) world. As you can see, it’s not exactly straightforward, but hopefully this tutorial helped in getting you up and running.
Have you had experiences with WP-API yet? Would you like to see more examples? Let us know!
Frequently Asked Questions (FAQs) about WP API and OAuth
What is the role of OAuth in WordPress REST API?
OAuth is an open standard for access delegation, commonly used as a way for Internet users to grant websites or applications access to their information on other websites but without giving them the passwords. In the context of WordPress REST API, OAuth is used as an authentication method. It allows third-party applications to interact with the WordPress site securely without the need to store sensitive user credentials.
How do I set up OAuth in WordPress?
Setting up OAuth in WordPress involves installing and configuring an OAuth plugin. There are several plugins available, such as the OAuth2 Provider plugin. Once installed, you need to create a new client application within the plugin settings. This will generate a client ID and secret, which are used to authenticate the third-party application.
What is the difference between OAuth1 and OAuth2 in WordPress?
OAuth1 and OAuth2 are different versions of the OAuth protocol. OAuth1 is more complex and requires more steps to authenticate, including the use of cryptographic signatures. On the other hand, OAuth2 is simpler and uses bearer tokens for authentication, making it easier to implement. However, OAuth2 is considered less secure than OAuth1 due to its simplicity.
How do I use the WordPress REST API with OAuth?
To use the WordPress REST API with OAuth, you first need to authenticate your application using the OAuth protocol. This involves sending a request to the WordPress site with your client ID and secret, and receiving an access token in return. This access token is then included in the header of all API requests to authenticate your application.
Can I use Basic Authentication instead of OAuth with WordPress REST API?
Yes, you can use Basic Authentication instead of OAuth with the WordPress REST API. However, Basic Authentication is less secure as it involves sending your username and password with each API request. It is recommended to use OAuth or another secure authentication method for production applications.
How do I secure my WordPress REST API?
Securing your WordPress REST API involves using a secure authentication method such as OAuth, limiting the permissions of your API keys, and regularly updating your WordPress and plugin versions. It’s also recommended to use HTTPS to encrypt all API requests.
What are the benefits of using WordPress without WordPress?
Using WordPress without WordPress, or “headless” WordPress, allows developers to use the powerful content management features of WordPress while building the front-end of their site with other technologies. This can result in a more flexible, performant, and secure site.
How do I authenticate a third-party application with WordPress?
Authenticating a third-party application with WordPress involves using an authentication method such as OAuth. The application sends a request to the WordPress site with its client ID and secret, and receives an access token in return. This access token is then used to authenticate all API requests from the application.
Can I use the WordPress REST API with other programming languages?
Yes, the WordPress REST API is language-agnostic, meaning it can be used with any programming language that can send HTTP requests and parse JSON responses. This includes languages such as JavaScript, Python, Ruby, and more.
What can I do with the WordPress REST API?
The WordPress REST API allows developers to interact with WordPress data programmatically. This includes creating, reading, updating, and deleting posts, pages, users, and other WordPress data. It also allows developers to build “headless” WordPress sites, where the front-end is built with other technologies.
Bruno is a blockchain developer and technical educator at the Web3 Foundation, the foundation that's building the next generation of the free people's internet. He runs two newsletters you should subscribe to if you're interested in Web3.0: Dot Leap covers ecosystem and tech development of Web3, and NFT Review covers the evolution of the non-fungible token (digital collectibles) ecosystem inside this emerging new web. His current passion project is RMRK.app, the most advanced NFT system in the world, which allows NFTs to own other NFTs, NFTs to react to emotion, NFTs to be governed democratically, and NFTs to be multiple things at once.


