Design a Stylized Custom WordPress Login Screen

 (Click to see the full version)
If you happen to want the background image that I used for this tutorial, you can download that here:
(Click to see the full version)
If you happen to want the background image that I used for this tutorial, you can download that here:
 I broke this into sections, so you can change only those parts that you want. You may only want to change a few items up, change some fonts, tweak some backgrounds, and call it good. For those that want a thorough facelift, you can make a very dramatic change, as you can see from my example. So, hang on and in short order you’ll have a highly stylized WordPress login form.
Modify Functions.php
One of the most frustrating parts about changing the login screen is that you need to add a few lines of code to your functions.php file to tell WordPress that you want a different stylesheet for the login screen. The login is a unique page in WordPress, unfortunately, but for security and other reasons, that’s just how it is. So, in your functions.php file, paste the following: [sourcecode language=”php”] function stylized_login() { echo ‘<link rel=”stylesheet” type=”text/css” href=”‘ . get_bloginfo(‘stylesheet_directory’) . ‘/stylized-login.css” />’; } add_action(‘login_head’, ‘stylized_login’); [/sourcecode] What we’ve done here is “hooked” into login_head and told WordPress to use our stylized-login.css document that we’re about to build. You need both the function and the add_action, so don’t skip either.Add Your CSS Document
Now you need to add the stylized-login.css document into your theme’s folder. This should be the in the folder as your style.css. If you want to put your custom login files in a separate folder, just make sure you update the folder in Step 1 accordingly. At this point you haven’t changed anything from the ordinary user’s point of view, but you have everything in place now.Change the Logo
We’re all used to the WordPress logo above the login form, so let’s start by changing this up first. In your stylized-login.css, add the following: [sourcecode language=”css”] .login h1 a { background-image: url(‘logo.png’); } [/sourcecode] I named my image logo.png. It should be 247 x 63 if you want it to fit perfectly.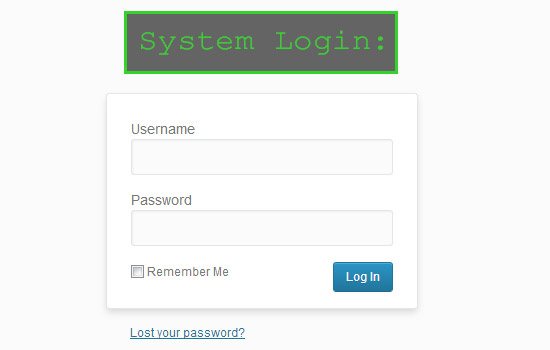
Change the Background Image for the Page
The background image is one of the easiest ways to give your login page a back face-lift: [sourcecode language=”css”] body.login { background-image: url(‘bg.png’); } [/sourcecode]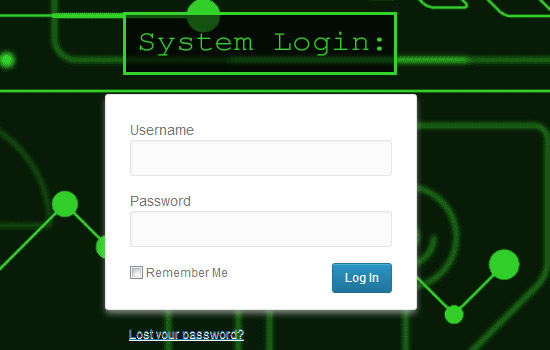 You don’t have to make the background an image. You can just set the background-color and call it good.
Change the Form Background and Border
The form itself, with the white background, is another calling card that screams “vanilla WordPress,” so lets change this up: [sourcecode language=”css”] .login form { background: rgba(0, 0, 0, .6); } #loginform { border-color:#33d42a; } [/sourcecode] Note that I used RGBA, which allows for an alpha (transpancy), so if you want to make the form more or less transparent, this is where you would change it. I’ve added transparency, which you can see in the image below.
Change the Username and Password Fonts
I’m sticking with some common system fonts, but you can always import a font of your choosing for a further stylized effect: [sourcecode language=”css”] .login label { font-family:”Courier New”, Courier, monospace; font-size: 28px; color: #33d42a; } [/sourcecode]
Change the Input Box Background and Border
In this example, I don’t even want the standard white background for my inputs, so here’s a quick way to give these inputs a whole new look: [sourcecode language=”css”] .login input[type=”text”]{ font-family:”Courier New”, Courier, monospace; font-size:24px; background-color:rgba(0,0,0,.6); border-color:#33d42a; } .login input[type=”password”]{ background-color:rgba(0,0,0,.6); border-color:#33d42a; } [/sourcecode] Once again, I’m using RGBA to get the transparency effect for those input boxes.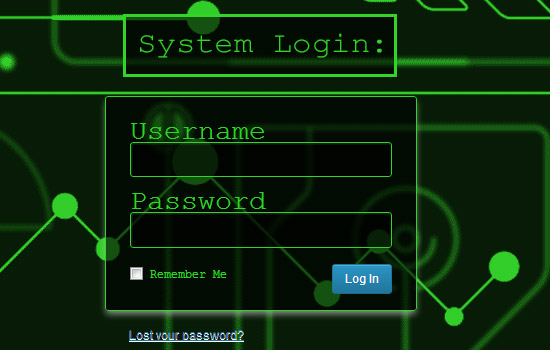
Change the Login Button
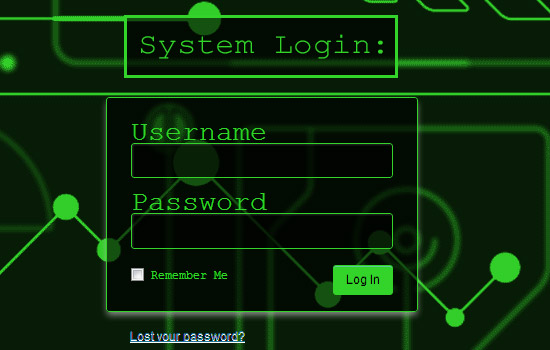
Now we have get that blue login button out of there. It’s ruining everything! [sourcecode language=”css”] .wp-core-ui .button-primary{ background-color:#000; background-image:none; border-color:#33d42a; border-bottom-color:#13f278; color:#33d42a; } .wp-core-ui .button-primary:hover { background-color:#33d42a; background-image:none; border-color:#33d42a; color:#000; } [/sourcecode] This also takes care of our hover state. When hovered, the button goes bright green. Look below for clarity.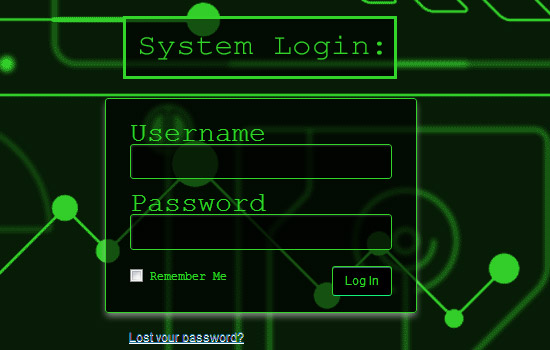
Change the Lost Password and “Back to…” Links
Almost done! Those little links at the bottom are now all that’s in the way of our completely stylized form. [sourcecode language=”css”] .login #nav a, .login #backtoblog a { color: #33d42a !important; text-shadow:none; } .login #nav a:hover, .login #backtoblog a:hover { color: #33d42a !important; text-shadow:0 1px 0 #33d42a; } [/sourcecode]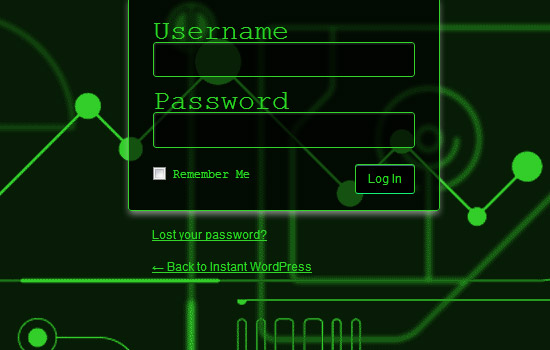
Change the Logo Link Button
Last, but not least, I couldn’t leave well enough alone and had to change the logo link to go to my own site — sorry WordPress.org, I don’t want that link any more. To make this change, you’re going to have to go back to your functions.php file and add the following: [sourcecode language=”php”] function login_link( $url ) { return get_bloginfo( ‘url’ ); } add_filter( ‘login_headerurl’, ‘login_link’ ); [/sourcecode]Final CSS
Here’s the CSS in one big block with comments for your copy and pasting pleasure: [sourcecode language=”css”] /* Logo above login form */ .login h1 a { background-image: url(‘logo.png’); } /* Background image */ body.login { background-image: url(‘bg.png’); } /* Background of form */ .login form { background: rgba(0, 0, 0, .6); } /* Border for the form */ #loginform { border-color:#33d42a; } /* Labels for the form */ .login label { font-family:”Courier New”, Courier, monospace; font-size: 28px; color: #33d42a; } /* Username text box */ .login input[type=”text”]{ font-family:”Courier New”, Courier, monospace; font-size:24px; background-color:rgba(0,0,0,.6); border-color:#33d42a; } /* Password text box */ .login input[type=”password”]{ background-color:rgba(0,0,0,.6); border-color:#33d42a; } /* Login button */ .wp-core-ui .button-primary{ background-color:#000; background-image:none; border-color:#33d42a; border-bottom-color:#13f278; color:#33d42a; } /* Login button hover */ .wp-core-ui .button-primary:hover { background-color:#33d42a; background-image:none; border-color:#33d42a; color:#000; } /* Lost password and ‘Back to’ links */ .login #nav a, .login #backtoblog a { color: #33d42a !important; text-shadow:none; } /* Lost password and ‘Back to’ hover links */ .login #nav a:hover, .login #backtoblog a:hover { color: #33d42a !important; text-shadow:0 1px 0 #33d42a; } [/sourcecode] That’s all. Enjoy tailoring WordPress to suit your (client’s) needs!Frequently Asked Questions about Designing a Stylized Custom WordPress Login Screen
How can I customize the WordPress login screen to match my brand?
Customizing your WordPress login screen to match your brand can be achieved by using a plugin or by manually coding. Plugins like Custom Login Page Customizer or LoginPress can help you easily customize your login screen. However, if you prefer to manually code, you can use the WordPress Login Customizer code in your functions.php file. This allows you to change the logo, background image, form styles, and more. Remember to always backup your site before making any changes to the code.
Can I use any image for my WordPress login screen background?
Yes, you can use any image for your WordPress login screen background. However, it’s recommended to use high-quality images that align with your brand. Websites like Unsplash, Adobe Stock, Freepik, and Pexels offer a wide range of high-quality images that you can use. Always ensure to respect the copyright rules associated with the images you choose.
How can I change the logo on my WordPress login screen?
Changing the logo on your WordPress login screen can be done by adding a custom function in your theme’s functions.php file. This function will replace the default WordPress logo with your custom logo. You can also use a plugin like Custom Login Page Customizer or LoginPress to easily change the logo.
Is it possible to change the layout of the WordPress login screen?
Yes, it’s possible to change the layout of the WordPress login screen. This can be achieved by using CSS to style the login form. You can change the form’s width, height, color, and more. Alternatively, you can use a plugin that offers layout customization options.
Can I add a custom message to my WordPress login screen?
Yes, you can add a custom message to your WordPress login screen. This can be done by adding a custom function in your theme’s functions.php file. The function will add your custom message below the login form. You can use this feature to welcome users, provide instructions, or display any other message.
How can I change the color of the WordPress login screen?
Changing the color of the WordPress login screen can be done by adding custom CSS in your theme’s style.css file. You can change the background color, form color, button color, and more. Alternatively, you can use a plugin that offers color customization options.
Is it possible to add a custom link to the WordPress login screen?
Yes, it’s possible to add a custom link to the WordPress login screen. This can be done by adding a custom function in your theme’s functions.php file. The function will add your custom link below the login form. You can use this feature to link to your website’s homepage, help page, or any other page.
Can I change the text on the WordPress login screen buttons?
Yes, you can change the text on the WordPress login screen buttons. This can be done by adding a custom function in your theme’s functions.php file. The function will replace the default button text with your custom text.
How can I add a custom CSS to the WordPress login screen?
Adding a custom CSS to the WordPress login screen can be done by adding a custom function in your theme’s functions.php file. The function will enqueue your custom CSS file, allowing you to style the login screen as you wish.
Can I preview my changes to the WordPress login screen before saving them?
Yes, you can preview your changes to the WordPress login screen before saving them. If you’re using a plugin, most of them offer a live preview feature. If you’re manually coding, you can use a local development environment to preview your changes.
When he's not being a complete goofball, “they” drag Justyn into the office where he pretends to be a Senior Editor and Content Engineer at Creative Content Experts — a content marketing firm out of NW Arkansas. He has 10+ years’ experience in technical writing and geek-related fields. He loves WordPress, coffee, and peanut butter a little too much.