How to Create an Invoice with Twitter Bootstrap, Part 2

In the first part of this series, I showed how to set things up to create an invoice with Twitter Bootstrap.
Now we are going to create our invoice.
Key Takeaways
- The tutorial provides a step-by-step guide on creating an invoice using Twitter Bootstrap, starting with setting up the invoice header, client details section, job/project details section, total amount section, and payment details section; each section includes specific code snippets to be replaced in the invoice.html file.
- The author also demonstrates how to enhance the invoice by integrating custom fonts from Google Fonts, specifically using the Bree Serif font for the body and all headings, and how to save the completed invoice as a PDF in Google Chrome.
- The tutorial includes a FAQ section addressing common queries related to customizing the invoice template, adding more fields, making the template responsive, using the template for commercial purposes, integrating the template with existing systems, adding a payment gateway, printing the invoice, saving the invoice as a PDF, adding a logo, and using the template without coding knowledge.
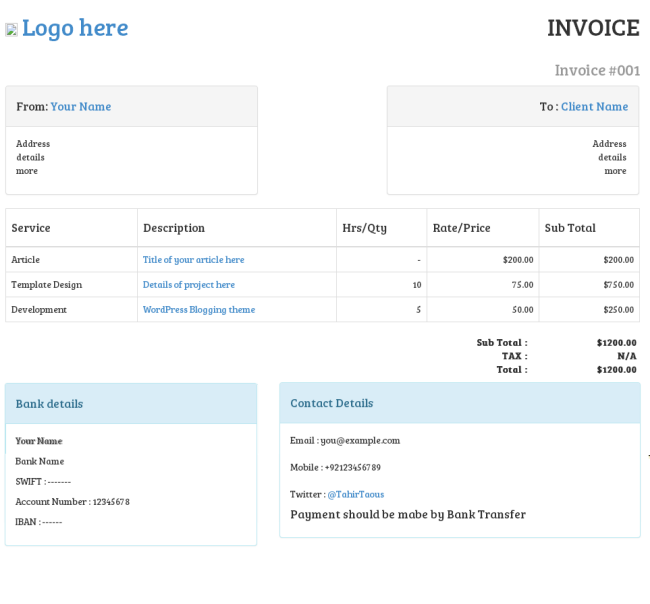
Invoice Header
Open your invoice.html file in your preferred text editor. Replace Content here with the following code.
<div class="col-xs-6">
<h1>
<a href="https://twitter.com/tahirtaous">
<img src="logo.png">
Logo here
</a>
</h1>
</div>
<div class="col-xs-6 text-right">
<h1>INVOICE</h1>
<h1><small>Invoice #001</small></h1>
</div>
<hr>
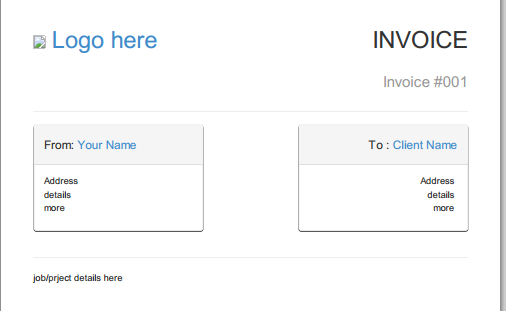
next sectionI have used col-xs-6 class t create two equal columns. In our first columns you can add your logo or your name. Just add a logo image in your invoice folder and name it logo.png. If you don’t have a logo then you can remove the image tag and replace Logo Here text with your name.
Now open invoice.html file in Google Chrome browser, right click anywhere on page and click on Print. You will see the following result.

For the second column I have also used text-right class to align the text (Invoice title) to the right side. For the invoice number I have used small class.
If you see a different print preview, make sure that you have commented out print styles properly.
Client details section
Next we will create two columns. I will use panels class to create contextual panels. In the first panel you can add your details (name, address) and in the second panel you can add client details. I will also use col-xs-offset-2 class to create a gap between the two panels. As I described earlier, different classes are available for panels. I will use the primary panel.
Now replace Next section text with following code.
      <div class="row">
        <div class="col-xs-5">
          <div class="panel panel-default">
                  <div class="panel-heading">
                    <h4>From: <a href="#">Your Name</a></h4>
                  </div>
                  <div class="panel-body">
                    <p>
                      Address <br>
                      details <br>
                      more <br>
                    </p>
                  </div>
                </div>
        </div>
        <div class="col-xs-5 col-xs-offset-2 text-right">
          <div class="panel panel-default">
                  <div class="panel-heading">
                    <h4>To : <a href="#">Client Name</a></h4>
                  </div>
                  <div class="panel-body">
                    <p>
                      Address <br>
                      details <br>
                      more <br>
                    </p>
                  </div>
                </div>
        </div>
      </div> <!-- / end client details section -->

       job/project details here
In our panel i have used panel-heading class for headings and panel-body class for body section, where you will add address. Now if you preview your page in chrome you will see following result.
Job/project details Section
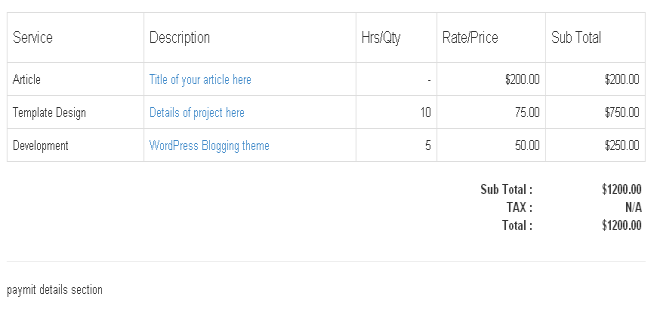
For this section i will use Tables with table and table-bordered class. We will have five headings for job details. Service, Description, Hrs/Qty, Rate/Price, Sub Total. Now replace the job/project details here text with following code.
      <table class="table table-bordered">
        <thead>
          <tr>
            <th><h4>Service</h4></th>
            <th><h4>Description</h4></th>
            <th><h4>Hrs/Qty</h4></th>
            <th><h4>Rate/Price</h4></th>
            <th><h4>Sub Total</h4></th>
          </tr>
        </thead>
        <tbody>
          <tr>
            <td>Article</td>
            <td><a href="#">Title of your article here</a></td>
            <td class="text-right">-</td>
             <td class="text-right">$200.00</td>
              <td class="text-right">$200.00</td>
          </tr>
          <tr>
            <td>Template Design</td>
            <td><a href="#">Details of project here</a></td>
            <td class="text-right">10</td>
             <td class="text-right">75.00</td>
              <td class="text-right">$750.00</td>
          </tr>
          <tr>
            <td>Development</td>
            <td><a href="#">WordPress Blogging theme</a></td>
            <td class="text-right">5</td>
             <td class="text-right">50.00</td>
              <td class="text-right">$250.00</td>
          </tr>
        </tbody>
      </table>

      Total amount section
Now we need to add a Total payment section. For this section I have created a new row with text-right class. This row has two columns, each with col-xs-2 class. Our first column has an extra col-xs-offset-8 class. Using col-xs-2 class we can move columns to the right. Each class increases the left margin of a column by a whole column.
Replace Total amount section text with following code.
<div class="row text-right">
  <div class="col-xs-2 col-xs-offset-8">
    <p>
      <strong>
        Sub Total : <br>
        TAX : <br>
        Total : <br>
      </strong>
    </p>
  </div>
  <div class="col-xs-2">
    <strong>
      $1200.00 <br>
      N/A <br>
      $1200.00 <br>
    </strong>
  </div>
</div>
payment details section
Here is a preview
Last section: Payment Details
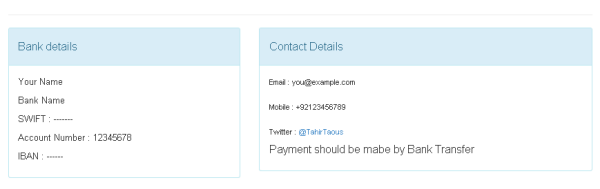
Now we will create the last section of our document. In this section we will create a two column layout. The first column will have col-xs-5 class and second column will have col-xs-7 class. Each column will have divs with panel-info class. The first panel will be used for payment details (banking details, paypal email or any other detail). In the second panel we will add contact information (email, twitter, mobile number) and any other detail.
Replace payment details section with following code.
<div class="row">
  <div class="col-xs-5">
    banking details
  </div>
  <div class="col-xs-7">
    contact details
  </div>
</div>
The above code will generate a two column layout. Now replace banking details with following code.
<div class="panel panel-info">
  <div class="panel-heading">
    <h4>Bank details</h4>
  </div>
  <div class="panel-body">
    <p>Your Name</p>
    <p>Bank Name</p>
    <p>SWIFT : -------</p>
    <p>Account Number : 12345678</p>
    <p>IBAN : ------</p>
  </div>
</div>
In the above code you can see we have a parent div with panel panel-info classes, then we have two child divs. The first child div has a panel-heading class and the second child div has a panel-body classes.
Now replace contact details with following code.
<div class="span7">
  <div class="panel panel-info">
    <div class="panel-heading">
      <h4>Contact Details</h4>
    </div>
    <div class="panel-body">
      <p>
          Email : you@example.com <br><br>
          Mobile : +92123456789 <br> <br>
          Twitter  : <a href="https://twitter.com/tahirtaous">@TahirTaous</a> | SitePoint : <a href="https://www.sitepoint.com/author/ttaous/">https://www.sitepoint.com/author/ttaous/</a>
      </p>
      <h4><small>payment should be mabe by Bank Transfer</h4>
    </div>
  </div>
</div>
Custom fonts
We have created a complete invoice with Twitter Bootstrap. Now let’s use web fonts from Google Fonts to spice up our Invoice. I am going to use Bree Serif font from Google fonts.
Add following Code
<style>
  @import url(http://fonts.googleapis.com/css?family=Bree+Serif);
  body, h1, h2, h3, h4, h5, h6{
    font-family: 'Bree Serif', serif;
  }
  </style>
Add this just below our main style sheet in the header section.
<link href="css/bootstrap.css" rel="stylesheet">I have used the @import method to use the Bree Serif font from Google fonts. I have used Bree Serif for body and all headings. If you use Bree Serif font for only the body selector, then your heading will use Bootstrap’s default styles for all heading. I have over-ridden Bootstrap’s font-family for all headings.
Save Invoice as PDF
Our invoice is complete. Now open invoice.html in Google Chrome, right click anywhere on web page, click Print and Choose Save from the right side panel. That’s all. You can download the source code for this project through this Github repository.
Frequently Asked Questions (FAQs) about Creating an Invoice with Twitter Bootstrap
How can I customize the invoice template to suit my brand?
Customizing the invoice template to suit your brand is quite straightforward. You can change the color scheme, font, and layout to match your brand’s identity. To change the color scheme, you can modify the CSS file associated with the template. For the font, you can import your preferred font from Google Fonts or any other source and then specify it in the CSS file. For the layout, you can rearrange the HTML elements in the template to achieve your desired look.
Can I add more fields to the invoice form?
Yes, you can add more fields to the invoice form. To do this, you need to modify the HTML file of the template. You can add input fields for additional information that you want to capture. Remember to also update the corresponding JavaScript or PHP file to process the additional data.
How can I make the invoice template responsive?
The invoice template is built with Twitter Bootstrap, which is a responsive framework. This means that the template should automatically adjust to different screen sizes. However, if you notice any issues with the responsiveness, you can tweak the CSS file to fix them. You can use media queries to specify different styles for different screen sizes.
Can I use this invoice template for commercial purposes?
Yes, you can use this invoice template for commercial purposes. However, it’s always a good idea to check the license of the template to make sure that commercial use is allowed. If the template is open source, you are generally free to use it for any purpose, including commercial.
How can I integrate this invoice template with my existing system?
Integrating this invoice template with your existing system would require some programming knowledge. You would need to modify the JavaScript or PHP file to send the invoice data to your system. You might also need to modify the HTML file to include any additional fields that your system requires.
Can I add a payment gateway to this invoice template?
Yes, you can add a payment gateway to this invoice template. To do this, you would need to integrate the payment gateway’s API with the JavaScript or PHP file of the template. This would allow you to process payments directly from the invoice.
How can I print the invoice?
You can print the invoice by adding a print button to the HTML file of the template. When clicked, this button should trigger the browser’s print function. You can use JavaScript to achieve this.
Can I save the invoice as a PDF?
Yes, you can save the invoice as a PDF. There are several JavaScript libraries that can convert HTML to PDF, such as jsPDF. You can use one of these libraries to add a ‘Save as PDF’ button to the invoice template.
How can I add a logo to the invoice?
You can add a logo to the invoice by modifying the HTML file of the template. You can add an img element where you want the logo to appear and then specify the source of the logo image in the src attribute.
Can I use this invoice template without knowing how to code?
While you can use the invoice template without knowing how to code, you might find it difficult to customize the template to suit your needs. If you want to add more fields, change the layout, or integrate the template with your system, you would need some knowledge of HTML, CSS, and JavaScript or PHP. However, if you just want to use the template as it is, you can fill in the invoice data directly in the HTML file.
Tahir Taous is founder of Just Learn WordPress, a training site where you can learn how to create and manage websites with WordPress, WordPress essential training, theme development courses free video tutorials and articles.

Published in
·Business·Content Marketing·Entrepreneurship·Freelancing·Marketing·SEO & SEM·December 31, 2013