

Key Takeaways
- Creating a simple order form in WordPress requires the installation of a plugin, with Gravity Forms being one of the popular options.
- Gravity Forms plugin allows you to build your form field by field, enabling you to customize options for customers to choose and personalize their order.
- The form can be inserted on a page or post by using a shortcode or by clicking the ‘Add Form’ button in the description box where the form should appear.
- The Gravity Forms plugin offers various customization options such as creating multipage forms, adding a PayPal checkout option, and collecting more user data.
Anyone running an online business will know the importance of offering visitors (read: potential customers) a seamless checkout experience. Aside from your sales copy, it’s the single most important means of generating direct revenue for your online business.
Out of the box, WordPress doesn’t give you the option to create forms, this will require the installation of a plugin.
In this tutorial, we will be creating a simple order form in WordPress using the Gravity Forms plugin which is commercially available for around $39 for an individual license and up to $199 for a developer license.
However, in the interest of impartiality, I’d like to point out there are several other free and almost free solutions available which all have their advantages and disadvantages compared to Gravity Forms. Some of these include:
- Ninja Forms is one of the main competitors to Gravity Forms and is free for the base version. However, if you want additional functionality, such as PayPal checkout and MailChimp/AWeber options, you could be paying around $199 for the add-ons.
- WordPress Form Manger is another popular, and completely free option. However, it has very limited functionality compared to the paid versions and is suitable for those looking to implement the simplest forms.
- Form Maker has a free version which limits you to only five fields in your form. To have full functionality, including a PayPal option, you’ll have to buy a licence. It’s still one of the cheaper commercial form plugins available for WordPress, but it doesn’t have near the same amount of developer options as Ninja Forms or Gravity Forms.
- Formidable is another premium form plugin, it offers many of the features of the other form plugins.
- Contact Form 7 is one of the most popular of the true free form plugins, with a nice range of extensions.
- Wufoo Shortcode Integration is a good option for users of the Wufoo form builder web application.
Whatever option you choose will depend on the specific product or service you’re selling on your website and the types of fields you need for your customers. For my purposes, I needed a form for a content writing business I’ve been developing, called WordsExpress. The business sells ready-made articles for internet marketers. This requires a user to input fields relating to length of article, number of articles, subject and various keyword and URL options.
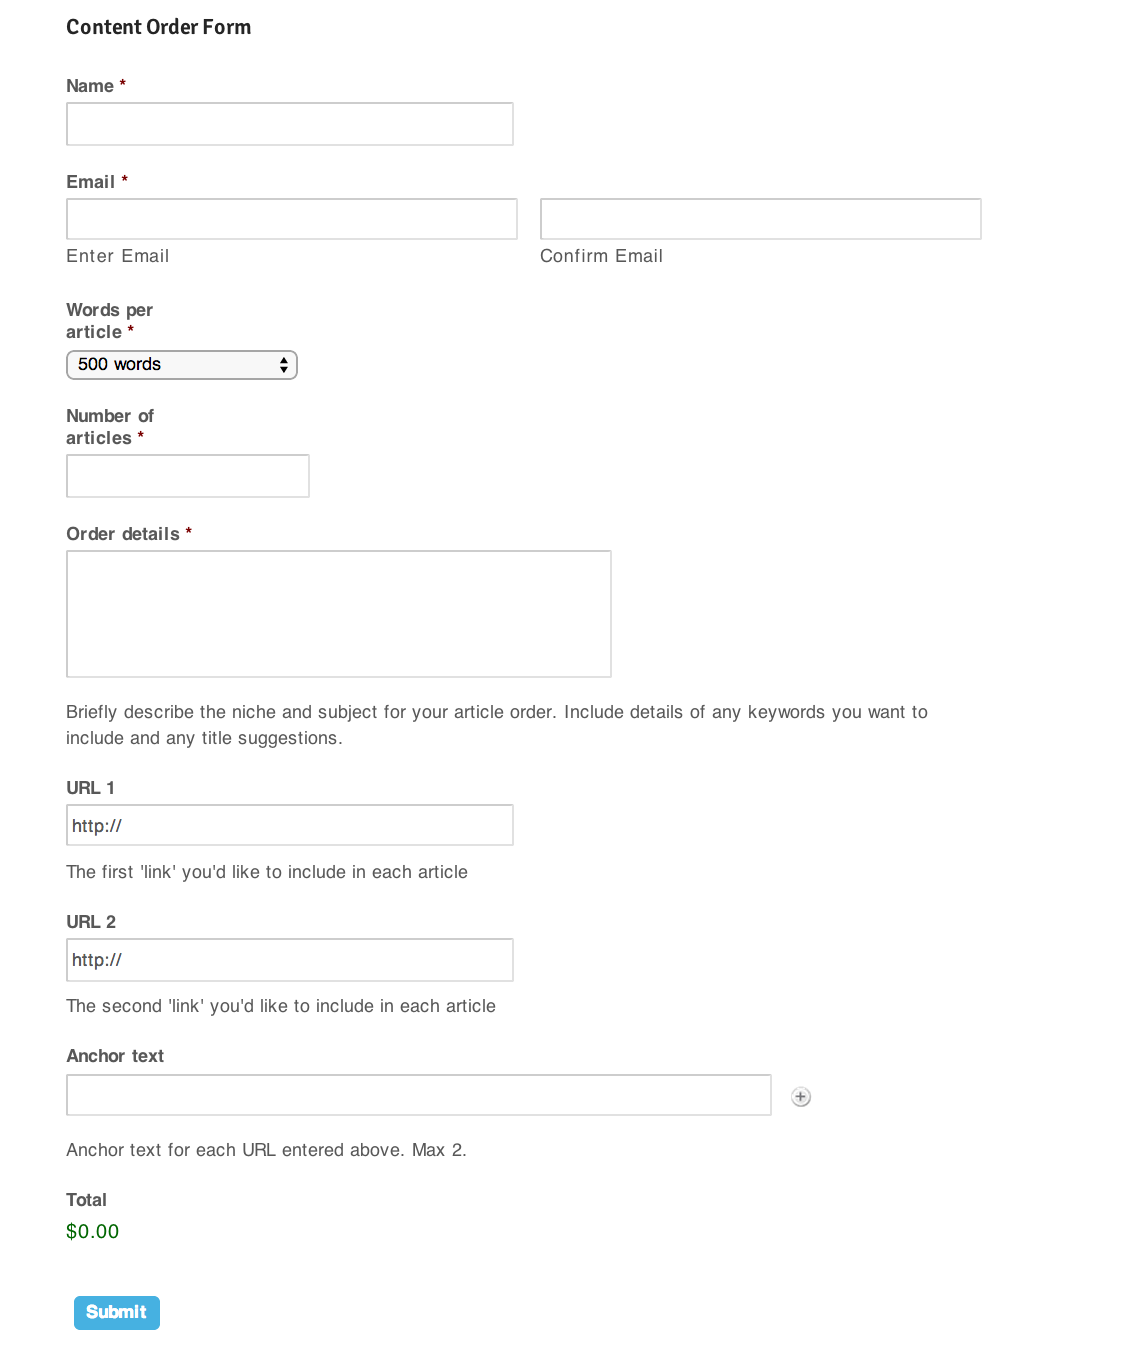
You can see the finished form below:
Now you know what we’ll be creating, let’s get started.
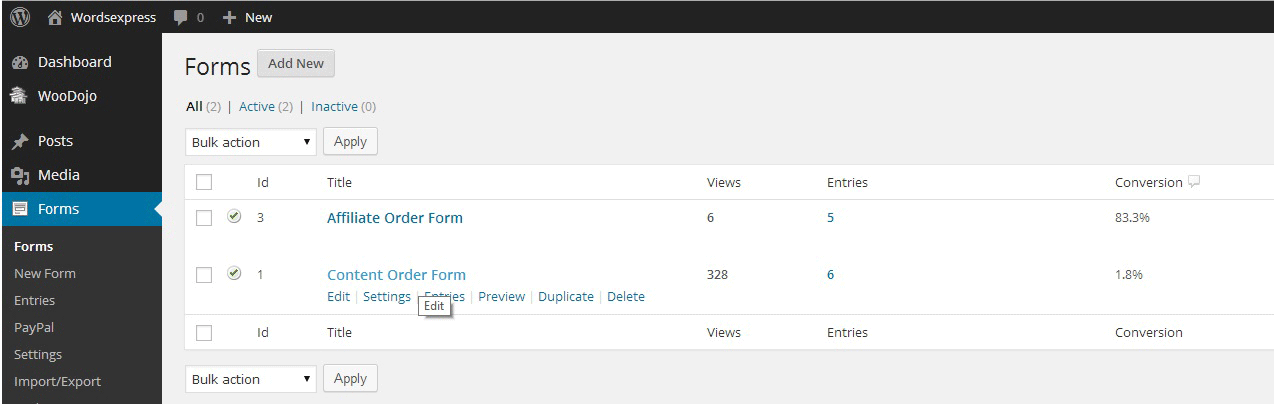
Once you’ve installed the Gravity Forms plugin, in your WordPress Dashboard in the left menu, you’ll see a new selection available called ‘Forms’.
Inside the Forms menu, click ‘Add New’. In the box that pops up, write a title for your form, in this case ‘Content Order Form’. You do not need to enter a description, but if you do, it will appear as text under the title when you publish the form.
Once you’ve created the form, you can start building it field by field. Below is the version used on my site.
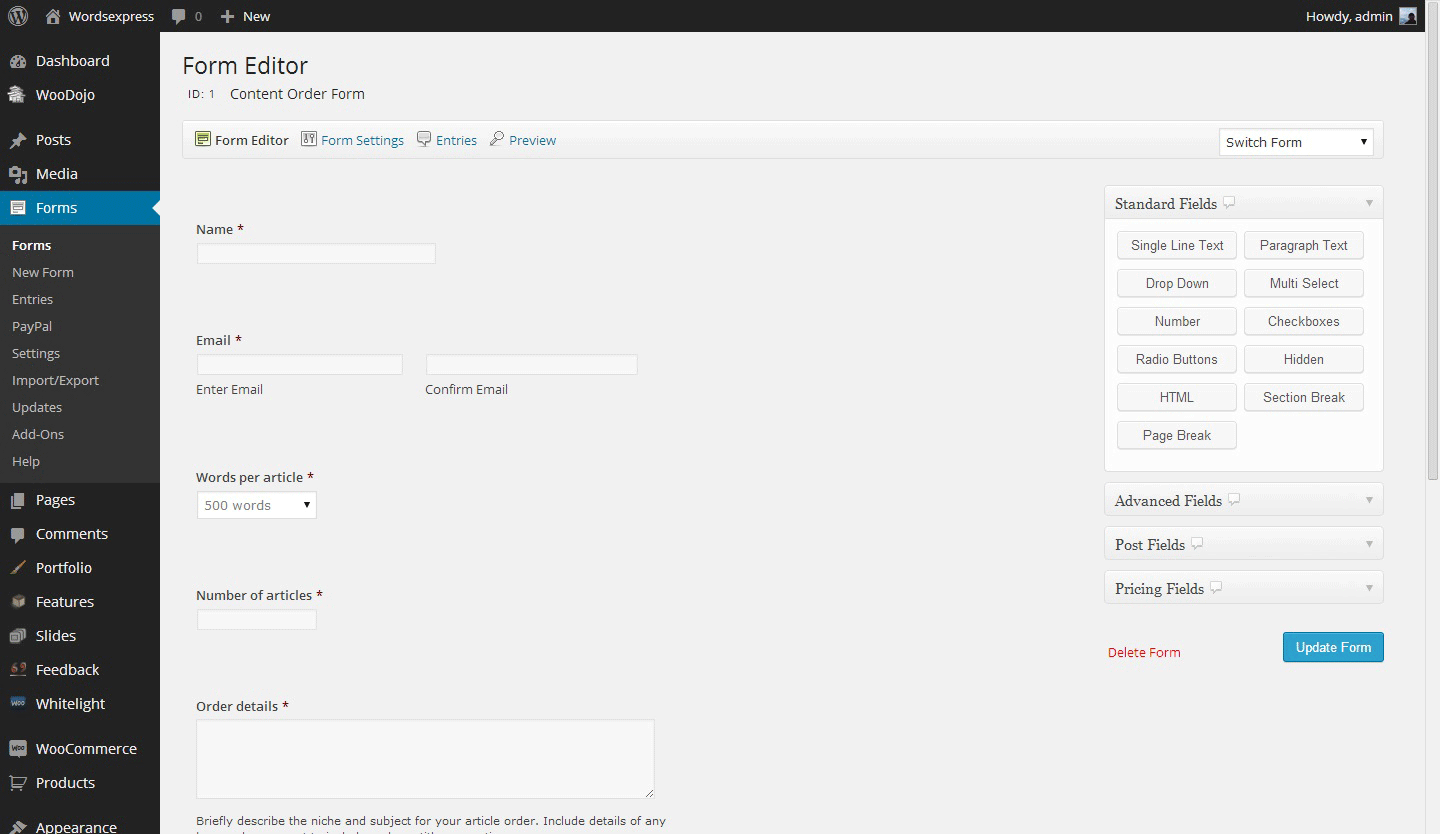
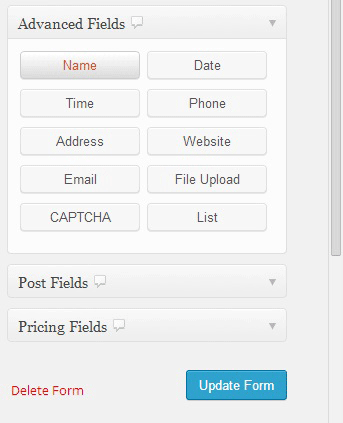
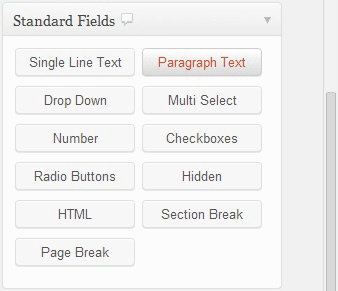
The first field we need is the name field. You can create this simply by selecting the ‘Single Line Text’ from the ‘Standard Fields’ options on the right hand side. However, Gravity Forms has an ‘Advanced Fields’ option called ‘Name’ which creates a nifty name field with space for both the first and last name.
When selected, this should insert the ‘Name’ field at the top of the form. We want to make this a required field, so click on the small down arrow in the top right hand corner of this newly added field.

Leave the ‘Field Label’ as ‘Name’ and at the bottom, check ‘Required’ to make this a required option for visitors to complete. You have a similar option for ‘Email’, via the ‘Advanced Fields’ menu, which will automatically insert an email field. The email field, like the others, has an edit menu which we’ll use to add a ‘Confirm Email’ option. Once you’ve inserted the email field, click on the small down arrow in the top right hand corner of this newly added field.
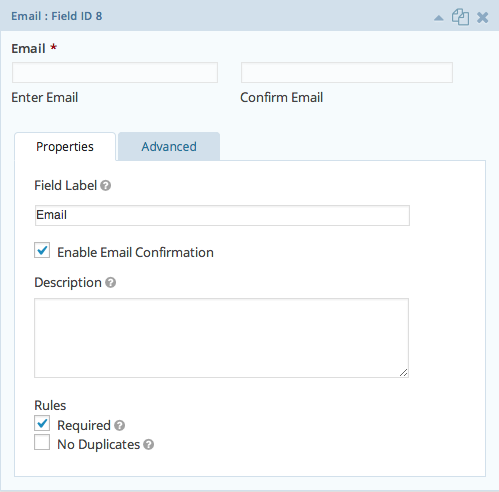
In the email edit box, we only need to check the ‘Enable Email Confirmation’ option and the ‘Required’ option.
Now we want to begin creating the options for customers to choose and customise the product they want to buy from the site. For my site, an article writing business, this means choosing the length of the article and the number of articles. Gravity Forms has specific options for creating product selections which allows you to calculate the values between two or more fields and display the total cost to the user.
In the right hand side, select the ‘Pricing Fields’ menu and click ‘Product’.

This will create the default product field for the form which we want to edit.

We need to make this specific to the content writing business which has options to produce 500 word articles and 300 word articles. For that reason, we’ll name the field ‘Words per article’ to make it clear to the user, and we’ll also choose ‘Drop Down’; from the field type options available, since there are two product variations for users to choose from. There are also other standard form components should they be more suitable for your project.
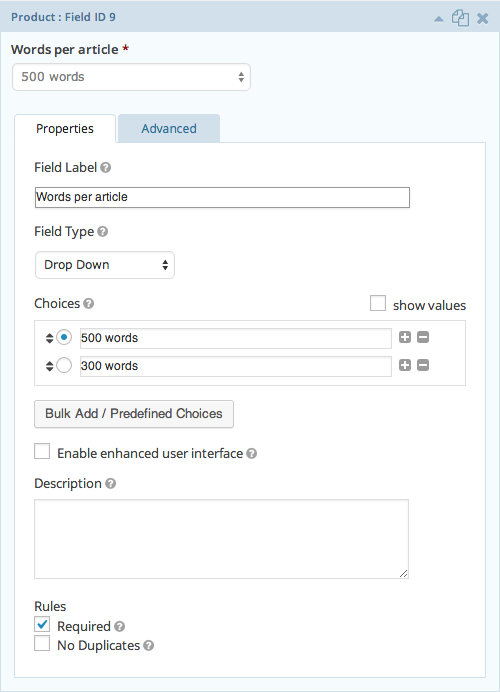
Once you select ‘Drop Down’ you can choose a name for the two product options – in this case, 500 words and 300 words – and select a price for both options. We’ll also check the left circle on the 500 words option to make this the default value. Finally, we’ll check the ‘Required’ option to make it a required field.
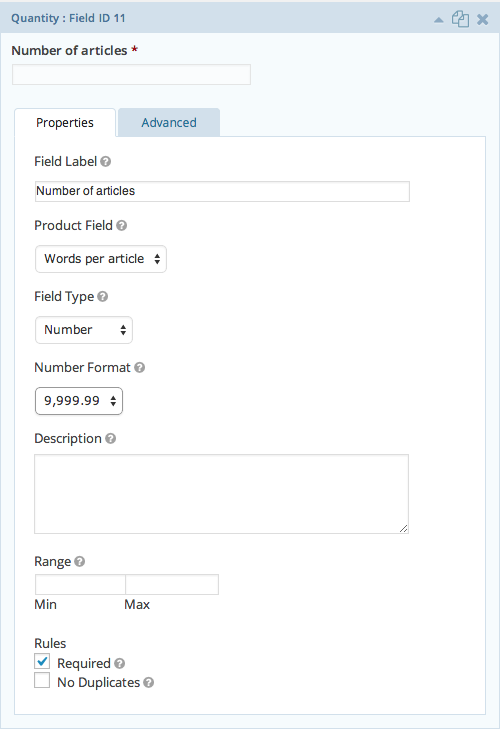
The next field we need is for the quantity of articles. This is easily done by selecting ‘Quantity’ in the ‘Pricing Fields’ menu, allowing us to use this as a multiplier for the products option above and producing a total. Name this field ‘Number of articles’ and make it required.
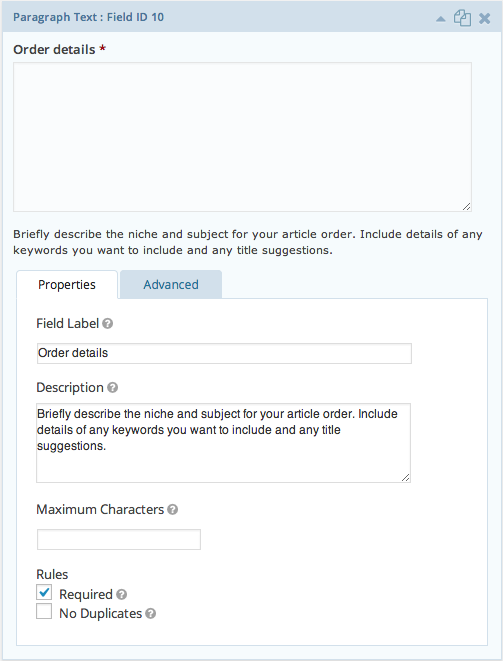
Finally, we need the customer to input details of their order, regarding the subject of the articles they require as well as any URL and anchor text options they want to include. This process should be simple. The first ‘Order details’ field is created using the ‘Paragraph Text’ field option in the ‘Standard Fields’ menu on the right.
Name this field ‘Order details’ and make it required. This particular field will require some explanation to the user, as the title is a little ambiguous. For this, we’ll fill in the ‘Description’ box for this paragraph text field we just created. Describe exactly what you would like the user to enter here.
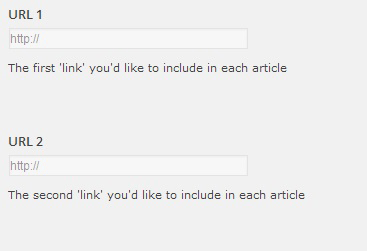
The final two options will allow the user to enter up to two URLs to include in their articles. The ‘Advanced’ field menu allows us to select the ‘Website’ option which neatly constricts the user to entering a web address, and automatically adds the ‘http://’ prefix. We’ll create two of these and name them ‘URL 1’ and ‘URL 2’ and add a description. We don’t need to make this required.
Next, we’ll give the user the option to add up to two anchor texts. We want to be flexible with this, allowing the user to add and subtract their anchor texts at will. For this we’ll use the ‘List’ option in the ‘Advanced Fields’ menu.
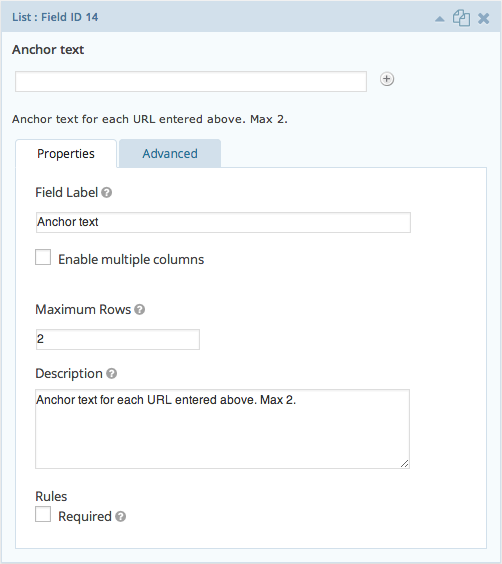
Call this field ‘Anchor text’ and choose ‘2’ as the number of rows (to correspond to the two URL options), and write this information in the ‘Description’ box. Again, leave the ‘Required’ option unchecked as this should be optional.
Finally, you want to be able to calculate the total cost of their order and present this to the user. This is easily done in Gravity Forms in the ‘Pricing Fields’ menu by selecting ‘Total’.
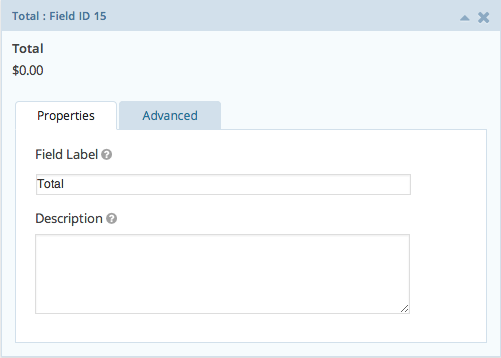
This should automatically insert the total of the order, calculated by multiplying the product selection and quantity, which will be displayed at the bottom of the form. Once this is done, select the ‘Update Form’ button on the right of the page, which should automatically save the form.
Now, it’s a simple case of inserting the form on a page or post. You can do this by inserting a shortcode for the form where appropriate in the ‘Text’ view. It should look something like this:
[gravityform id="3" name="Content Order Form" ajax="true"]
However, if this is too complicated for you, there is another way to insert your form. Simply go to your page or post, put your cursor into the description box where you would like your form to appear and click the ‘Add Form’ button which is next to ‘Add Media’ just below your page or post title.

And that’s it. This was a very simple tutorial on creating a basic order form using Gravity Forms, which will email the user’s submission to whatever email is specified in the ‘admin’ login of your WordPress settings.
You can, of course, change this in the form’s options area. There are many other customisations that can be done with this plugin such as creating multipage forms, adding a PayPal checkout option, and collecting more user data if you so wish. I’ll leave that up to you to explore.
Frequently Asked Questions about Creating a Simple Order Form in WordPress
How can I add more fields to my order form in WordPress?
Adding more fields to your order form in WordPress is quite simple. You can do this by going to the form editor in your chosen form plugin. There, you can add new fields by dragging and dropping them into your form. These fields can range from text boxes, drop-down menus, checkboxes, and more. Remember to save your changes before exiting the form editor.
Can I integrate payment options into my order form?
Yes, you can integrate payment options into your order form. Most form plugins for WordPress offer integration with popular payment gateways like PayPal, Stripe, and others. You can set this up in the settings of your form plugin. Once set up, your customers can make payments directly through the form.
How can I customize the design of my order form?
Customizing the design of your order form can be done within the form editor of your plugin. You can change the layout, colors, fonts, and more to match your website’s design. Some plugins also allow you to add custom CSS for more advanced customizations.
Can I add a file upload field to my order form?
Yes, you can add a file upload field to your order form. This can be useful if you need customers to send you files as part of their order. You can add this field in the form editor of your plugin.
How can I make my order form mobile-friendly?
Most WordPress form plugins automatically create forms that are responsive, meaning they adjust to fit any screen size. However, it’s always a good idea to test your form on different devices to ensure it looks and works correctly.
Can I add a terms and conditions checkbox to my order form?
Yes, you can add a terms and conditions checkbox to your order form. This can be done in the form editor of your plugin. You can also link the checkbox to your terms and conditions page so customers can read them before agreeing.
How can I prevent spam submissions on my order form?
Most form plugins offer spam protection features. This can include CAPTCHA fields, honeypot fields, and more. You can enable these features in the settings of your form plugin.
Can I send automatic confirmation emails to customers who complete the order form?
Yes, you can set up automatic confirmation emails in the settings of your form plugin. You can customize the content of these emails and choose when they are sent.
How can I track the performance of my order form?
You can track the performance of your order form by integrating it with analytics tools like Google Analytics. Some form plugins also offer built-in analytics features.
Can I export the data collected from my order form?
Yes, most form plugins allow you to export the data collected from your order form. This can be done in the settings of your plugin. You can usually choose the format of the export, such as CSV or Excel.