
Festivity is in the air these days; every place is being decorated with Christmas trees, ornaments and colorful lights. In the meantime, web designers are also focusing on creating their own festive artworks, whether it’s a greeting card, a holiday advertisement, or just some seasonal wallpaper. It’s the demand of the season. That’s the reason I thought of creating some colorful Christmas ornaments, which I am going to share with you.
In this tutorial, I’ll show you how to create a 3D Christmas ball ornament in Illustrator from scratch. You will also learn how to create different types of snowflakes and how to incorporate them onto the surface of the Christmas ornament. Hopefully, you will learn some handy Illustrator tips along the way, so let’s get started!
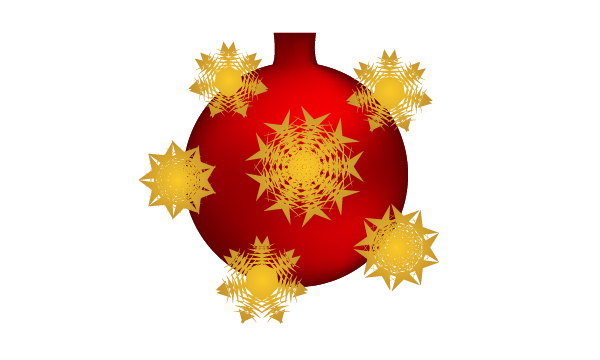
Final result: (Download the completed Illustrator file here.)

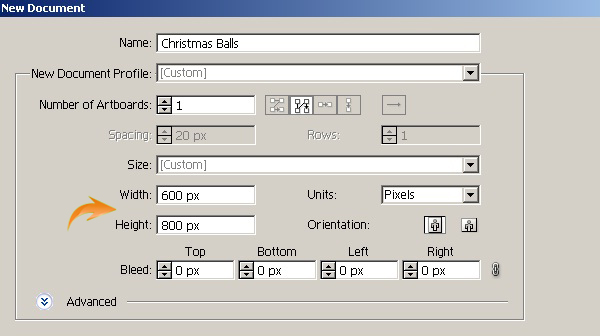
Step 1
Create a new document in Illustrator with a 600px width and an 800px height.
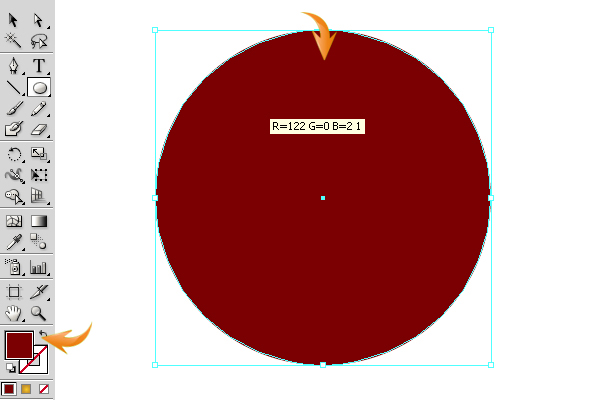
Step 2
First of all, we’ll draw the basic ball shape. Select the ellipse tool to draw an ellipse of the size you want your Christmas ball to be. Hold the Shift key while making your ellipse to get a perfect circle. Choose any fill color and set stroke to “none.” I am going to use dark red fill color to fit our holiday theme.
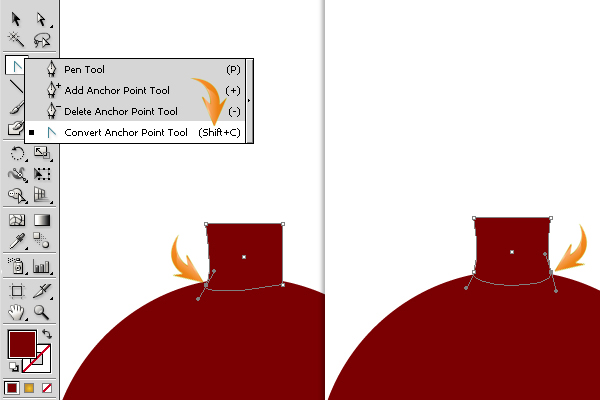
Step 3
To make the Christmas ornament’s neck, select the rectangle tool to draw a small rectangle at center of the top of the ball.

Now select the “Convert Anchor Point Tool” and click and drag the bottom-left anchor point of the rectangle to achieve the shape shown below. Click and drag the bottom-right anchor point in the same way for symmetry.
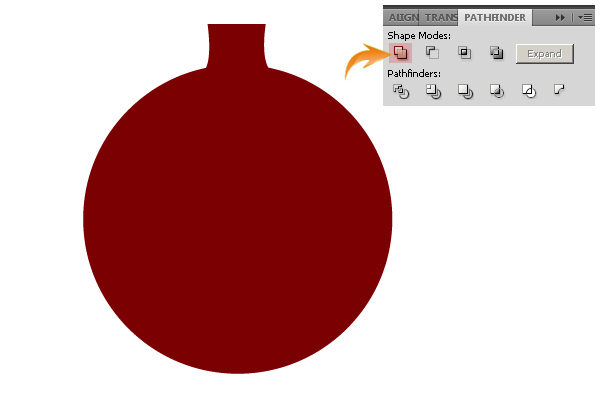
Step 4
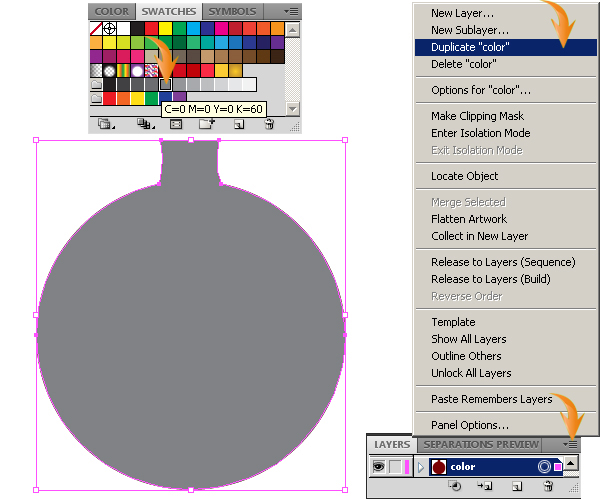
Now, select both the ball and neck layers and go to “Window” > “Pathfinder.” Hit “unite” in the pathfinder window to combine these layers. Label this new shape layer as “Color”.
Step 5
Duplicate the “Color” layer, and label the new duplicate as “mesh1”. We’ll use it for the shading. Select the “mesh1” layer and change its fill to a gray color.
Step 6
Keep the “mesh1” layer selected and pick the mesh tool. Click a point over the ball where you want to create the highlight and then select pure white from the color swatches.
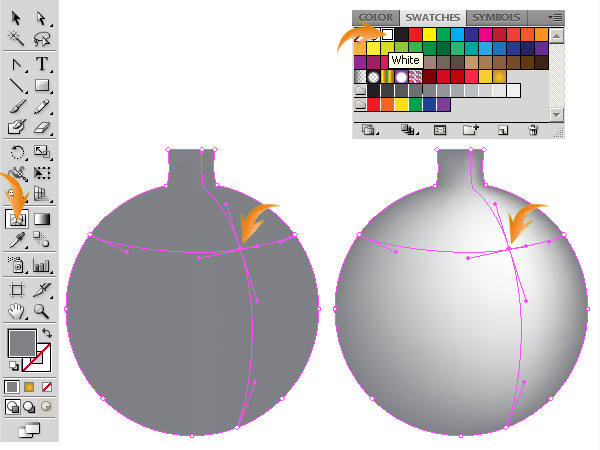
Click another point over the ball using the mesh tool and then pick a lighter gray shade. Experiment with the shading using the same technique to get the desired result.

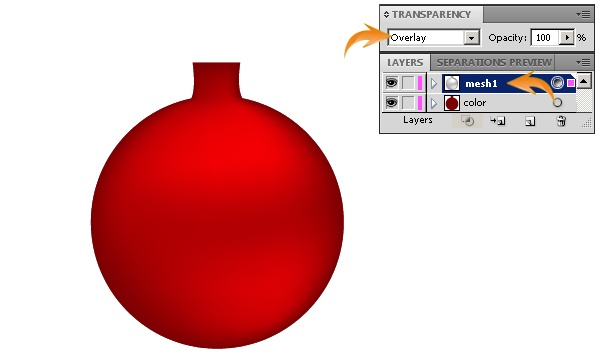
Step 7
Change the blending mode of the “mesh1” layer to “Overlay” to get the effect shown below.
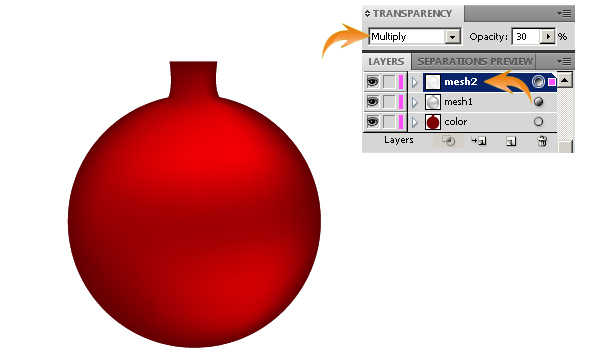
Step 8
Duplicate the “mesh1” layer and label the new duplicate as “mesh2”. Select this layer and change its blending mode to “Multiply” with 30% opacity.
Step 9
Now, I’ll show you how to make various snowflakes in Illustrator. There are many techniques to do so; I’ll show you few of them. Select any fill color to begin with and select the star tool. Apply the star brush on a new layer while holding the Shift key and pressing the up arrow key two or three times to get more sides of the star. I’ve made a star with seven sides. After that, select this star and go to “Effect” > “Distort & Transform” > “Pucker& Bloat.” Use the following settings here.

Step 10
Now, select this new shape layer and go to “Effect” > “Distort &Transform” > “Zig Zag.” Apply the following settings for Zig Zag.

Step 11
To make another snowflake, select the polygon tool and apply it on a new layer while holding the Shift key. You can make even more sides to the snowflake by pressing the up arrow key. Now, use the following “Pucker& Bloat” settings to make a flower.

Step 12
Now, apply the following settings for Zig Zag on the flower shape to make a new, slightly different snowflake.

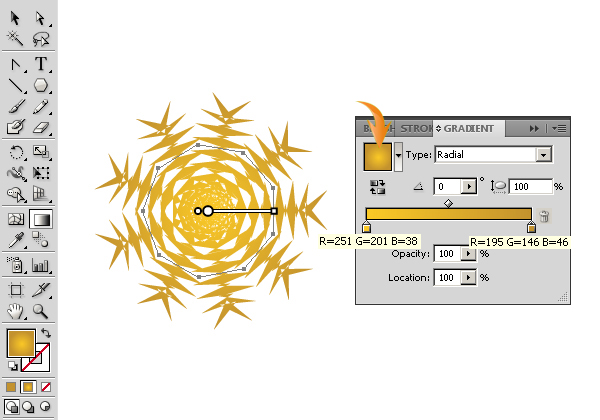
Step 13
Next, select this new snowflake layer and apply following gradient to it. After that, drag this gradient to the swatches.
Step 14
Apply the same gradient on the other snowflakes. Now, duplicate the two types of snowflakes few times, resize them, and arrange them any way you like. Once you are satisfied with their positioning, select all the snowflakes and collect them in new layer. Label this new layer as “Snowflakes”.
Now, duplicate the “Color” layer and place this copy just above the “Snowflakes” layer. After that, select the duplicated color and snowflakes layers and press Ctrl + “7” to create clipping mask. I’ve made another snowflake sequence by experimenting with varied “Pucker& Bloat” and “Zig Zag” settings.
Step 15
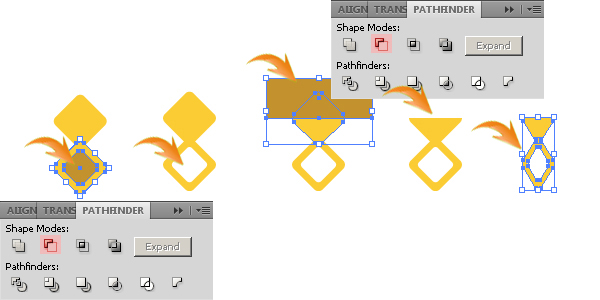
Next, we’ll make the Christmas ornament’s cap. Select the rounded rectangle tool to draw a rounded square. Right-click the document and select “Transform” > “Rotate.” Enter a 45⁰ angle. Duplicate the angled rectangle and arrange it just below the original rectangle. Make a smaller rectangle inside this duplicated one.
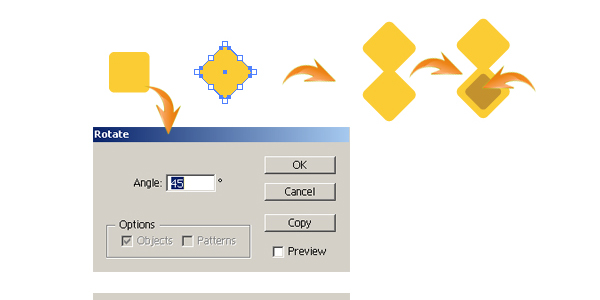
Now, select the bottom two rectangles and hit “Minus Front” within the pathfinder panel. After that, draw a rectangle and position it over the upper half of the top rounded rectangle. Now, select both the top rounded rectangle and this new rectangle and hit “Minus Front” once again in the pathfinder panel. Collect these shapes into new layer and reduce its size a bit horizontally using selection tool (“V”). Label the layer as “Cap pattern”.
Step 16
Duplicate the “Cap pattern” layer twice and arrange the duplicates as shown below over the ball’s neck. After that, select the three layers and hit “unite” in the pathfinder panel. Now, apply the same gradient on the cap that you applied to the snowflakes.

Step 17
Duplicate the cap layer, change the color of the original layer to black and reduce its opacity to 45% to make a subtle shadow.

Step 18
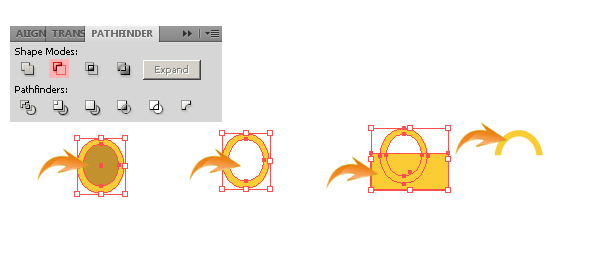
To make the cap’s hook. Draw two ellipses over each other as shown below. Select them and hit “Minus Front” in the pathfinder panel. Draw a rectangle over its lower half, select these shapes and again hit “Minus Front” in the pathfinder panel to get the curvy shape shown below. Resize and position it at top of the cap.
Step 19
Lastly, make two thin rectangles as shown below.

Step 20
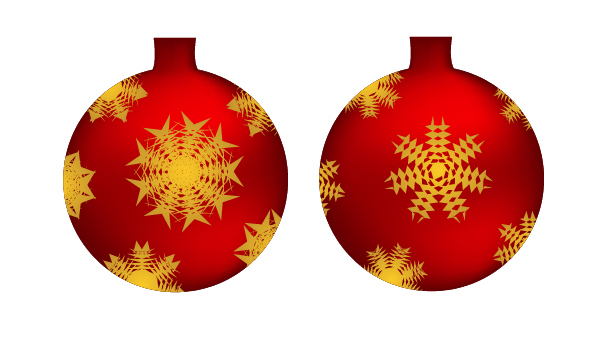
Our gorgeous Christmas ball ornament is ready. You can create different styles of Christmas balls from this simply by changing the color of the background circle. You can try different patterns instead of snowflakes.

I hope you enjoyed the tutorial. I’ll be waiting for your feedback. Happy holidays!
Frequently Asked Questions about Creating a Christmas Ornament Vector in Illustrator
How can I add more details to my Christmas ornament vector in Illustrator?
Adding more details to your Christmas ornament vector can make it more visually appealing. You can add details like patterns, gradients, or even text. To add a pattern, select the shape you want to add the pattern to, then go to the Swatches panel and select a pattern. To add a gradient, select the shape, then go to the Gradient panel and choose the colors you want. To add text, use the Type tool, click on the shape where you want the text to be, and start typing.
Can I use Illustrator to create other types of Christmas vectors?
Yes, Illustrator is a versatile tool that can be used to create a variety of Christmas vectors. You can create vectors of Christmas trees, snowflakes, reindeer, and more. The process is similar to creating a Christmas ornament vector. You just need to use different shapes and details.
How can I make my Christmas ornament vector look more realistic?
To make your Christmas ornament vector look more realistic, you can add shading and highlights. Shading can be added by creating a new shape that covers the part of the ornament that would be in shadow, then filling it with a darker color. Highlights can be added by creating a new shape that covers the part of the ornament that would be lit up, then filling it with a lighter color.
Can I animate my Christmas ornament vector in Illustrator?
While Illustrator is primarily a tool for creating static images, it does have some basic animation capabilities. You can use the Blend tool to create a sequence of shapes that transition from one to another, giving the illusion of movement. However, for more complex animations, you might want to use a dedicated animation software like Adobe After Effects.
How can I export my Christmas ornament vector for use in other applications?
To export your Christmas ornament vector, go to the File menu, select Export, then choose the format you want. If you want to maintain the vector quality, choose a vector format like SVG or EPS. If you want to use the image in a web page or a document, you might choose a raster format like JPEG or PNG.
Can I use my Christmas ornament vector for commercial purposes?
Yes, you can use your Christmas ornament vector for commercial purposes, as long as you created it yourself and it doesn’t infringe on any copyrights. However, if you’re using stock images or patterns in your design, you need to make sure they are licensed for commercial use.
How can I create a 3D effect in my Christmas ornament vector?
Illustrator has a 3D effect feature that can be used to give your Christmas ornament vector a three-dimensional look. To use this feature, select the shape you want to apply the effect to, then go to the Effect menu, select 3D, and choose the type of 3D effect you want.
Can I change the color of my Christmas ornament vector after I’ve created it?
Yes, you can change the color of your Christmas ornament vector at any time. Just select the shape you want to change the color of, then go to the Color panel and choose a new color.
How can I create a pattern for my Christmas ornament vector?
To create a pattern, draw the design you want to use as a pattern, then select it and go to the Object menu, select Pattern, and choose Make. You can then apply this pattern to your Christmas ornament vector using the Swatches panel.
Can I resize my Christmas ornament vector without losing quality?
Yes, one of the advantages of using vectors is that they can be resized without losing quality. To resize your Christmas ornament vector, select it, then use the bounding box handles to resize it. Hold down the Shift key while resizing to maintain the proportions.