
Vectorized characters are often used to build a friendlier brand for businesses. They carry great visual appeal and have an immediate impact on viewers, and they’re also a rare opportunity for designers to unleash their creativity without normal business constraints. There are lots of graphic design applications that can help you make your next mascot, including Illustrator, Photoshop, and Corel Draw.
In this tutorial, I’ll show you how to create an irresistibly cute vector monster in Illustrator. We’ll use the pen tool, the pencil tool, shape tools, symbol tools, and various options within the effects menu to achieve the final outcome. We’ll use simple techniques leading to a gorgeous 3D character. So, let’s get started!
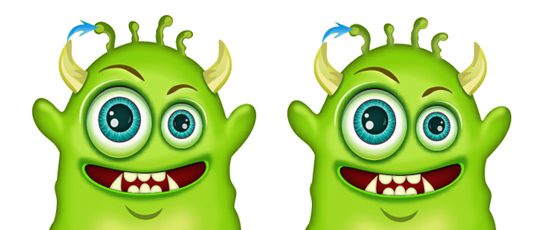
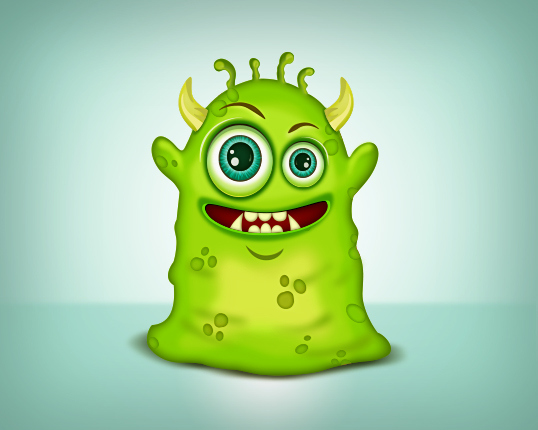
Final result: (Download the layered design file.)

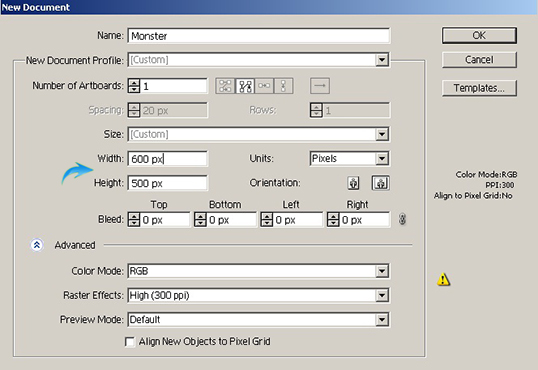
Step 1
Create a new document in Illustrator with a 600px width and a 500px height.
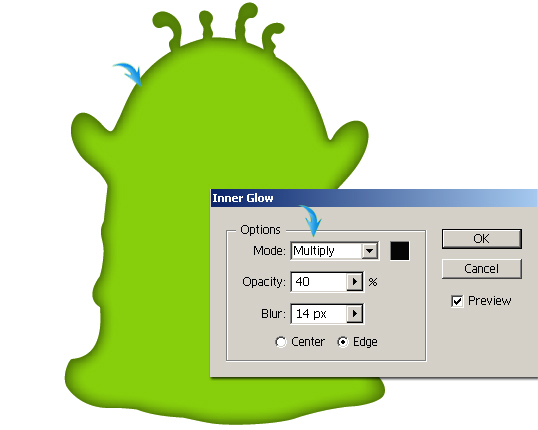
Step 2
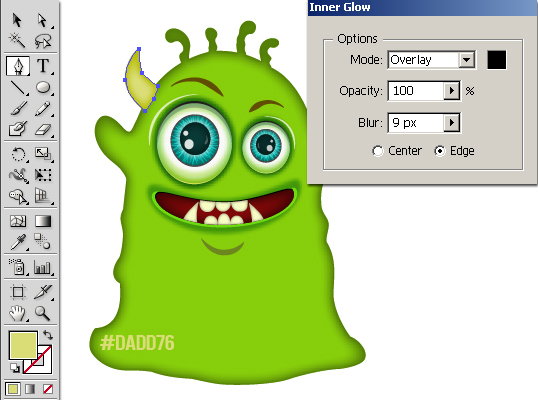
Draw the basic shape of monster using the pen tool or the pencil tool, whatever tool you are comfortable with. Your monster doesn’t have to be exactly like mine, you can make the shape however you like. Label this layer as “Body.”

Now, select the body layer by pressing the ring-shaped target on the right side of the respective layer and go to “Effect” > “Stylize” > “Inner Glow.” Use the following settings here.
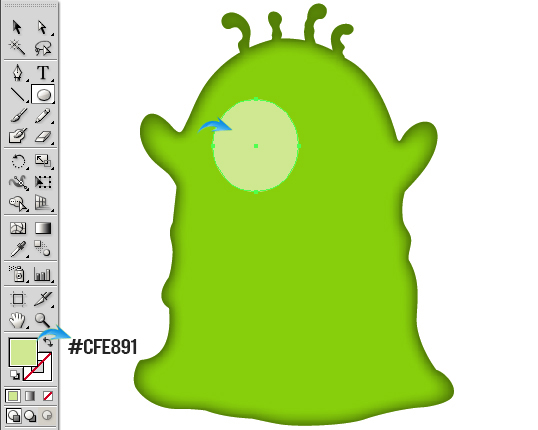
Step 3
Next, we’ll make the eyes. Draw an ellipse using the ellipse tool.
Step 4
Draw another ellipse inside the previous one in white. Select it and go to “Effect” > “Blur” > “Gaussian Blur.” Apply a 10px value here.

Step 5
To create shading at the bottom part of eye ball, draw an ellipse. Duplicate it and drag it upwards. Now, select both of the ellipses and press “Minus Front” shape mode in the pathfinder window (Shift + Ctrl + F9).
After that, apply a 9px Gaussian blur effect on the semilunar shape and change its blending mode to “Multiply.”

Step 6
To blend the eye layers, draw a gray ellipse covering the eyeball, and change its blending mode to “Screen” and its opacity to 50%.

Next, make another semilunar shape with a black fill color for the top part of the eye ball. Duplicate it, drag it a bit downward, and change its color to lighter gray as shown below.

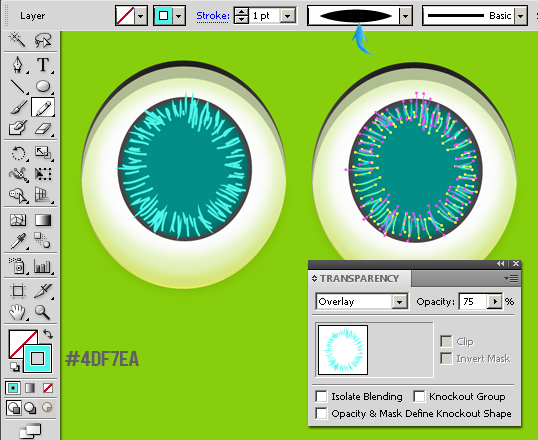
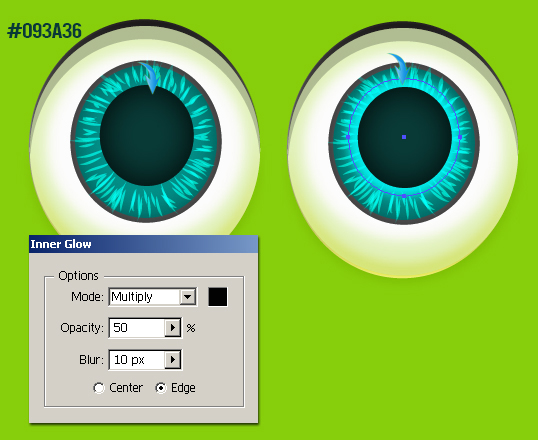
Step 7
Now, draw a bluish ellipse above the rest of the layers with a gray 1pt stroke and apply the following settings for inner glow.

Now, set the fill color to none and pick a stroke color like the one below. Select the pencil tool to draw irregular lines over the previous circle. After that, select these lines and change their width profile to “1” from the top options bar. Reduce the opacity of this layer to 75% and change its blending mode to “Overlay.”
Step 8
Draw a smaller ellipse and apply the following inner glow values to it. After that, draw a larger white ellipse behind it, and apply an 8px Gaussian blur effect to it. Change the blending mode of this layer to “Overlay.”
Next, make the light spots shown below.

Step 9
Draw a dark green ellipse below the rest of the eye layers, and apply a 10px Gaussian blur effect on it to blend it seamlessly with the body of monster.

Step 10
Now set the fill color to none and choose a 3pt stoke. Draw a curved line using the pen or pencil tool as shown below. After that, select it and change its width profile to “width profile1.”

Make the eyebrow by drawing a 7pt stroke and change its width profile to “width profile 5.”

Step 11
Select all the eye layers and click on the options square at the top-right corner of the layers panel. Choose “Collect in New Layer” from the options. Duplicate this layer, select it, right-click the canvas, and choose “Transform” > “Reflect.” Reflect it vertically to adjust the direction of the highlight and eyebrow on the duplicated eye. Now decrease its size and position it on the right side.

Step 12
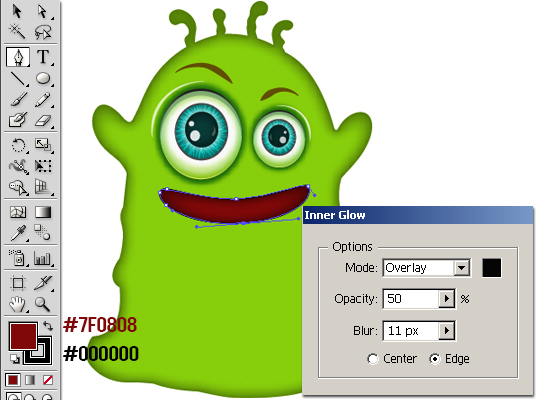
Next, we’ll make monster’s mouth. Set the following fill and stroke (1pt) colors. Select the pen tool and draw the shape shown below. After that, apply an inner glow effect on it using the following settings.
Step 13
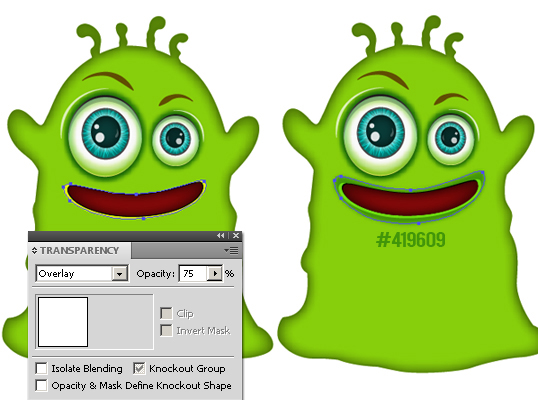
Duplicate the mouth shape, place it below the original layer, and drag a bit downwards. Change its fill color to white and its stroke to none. Now, change its blending mode to “Overlay” and reduce its opacity to 75%. To blend the mouth with the body, duplicate the mouth shape layer and place it below the original. Set its fill color to a dark green and apply a 10px Gaussian blur effect to it. After that, increase the size of shape, as shown below.
Step 14
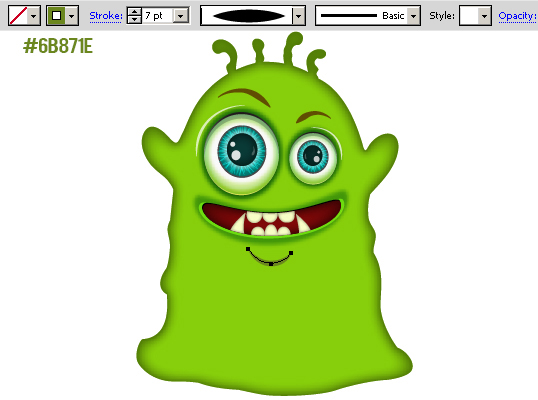
Make the teeth using the pen tool and the ellipse tool. Look below for clarity.

To confine the teeth to the mouth area, duplicate the mouth shape once again, set its fill and stroke to “none,” and place it above the teeth layer. Now, select the teeth and this duplicated mouth layer and go to “Object” > “Clipping Mask” >“Make.” After that, apply the inner glow effect on the teeth using the following settings.

Step 15
Make the monster’s chin by drawing a curved line with 7pt stroke, and then change its width profile to “Width profile1.”
Step 16
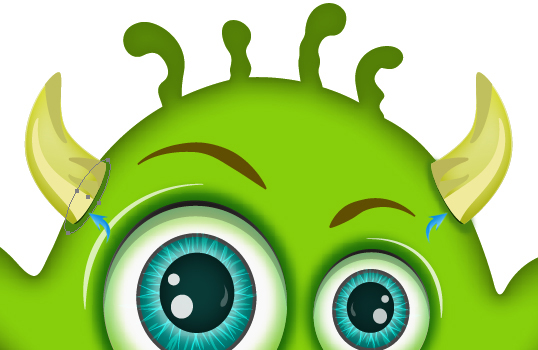
Now, we’ll give the monster horns. Draw the shape shown below using the pen tool and apply the following inner glow settings to it.
Draw few shapes shown below to add some shading to the horn. Now, to confine these shapes to the horn, use the same technique we used to confine the teeth to the mouth in step 14.

Step 17
Draw an ellipse with a dark green fill color, rotate, and place it below the horn layers as shown below. After that, apply a 5px Gaussian blur effect to it so that it blends with the body. Duplicate the horn, reflect it vertically, and position it on the right side.
Step 18
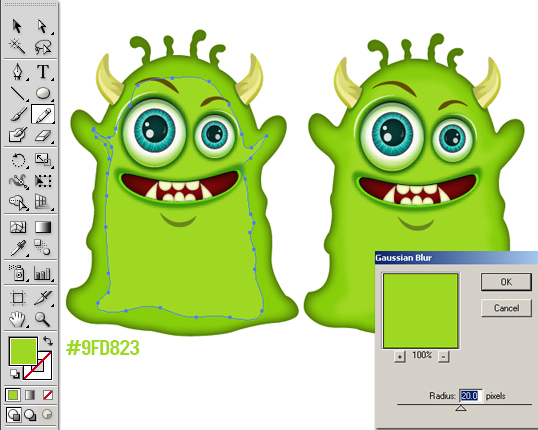
Next, we’ll do some shading over the monster’s body. Select the pencil or pen tool and roughly make the shape shown below. Pick a lighter green fill color compared to the body’s color. Select this new shape and apply a 20px Gaussian blur effect to it.
Step 19
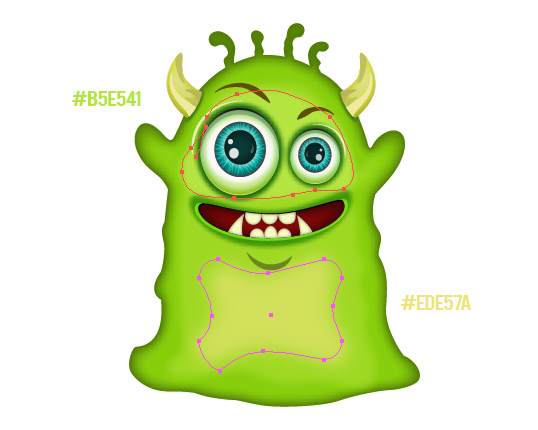
Draw two areas around the eyes and belly with the following fill color and apply a 20px Gaussian blur effect to both.
Draw few more shapes below the eyebrows and over the ears and apply a 12px Gaussian blur effect to them.

Step 20
Draw the shapes inside the small tentacles on the head, and apply 2-3px Gaussian blur effect to them.
Draw few strokes over the body and apply a 20px Gaussian blur effect to them.

Step 21
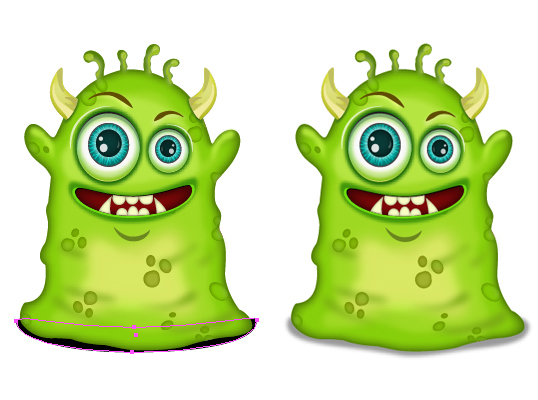
We are almost done with our monster. However, you can add few spots if you want. To do this, draw 4-5 irregular spots, select them, and drag them to the symbols window. Now, select the “symbol sprayer tool” to spray them over the body, and play around with the symbol shifter, scruncher, sizer, and spinner tools to give the spots a more random look. Once you are satisfied with their appearance, confine them to the body by adding a clipping mask.


Step 22
To make the monster’s shadow, draw the shape with a black fill color below the rest of the layers. Apply a 12px Gaussian blur effect to it. Change its blending mode to “Multiply” and reduce its opacity to 40%.
That’s it guys. I hope you learned something interesting. Experiment with your monster and share your results!
Frequently Asked Questions about Creating a Monster Mascot in Illustrator
How can I add more details to my monster mascot in Illustrator?
Adding details to your monster mascot can make it more appealing and unique. You can add details like fur, scales, or spots by using the brush tool or the blob brush tool. You can also use the gradient tool to add depth and dimension to your mascot. For more intricate details, you can use the pen tool to draw shapes and lines. Remember, the key to a great mascot is to make it unique and memorable, so don’t be afraid to experiment with different tools and techniques.
Can I animate my monster mascot in Illustrator?
While Adobe Illustrator is primarily a graphic design tool, you can create simple animations using the blend tool. However, for more complex animations, you might want to consider using a dedicated animation software like Adobe After Effects. You can easily import your Illustrator files into After Effects and animate them there.
How can I make my monster mascot look more professional?
To make your monster mascot look more professional, pay attention to the details. Use consistent line weights, make sure your colors are harmonious, and keep your shapes simple and clean. Also, consider the personality of your mascot. A professional mascot should be unique, memorable, and representative of your brand.
What are some tips for creating a unique monster mascot?
To create a unique monster mascot, start by sketching out different ideas. Experiment with different shapes, colors, and features. Try to think outside the box and create a mascot that is different from what’s already out there. Once you have a design you like, you can refine it in Illustrator.
How can I use my monster mascot in my branding?
A monster mascot can be a great addition to your branding. You can use it on your website, social media profiles, marketing materials, and more. Just make sure that your mascot is consistent with your brand’s personality and values.
Can I create a monster mascot in Illustrator if I’m a beginner?
Absolutely! Illustrator has a range of tools that are beginner-friendly. Start with basic shapes and as you get more comfortable, you can start adding more details and using more advanced tools.
How can I add texture to my monster mascot in Illustrator?
Adding texture to your mascot can give it a more realistic and interesting look. You can add texture by using the grain effect, the brush tool, or by importing texture images and applying them to your shapes.
How can I make my monster mascot look cute?
To make your monster mascot look cute, try using bright colors, round shapes, and big eyes. You can also give it a friendly smile or a cute accessory like a bow or a hat.
Can I sell my monster mascot designs?
Yes, you can sell your monster mascot designs. You can sell them as stock images, or you can offer custom mascot design services. Just make sure that your designs are original and not infringing on any copyrights.
How can I improve my skills in creating monster mascots in Illustrator?
The best way to improve your skills is through practice. Try creating different types of mascots, experiment with different tools and techniques, and don’t be afraid to make mistakes. You can also learn from other designers by studying their work and taking online courses or tutorials.