
- Explain how PayPal works (IPN and PDT process). Chapter One
- Give a good example to show how register work with PayPal, containing database, controller and front end form with jQuery functionalities. And explain how to setup a PayPal account (Sandbox and real PayPal business account example). Chapter Two
This tutorial gives a big picture of PayPal process (PDT and IPN), and a real project from starting point to the end. Good explanation and pictures, detailed comments in code line. Hopefully, it will be useful for all readers.
Chapter Three
After setup PayPal sandbox working with a real project, we can start to setup our business PayPal account and start to publish our project and earn money.
Setup Genuine PayPal Business Account
The genuine PayPal business account panel is a little bit different from Sandbox, but other settings are quite the same. So I just point out where the settings are, and settings should be the same as previous examples.
First apply for your business PayPal account, but we skip this step, because PayPal business account is quite different in different situations and companies. As you see, there are many personal sensitive details, I have to mask. So, click on Profile link.
Then, in the source code, comment out everything related to ‘sandbox’, and change the token, and uncomment the code next to sandbox code.
I have highlighted the changes in code:
1. You need to change redirect URL to PayPal, instead of sandbox: (CAUTION: the snippet contains ‘>’ and ‘&’, those should be ‘>’ and ‘&’)
public function registerSubmit()

{

// more code here ...

// return url to paypal

// return json_encode(array('result' => true, 'url' => "https://www.sandbox.paypal.com/cgi-bin/webscr?cmd=_s-xclick&hosted_button_id=HA9DZBCKXKCL2&item_number=".$itemId."&amount=".$this->amount));

        return json_encode(array('result' => true, 'url' => "https://www.paypal.com/cgi-bin/webscr?cmd=_s-xclick&hosted_button_id=SSZF9WEUY87GS&item_number=".$itemId."&amount=".$this->amount));
2. _PDT changes:
private function _PDT()

{

// more code here ...

// $auth_token = "_PJaHiwRfwMmWzW-9nuPuSguYxC-1d9KpxaasaNANtIvyOcmqY6jXNkRmxW";

$auth_token = "OxDenzKmrWPyEXU0YzIg2zs-VAe7ufCADyjbfxF_RpREL4rLEslZrSa21R4";$req .= "&tx=$tx_token&at=$auth_token";// post back to PayPal system to validate$header = "POST /cgi-bin/webscr HTTP/1.0rn";
// $header .= "Host: www.sandbox.paypal.comrn";

$header .= "Host: www.paypal.comrn";
$header .= "Content-Type: application/x-www-form-urlencodedrn";

$header .= "Content-Length: " . strlen($req) . "rnrn";
// $fp = fsockopen ('ssl://www.sandbox.paypal.com', 443, $errno, $errstr, 30); // open socket

$fp = fsockopen ('ssl://www.paypal.com', 443, $errno, $errstr, 30); // open socket

// more code here ...

}
3. _IPN changes:
private function _PDT()

{

// more code here ...

// $url= 'https://www.sandbox.paypal.com/cgi-bin/webscr';

$url= 'https://www.paypal.com/cgi-bin/webscr';

// more code here ...

// curl_setopt($ch, CURLOPT_HEADER , array('Host: www.sandbox.paypal.com'));

curl_setopt($ch, CURLOPT_HEADER , array('Host: www.paypal.com'));

// more code here ...

}
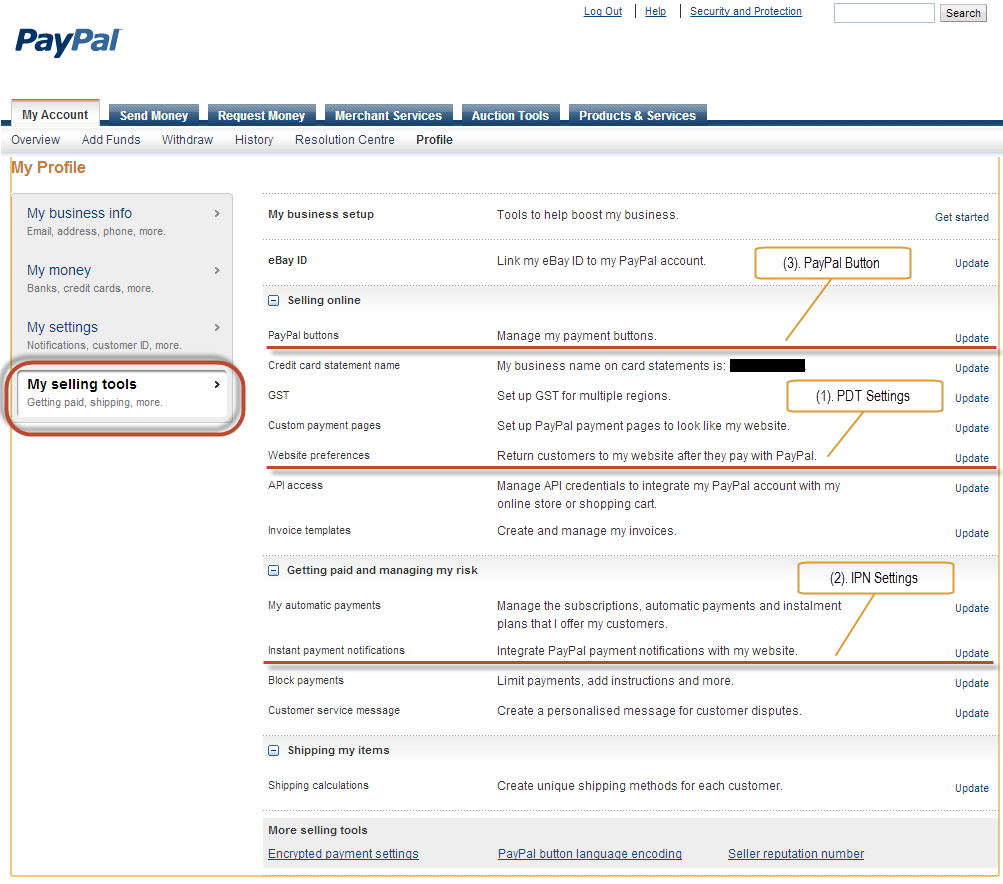
Then go to ‘My selling tools’ and you can setup you PDT, IPN, and PayPal button.
Then, DONE! Thank you!
I hope you enjoyed my quick tutorial on how to use Paypal to setup automatic payments.
Frequently Asked Questions about Registering for a PayPal Account
What are the benefits of setting up a PayPal business account?
A PayPal business account offers several benefits. It allows businesses to accept payments online and in-person from customers worldwide. It also provides the ability to send invoices and accept payments on your website. Moreover, it offers access to business loans to help grow your business. PayPal also provides Seller Protection, which can help protect your online sales, minimize claims and chargebacks, and help prevent merchant fraud.
How can I upgrade my personal PayPal account to a business account?
Upgrading your personal PayPal account to a business account is a straightforward process. Log in to your PayPal account, click on the settings icon at the top of the page, then click Upgrade to a Business account. Follow the prompts to complete the upgrade process. Remember, you’ll need to provide additional information about your business.
What information do I need to provide to set up a PayPal business account?
To set up a PayPal business account, you’ll need to provide your email address, create a password, and provide your business name, address, and phone number. You’ll also need to provide your legal first and last name, date of birth, and Social Security number. For businesses, you’ll need to provide your EIN or Tax ID number.
Can I use PayPal if my business is not incorporated?
Yes, you can use PayPal even if your business is not incorporated. PayPal offers different types of accounts for different business structures, including sole proprietorships, partnerships, and corporations.
How can I accept payments through PayPal on my website?
To accept payments through PayPal on your website, you’ll need to integrate PayPal’s payment buttons or use a shopping cart that supports PayPal. PayPal provides step-by-step instructions on how to add payment buttons to your website.
What are the fees associated with a PayPal business account?
PayPal charges a fee for each transaction processed through your account. The fee is typically a percentage of the transaction amount plus a fixed fee. The exact fee depends on the type of transaction and the country of the buyer.
How can I link my bank account to my PayPal business account?
To link your bank account to your PayPal business account, log in to your PayPal account, click on Wallet at the top of the page, then click Link a bank account. Follow the prompts to enter your bank account information.
How can I send invoices through PayPal?
PayPal allows you to create and send invoices directly through your account. You can customize your invoices with your logo and item details, and customers can pay directly through the invoice using their credit or debit card, or their own PayPal account.
What is PayPal’s Seller Protection, and how does it work?
PayPal’s Seller Protection is a program that provides protection to sellers against claims, chargebacks, or reversals that are a result of unauthorized purchases or items not received. To be eligible for Seller Protection, you must meet certain requirements, including shipping to the address on the Transaction Details page and providing proof of shipment.
Can I use PayPal for international transactions?
Yes, PayPal allows you to accept payments from customers worldwide. However, fees for international transactions may be higher than domestic transactions. You can check PayPal’s fee structure on their website for more details.