Change Colors In Photoshop with the Hue Blend Mode
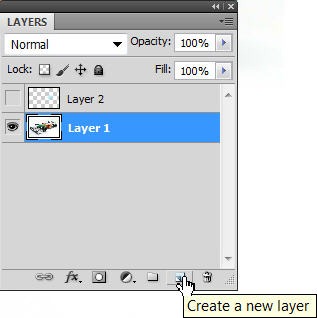
 2. Create a new layer above this image by clicking on the New Layer icon at the bottom of the Layer’s palette/panel.
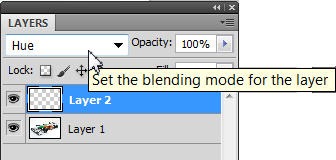
 3. Click on the Blending Modes menu at the top of the Layers palette and set the new layer’s blend mode to Hue.
 4. Choose the Brush tool (B) and then select the color you want to apply by clicking on the foreground color. Use the Color Picker to pick a color, then click OK.
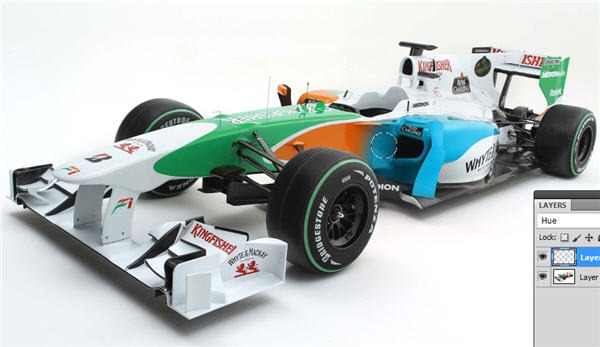
5. Start painting on the new layer over the object you’re change the color on. Because the layer you are painting on has the Hue blend mode applied, the paint does not go on opaquely. Highlights, shadows and shines are all dealt with very nicely.
 6. If you make a mistake or “go outside the lines” you can switch to the Eraser tool (E) and carefully erase the new color. This is generally not too much of a problem with this image, thanks to the blend mode change. If you paint on top of white pixels on the underlying layer, there will be no change of color. For this example I’ve painted all orange and red livery with a light blue brush.
 7. To finish up, select another color for the Foreground and paint over the green livery and green strips on the tyres.
 This is just one, of many ways to change colors in Photoshop. It’s very quick and easy and handles highlights and shadows extremely well.
Frequently Asked Questions about Changing Colors in Photoshop with the Hue Blend Mode
How does the Hue Blend Mode work in Photoshop?
The Hue Blend Mode in Photoshop is a powerful tool that allows you to change the hue of an image while preserving its luminosity and saturation. It works by replacing the hue of the base color with the hue of the blend color. This means that the brightness and saturation of the image remain the same, but the color changes. This is particularly useful when you want to change the color of an object in an image without affecting its shading or texture.
Can I use the Hue Blend Mode to change the color of a specific area in my image?
Yes, you can use the Hue Blend Mode to change the color of a specific area in your image. To do this, you need to create a selection around the area you want to change. You can use any of the selection tools in Photoshop, such as the Lasso Tool, the Quick Selection Tool, or the Magic Wand Tool. Once you have made your selection, you can then apply the Hue Blend Mode to change the color of the selected area.
What is the difference between the Hue Blend Mode and the Color Blend Mode in Photoshop?
The Hue Blend Mode and the Color Blend Mode in Photoshop are similar in that they both allow you to change the color of an image. However, they work in slightly different ways. The Hue Blend Mode changes the hue of the base color to the hue of the blend color, while preserving the luminosity and saturation of the base color. On the other hand, the Color Blend Mode changes both the hue and the saturation of the base color to the hue and saturation of the blend color, while preserving the luminosity of the base color.
Can I use the Hue Blend Mode to create a monochromatic image?
Yes, you can use the Hue Blend Mode to create a monochromatic image. To do this, you need to create a new layer and fill it with the color you want your image to be. Then, set the blend mode of this layer to Hue. This will change the hue of your image to the hue of the color you filled the layer with, creating a monochromatic effect.
How can I adjust the intensity of the Hue Blend Mode?
You can adjust the intensity of the Hue Blend Mode by changing the opacity of the layer. The opacity controls how much of the blend color is applied to the base color. If you set the opacity to 100%, the blend color will completely replace the base color. If you set the opacity to a lower value, the blend color will only partially replace the base color, creating a more subtle effect.
Can I use the Hue Blend Mode to change the color of a grayscale image?
Yes, you can use the Hue Blend Mode to change the color of a grayscale image. However, because a grayscale image has no color information, the result will be a monochromatic image. To change the color of a grayscale image, you need to create a new layer and fill it with the color you want your image to be. Then, set the blend mode of this layer to Hue.
What other blend modes can I use to change the color of an image in Photoshop?
In addition to the Hue Blend Mode, there are several other blend modes you can use to change the color of an image in Photoshop. These include the Color Blend Mode, the Saturation Blend Mode, and the Luminosity Blend Mode. Each of these blend modes works in a slightly different way, allowing you to achieve different effects.
Can I use the Hue Blend Mode to change the color of a text layer in Photoshop?
Yes, you can use the Hue Blend Mode to change the color of a text layer in Photoshop. To do this, you need to create a new layer and fill it with the color you want your text to be. Then, set the blend mode of this layer to Hue and place it above the text layer in the Layers panel.
How can I revert the changes I made using the Hue Blend Mode?
If you want to revert the changes you made using the Hue Blend Mode, you can simply change the blend mode of the layer back to Normal. This will remove the hue change and restore the original color of the image.
Can I use the Hue Blend Mode to change the color of a pattern or texture in Photoshop?
Yes, you can use the Hue Blend Mode to change the color of a pattern or texture in Photoshop. This can be particularly useful when you want to change the color of a pattern or texture without affecting its detail or contrast. To do this, you need to create a new layer and fill it with the color you want your pattern or texture to be. Then, set the blend mode of this layer to Hue.
Jennifer Farley is a designer, illustrator and design instructor based in Ireland. She writes about design and illustration on her blog at Laughing Lion Design.
