

Key Takeaways
- Amazon Marketing Services provides businesses with more control over their product listings, offering features such as custom URLs, Amazon Analytics, and the ability to integrate with Facebook for enhanced marketing.
- Amazon Pages and Posts allow small businesses to build their Amazon presence without needing expensive merchandising software, and can make a brand look as professional as larger competitors.
- To create an Amazon brand page, businesses must first register their brand with Amazon. This process must be repeated for each brand owned by a business, and the business cannot be an artist, author, or third-party vendor.
- Amazon’s Merchandising System is particularly beneficial for brands with a large number of products listed on Amazon, as well as small businesses that do not have the infrastructure to manage a large retail site independently.
Designers meticulously polish every last pixel of their landing pages to maximize appeal, but they rarely have the opportunity to tailor their product listings on major retail websites. Often, all you can do is include is a well-composed image, write a well-written, compelling product description, and hope for the best. Thankfully, the world’s #1 retailer is allowing designers and marketers much more control and ability to perfect their product’s presence on Amazon.com.
At the end of 2012, Amazon released a new retail function in an attempt to allow sellers and brands better customization and control over their Amazon presence. There are two main parts — Pages and Posts — of this new function, together dubbed Amazon Marketing Services. Both are modeled after the best features found on Facebook and Pinterest, seemingly in an attempt to make more social look and feel for product pages. An added bonus is that Amazon Analytics is included in this group of marketing services as well. Custom URLs are also available in a www.amazon.com/brandname format.
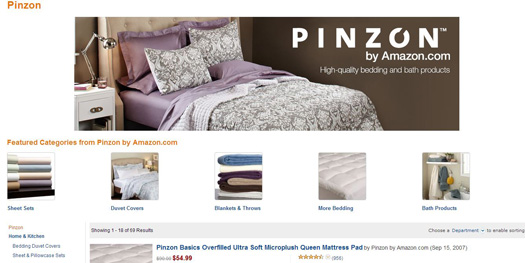
While few brands have jumped on board yet, both Amazon Pages and Amazon Posts have the potential of helping small businesses build their Amazon presence without the need to pay for expensive merchandising software. Because the Pages functionality compiles all of a brand’s Amazon retail products, customers can more easily browse through your brand’s product offerings. It also gives small businesses a chance to look just as savvy as big brands on Amazon. Amazon also allows integration with Facebook so that small business owners can better market their retail to Facebook fans. In fact, the Posts section allows publication of short content to Amazon Pages and Facebook at the same time.
Before anyone can create an Amazon brand page, they must first register their brand by clicking on the “Register Your Brand” button on the AMS Amazon page. Once Amazon approves your brand, then you can start building your page and posts. If you own multiple brands, you will have to register each one separately. To be eligible, you cannot be an artist, author, or third-party vendor; and you have to have products listed on Amazon.
Interested in seeing more of how exactly Amazon Pages and Posts can help your freelance or small business? Read through the guide below to see if Amazon Marketing Services (AMS) are right for you. Or, use this guide to help you get started if you already know that you’d like to use it.
Amazon Pages Guide

Brand managers can customize their Amazon Pages using templates and widgets. All of the templates include Twitter and Facebook buttons (if desired), your brand’s name, a widget for your logo, and a banner-like image across the top. Once your brand has been approved by Amazon, you can start creating your page by selecting one of the three templates available. Keep in mind that you can change the template at any time, so you may find that you use each of these templates during different marketing campaigns you may be promoting.
- Posts Only — This template is best used for when you are promoting a specific message rather than specific products. For instance, you may want to let customers know about a specific, time-sensitive event such as during the holidays. The widgets included are the hero widget (a large, banner-like image), posts widget (for your Amazon Posts), and text widget (a description of your brand).
- Posts with Merchandising — This template works well for brands who want to promote specific products as well as keep customers updated with posts. The widgets include the hero widget, posts widget, text widget, and merchandising widgets (featured products).
- All Products — This template is great for those brands wanting to make featured products the focus of their page. The widgets include the hero widget, merchandising widget, and an all products widget (all of your brand’s products are listed here).
While these templates may seem overly simple at first glance, there is actually quite a bit of customization available with the widgets:
- Hero Widget — This widget makes a 980 x 290px image appear across the top of your template. Make sure your image is JPG, GIF, or PNG format and a maximum of 10MB. You are able to select a background color for browsers with a window size larger than 980px wide. You can also choose from two types of hero widgets. A Simple Hero is just an image that you upload. A Product Hero is a product image that you select from your Amazon catalog.
- Merchandising Widget — With this widget, you have to include at least 3 products/links with a maximum of 5 products/links available. The heading in this widget allows for up to 60 characters in which you can describe this set of featured products or links. You can select from two types of features. The Featured Products widget allows you to display a product image along with title, list/stock price, star ratings from customer reviews, any other product info, and even the all-important “Add to Cart” button. The Featured Links widget allows you to display links to other Amazon.com pages, such as your other brand pages, product pages, etc. This could be helpful in the case of a certain event you are promoting.
- Social Media Buttons — You can add or remove social media buttons at any time as well. As of now, only the Facebook “Like” button and the Twitter “Follow” buttons are available. Just click on either button when in the Page Editor view to add/remove one or both.
At any time, you can easily make changes to your page in the Page Editor view. And changes are as easy as the click of a few buttons:
- Change the Entire Template — To change the template for your page, simply click on the “Change Template” button in the left navigation menu and select the one you want.
- Change Your Logo — Click on the “Change Logo” button in the left navigation menu and follow the steps.
- Change Your Hero — Click the “Edit” button above the Hero widget.
- Change Your Featured Products — You can replace a product listed in the merchandising widget simply by clicking the pencil icon above the product. Or, change the order of the products using the slider icon. To delete a product, simply click the “X” button above the product.
- Change the Text Widget — To rewrite the message displayed in the side text box, simply click the “Edit” button at the top of the widget.
You can also manage users on your AMS account by going to the top navigation menu and selecting “Manage Users”:
- Invite a new user — Click on this to enter an email address and name for a new user. Then you can give the Admin access or just Editor access, which doesn’t allow them to remove/add/or change the status of users.
- Make changes to users — Find the name of the user in the Manage Users page to delete them using the “Delete” button in the Actions column. Or, you can change their access level by clicking on the Access box.
Amazon Posts Guide

Amazon Posts is still a part of Amazon Pages, but to add or edit posts, you will need to click “Posts” in the top navigation bar to switch from the Pages view to the Posts view. Keep in mind too that — like in to WordPress — you can write several posts at once and schedule them to post at a later date. Similar to Twitter (oddly enough, though, you can’t simultaneously post content to Twitter), posts are limited to 140 characters in length. And, publishing and scheduling posts is simple:
- Click “Posts” to switch to the posts feature.
- Select “Start Posting” (if you haven’t yet set up your Pages, your first post will prompt you to upload a logo and set up one of the two templates that includes the post widget).
- Enter 140 characters or less by clicking on the text box and typing in your message.
- You can see how your post will appear, even as you type, by clicking “Preview.”
- Select “Post Now” to make your post live immediately.
- To schedule your post, click on “Schedule This Post” and select the date and time. Then, click “Post Now.” Then, click on “Scheduled Posts” at any time to view your list of upcoming posts.
- To delete a live post at any time, go to the “Active Posts” table when in Posts view. Click on the trashcan icon located on the row for that post you want to delete.
But, you don’t have to stick with simple text-only posts. Add in an image or product (but not both at the same time), URLs, and even change the logo displayed next to posts:
- Add an Image — After typing your message, click on the “Upload an image” button beneath the text box. Then select a JPG, GIF, or PNG file that’s less than 10 MB.
- Add a Product — Beneath the text box, select the “Look up a product” button. Then, simply search for your product and select it.
- Add a URL — While URLs don’t appear as hyperlinks on Amazon, they will appear as hyperlinks if you choose for posts to display on Facebook. Just add in your URL into the content of your text.
- Change the Logo — To change the logo that appears next to your published Posts, click on the “Upload Logo” button in the left navigation window.
- Sync with Facebook — For your Amazon posts to automatically post to Facebook as well, go to your top navigation bar and click the brand menu. Then select “Social Accounts” and click on “Connect to Facebook.” Note that you have to have a Facebook brand page for this to work. To remove this cross-posting feature, you’ll have to remove the app from your Apps section within your Facebook account.
Amazon Analytics Guide

The analytics section of AMS is actually fairly self-explanatory. You can either look at analytics of your brand page or of your posts. With both pages and posts, the data is available 24 hours after a post or your page goes live.
- Page Analytics — The analytics for your Amazon Pages shows data for visitor demographics, purchases, considerations, and more. Just go to Analytics listed in the top navigation menu. The Page Performance view shows the data for what visitors did with your links or products. Audience Insights shows the demographics of visitors.
- Post Analytics — Similar to pages analytics, your post analytics shows considerations vs. purchases but also click-through rates, average purchase rate, and more. Once again, click “Analytics” in the top navigation menu, and then select Post Analytics from the left navigation menu.
Overall, the Amazon Merchandising System seems like an excellent option for brands with lots of products on Amazon. It also gives small businesses a way to provide a feeling of security for customers since Amazon is such a well-known e-commerce site. The best part? It’s a great option for small business owners without the infrastructure for managing a large retail site on their own.
Frequently Asked Questions (FAQs) about Customizing Amazon Product Listings
What are Amazon Pages and how can they be used to customize product listings?
Amazon Pages are a part of Amazon’s brand services that allow sellers to create a customized, brand-centric shopping experience on Amazon. They are essentially mini-websites within Amazon, where sellers can showcase their brand story, product portfolio, and unique selling propositions. They can be customized with multimedia content, such as videos and high-quality images, to make the product listings more engaging and informative. Amazon Pages also come with built-in social sharing features, allowing customers to share the pages on their social networks, thereby increasing the brand’s visibility.
How can Amazon Posts help in enhancing product listings?
Amazon Posts is a social media-like feature that allows brands to share content in a feed-based format. Brands can use this feature to share engaging content, such as product usage tips, customer testimonials, and behind-the-scenes stories, which can help in building a stronger connection with the customers. The posts appear on the product detail pages, category pages, and brand feed, thereby providing additional exposure to the products.
How can Amazon Analytics be used to optimize product listings?
Amazon Analytics provides detailed insights into how customers are interacting with the product listings. It provides data on various metrics, such as page views, unique visitors, sales, and conversion rates. By analyzing this data, sellers can identify the strengths and weaknesses of their product listings and make necessary adjustments to improve their performance. For example, if a product listing is getting a lot of views but not many sales, it might indicate that the product description or images are not convincing enough.
How can I apply a customization template to my product listing?
Amazon provides a variety of customization templates that sellers can use to enhance their product listings. These templates provide a structured format for presenting product information, making it easier for customers to understand. To apply a customization template, you need to go to the ‘Manage Inventory’ section in Seller Central, select the product you want to customize, and then choose the desired template from the ‘Customize’ option.
How can I use images to make my product listing more appealing?
Images play a crucial role in influencing customers’ purchase decisions. High-quality images that clearly showcase the product features can significantly enhance the appeal of your product listing. Amazon allows sellers to upload multiple images for each product, so you can show the product from different angles, in use, or even compare it with other products. You can also use infographics to highlight key features or benefits of the product.
How can I make my product listing more engaging?
Besides using high-quality images and detailed product descriptions, you can also make your product listing more engaging by adding videos, 360-degree images, and interactive content. You can also use A+ Content (formerly known as Enhanced Brand Content) to add additional text, images, and comparison charts to your product listing.
How can I improve the visibility of my product listing on Amazon?
There are several ways to improve the visibility of your product listing on Amazon. One of the most effective ways is to optimize your product listing for Amazon’s search engine by using relevant keywords in the product title, description, and backend keywords. You can also use Amazon’s advertising services, such as Sponsored Products and Sponsored Brands, to promote your products.
How can I monitor the performance of my product listing?
Amazon provides several tools and reports that sellers can use to monitor the performance of their product listings. These include the Business Reports in Seller Central, which provide data on sales, traffic, and conversion rates, and the Brand Analytics reports, which provide insights into customer search behavior and product comparisons.
How can I handle negative reviews on my product listing?
Negative reviews can significantly impact the performance of your product listing. It’s important to address them promptly and professionally. You can respond to the review publicly, apologizing for the customer’s bad experience and offering a solution. You can also contact the customer privately to resolve the issue. In some cases, you might be able to get the review removed if it violates Amazon’s review guidelines.
How can I encourage customers to leave reviews on my product listing?
Reviews play a crucial role in influencing customers’ purchase decisions. You can encourage customers to leave reviews by providing excellent customer service, following up with customers after their purchase, and asking for their feedback. However, it’s important to note that Amazon has strict rules against incentivized reviews, so you should never offer any rewards or discounts in exchange for reviews.

