- What Shall We Include in a Theme Settings Page?
- Creating a Theme Settings Page Menu Item
- Overview of the Settings API
- Adding Social Profile URLs
- Adding Option to Choose Between Layouts
- Uploading a Logo
- Retrieving Settings
- Conclusion
- Frequently Asked Questions (FAQs) about Creating a WordPress Theme Settings Page
Most WordPress themes have a Theme settings page to customize its features, behaviour and styles. Providing a theme settings page with your theme makes it easy for your users to customize your theme instead of directly editing the PHP or CSS files. This makes updating your theme easier, as users will not lose the changes they’ve made.
In this tutorial we’ll learn the ‘WordPress’ recommended way of creating a theme settings page, that is, using the WordPress Settings API. The WordPress Settings API was added in WordPress 2.7 and since then it has become one of the most popular WordPress APIs. This tutorial will also be useful if you’re planning to add a settings page to your WordPress plugin. Let’s get started.
What Shall We Include in a Theme Settings Page?
Options in your theme settings page depend on what features and customization your theme supports. That said, there are some common things which are included in every theme settings page. Some of the common options are: social URLs, static or responsive layout and header logo to name a few. In this tutorial I’ll show you how to include these four options in our theme settings page.
Creating a Theme Settings Page Menu Item
First we have to create a menu item on the admin panel that will access our theme settings page.
We can create a menu item using the WordPress Menu API. Here’s the code to create a menu item.
function theme_settings_page(){}

function add_theme_menu_item()
{
	add_menu_page("Theme Panel", "Theme Panel", "manage_options", "theme-panel", "theme_settings_page", null, 99);
}

add_action("admin_menu", "add_theme_menu_item");
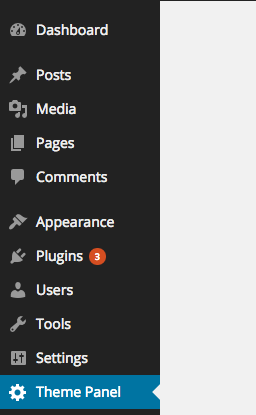
Here, theme-panel is the unique ID representing our menu item. theme_settings_page is the callback for displaying the content of the page created by the Menu API. We’ll be coding this function next.
Here’s how it looks.
Overview of the Settings API
The Settings API is used to populate the page created by the menu item API. A settings page is divided into sections and fields.
For the sake of this tutorial, we’ll just be creating a single section and will put all the fields inside that section.
Here is the code for the theme_settings_page function to create a section and add the submit button.
function theme_settings_page()
{
    ?>
	    <div class="wrap">
	    <h1>Theme Panel</h1>
	    <form method="post" action="options.php">
	        <?php
	            settings_fields("section");
	            do_settings_sections("theme-options");
	            submit_button();
	        ?>
	    </form>
		</div>
	<?php
}
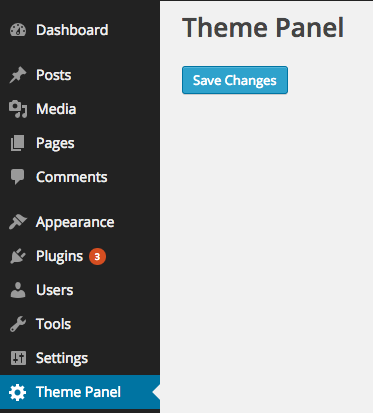
Here we’re registering a section using settings_field with an ID section. theme-options is a group ID to all of the fields belonging to a section. Finally, the submit_button() function echoes the submit button for our theme settings page.
Here’s how that should look.
Adding Social Profile URLs
Now, let’s add fields in our settings page to store our Facebook and Twitter profile URLs. Almost every WordPress theme has social profile options, therefore it’s a handy, practical example.
Here’s the code to add input text fields using the Settings API.
function display_twitter_element()
{
	?>
    	<input type="text" name="twitter_url" id="twitter_url" value="<?php echo get_option('twitter_url'); ?>" />
    <?php
}

function display_facebook_element()
{
	?>
    	<input type="text" name="facebook_url" id="facebook_url" value="<?php echo get_option('facebook_url'); ?>" />
    <?php
}

function display_theme_panel_fields()
{
	add_settings_section("section", "All Settings", null, "theme-options");

	add_settings_field("twitter_url", "Twitter Profile Url", "display_twitter_element", "theme-options", "section");
    add_settings_field("facebook_url", "Facebook Profile Url", "display_facebook_element", "theme-options", "section");

    register_setting("section", "twitter_url");
    register_setting("section", "facebook_url");
}

add_action("admin_init", "display_theme_panel_fields");
After the admin panel is initialized, we’re registering the sections and fields display callbacks. Here we’re using three important functions:
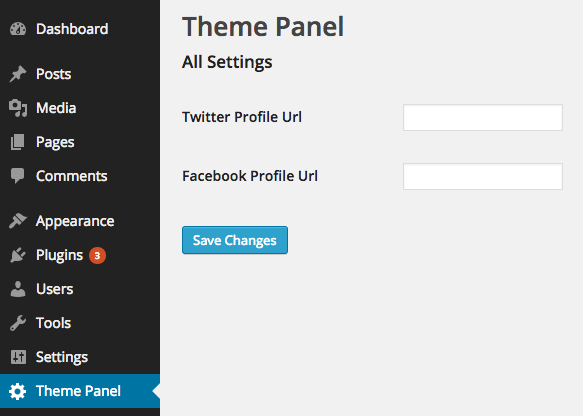
add_settings_sectionis used to display the section heading and description.add_settings_fieldis used to display the HTML code of the fields.register_settingis called to automate saving the values of the fields.
Here’s what our settings page should now look like.
We’ve now seen how to add input text fields using our settings page. Let’s see how to add a checkbox by providing an option to choose between static or responsive layouts.
Adding Option to Choose Between Layouts
Let’s see how to expand out the display_theme_panel_fields function to display a checkbox to choose between layouts.
Here’s the code to achieve this.
function display_twitter_element()
{
	?>
    	<input type="text" name="twitter_url" id="twitter_url" value="<?php echo get_option('twitter_url'); ?>" />
    <?php
}

function display_facebook_element()
{
	?>
    	<input type="text" name="facebook_url" id="facebook_url" value="<?php echo get_option('facebook_url'); ?>" />
    <?php
}

function display_layout_element()
{
	?>
		<input type="checkbox" name="theme_layout" value="1" <?php checked(1, get_option('theme_layout'), true); ?> />
	<?php
}

function display_theme_panel_fields()
{
	add_settings_section("section", "All Settings", null, "theme-options");

	add_settings_field("twitter_url", "Twitter Profile Url", "display_twitter_element", "theme-options", "section");
    add_settings_field("facebook_url", "Facebook Profile Url", "display_facebook_element", "theme-options", "section");
    add_settings_field("theme_layout", "Do you want the layout to be responsive?", "display_layout_element", "theme-options", "section");

    register_setting("section", "twitter_url");
    register_setting("section", "facebook_url");
    register_setting("section", "theme_layout");
}

add_action("admin_init", "display_theme_panel_fields");
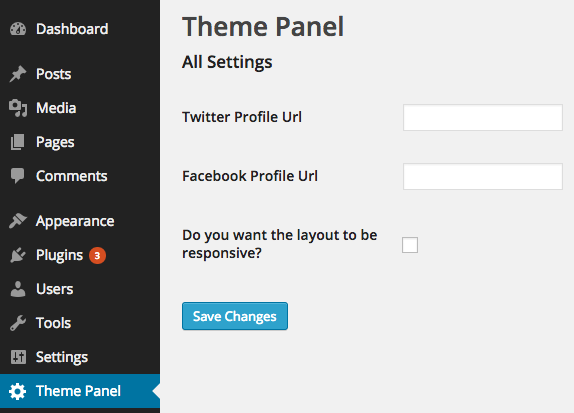
We added a new settings field using add_settings_field and registered it using register_settings as usual. One thing to note, if we want to tell whether a user has checked the checkbox or not, we’re using the checked() function.
The checked() function compares a value with an another value, if they’re equal then it echoes a checked attribute, otherwise nothing.
Here’s how our settings page looks now.
Uploading a Logo
The register_setting function takes a third argument which is a callback, this callback is fired before it saves the settings into the database. We can utilise this callback to handle uploads.
Here is code to upload a logo in our settings page.
function logo_display()
{
	?>
        <input type="file" name="logo" />
        <?php echo get_option('logo'); ?>
   <?php
}

function handle_logo_upload()
{
	if(!empty($_FILES["demo-file"]["tmp_name"]))
	{
		$urls = wp_handle_upload($_FILES["logo"], array('test_form' => FALSE));
	    $temp = $urls["url"];
	    return $temp;
	}

	return $option;
}

function display_theme_panel_fields()
{
	add_settings_section("section", "All Settings", null, "theme-options");

    add_settings_field("logo", "Logo", "logo_display", "theme-options", "section");

    register_setting("section", "logo", "handle_logo_upload");
}

add_action("admin_init", "display_theme_panel_fields");
Here, we’re using wp_handle_upload to store the image file and retrieve its URL and store it as a option.
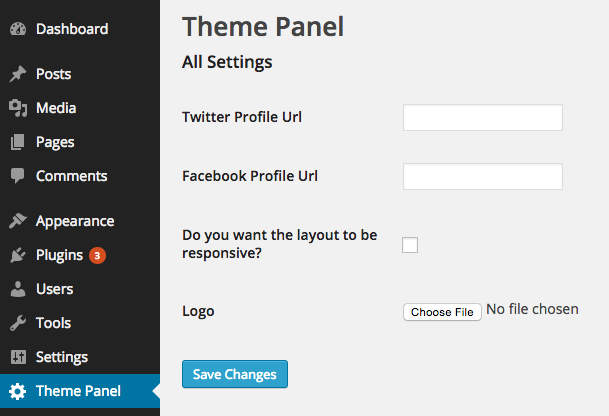
Here’s how our settings page looks now, it’s shaping up nicely!
Retrieving Settings
A theme needs to retrieve the setting values on the front end. The Settings API internally stores the values using the Options API. Therefore, you can retrieve the values using get_option() function.
It’s quite simple, here’s the code.
<?php

$layout = get_option('theme_layout');
$facebook_url = get_option('facebook_url');
$twitter_url = get_option('twitter_url');
Conclusion
In this article we saw how we can easily create a theme settings page using the Settings API. We created a text, file and checkbox input fields to take input in various data formats. Go ahead and try to expand the page and add more form controls yourself.
Frequently Asked Questions (FAQs) about Creating a WordPress Theme Settings Page
What is the WordPress Settings API and why is it important?
The WordPress Settings API is a set of functions and hooks provided by WordPress to help developers create, manage, and control theme and plugin settings. It is important because it provides a standardized and secure way of handling data. It also ensures that your theme or plugin is compatible with the WordPress ecosystem, making it easier for users to manage settings from the WordPress admin area.
How can I add a new section to my WordPress theme settings page?
To add a new section to your WordPress theme settings page, you need to use the add_settings_section() function. This function takes three parameters: the ID of the section, the title of the section, and a callback function that outputs the content of the section. The ID should be unique to avoid conflicts with other sections.
How can I register a setting in WordPress?
To register a setting in WordPress, you can use the register_setting() function. This function takes three parameters: the option group, the option name, and an array of arguments defining the setting. The option group should match the group used in settings_fields() function, and the option name is the name of the option to be saved in the database.
How can I create a form field for my setting?
To create a form field for your setting, you can use the add_settings_field() function. This function takes several parameters including the ID of the field, the title of the field, a callback function that outputs the form field, the page where the field should be displayed, the section where the field should be added, and an array of arguments for the field.
How can I validate and sanitize my settings?
To validate and sanitize your settings, you can use the sanitize_callback argument in the register_setting() function. This argument should be a callback function that takes the input data, validates and sanitizes it, and then returns the sanitized data. This ensures that only valid and safe data is saved in the database.
How can I display my settings on the settings page?
To display your settings on the settings page, you can use the settings_fields() and do_settings_sections() functions in your form. The settings_fields() function outputs the nonce, action, and option page fields for your settings page, while the do_settings_sections() function outputs the sections and fields added to the page.
How can I save my settings in WordPress?
To save your settings in WordPress, you need to submit the form on your settings page. When the form is submitted, WordPress automatically saves the settings using the register_setting() function. You can also use the update_option() function to manually save a setting.
How can I retrieve my settings in WordPress?
To retrieve your settings in WordPress, you can use the get_option() function. This function takes the name of the option as a parameter and returns the value of the option. If the option does not exist, it returns a default value that you can specify as the second parameter.
How can I delete my settings in WordPress?
To delete your settings in WordPress, you can use the delete_option() function. This function takes the name of the option as a parameter and deletes the option from the database. Be careful when using this function as it permanently deletes the option.
How can I troubleshoot issues with my settings page?
To troubleshoot issues with your settings page, you can use various debugging tools provided by WordPress. For example, you can use the WP_DEBUG constant to enable debug mode and display PHP errors, notices, and warnings. You can also use the var_dump() function to output the value of variables and see what data is being processed.
 Narayan Prusty
Narayan is a web astronaut. He is the founder of QNimate. He loves teaching. He loves to share ideas. When not coding he enjoys playing football. You will often find him at QScutter classes.


