
Key Takeaways
- To start a HoloLens app, you need to create all the necessary assets, with a focus on 3D holograms, even though 2D holograms are also valid implementations.
- For 3D modelling, tools like Blender, Sculptris, and Maya Autodesk 3D are recommended, but the process requires a creative streak and understanding of 3D modelling. If you’re not keen on creating your own assets, consider teaming up with an artist or buying assets from online stores.
- Unity3D is used to set up your first HoloLens project. After setting up the environment for holographic experiences, you can create your first hologram and export the project from Unity to Visual Studio.
- The HoloLens emulator and portal are essential tools in the development process. The emulator simulates a full 3D experience with movement in x, y, and z dimensions, while the portal provides detailed information about your device and performance metrics.
This series of articles will take you through the basics of starting a HoloLens app, some of the pitfalls to look out for and how to make the most out of the project for the entire universal Windows platform (UWP). This first part focuses on creating all of the assets needed to start the project and, as I am a developer myself, will be focused on helping developers get started.
If you are a 3D artist wanting to get into the space of holographic experiences and want assistance with the software development side of things, get in touch with me or read through this series to get an idea of what is involved. Sitepoint also has a range of articles on Unity development here.
Even though the Microsoft HoloLens is a device to project 3D holograms into your physical world, 2D holograms are perfectly valid implementations as well. You can have movies playing on the wall, internet browsers hanging in mid-air or Skype calls follow you as you walk around the space you are in. Even though these are valid 2D holograms and work exactly as you expect them to, they don’t require as much of the tools and techniques in this article series, as 3D holograms do. Therefore, for the purpose of these articles, holograms refer to 3D holograms, unless otherwise explicitly called out.
One of the traps of mixed reality (MR) is that it is easy to get caught in a project purely based on “wow” factor and creating an experience that either has no commercial aspect or no solid use case beyond the initial user experience, and in fact is not an actual MR experience. To understand the differences between virtual reality (VR), augmented reality (AR) and MR, see this article.
Acquiring Tools
The tools for developing for HoloLens are all free and are described in my previous article. If you have a shipping address in North America you can now buy a physical HoloLens developer kit without any invitation or special arrangement. If you have $US3,000, you too can own this magical device. It is not a device that is currently easy to get your hands on or even get to try, especially if you are outside North America. Having said all that, there are ways to get an early start on what is predicted to be a billion dollar market in 2016, and that is exactly what we will be investigating in this series of articles.
Choosing a 3D Modelling Tool
As I said above, I am not a designer, nor will I ever be. I can convert a good design to code and make it look good, but I won’t attempt to do the design in the first place.
If you, however, do have an urge or need to design your own 3D models for your HoloLens app, there are a few tools I can recommend.
Before we get into the tools you might choose to use, bear in mind that 3D modelling is less about the tools and more about the creativity needed. You can’t make a great model simply because you are the master of a tool. Granted, a good tool makes it easier to focus on the creative process, and learning a tool can take some time, but in the end, you need to have a creative streak and understand 3D modelling to fully get the most out of the process.
Blender
If you are after community supported free 3D modelling software, you can’t do much better than Blender. Although the learning curve is rather steep for Blender, it does provide a full and comprehensive toolset for creating professional grade 3D models including rendering photo-realistic images, animating key frames or creating games. In fact, there is so much you can do with Blender in the 3D space that it is often overwhelming for new and experienced users alike.
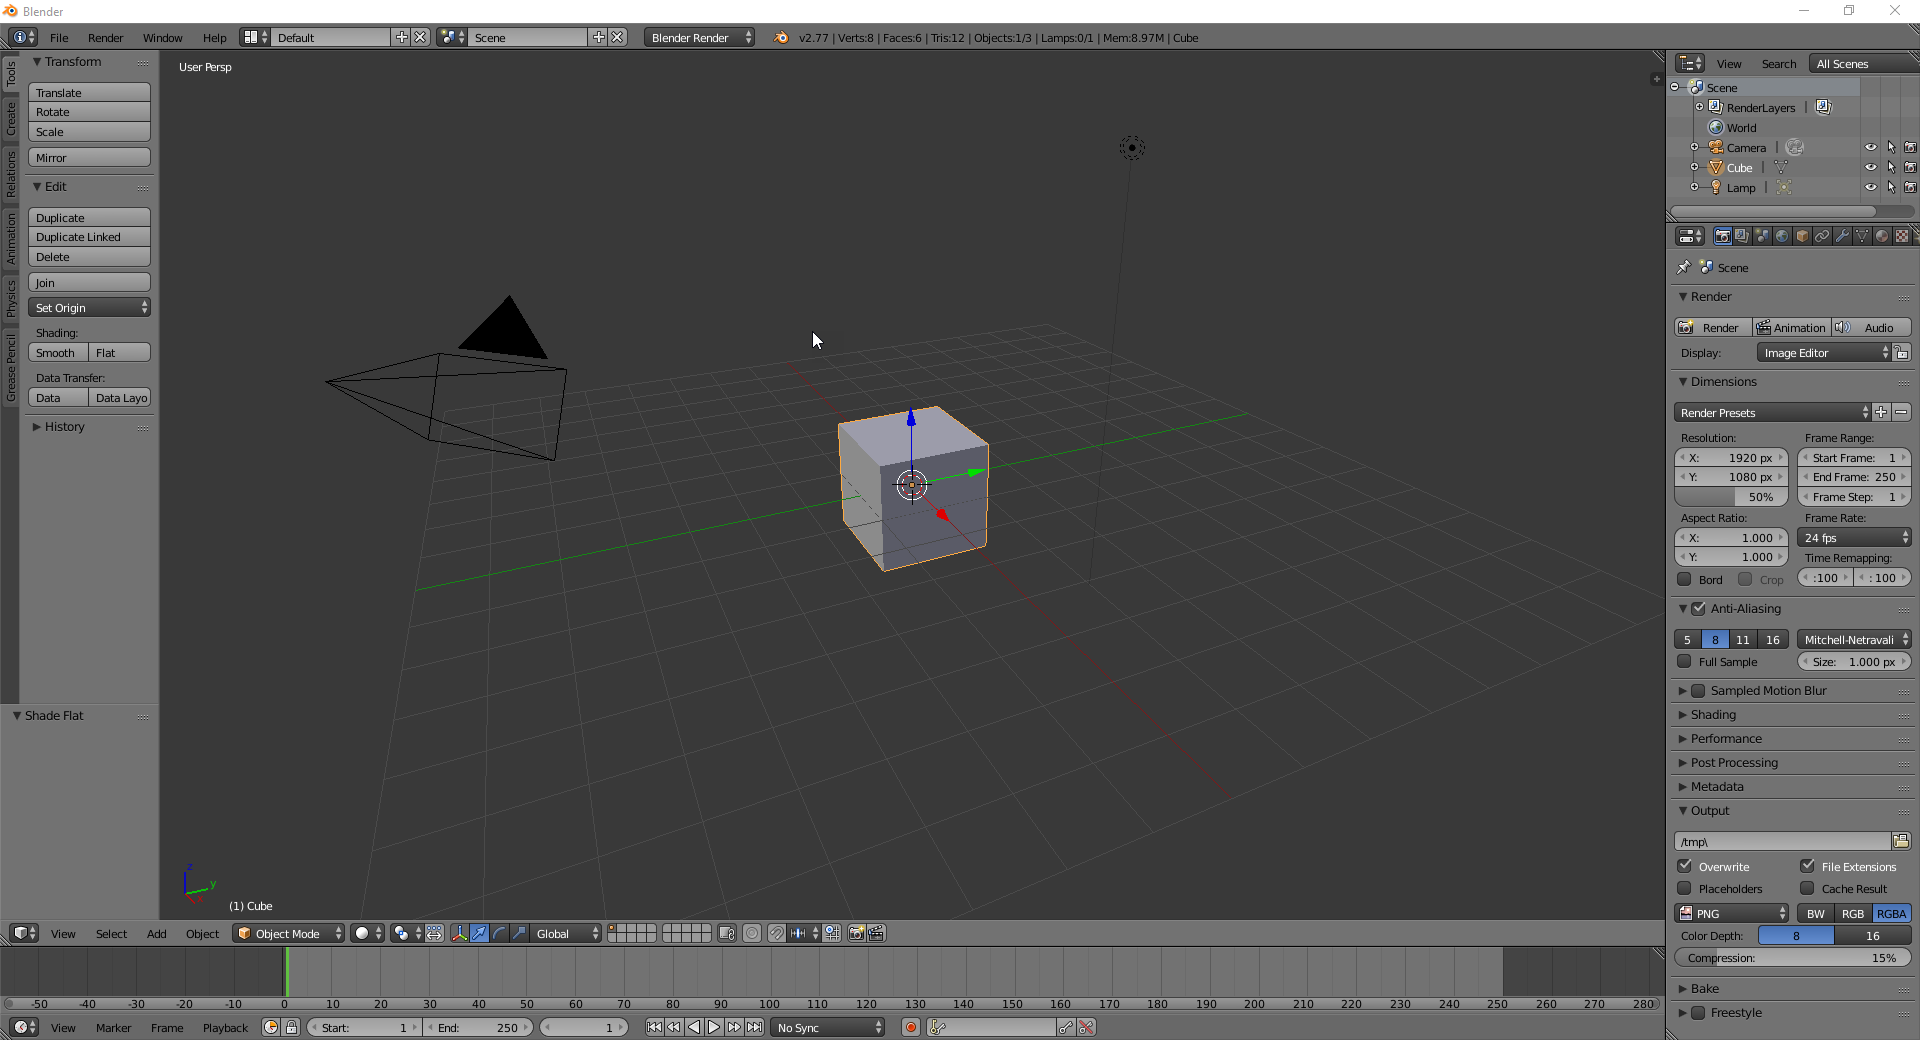
To get started with Blender, follow these tutorials from their official website, and be inspired by the demo reel below.
[youtube wDRTjzLNK0g]
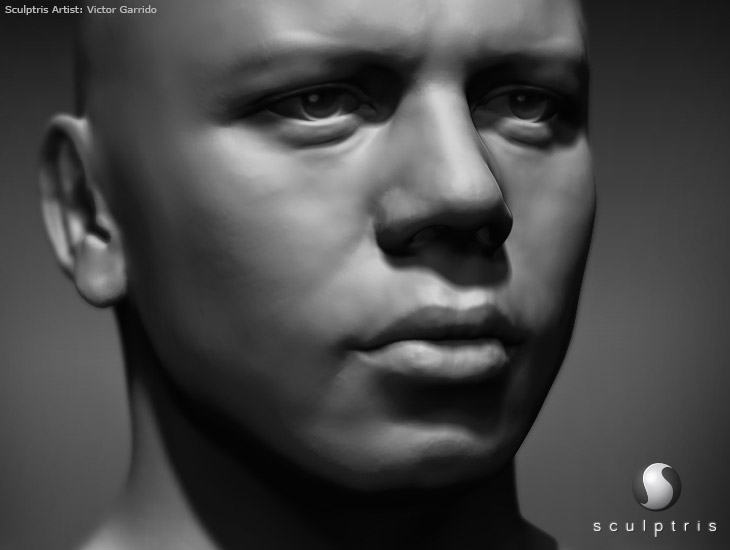
Sculptris
If you are focused on character modelling (e.g. creating very lifelike animals, monsters or people), Sculptris is comprehensive and specifically directed at sculpting in a 3D space.
Maya Autodesk 3D
One of the oldest and most established 3D tools is Autodesk’s Maya. It isn’t just a 3D modelling tool, but also allows the user to create animations and movies. It is an expensive piece of software at just over $2,000 per year, but if you are a student there is a free educational edition. Although Unity 3D is the defacto tool for creating HoloLens projects, Maya has also been associated with HoloLens development.
Teaming up with an Artist
If you aren’t keen to create your own assets, don’t want to dedicate the time to it, or for whatever reason would rather someone else did it, I would recommend trying to find a project partner that has a good eye for design and modelling. Having a partner in a project is not only great for skill diversity, but also for discussing ideas and problem solving.
A great place to team up with designers is community events, such as meetups, hack days and other user groups. Many people that attend these events are keen to work on out-of-hours projects.
Buying Assets
There are assets of all kinds created by a large group of artists, who sell them in the various online stores that exist for 3D assets. However, if you have specific branding requirements for your project, buying ready-made assets is unlikely to work. It may be a good option to get you started if you are waiting for artists to complete custom models — you can always swap them out later.
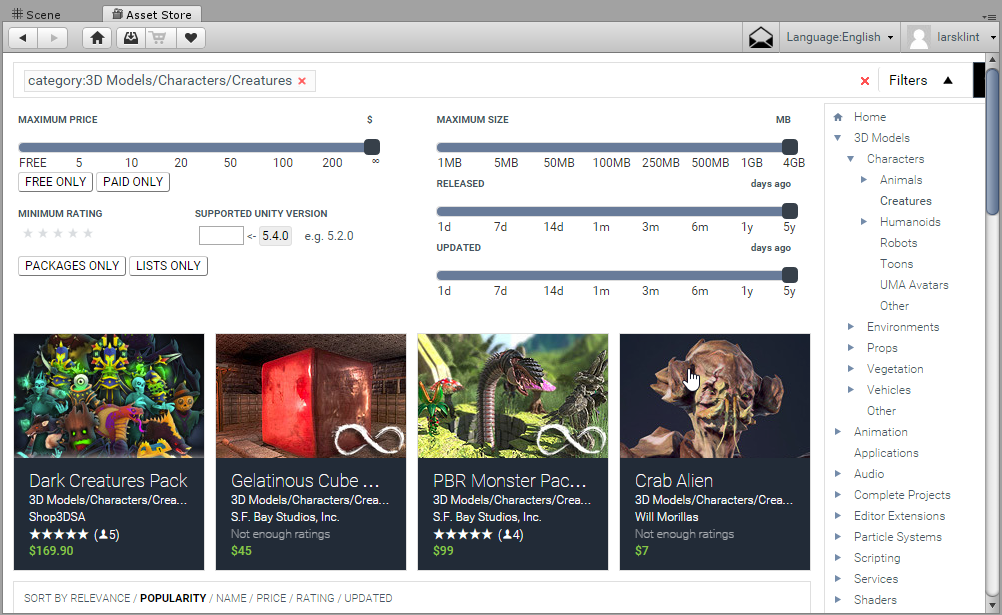
Unity Asset Store
Right within Unity itself is the asset store that offers a huge range of assets from 3D models to audio clips to scripts ready for you to use. They range from free to relatively expensive, but chances are that you can quickly find the assets you need to get your project underway.
The assets can all be imported directly into Unity and the process is relatively smooth.
Setting up Unity3D
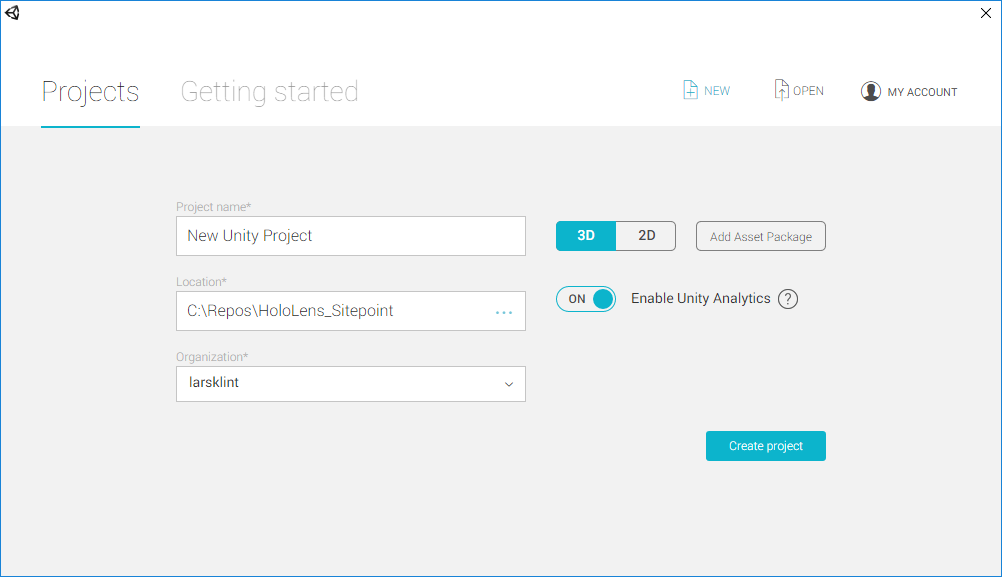
To get started with your first HoloLens project, open up Unity and create a new project. Make sure you have toggled 3D on.
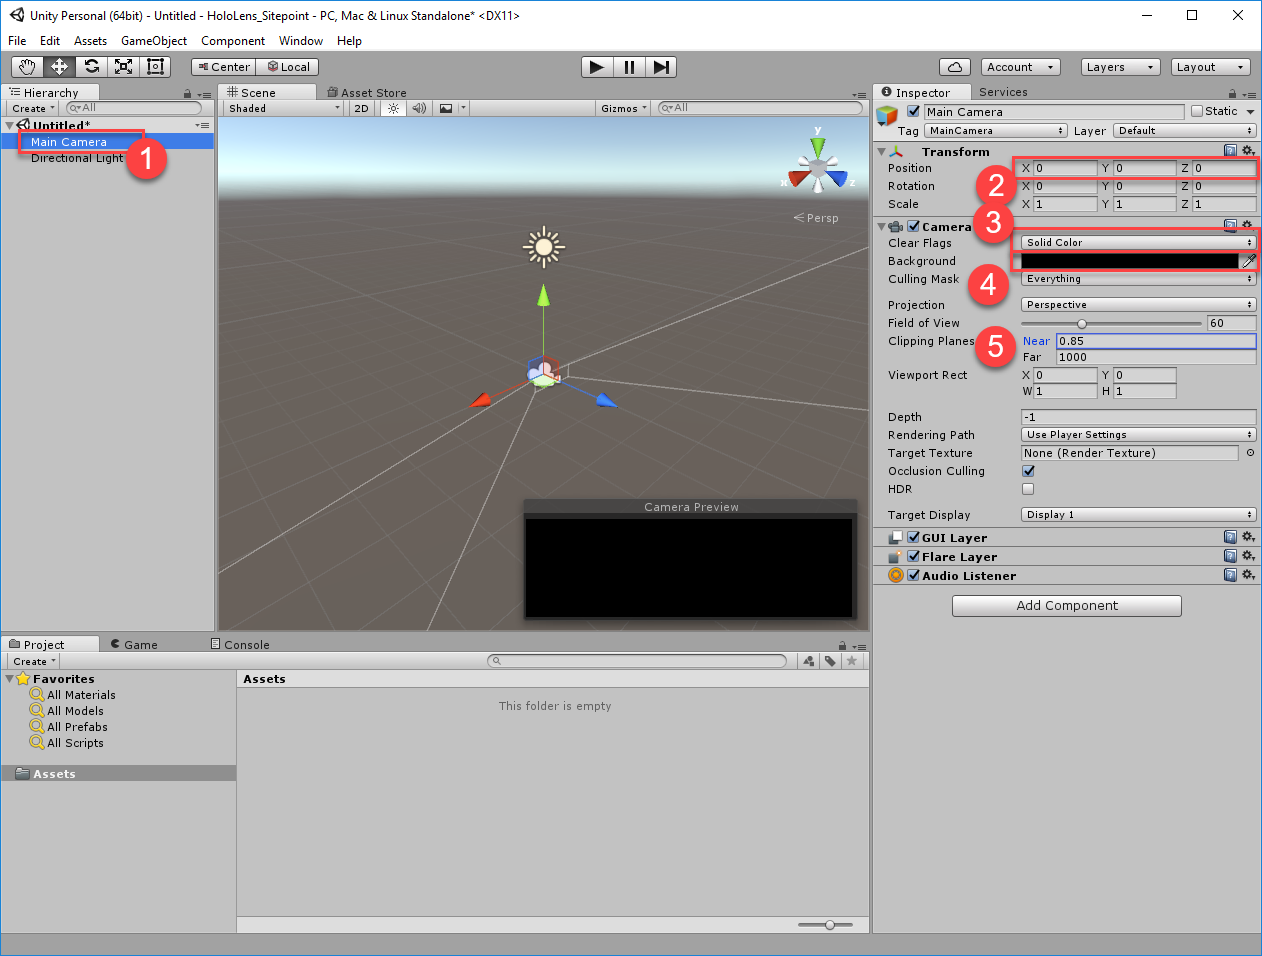
Once the workspace opens, you will have a standard Unity project. Let’s adjust it to be HoloLens specific. First off, let’s edit the main camera for the scene. The main camera takes care of head tracking and stereoscopic rendering. The main camera is essentially the user’s head, so change the starting position to {X:0, Y:0, Z:0} by clicking on Main Camera and changing the values in the Inspector panel. This will make it a bit easier to lay out the holograms.
Secondly, the background for the camera needs to be all black, as black becomes transparent in HoloLens apps, and we want the real world to appear behind our holograms to create the desired mixed reality effect.
In the Inspector panel, change Clear Flags to Solid Color and then set the background to black.
Finally, because we don’t want holograms to appear to close to the users face (and make them cross-eyed), change the Near Clipping Plane to 0.85.
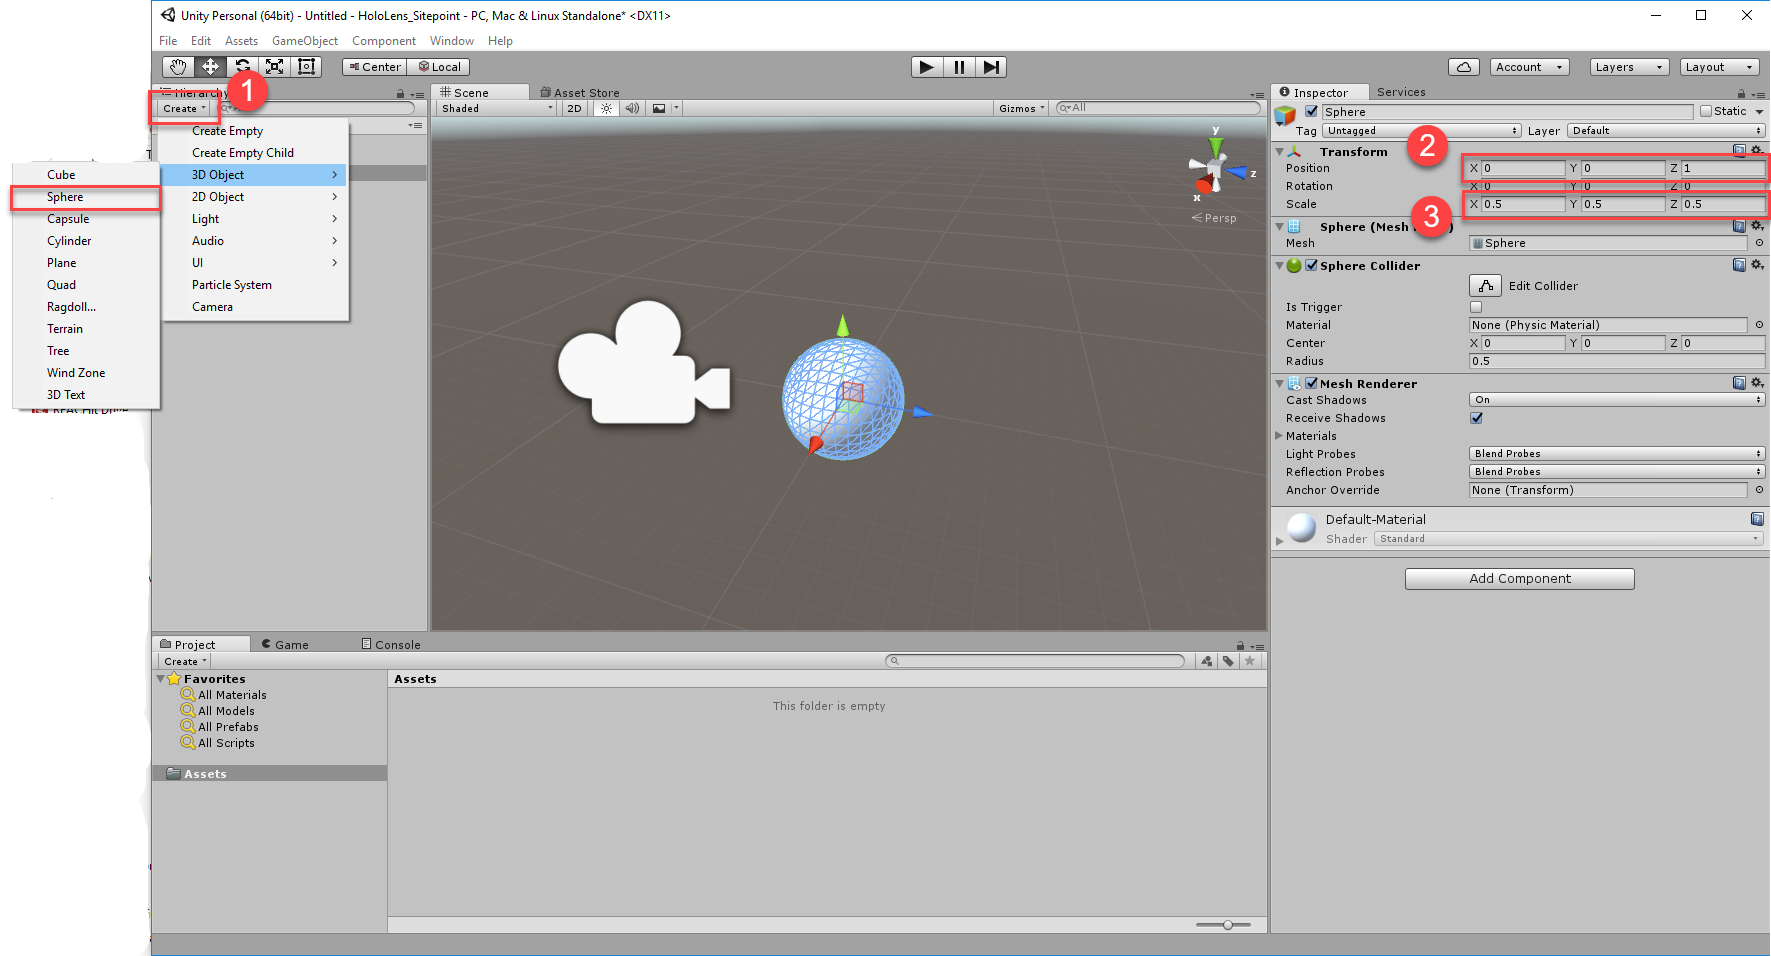
Now the environment is set up for holographic experiences, let’s create our first hologram. In the top left, in the Hierarchy pane, click Create > 3D Object > Sphere. In the Inspector, change the position of the sphere to {X:0, Y:0, Z:1}, which will position the sphere one meter in front of the user upon start. If you want a smaller or larger sphere, you can play with the Scale as well. In Unity, all units are meters, which makes it easy for HoloLens as you are dealing with both the real world and the digital world.
Save the scene changes and give it an appropriate name.
Exporting from Unity to Visual Studio
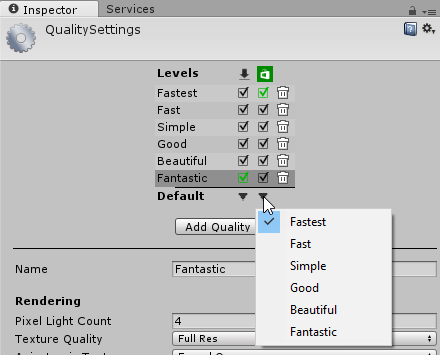
There are a few settings to configure before we can export the Unity solution. First of all, one of the most important aspects of a HoloLens app is that it performs very fast.
Select Edit > Project Settings > Quality, use the dropdown under the Windows Store logo and select Fastest.
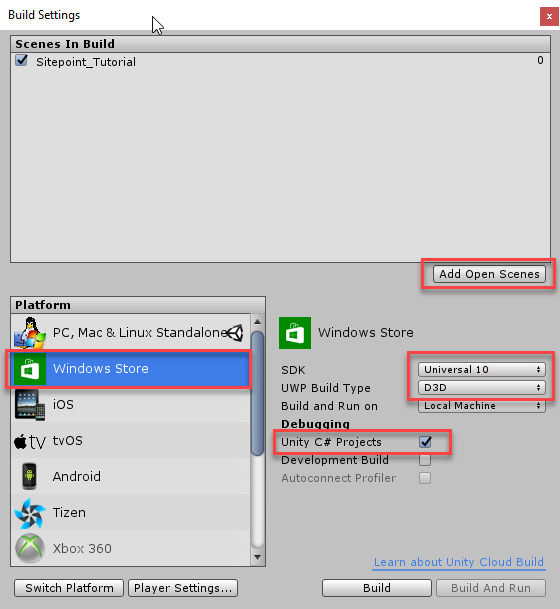
Next, change the build settings. Because all HoloLens apps are Universal Windows Platform apps, we need to tell the build engine this. Select File > Build Settings and choose Windows Store as platform, Universal 10 SDK and D3D as Build Type, and check Unity C# Projects. Also Add Open Scenes to the build.
In the build settings windows, click Player Settings to open the pane. Click the Windows Store tab, check Virtual Reality Supported and make sure Windows Holographic is shown.

We are now ready to build the project and export it. Return to the Build Settings again, and click Build. Create a new folder in the default directory and name it “App”. Select the App folder and continue.
Visual Studio 2015 and the HDK
Open the Visual Studio solution from the above steps. Unless you are specifically targeting more than just HoloLens with your app, there are a couple of changes worth making to take advantage of more features for HoloLens.
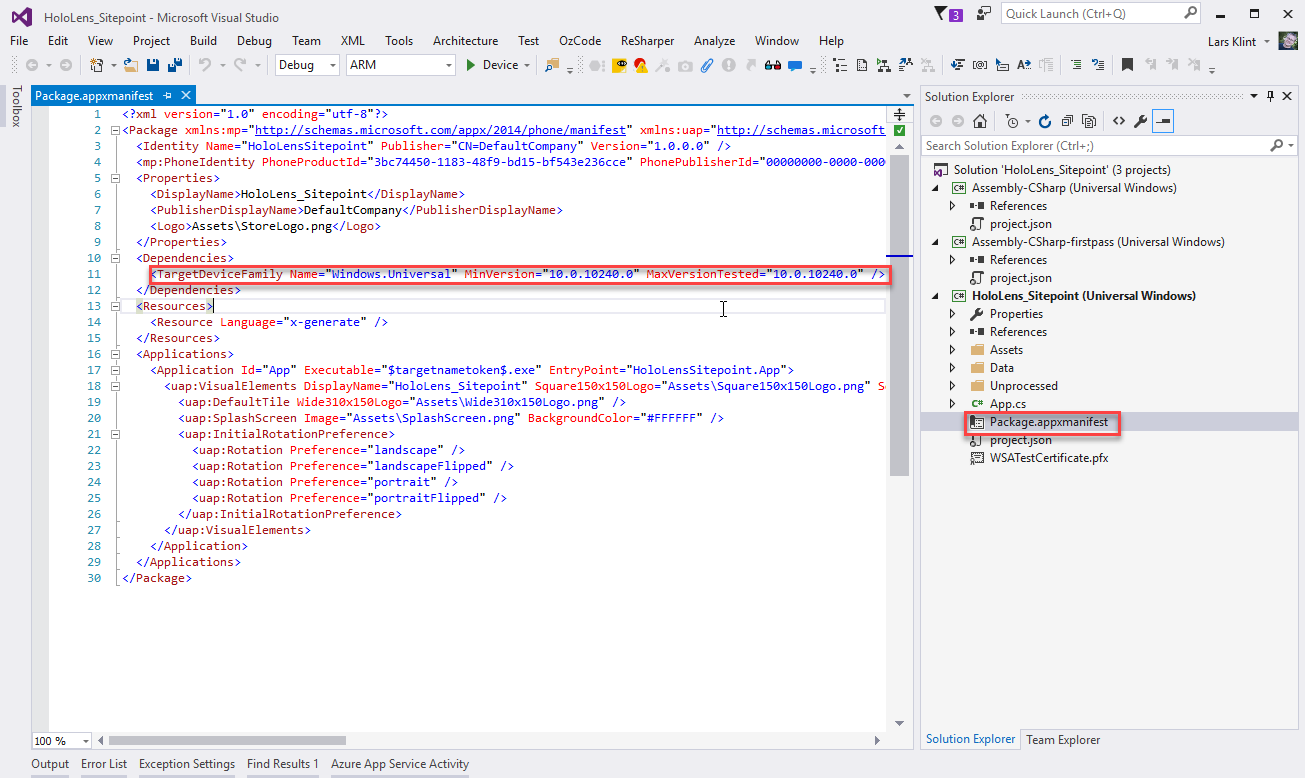
In Visual Studio, right click on Package.appxmanifest in the Solution Explorer and select View Code. Find the line specifying TargetDeviceFamily and change Name="Windows.Universal" to Name="Windows.Holographic". On the same line, change MaxVersionTested="10.0.10240.0" to MaxVersionTested="10.0.14393.0". Then, save the Package.appxmanifest.
Notice that the project is a Universal Windows app, which means it runs on the core API of the Windows 10 OS. This article is not going to explore the Universal Windows Platform, but it is important to understand that that is the underlying architecture for HoloLens (as well as any other device running Windows 10).
Unity creates three separate projects in the solution. These are all necessary for HoloLens apps and we will get into those more in later articles. For now, let’s launch the basic app we have created.
If you are using the emulator, change target to x86, select HoloLens emulator and click Play. If you are using a physical device, connect it either via USB or Wi-Fi.

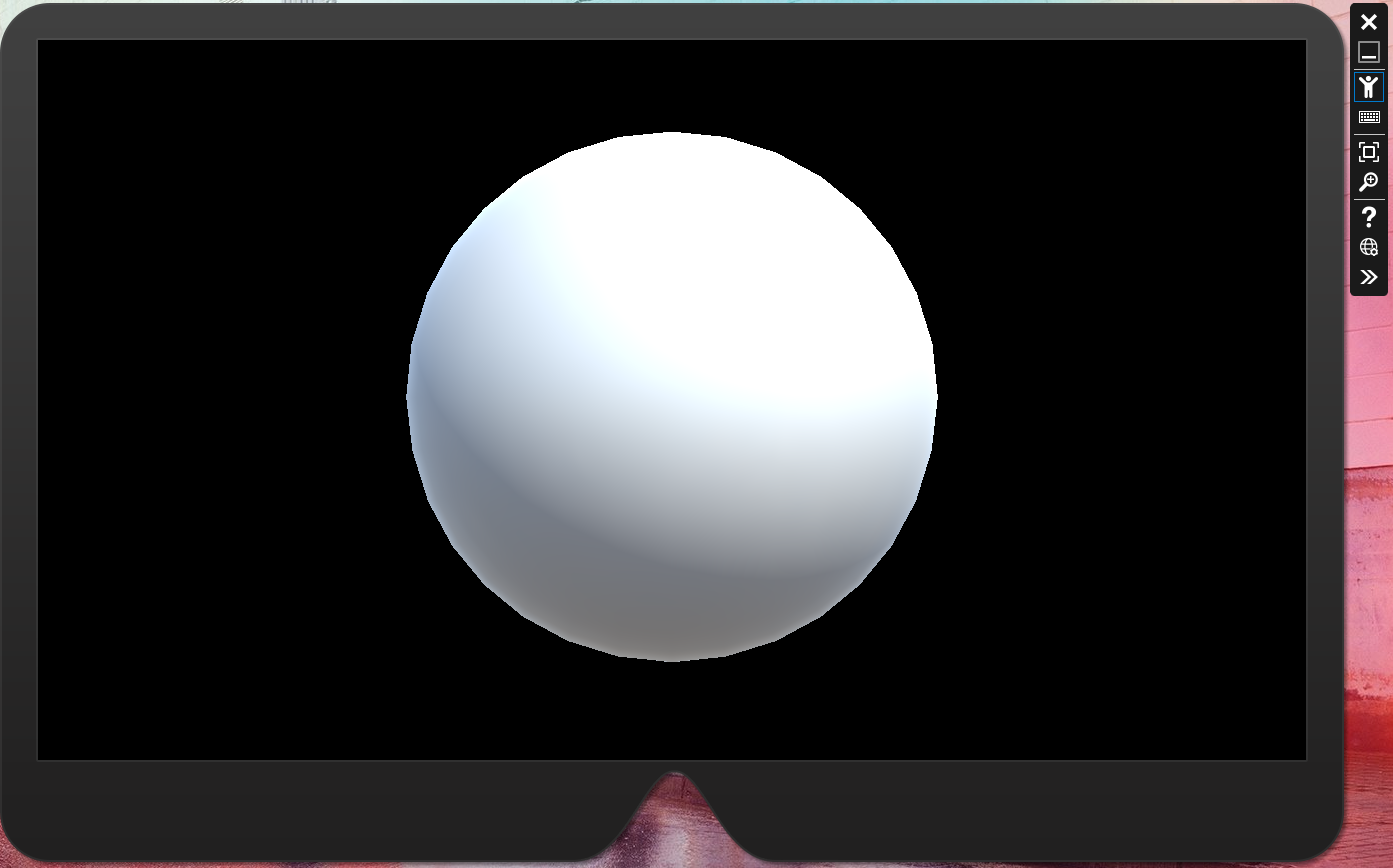
This will launch the app in the HoloLens emulator, which is as close as you get to a HoloLens experience without actually having a physical device.
HoloLens Emulator and Portal
The emulator comes as equipped as possible within the virtual limits of physical computing. It can simulate a full 3D experience with movement in x, y and z dimensions. Using the arrows and AWSD keys you can manoeuvre the virtual 3D space which is modelled on a real room with spatial data captured by a HoloLens. Hitting enter will perform the tap gesture and hitting the Windows key brings up the start menu. Simple.
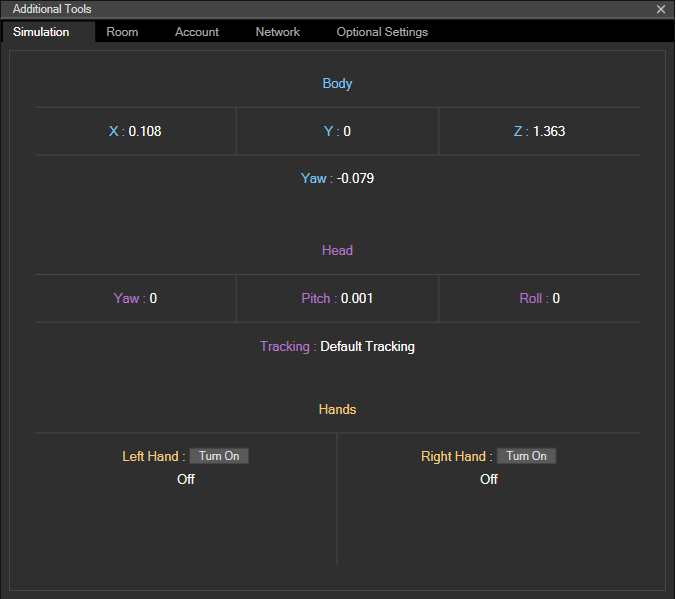
Clicking the double arrow to the right of the emulator brings up the emulator tools. These gives all of the detailed information of the current session. You can see exactly what your virtual body, head and hands are doing, as well as load new rooms, use your real MS account and get network details. Because head movement is so crucial for the HoloLens experience, it can prove very time-saving for debugging purposes knowing exactly where you are in relation to the holograms.
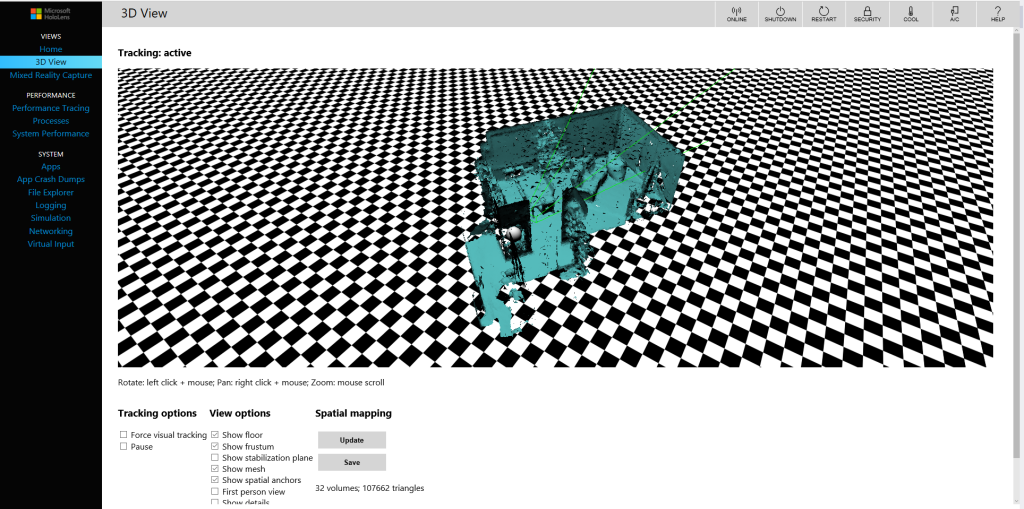
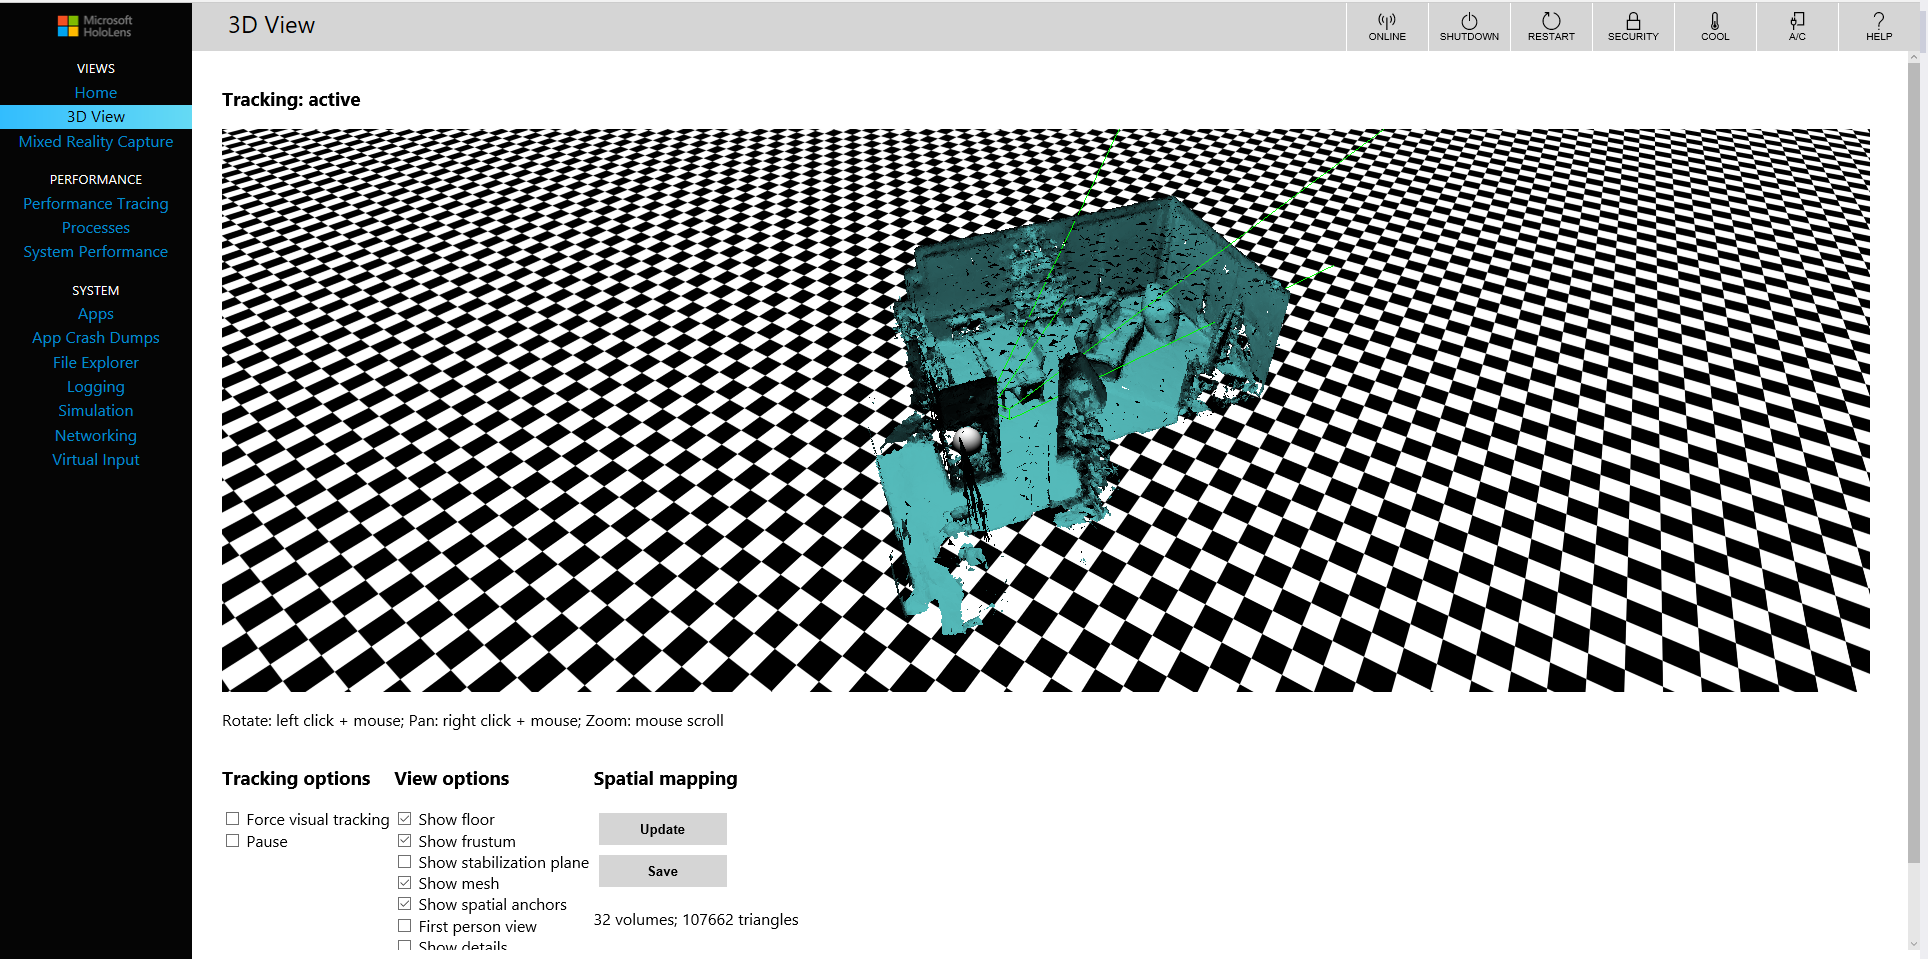
The last part of the tools that you need to be aware of, whether you are using the emulator or a physical device, is the device portal. Clicking on the little globe icon on the right of the emulator will load a web page with all possible details about your device (whether physical or virtual). There are a lot of metrics for measuring performance and device health along with file explorer and input simulations. You can also record new rooms if you have a physical device to spatially map your surroundings.

The most immediately useful feature is the 3D view, which relates to where you move in the emulator. In other words, when you move your virtual body in the emulator, the 3D view updates in real time to show where you are. Super useful and another way to make the simulation even more real and useful.
Wrap Up!
You now have all the tools ready, and you have built a very simple HoloLens app. Granted, it doesn’t do anything yet, but getting off to the right start is half the battle won. In the next article, I will go through using gaze and gestures to bring your app to life.
Frequently Asked Questions (FAQs) about Building Your First HoloLens App
What are the basic requirements for building a HoloLens app?
To start building a HoloLens app, you need a Windows 10 PC, Visual Studio 2017 or later, and the HoloLens emulator. The PC should have a 64-bit processor, 8GB of RAM, and DirectX 12 with feature level 11.0. You also need to install the Universal Windows Platform development workload and the Windows 10 SDK.
How can I install the HoloLens emulator?
The HoloLens emulator is a tool that allows you to test HoloLens apps on your PC without a physical HoloLens. You can download it from the official Microsoft website. After downloading, run the installer and follow the instructions. Make sure your PC meets the system requirements for the emulator.
How can I create assets for my HoloLens app?
Assets for a HoloLens app can be created using 3D modeling software like Blender or Unity. These tools allow you to create and animate 3D models, which can then be imported into your HoloLens app. You can also use the Mixed Reality Toolkit, which provides a set of components and features to accelerate cross-platform MR app development in Unity.
How can I deploy my HoloLens app to the emulator?
To deploy your HoloLens app to the emulator, you need to select the emulator as the target device in Visual Studio. Then, you can use the “Start Debugging” or “Start Without Debugging” command to deploy and run your app.
What is the role of Unity in HoloLens app development?
Unity is a powerful game development engine that is widely used for creating 3D applications, including HoloLens apps. It provides a rich set of features for creating interactive 3D content, and it supports C# scripting, which is used for programming HoloLens apps.
How can I test my HoloLens app?
You can test your HoloLens app using the HoloLens emulator or a physical HoloLens device. The emulator allows you to test your app in a simulated environment on your PC, while the device allows you to test your app in a real-world environment.
What are the best practices for designing a HoloLens app?
When designing a HoloLens app, you should consider the unique characteristics of mixed reality. For example, you should design for a 360-degree environment, use spatial sound, and consider the user’s comfort and safety.
How can I publish my HoloLens app?
You can publish your HoloLens app to the Microsoft Store. To do this, you need to create a developer account, submit your app for certification, and then publish it.
What are some common issues in HoloLens app development and how can I troubleshoot them?
Some common issues in HoloLens app development include problems with deployment, performance issues, and issues with 3D modeling. These can often be troubleshooted by checking the error messages, consulting the documentation, and seeking help from the community.
How can I learn more about HoloLens app development?
There are many resources available for learning about HoloLens app development. These include the official Microsoft documentation, online tutorials, and community forums. You can also learn by experimenting and building your own apps.