
Key Takeaways
- Android developers can create specialized menus such as contextual and popup menus within their apps. Contextual menus appear when a user presses and holds on a specific item, while popup menus can be programmed to appear when a button is clicked.
- A contextual menu is created within a view. To create a contextual menu, first register the view for the contextual menu, then create the menu itself. This can be done either in XML or directly through Java programming.
- To respond to user selections on contextual menus, implement the onContextItemSelected function within the activity. The menu item that’s chosen is passed to this function, and getItemId can be used to identify which menu item was clicked.
- Popup menus, supported only after Android API level 11, are modal menus that can be created and displayed near a view. To create a popup menu, define the menu items in an XML file, create a PopupMenu object in Java code, inflate the menu XML using the inflate() method, and handle the menu item clicks by setting an OnMenuItemClickListener on the PopupMenu object.
In the previous article in this series, we learned how to create standard options menus for your Android app using XML or built directly through Java programming. Besides these typical options menus, Android developers can also create specialized menu types such as the contextual menu and the popup menu within their Android apps.
A contextual menu is a menu which affects (or appears on) specific items and generally has options that affect only that particular item. The contextual menu in Android appears when a user presses and holds on a specific item. The contextual menu will be presented to the user, and he or she will be able to choose from the array of options.
Android also lets you create popup menus in your application. A popup menu is a modal menu that can be programmed to appear when a button is clicked.
In this article, we are going to demonstrate how we can create contextual and popup menus within our Android apps.
Registering the View for Contextual Menus
To start, we are going to build a basic example by creating a contextual menu on one single item. A contextual menu is created within a view, so we will register that view for the contextual menu first and then move on to the menu itself.
Bu, lets first create an Android activity within layout main.xml file as follows:
<?xml version="1.0" encoding="utf-8"?>
<LinearLayout xmlns:android="http://schemas.android.com/apk/res/android"
android:layout_width="fill_parent"
android:layout_height="fill_parent"
android:orientation="vertical"
>
<TextView
android:id="@+id/<span style="text-decoration: underline;">Username</span>"
android:layout_width="fill_parent"
android:layout_height="60dip"
android:text="Hold For contextual menu"
android:padding="4dip"
/>
<EditText
android:id="@+id/usernameEdittext"
android:layout_height="wrap_content"
android:singleLine="true"
android:background="#<span style="text-decoration: underline;">ffffff</span>"
android:layout_width="400dip" >
</EditText>
</LinearLayout>
In the above layout, we have just created one TextView and one edit view within the layout. Now, we’ll write the code for the activity is as follows:
[sourcecode language=”java”]
package com.contexualandpopupmenudemon;
import android.os.Bundle;
import android.app.Activity;
import android.view.Menu;
import android.widget.EditText;
public class ContextualAndPopupmenuDemo extends Activity {
@Override
protected void onCreate(Bundle savedInstanceState) {
super.onCreate(savedInstanceState);
setContentView(R.layout.main);
EditText UserNameEditText = (EditText)findViewById(R.id.usernameEdittext);
registerForContextMenu(UserNameEditText);
}
}
[/sourcecode]
In the activity above, we have overridden the onCreate method in which we have set the main layout. Then, we find the EditText using the function findViewById.
Once we get the EditView, we call registerForContextMenu on that view. This function registers the view and allows us to display a context menu.
Creating the Contextual Menu
Once we have registered the view for a contextual menu, we will create a menu in XML for our contextual menu. To create a menu in XML format, create a contextual.xml file in the menu folder of your resources. Add the following code to your contextual.xml file:
<menu xmlns:android="http://schemas.android.com/apk/res/android">
<item android:id="@+id/fetch"
android:title="Fetch New <span style="text-decoration: underline;">Username</span>" />
<item android:id="@+id/check"
android:title="Check For Duplicate" />
</menu>
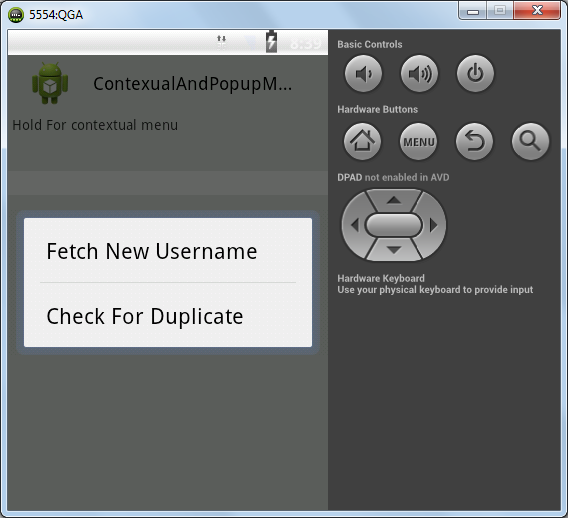
In our contextual menu, we have created two items: one to acquire usernames, and one to check for duplicates. Once we have created the menu in XML format, we will have to override the onCreateContextMenu function as follows:
[sourcecode language=”java”]
@Override
public void onCreateContextMenu(ContextMenu menu, View v,
ContextMenuInfo menuInfo) {
super.onCreateContextMenu(menu, v, menuInfo);
if (v.getId()==R.id.usernameEdittext) {
getMenuInflater().inflate(R.menu.contextual, menu);
}
}
[/sourcecode]
In this code, we determine if the ID of the view is the specific one we are looking for. If it is, we initiate the menu as described in the previous article in this series.
Now, if you hold for a few seconds on the EditText, you should be able to see the following contextual menu:
If you don’t want to build this menu in XML, you can build an identical menu in Java using the following programming:
[sourcecode language=”java”]
@Override
public void onCreateContextMenu(ContextMenu menu, View v,
ContextMenuInfo menuInfo) {
super.onCreateContextMenu(menu, v, menuInfo);
if (v.getId()==R.id.usernameEdittext) {
menu.add(0, 1, 0, “Fetch New Username”);
menu.add(0, 2, 0, “Check For Duplicate”);
}
}
[/sourcecode]
Now, if you run the app again, you will see a very similar menu to what we created through XML formatting.
Responding to Clicks on Contextual Menus
To respond to user selections on our contextual menus, we must implement the onContextItemSelected function within our activity. To respond to our menu items, we implement the onContextItemSelected as shown below:
[sourcecode language=”java”]
@Override
public boolean onContextItemSelected(MenuItem item) {
switch (item.getItemId()) {
case R.id.fetch:
showToast(“Fetch Clicked”);
return true;
case R.id.check:
showToast(“Check Clicked”);
return true;
default:
return super.onContextItemSelected(item);
}
}
public void showToast(String message) {
Toast toast = Toast.makeText(getApplicationContext(), message, Toast.LENGTH_SHORT);
toast.show();
}
[/sourcecode]
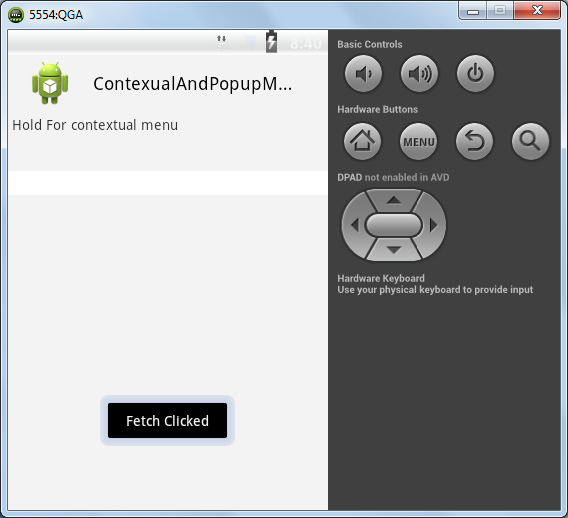
In the programming above the menu item that’s chosen is passed to the function onContextItemSelected, and we can call getItemId to identify which menu item was clicked. Then, we call the appropriate function (that matches the user’s choice) to handle this menu click . Currently, the only functionality that results from selecting a menu option is a toast with a message. So, now if you click on the “Fetch New Username” option, you should see the following:
Creating a Popup Menu
A popup menu (supported only after Android API level 11) is a modal menu that you can create and display near a view. For demonstration purposes, we will create a popup menu when an “Options” button is clicked on the activity. First, let’s add this “Options” button to our layout.xml file, as shown below.
<Button
android:id="@+id/<span style="text-decoration: underline;">btnoptions</span>"
android:layout_width="wrap_content"
android:layout_height="wrap_content"
android:text="Options"
android:onClick="CreatePopupMenu"/>
This will create the necessary “Options” button for our popup menu. When selected, the function CreatePopupMenu will be called. Then, we create a new popup.xml file in our res/menu folder with the following content:
<menu xmlns:android="http://schemas.android.com/apk/res/android">
<item android:id="@+id/option1"
android:title="Option 1" />
<item android:id="@+id/option2"
android:title="Option 2" />
</menu>
In our popup.xml file above, we have created two menu items: option1, and option2. Then, we add the function CreatePopupMenu to our activity using the following programming:
[sourcecode language=”java”]
public void CreatePopupMenu(View v) {
PopupMenu mypopupmenu = new PopupMenu(this, v);
MenuInflater inflater = mypopupmenu.getMenuInflater();
inflater.inflate(R.menu.<i>popup</i>, mypopupmenu.getMenu());
mypopupmenu.show();
}
[/sourcecode]
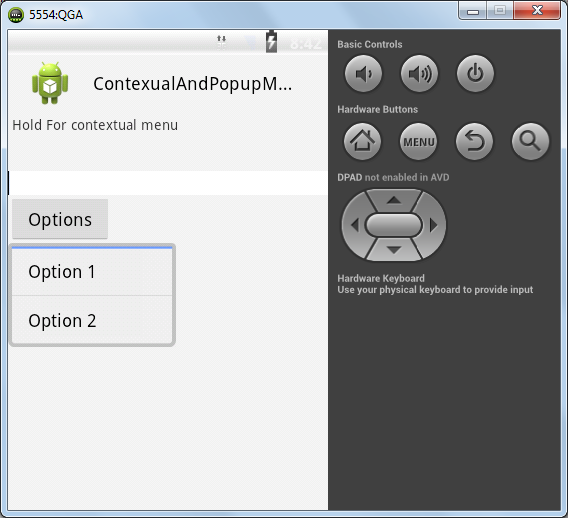
Above, we create a new PopupMenu object and then include our popup.xml menu within it. Then, we show the popup menu by calling the show function.
So, now if we run the app and click on our new “Options” button, you should be able to see the menu shown below.
Responding to Popup Menu Clicks
To respond to popup menu clicks, you have to set a menu item click listener, which is a class that implements the OnMenuItemClickListener interface. It has one method in it—onMenuItemClick. We will implement this interface in our activity itself. So, we must change the class definition as follows:
[sourcecode language=”java”]
public class ContextualAndPopupmenuDemo extends Activity implements OnMenuItemClickListener{
Then we change CreatePopupMenu and implement onMenuItemClick as follows
public void CreatePopupMenu(View v) {
PopupMenu mypopupmenu = new PopupMenu(this, v);
mypopupmenu.setOnMenuItemClickListener(this);
MenuInflater inflater = mypopupmenu.getMenuInflater();
inflater.inflate(R.menu.popup, mypopupmenu.getMenu());
mypopupmenu.show();
}
@Override
public boolean onMenuItemClick(MenuItem arg0) {
switch (arg0.getItemId()) {
case R.id.option1:
showToast(“Option1 Clicked”);
return true;
case R.id.option2:
showToast(“Option2 Clicked”);
return true;
default:
return super.onContextItemSelected(arg0);
}
}
[/sourcecode]
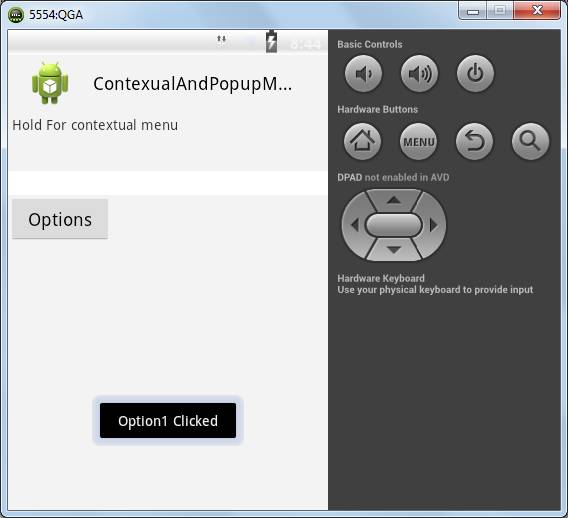
In the function, onMenuItemClick—depending on the menu item clicked—will display the appropriate toast. If we click on one of the menu options, we should see the toast shown below.
Conclusion
In Android, you can create a wide variety of menus for various settings and circumstances. You can define those menus in an XML file, or you can add them via java code directly. You can respond to the menu items depending on the type of menu (contextual, popup) you have created. When you offer application-wide settings, you should typically use the “Options” menu. If you want to offer specialized options or settings for a particular item, then you probably should use the contextual menu.
For the contextual menu to appear, the user has to hold for some time on the desired option. If you want to show a menu on some other user action such as a click of a button or tapping an image, you can use popup menu for that purpose as well. Regardless of your app idea or the functionality that you have in mind, you now have the tools needed to capture user input and build a sensible, intuitive app experience. Have fun while implementing these various menu types in your next Android app.
Frequently Asked Questions (FAQs) about Building Intuitive, Extensible Menus in Android with Java and XML
How can I create a Popup Menu in Android using Java and XML?
Creating a Popup Menu in Android using Java and XML involves a few steps. First, you need to define the menu items in an XML file in the res/menu directory. Each item should have an ID, title, and optionally, an icon. Next, in your Java code, you need to create a PopupMenu object, passing the context and the view to which the menu should be anchored. Then, you inflate the menu XML using the inflate() method. Finally, you can handle the menu item clicks by setting an OnMenuItemClickListener on the PopupMenu object. Here’s a simple example:PopupMenu popup = new PopupMenu(context, view);MenuInflater inflater = popup.getMenuInflater();inflater.inflate(R.menu.menu_example, popup.getMenu());popup.setOnMenuItemClickListener(new PopupMenu.OnMenuItemClickListener() {
public boolean onMenuItemClick(MenuItem item) {
// Handle item selection
return true;
}});popup.show();
What is a Context Menu in Android and how can I implement it?
A Context Menu is a type of menu that provides a set of menu items that are related to the specific context of the user’s interaction. It’s typically used for providing quick access to functions that are relevant to the current activity or selection. To implement a Context Menu, you need to override the onCreateContextMenu() method in your activity or fragment, and inflate your menu XML here. Then, you can handle the menu item clicks in the onContextItemSelected() method. Here’s a basic example:@Overridepublic void onCreateContextMenu(ContextMenu menu, View v, ContextMenu.ContextMenuInfo menuInfo) {
super.onCreateContextMenu(menu, v, menuInfo);
MenuInflater inflater = getMenuInflater();
inflater.inflate(R.menu.context_menu, menu);}@Overridepublic boolean onContextItemSelected(MenuItem item) {
// Handle item selection
return super.onContextItemSelected(item);}
How can I customize the appearance of my Android menu?
You can customize the appearance of your Android menu by using styles and themes. In your styles.xml file, you can define a style for your menu, specifying attributes like background color, text color, text size, etc. Then, you can apply this style to your menu in your XML layout file using the style attribute. Here’s an example:<style name="MyPopupMenu" parent="Widget.AppCompat.PopupMenu">
<item name="android:textColor">#FFFFFF</item>
<item name="android:background">#000000</item></style>
Then in your layout:<android.support.v7.widget.PopupMenu
android:layout_width="wrap_content"
android:layout_height="wrap_content"
style="@style/MyPopupMenu" />
Remember to also apply the style in your Java code when creating the PopupMenu object:PopupMenu popup = new PopupMenu(new ContextThemeWrapper(context, R.style.MyPopupMenu), view);
How can I add icons to my Android menu items?
To add icons to your Android menu items, you simply need to include the android:icon attribute in your menu item definition in your XML file. The value of this attribute should be a reference to the drawable resource for the icon. Here’s an example:<item
android:id="@+id/action_settings"
android:orderInCategory="100"
android:title="@string/action_settings"
android:icon="@drawable/ic_settings" />
Note that starting from Android 3.0 (API level 11), only the overflow menu (the three vertical dots) will show the icons. Regular menu items in the action bar will not show the icons, even if they are defined in the XML.
How can I handle the click events of my Android menu items?
To handle the click events of your Android menu items, you need to override the onOptionsItemSelected() method in your activity or fragment. This method is called whenever a menu item is selected. The MenuItem object passed to this method allows you to identify the clicked item by its ID, so you can perform the appropriate action. Here’s an example:@Overridepublic boolean onOptionsItemSelected(MenuItem item) {
switch (item.getItemId()) {
case R.id.action_settings:
// User chose the "Settings" item, show the app settings UI...
return true;
case R.id.action_favorite:
// User chose the "Favorite" action, mark the current item as a favorite...
return true;
default:
// If we got here, the user's action was not recognized.
// Invoke the superclass to handle it.
return super.onOptionsItemSelected(item);
}}
How can I create a submenu in my Android menu?
To create a submenu in your Android menu, you can use the
How can I show and hide menu items programmatically in Android?
To show and hide menu items programmatically in Android, you can use the setVisible() method of the MenuItem class. You need to get a reference to the MenuItem object by calling the findItem() method on the Menu object, passing the ID of the menu item. Here’s an example:@Overridepublic boolean onPrepareOptionsMenu(Menu menu) {
MenuItem item = menu.findItem(R.id.action_settings);
item.setVisible(false); // Hide menu item
return super.onPrepareOptionsMenu(menu);}
To show the menu item, you would call setVisible(true) instead.
How can I create a dynamic menu in Android?
To create a dynamic menu in Android, you can add menu items programmatically in your Java code. You can do this in the onCreateOptionsMenu() method, by calling the add() method on the Menu object. The add() method takes four parameters: the group ID, item ID, order, and title of the menu item. Here’s an example:@Overridepublic boolean onCreateOptionsMenu(Menu menu) {
menu.add(0, 1, 0, "Dynamic Item 1");
menu.add(0, 2, 1, "Dynamic Item 2");
return true;}
You can handle the click events of the dynamic items in the same way as regular items, using the onOptionsItemSelected() method.
How can I create a checkable menu item in Android?
To create a checkable menu item in Android, you can use the android:checkable attribute in your XML file. If you want to create a group of mutually exclusive checkable items (like a group of radio buttons), you can use the <group android:checkableBehavior="single">
<item android:id="@+id/action_option1"
android:title="Option 1"
android:checkable="true" />
<item android:id="@+id/action_option2"
android:title="Option 2"
android:checkable="true" /></group>
You can check and uncheck the items programmatically using the setChecked() method of the MenuItem class.
How can I create a searchable menu item in Android?
To create a searchable menu item in Android, you need to use a SearchView widget as an action view of a menu item. First, you define the menu item in your XML file with the android:actionViewClass attribute set to “android.widget.SearchView”. Then, in your Java code, you get a reference to the SearchView and set an OnQueryTextListener on it to handle the search queries. Here’s an example:<item android:id="@+id/action_search"
android:title="Search"
android:icon="@drawable/ic_search"
app:showAsAction="ifRoom|collapseActionView"
app:actionViewClass="android.widget.SearchView" />@Overridepublic boolean onCreateOptionsMenu(Menu menu) {
getMenuInflater().inflate(R.menu.menu_main, menu);
MenuItem searchItem = menu.findItem(R.id.action_search);
SearchView searchView = (SearchView) searchItem.getActionView();
searchView.setOnQueryTextListener(new SearchView.OnQueryTextListener() {
@Override
public boolean onQueryTextSubmit(String query) {
// Perform the search
return true;
}
@Override
public boolean onQueryTextChange(String newText) {
// Update the search results
return true;
}
});
return true;}