
Key Takeaways
- Android provides a flexible infrastructure to add menus in apps, which can be created through XML resources or directly via code. The menus offer a way to organize options, features, and settings in a user-friendly manner.
- Menus can be created using the menu.xml resource file, creating a menu directory in the resource directory. Each menu item requires an XML item tag and can have attributes such as id, title, and icon.
- Submenus can be created by adding a nested
- Actions can be performed based on menu selections by overriding the onOptionsItemSelected function in the activity. Alternatively, menus can also be created directly via code if XML is not suitable.
App users love powerful options and features, but if they’re not well organized within your app’s interface, they might as well not even exist. Depending on what you’ve built, these options and features could affect the way that the app behaves, they could offer extensive customization options, or they could even tie into APIs, other apps, hardware capabilities, or other external technologies. But, they’ll have to be intuitive and organized to be at their best. That’s where proper menu design comes in.
When you are designing an app it is very important to design a sensible order and structure for the many options, features and settings that you plan to build. Obviously, your interface plays a pivotal role in your app’s performance; without it, your app would be nothing more than a disorganized collection of functions.
Menu items are a very old and famous user interface entity. Almost all users are comfortable using menus in their apps. Android provides an easy and flexible infrastructure to add menus in your app. It lets you create menus through XML resources or directly via code. Based on the menu item clicked, a certain action can be performed by your app. In this article, we are going to see how we can easily create menus and respond to menus using the Android API.
Creating a Menu Using XML
Let’s start by creating an Android project called MenuOptionsDemoProject, in which we are going to demonstrate menu creation via XML. Once we have created a project and created an activity in MenuOptionsDemoProject, we are ready to add a menu to it.
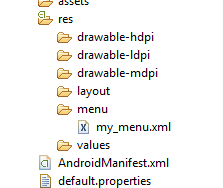
One way to create an options menu in Android is using the menu.xml resource file. To create menus using this method, you must create a menu directory in your resource directory. Create a file called my_menu.xml. Your directory structure should look as follows:
Once you have created the file structure above, you can add the following code into your my_menu.xml file:
<?xml version="1.0" encoding="utf-8"?>
<menu xmlns:android="http://schemas.android.com/apk/res/android">
<item android:id="@+id/open" android:icon="@drawable/openicon"
android:title="Open the file" />
<item android:id="@+id/save"
android:icon="@drawable/saveicon"
android:title="Save the file" />
</menu>
To create a menu resource, you have to employ the <menu> tag. You must create this XML item tag for each menu item that you want to show in your menu. There are a lot of attributes that you can specify within <menu> XML tag. Some of the most important ones are the id for the item and the title tag, which determines the text shown on the menu item. You can also specify the icon for the <menu> item to determine the graphic that’s visually associated with it’s respective menu option.
In the above XML, we have created two menu items: one for opening a file, and one for saving the file. We have given both of the items titles, and we’ve also given each an icon.
Once the menu resource file (my_menu.xml) is ready and has all the items you intend to add, you can use MenuInflater to override the function onCreateOptionsMenu. This function is supposed to fill the menu object with the desired menu items, but Android’s MenuInflater class helps you create menu items from the XML resource mentioned above. The code of our activity will be as follows:
[sourcecode language=”java”]
import android.app.Activity;
import android.os.Bundle;
import android.view.Menu;
import android.view.MenuInflater;
public class MenuOptionsDemoProject extends Activity {
/** Called when the activity is first created. */
@Override
public void onCreate(Bundle savedInstanceState) {
super.onCreate(savedInstanceState);
setContentView(R.layout.main);
}
@Override
public boolean onCreateOptionsMenu(Menu menu) {
MenuInflater inflater = getMenuInflater();
inflater.inflate(R.menu.my_menu, menu);
return true;
}
}
[/sourcecode]
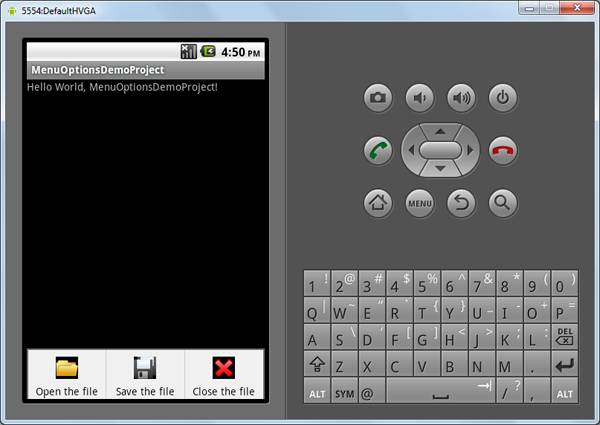
Now if you run your activity and click on the menu button, you should be able to see your newly-created menu items, as shown below.

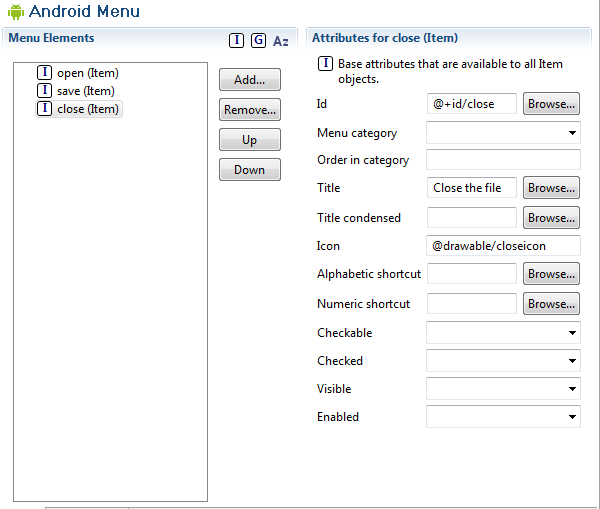
In case you are using Eclipse for development, you also have a helpful Android menu editor using, which you can use add menu items. Below, we just added one more menu item (one for closing the file) through Eclipse’s Android menu editor.
Creating a Submenu Using XML
Once we have created the single-level menu using XML, now let’s create a submenu using the same XML method. Suppose we want the user to have the of either saving or closing only the current file or saving or closing all the files. Using submenus in Android, we will provide these new options to the user.
We will have to update our my_menu.xml file to add sub menus. Below is the modified XML file:
<?xml version="1.0" encoding="utf-8"?>
<menu xmlns:android="http://schemas.android.com/apk/res/android">
<item android:id="@+id/open"
android:icon="@drawable/openicon"
android:title="Open the file" />
<item android:id="@+id/save"  android:icon="@drawable/saveicon"   android:title="Save the file">
<menu>
<item android:id="@+id/savecurrent"
android:title="Save Current file" />
<item android:id="@+id/saveall"
android:title="Save All Files" />
</menu>
</item>
<item android:id="@+id/close" android:title="Close the file" android:icon="@drawable/closeicon">
<menu>
<item android:id="@+id/closecurrent"
android:title="Close Current file" />
<item android:id="@+id/closeall"
android:title="Close All Files" />
</menu>
</item>
</menu>
In the above XML, you can you can add a nested <menu> tag to create a sub menu. In the newly modified XML data, we’ve added menu tags in both of the original menu items.
Our code in onCreateOptionsMenu will not require any changes, as the MenuInflater will just use the newly-updated xml. This gives us the ability to build out multi-tier Android menu items quickly and easily with simple XML tags.
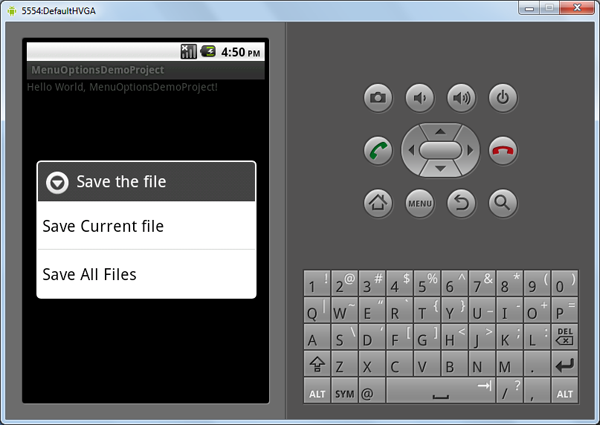
If we run the activity now and click on the menu button, we will first see the first level menu, as shown below.
Once the user clicks on the “Save the file” item, the submenu will be shown for the user to select one of the second-tier options, as shown below.
Performing Actions on Menu Selections
Now that we’ve completed our menu, we should write the code to respond to all possible menu selections. Whenever a menu item in the options menu of the Android activity is selected, the onOptionsItemSelected function of the activity is called. In order to respond the menu selections, we will have to override this function in our activity.
The code for onOptionsItemSelected is as follows:
[sourcecode language=”java”]
@Override
public boolean onOptionsItemSelected(MenuItem item) {
switch (item.getItemId()) {
case R.id.open:
showToast(“Open Clicked”);
return true;
case R.id.savecurrent:
showToast(“Save current Clicked”);
return true;
case R.id.saveall:
showToast(“Save All Clicked”);
return true;
case R.id.closecurrent:
showToast(“Close current Clicked”);
return true;
case R.id.closeall:
showToast(“Close all Clicked”);
return true;
default:
return super.onOptionsItemSelected(item);
}
}
public void showToast(String message)
{
Toast toast = Toast.makeText(getApplicationContext(), message, Toast.LENGTH_SHORT);
toast.show();
}
[/sourcecode]
In the above code, the selected menu item is passed to the function onOptionsItemSelected. Then, using the getItemId function on the menu item, we can find out which menu item was chosen.
Then, based on the menu item selected, we call the function showToast with the appropriate message. Here, you can put any code that you want to execute on the selection of that particular menu item.
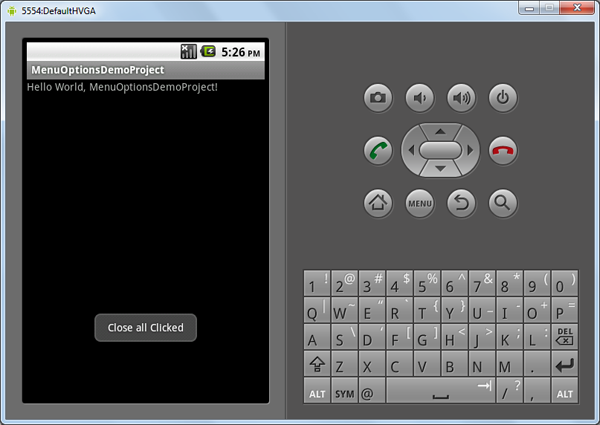
So in case the “Close all” menu option is clicked, now we should see the following message displayed:
Creating a Menu Via Code
In case you cannot create the menu using XML for some reason, you can also add the menu items via the code itself. Suppose we want to add the same three menu items (“open the file,” “save the file,” “close the file”) via code. We will have to write the code of our onCreateOptionsMenu function as follows:
[sourcecode language=”java”]
@Override
public boolean onCreateOptionsMenu(Menu menu) {
menu.add(1, 1, 0, “Open the file”);
menu.add(1, 2, 1, “Save the file”);
menu.add(1, 3, 2, “Close the file”);
return true;
}
[/sourcecode]
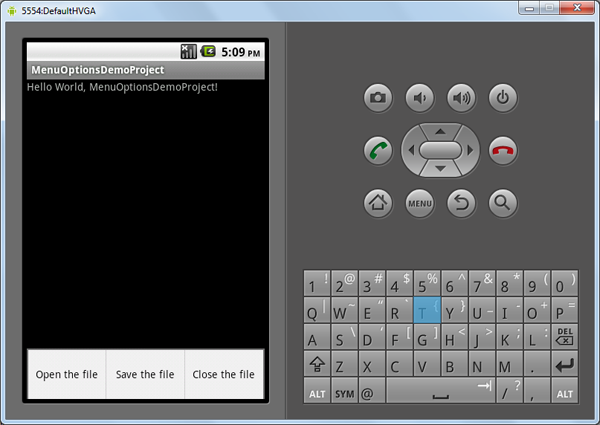
Now, our onCreateOptionsMenu function has the menu object which we can utilize to build out the desired menu. In the add function, you will have to pass the groupid, itemid, order, and title as the arguments. Once we have made the changes and run the activity, the menu should look like the following:
Conclusion
In this article, we saw that in Android we can easily create menus using two different methods. The menus can be defined as resources in XML files, which makes it very easy for us to change the menu items if needed. We can also create submenus if needed based on the types of options we want to provide in our Android application. If creating menus in XML is not suitable, you can add menu items in Java instead. Providing options and customizations to the user in your Android application is absolutely necessary if you want to make a useful Android app.
So have fun building powerful, extensible Android apps with simple, easily-editable menus.
Frequently Asked Questions (FAQs) about Menus in Android
What are the different types of menus in Android?
Android provides three types of menus: Options Menu, Context Menu, and Popup Menu. The Options Menu is the primary collection of menu items for an activity. It’s where you should place actions that have a global impact on the app, such as “Search,” “Compose email,” and “Settings.” The Context Menu is a floating menu that appears when the user performs a long-click on an element. It provides actions that affect the selected content or context frame. The Popup Menu is a simple list of menu items. It is anchored to a view. It provides a set of actions to choose from.
How do I create a menu in Android Studio?
To create a menu in Android Studio, you need to create a new directory under the res directory called ‘menu’. Then, create a new XML file within this directory. This XML file will define your menu, including all the items and their respective actions. You can then inflate this menu in your activity or fragment using the getMenuInflater().inflate() method.
How can I add icons to my Android menu?
To add icons to your Android menu, you need to use the android:icon attribute in your menu XML file. You can reference any drawable resource as the icon, but make sure the icon is appropriately sized and clear at the resolution of your target devices.
How do I handle menu item clicks in Android?
To handle menu item clicks in Android, you need to override the onOptionsItemSelected() method in your activity or fragment. This method receives the MenuItem that was clicked as a parameter. You can then use the getItemId() method of the MenuItem to determine which item was clicked and perform the appropriate action.
Can I create a dynamic menu in Android?
Yes, you can create a dynamic menu in Android. To do this, you need to override the onPrepareOptionsMenu() method in your activity or fragment. This method is called every time the menu is displayed, allowing you to modify the menu items at runtime.
How do I create a submenu in Android?
To create a submenu in Android, you need to use the
How do I create a context menu in Android?
To create a context menu in Android, you need to override the onCreateContextMenu() method in your activity or fragment. You also need to register the view for which you want to create the context menu using the registerForContextMenu() method.
How do I create a popup menu in Android?
To create a popup menu in Android, you need to use the PopupMenu class. You can instantiate this class with the context and the view to which the popup menu should be anchored. You can then inflate your menu XML file into this popup menu.
How do I change the background color of the menu in Android?
To change the background color of the menu in Android, you need to create a custom theme in your styles.xml file. You can then set this theme to your activity or application in the AndroidManifest.xml file.
How do I add a divider between menu items in Android?
To add a divider between menu items in Android, you need to use the