
In mobile commerce apps, one of the most crucial aspects that determines success is the design of your payment flow. Having gotten a user to the point where they’re ready to make a purchase, your app will need to request credit card details. It will then process the credit card through a payment processor, and deliver the purchased goods on a successful transaction.
A well-designed payment flow for an app should take into account the constraints of screen real-estate on a mobile device. It should require minimal typing and input from the user while completing the transaction, and make repeat purchases seamless by eliminating the need to go through repetitive steps.
Key Takeaways
- The design of the payment flow in mobile commerce apps is crucial for success and should be seamless, requiring minimal input from the user.
- App Store guidelines mandate the use of the In-App Purchase framework for selling digital products or content within the app, while physical goods or services require a 3rd-party payment processor like Stripe, Braintree, Authorize.net, or Paypal.
- A good payment processor should offer a native SDK that can be integrated into the app’s custom views for a smooth payment experience. Stripe, Braintree, and Paypal are popular options amongst developers.
- The article provides a step-by-step guide on integrating the Stripe SDK into an iOS app to collect credit card information and charge it using a backend server.
App Store guidelines on payments as well as best practices
When choosing how to accept payments in your iOS app, it is important to keep in mind the rules of the App Store about in-app purchases.
For selling of digital products or content within your app, Apple mandates the use of the In-App Purchase framework. This means that it is not possible to use a 3rd-party payment processor when selling digital content via your iOS app. The benefit is that users get a 1-click purchase experience in your app, enabling anybody with an Apple account to purchase products inside your app through a simple, native payment interface that every iOS user is familiar with.
On the other hand, if you are selling physical goods or services, the App Store rules require you to use a 3rd-party payment processor, like Stripe, Braintree, Authorize.net or Paypal and not the Apple In-App Purchase framework.
If you are creating an ecommerce app, implementing the proper payment information security and data flow inside a native iOS app is different from the implementation for a web app.
Some mobile commerce apps get around this problem by wrapping their existing provider’s web UI in a series of WebViews, but this can lead to a very poor user experience. It can also be bug prone because it requires the app developer to handle redirects from the payment gateway and write server-side code to augment the app’s payment flow.
For a smooth payment experience inside your app, I recommend that you pick a payment processor that offers a native SDK you can integrate into your app’s custom views. A few popular options amongst developers are the iOS SDKs offered by Stripe, Braintree, and Paypal.
While each of the providers mentioned has its own advantages, the main difference between them is that Braintree and Paypal include UI views for the entire payment flow. This includes typing in credit card details, processing them and returning success or failure to the application. The advantage of this approach is that a developer does not need to write custom views from scratch. Stripe, on the other hand, gives you fine-grained control over the UI, requiring you to use the library for card tokenization and leaving the custom views up to you.
Integrating the Stripe SDK and charging customers from your iOS app
In this section, we will show how to integrate the Stripe SDK into your iOS app to collect credit card information, and use a backend server to charge it.
Here is an overview of the steps we will need to follow:
- Create a Stripe account & access your API key
- Download the Stripe iOS SDK
- Collect card information
- Create a single-use token
- Send the token to your server
- On the server, call Stripe to charge the card and complete the transaction
Create a Stripe account & access your public API key
Head over to stripe.com and sign up for a new account, if you don’t have one already. Once you’re signed up and in your dashboard, click on Your Account on the top-right corner and select Account Settings.
You will find your keys under the tab labeled API Keys.
Since we’re doing this as part of our tutorial for test purposes, whenever you need your API keys, use the Test set of keys. Of course, when the project goes into production, you will want to use your Live keys.
Download and set up the Stripe SDK in your XCode project
The easy way to do this is using git:
git clone --recursive https://github.com/stripe/stripe-ios.git
Next, add the Stripe bindings to your XCode project:
- In the menu bar, click on ‘File’ then ‘Add files to “Project”…’
- Select the ‘Stripe’ directory in the downloaded repository
- Make sure ‘Copy items into destination group’s folder (if needed)’ is checked
- Click ‘Add’
Stripe iOS relies on Quartz Animation, which means you’ll need to import the relevant framework. Navigate to your application’s target, scroll down to ‘Linked Frameworks and Libraries’, and add the QuartzCore.framework.
Collect credit card details in the app
The code snippets that follow are available in the full example on Github.
Create a new class in your XCode project (let’s call it ViewController) by selecting File-> New -> File… and then “Objective-C Class”) and make sure it inherits from UIViewController.
In your class header (ViewController.h), you will need to import STPView.h like this:
#import <UIKit/UIKit.h>;

#import "STPView.h"
@interface ViewController : UIViewController <STPViewDelegate>;
@property (nonatomic, strong) STPView* stripeView;
@end
In ViewController.m, we instantiate the STPView and add it as a subview:
- (void)viewDidLoad

    {

        [super viewDidLoad];
        self.stripeView = [[STPView alloc] initWithFrame:CGRectMake(15,80,290,55)

                                                  andKey:@"YOUR_PUBLISHABLE_KEY_HERE"];

        self.stripeView.delegate = self;

        [self.view addSubview:self.stripeView];

    }
Note that you will need to use your own publishable API key in the above code snippet.
Create a single use token
At this point you’ve validated card input and are ready to send credit card data off to Stripe’s servers to receive a token, you will need to call createToken. Add the following code to ViewController.m (this assumes you have a simple Save button that can be clicked):
- (IBAction)savePressed:(id)sender

{

    [[UIApplication sharedApplication] setNetworkActivityIndicatorVisible:YES];

    // Call 'createToken' when the user hits “Save”

    [self.stripeView createToken:^(STPToken *token, NSError *error) {

        [[UIApplication sharedApplication] setNetworkActivityIndicatorVisible:NO];

        if (error) {

            // Handle error

            NSLog(@"Error %@",error);

            [[[UIAlertView alloc] initWithTitle:@"Error" message:@"Credit Card check failed" delegate:self cancelButtonTitle:@"OK" otherButtonTitles:nil] show];

        } else {

            // Ok, step 5.

            [self hasToken:token];

        }

    }];

}
Send the token to your server to charge it
If the call to createToken succeeded, the final step is to call an endpoint on your server to which you will pass the Stripe token obtained in Step 4. Add the following code to ViewController.m:
- (void)hasToken:(STPToken *)token

{

    NSLog(@"Received token %@", token.tokenId);
    NSMutableURLRequest *request = [[NSMutableURLRequest alloc] initWithURL:[NSURL URLWithString:@"https://example.com"]];

    request.HTTPMethod = @"POST";

    NSString *body     = [NSString stringWithFormat:@"stripeToken=%@", token.tokenId];

    request.HTTPBody   = [body dataUsingEncoding:NSUTF8StringEncoding];
    [NSURLConnection sendAsynchronousRequest:request

                                       queue:[NSOperationQueue mainQueue]

                           completionHandler:^(NSURLResponse *response, NSData *data, NSError *error) {

                               [[[UIAlertView alloc] initWithTitle:@"Success!" message:@"Your card was charged successfully" delegate:self cancelButtonTitle:@"OK" otherButtonTitles:nil] show];

                           }];

}
On your server, call Stripe to charge the card and complete the transaction
On your server, you will need to check whether there’s sufficient inventory to fulfil the order. Assuming the inventory check succeeds, the final step is to charge the card from your server side code and return success or failure to the app. Here’s example Python code that charges the card using the token passed into it.
# Set your secret key: remember to change this to your live secret key in production

# See your keys here https://manage.stripe.com/account

stripe.api_key = "MWvGLiJ66l72RxJqvwcoXeF9abflctah"
# Get the credit card details submitted by the form

token = request.POST['stripeToken']
# Create the charge on Stripe's servers - this will charge the user's card

try:

  charge = stripe.Charge.create(

      amount=1000, # amount in cents, again

      currency="usd",

      card=token,

      description="payinguser@example.com"

  )

except stripe.CardError, e:

  # The card has been declined

  pass
And that’s it – you’re done successfully charging your customers’ credit card for a purchase they made inside your app!
Alternatively, you could consider using our MobStac iOS SDK for mobile commerce apps that does all this for you, and also integrates with an ecommerce backend like Magento.
Example of a good payment flow
A number of mobile commerce apps today already employ a simple and intuitive mobile payment experience to drive transactions. Lyft, the ride-sharing service is one such app which uses Stripe to quickly process mobile payments.
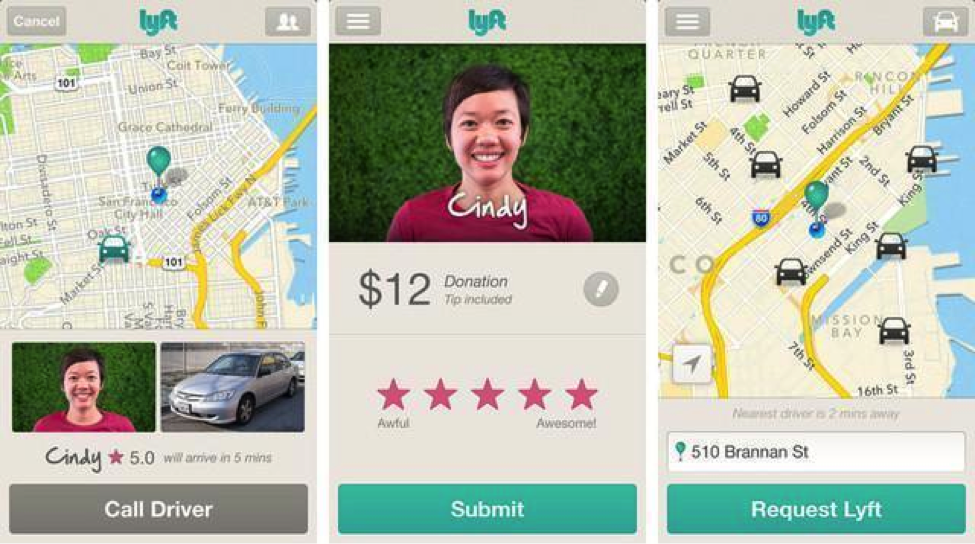
When a user logs in for the first time, the app prompts them to enter their credit card details. Users can even add multiple credit cards and label them.
When you complete a ride, you can use the app to choose the card to pay with, adjust the tip amount and then submit the payment. If you are at the payment submission screen and decide to use a different card, the app lets you switch between them, making the payment process as frictionless as possible.
What are some of the best payment experiences you have seen or used in mobile apps?
Frequently Asked Questions (FAQs) about Accepting Payments in iOS Apps
How can I integrate Apple Pay into my iOS app?
Integrating Apple Pay into your iOS app involves a few steps. First, you need to set up an Apple Pay Merchant ID and enable Apple Pay in your app. Then, you need to create a payment request, which includes the payment amount and the currency code. After that, you need to present the payment sheet to the user and handle the payment authorization. Finally, you need to process the payment with your payment provider.
What are the benefits of accepting payments through iOS apps?
Accepting payments through iOS apps offers several benefits. It provides a seamless and convenient payment experience for your customers, which can lead to increased sales. It also allows you to track customer behavior and preferences, which can help you tailor your offerings and marketing strategies. Moreover, it can reduce the risk of fraud and chargebacks, as mobile payments are typically more secure than traditional payment methods.
Are there any fees associated with accepting payments in iOS apps?
Yes, there are fees associated with accepting payments in iOS apps. Apple charges a fee for every transaction made through Apple Pay. The fee varies depending on the country and the type of transaction. In addition to Apple’s fees, you may also need to pay fees to your payment provider.
How secure is accepting payments through iOS apps?
Accepting payments through iOS apps is very secure. Apple Pay uses a method called tokenization to secure transactions. This means that your customers’ credit card information is never stored on their device or on Apple’s servers. Instead, a unique Device Account Number is assigned, encrypted, and securely stored in the Secure Element, a dedicated chip in the device.
Can I accept international payments through my iOS app?
Yes, you can accept international payments through your iOS app. Apple Pay is available in many countries around the world, and it supports a wide range of credit and debit cards. However, you need to make sure that your payment provider also supports international payments.
What types of businesses can benefit from accepting payments in iOS apps?
Almost any type of business can benefit from accepting payments in iOS apps. This includes retail businesses, restaurants, hotels, service providers, and online businesses. By offering a mobile payment option, you can attract more customers and increase your sales.
How can I handle refunds and chargebacks in my iOS app?
Handling refunds and chargebacks in your iOS app depends on your payment provider. Most providers offer tools and APIs that allow you to process refunds and handle chargebacks. You should check with your provider for specific instructions.
Can I customize the payment interface in my iOS app?
Yes, you can customize the payment interface in your iOS app. Apple provides a number of APIs and tools that allow you to customize the look and feel of the payment sheet. However, you need to follow Apple’s guidelines to ensure a consistent and user-friendly payment experience.
What happens if a customer’s payment is declined in my iOS app?
If a customer’s payment is declined in your iOS app, you should provide a clear and helpful error message. You can use Apple’s APIs to determine the reason for the decline and suggest appropriate actions for the customer.
How can I test the payment functionality in my iOS app?
You can test the payment functionality in your iOS app using Apple’s sandbox environment. This allows you to simulate transactions without actually processing payments. You can also use test credit cards provided by your payment provider.