
Key Takeaways
- Simplified, minimally formatted emails encourage reader focus on the core message, fostering a more personal connection and perceived value.
- HTML should not be abandoned, but used minimally to enhance the message through basic formatting and tracking, retaining a “plain text” feel.
- It’s possible to create a custom, mobile-friendly, minimal HTML MailChimp template for consistently formatted emails; this template can be used seamlessly with the standard MailChimp email editor.
Do you have a MailChimp list? Have you noticed the abundance of fancy email templates they’re pushing?
MailChimp has made it really easy to make fancy, graphics-laden emails.
But should you?
Multi-column, image-heavy emails may be appropriate for a travel agency, but in the world of designers and developers, the successful bootstrappers I follow use simply formatted emails.
Folks like Nathan Barry and Patrick McKenzie have thousands of subscribers. And after years of running their mailing lists, they’ve settled on emails with minimal formatting.
They know that over-styled, multi-column formatting pulls the reader’s attention away from your message.
Instead, you should aim for clean, minimally formatted emails that emphasize your content. This creates a more personal connection and the perception of higher value.
HTML vs. Plain Text
Should you use plain text then?
No, abandoning HTML is a mistake. With plain text, you can’t do any formatting or track opens. But you’ll want to keep the formatting simple: fonts, bold, italic, images, and clean, clickable links.
In other words, you’ll want to use HTML to enhance your message by using a minimal amount of formatting, while still retaining that “plain text,” personal feel.
Creating a Minimal HTML MailChimp Template
MailChimp doesn’t have a simple enough template out of the box.
Even the simplest “1 column” template has headers, images, and a website-like layout that you don’t want:

So, you’ll need to create your own HTML template that you can use whenever you compose a new MailChimp email.
If you follow these steps, you’ll be able to use the normal MailChimp editor when composing emails. This template is also mobile friendly, so it will render nicely on smartphones.
Here’s how to create your new template.
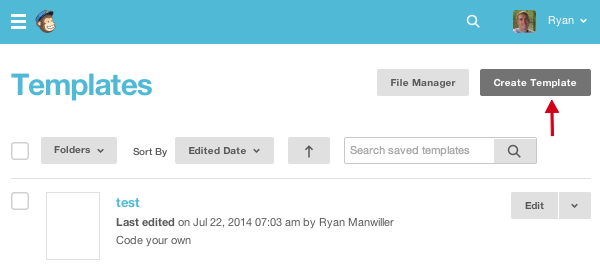
- In MailChimp, go to the Templates page, click the Create Template button.
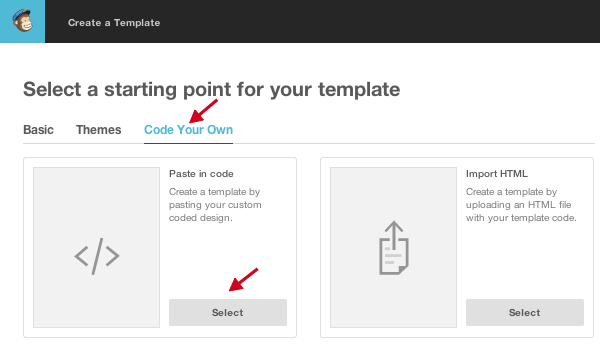
- Select the Code Your Own as the starting point, and choose the Paste in code option.
-
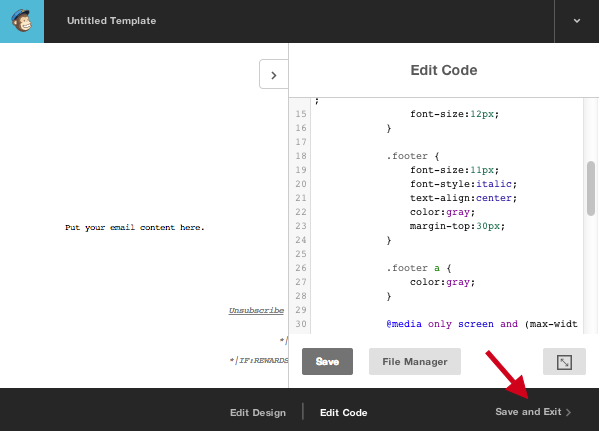
The HTML editor will open. On the right side, select all the HTML and delete it.
-
Paste in the following HTML (here’s a GitHub repository that I keep up to date with the latest version).
- Click Save and Exit. Give the template a name when prompted.
<!DOCTYPE html>

<html>

    <head>

        <meta name="viewport" content="width=device-width"/>

        <meta http-equiv="Content-Type" content="text/html; charset=UTF-8"/>

        <title>*|MC:SUBJECT|*</title>
        <style type="text/css">

            body {

                background:white;

                font-family:Arial,sans-serif;

                font-size:12px;

            }
            .footer {

                font-size:11px;

                font-style:italic;

                text-align:center;

                color:gray;

                margin-top:30px;

            }
            .footer a {

                color:gray;

            }
            @media only screen and (max-width:480px) {

                body{

                    font-size:18px !important;

                    -webkit-text-size-adjust:none !important;

                }

            }
        </style>
    </head>
    <body>
        <div mc:edit="body">

            Put your email content here.

        </div>
        <div mc:edit="footer" class="footer">

            <a href="*|UNSUB|*">Unsubscribe</a> *|EMAIL|* from this list.<br /> <br />

            *|LIST:ADDRESS|* <br />

            *|IF:REWARDS|* *|REWARDS|* *|END:IF|*

        </div>
    </body>
</html>
Let’s review what’s in our minimal template.
Minimal CSS
The <style> block includes some very simple styling to get that “default Gmail” look. It also specifies a @media directive to increase the font size for tiny screens. A larger font is much easier to read on a phone.
These styles are a very simple starting point. Obviously, you can tweak them to suit your situation.
Body and Footer Sections
We designed our main div elements with the special MailChimp mc:edit=body and mc:edit=footer tags. This is what enables your template to work seamlessly with the standard MailChimp email editor.
The footer contains the MailChimp required unsubscribe and address information. If you aren’t careful with the footer, MailChimp will add its own footer to your email. For example, it’s not enough to include the *|UNSUB|* merge tag on its own. It must be within an <a> tag.
This is just a starting point. If you normally use additional merge tags, such as the *|ARCHIVE|* or *|FORWARD|* tags, you can add those in the body or footer as necessary.
Composing an email
The next time you create a campaign or autoresponder, your template will be available for use. Make sure you choose Regular ‘ol Campaign, not Plain-Text Campaign. Then, on the Template screen, click the Saved Templates category, and you should see your template.
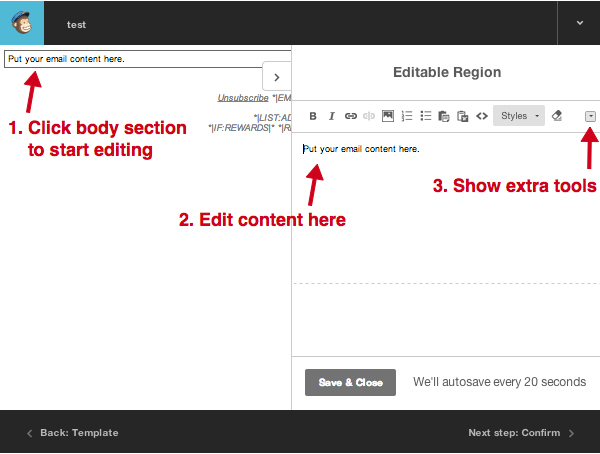
Once you choose the template, a two-sided editor opens. You initiate editing by clicking a section on the left side (when you hover on the left, Edit markers are revealed). Then you can make your edits on the right side.
You can use the edit toolbar to set font styles and insert images, links, or merge tags. Be sure to click the well-hidden Show Extra Tools button to reveal the Merge Tags drop-down.
Any styles you apply while editing will override the styles in your template.
If you’re pasting in text from another editor, like Google Docs, be aware that sometimes the pasted HTML formatting can conflict and cause layout problems. If things don’t look right, select the text and click the Clear Formatting (eraser) button in the toolbar.
Test the email
It’s always a good idea to send a test email to verify the formatting looks good. Use the Preview and Test menu at the top of the window to send yourself a test email. View the email on both your computer and phone.
Create Your Own
This simple HTML template will accentuate your content and help create a more personal connection with your subscribers.
If you haven’t done it yet, sign in to MailChimp and create your minimal template now.
Even if you don’t use it right away, it’ll be ready for you when you compose your next campaign.
Frequently Asked Questions about Mailchimp Templates
What are the optimal image sizes for Mailchimp templates?
The optimal image sizes for Mailchimp templates depend on the specific template you’re using. However, a general rule of thumb is to use images that are at least 600 pixels wide to ensure they display correctly across all devices. For full-width images, a width of 1200 pixels is recommended. Always remember to optimize your images for web use to ensure they load quickly and don’t impact your email’s performance.
How can I customize my Mailchimp template?
Mailchimp provides a variety of customization options for your templates. You can change the colors, fonts, and layout to match your brand’s style. To customize your template, go to the template editor, select the element you want to change, and use the style and settings tabs to make your adjustments. Remember to save your changes before exiting the editor.
Can I use my own HTML in Mailchimp templates?
Yes, Mailchimp allows you to use your own HTML in their templates. You can either import your HTML file or paste your code directly into the editor. This gives you more control over the design and layout of your email. However, it’s important to note that using custom HTML requires a good understanding of HTML and CSS.
Why are my images not displaying correctly in my Mailchimp template?
There could be several reasons why your images are not displaying correctly. The most common issues are related to the image size and format. Make sure your images are at least 600 pixels wide and are saved in a web-friendly format like JPEG or PNG. If your images are still not displaying correctly, it could be due to your email client’s settings or a problem with the image’s URL.
How can I add links to my Mailchimp template?
Adding links to your Mailchimp template is easy. In the template editor, select the text or image you want to link, click on the link icon in the toolbar, and enter the URL you want to link to. You can also set the link to open in a new window and add a title for the link.
Can I preview my Mailchimp template before sending it?
Yes, Mailchimp provides a preview option that allows you to see how your email will look on different devices and in different email clients. You can also send a test email to yourself or a colleague to ensure everything looks and works as expected.
How can I save my Mailchimp template for future use?
To save your Mailchimp template for future use, click on the ‘Save and Exit’ button in the template editor. This will save your template in the ‘Saved Templates’ section of your account. You can then use this template for future emails by selecting it when creating a new campaign.
Can I use animated GIFs in my Mailchimp template?
Yes, you can use animated GIFs in your Mailchimp template. However, keep in mind that not all email clients support animated GIFs. In email clients that don’t support animation, only the first frame of the GIF will be displayed.
How can I ensure my Mailchimp template is mobile-friendly?
Mailchimp templates are designed to be responsive, which means they automatically adjust to fit the screen size of the device they’re viewed on. However, it’s still important to preview your email on different devices to ensure it looks good and works well on all screen sizes.
Can I add a video to my Mailchimp template?
While you can’t directly embed a video in your Mailchimp template, you can add a screenshot of your video and link it to the video’s URL. This way, when recipients click on the screenshot, they’ll be taken to the video on your website or a video hosting platform like YouTube or Vimeo.