

Key Takeaways
- For added security, move the wp-config.php file outside of the WordPress installation directory. It will still function properly and will be less accessible to potential hackers.
- Utilize the WordPress Command Line Interface (WP-CLI) to manage WordPress installations and perform common tasks like updating WordPress, generating backups, and setting up WordPress Multi-site.
- Enable SSL for logins and access to the Administration Dashboard to enhance security. This will require an SSL certificate for your domain.
- Install WordPress in a subdirectory to declutter your web root. This won’t affect the site’s URL or accessibility but will help keep your file structure organized.
WordPress not only gives users the ability to create powerful websites with great features, it also allows users to make customizations to add extra security, streamline deployment and assist with administration.
Installing WordPress is very simple and easy, even beginners with a basic knowledge of the web can do it. In this article, we go beyond the basics and discuss 5 tips for WordPress power users:
- wp-config can reside outside of the root directory
- WordPress can be installed via the command line using WP-CLI
- You can enable SSL for logins and to access the Dashboard
- You can easily enable two-factor authentication
- WordPress can be installed in a subdirectory (and still run it from the web root)
1. wp-config Can Reside Outside of the Root Directory
wp-config is the primary WordPress configuration file. It contains your database name, database user and password, unique authentication keys, table prefix and other important information.
To add an extra layer of security, you can move wp-config.php outside of the WordPress installation directory. This means for a site installed in the root of your web hosting space (e.g the public_html directory), you can save wp-config.php outside of the web root folder.
You can also create a new directory outside of public_html or you can save wp-config.php in an existing directory, and WordPress just works.
2. WordPress Can Be Installed Via the Command Line Using WP-CLI
WP-CLI stands for WordPress Command Line Interface. WP-CLI is a set of command-line tools for managing WordPress installations and it’s extremely powerful. You can perform common tasks very easily such as updating WordPress, generating backups, updating plugins and setting up WordPress Multi-site just to name a few.
The WP-CLI project website has all the details on how to install and use WordPress’ command line interface. If you use DreamHost, WP-CLI is installed on all their servers. For more information, you can visit the DreamHost Wiki.
3. You Can Enable SSL for Logins and to Access the Dashboard
Normally, most of us log into our WordPress sites without SSL enabled, but WordPress allows you to force SSL logins and access to the Administration Dashboard.
To enable this, all you need to do is add the following to your wp-config.php:
define('FORCE_SSL_ADMIN', true);
define('FORCE_SSL_LOGIN', true);
/ That's all, stop editing! Happy blogging. /
You also need an SSL certificate setup for your domain. SSL certificates will cost you around $10 to $50+ annually. The WordPress Administration Over SSL Codex page has all of the details for those wanting to know more.
4. You Can Easily Enable Two-factor Authentication
While this isn’t a native feature of WordPress and requires a plugin, we felt that it’s related to some of the other tips covered in this article and deserves a mention.
Two-factor (or two-step) authentication is the process of requiring 2 pieces of information to log in, not just a password. Usually it’s a hardware token such as a Yubikey or a service such as Google Authenticator or Duo.
Some of the various security plugins also offer two-factor authentication.
5. WordPress Can Be Installed in a Subdirectory
Did you know that WordPress allows you to customize your installation directory as well? Normally, you would install WordPress in the root directory (e.g public_html) but WordPress also allows you to install it in a subdirectory http://domain.com/wphere and your site address (URL) will remain same http://domain.com/.
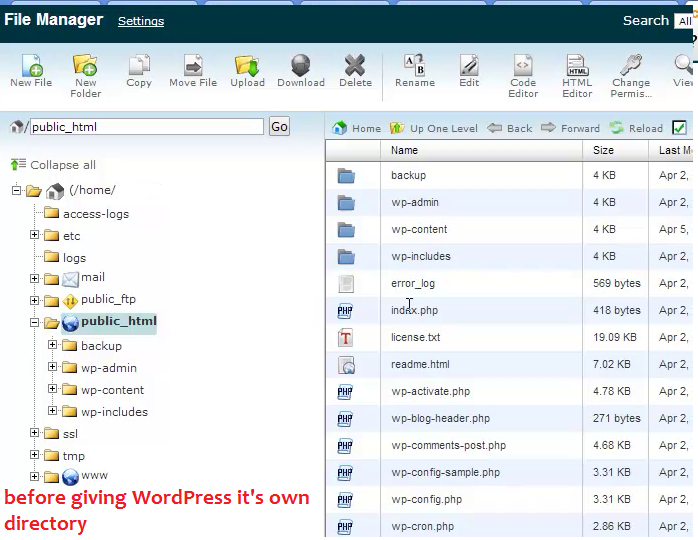
Here is a screen shot of WordPress installation in root directory.
Your login URL should look something like this:
http://www.domain.com/wp-admin/
If you install WordPress in its own directory, suppose you have named your directory layer213 your login URL will be something like:
http://www.domain.com/layer213/wp-admin/
You can name the directory where the WordPress files will be located to anything you like. In my case, you can see I have named it layer213.
One reason for wanting to do this is to move the files and directories that clutter up your web root to somewhere else. Your website will still appear to be installed in the web root and your URLs will still work as normal.
So, in our example your WordPress directory structure would look like:
http://www.domain.com/layer213/wp-admin/
Your site address will remain at:
http://www.domain.com/
That means that users will still visit:
http://www.domain.com/
To view your site Dashboard, you would visit:
http://www.domain.com/layer213/wp-admin/
It may seem strange, but it’s a fully supported configuration, covered in more detail at the WordPress Codex.
How to Change the WordPress Address (URL) in the Dashboard
Please note: You should only attempt to do this if you have FTP/SFTP access to your server and you are comfortable getting hands-on with copying and moving files.
Let’s walk through the steps needed to install WordPress in its own directory, or if you have already installed it in a subdirectory, how can you change these settings.
Log in to your WordPress dashboard go to Settings and General. Below is a screenshot of WordPress Dashboard before moving the WordPress files.

Now change WordPress Address (URL) with your directory name, whatever you want to name your directory. In my example, I have given it layer213. Site Address (URL) will remain same. Here is a screenshot after changing WordPress Address (URL).
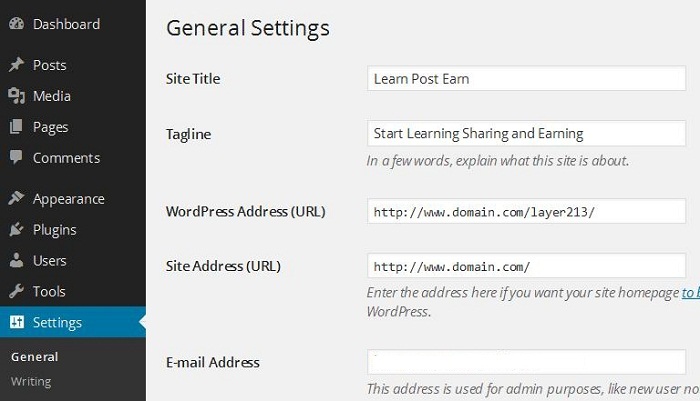
Now click Save Changes. Don’t worry if you see any errors or your site without any styles. This is normal, we are yet to move the files the new location.
Moving the WordPress Files
Now log in your web hosting Control Panel (cPanel or Plesk etc) or connect via FTP/SFTP. Go to your File Manager and create a new directory. Name it layer213 (change this to whatever name you’d like), the name must be the same as what you entered in the WordPress Dashboard.
Select all the WordPress files except the new directory that you created. In my case it is layer213 and move all files to this new directory.
Copy (Do NOT MOVE!) the index.php and .htaccess files from the new WordPress directory into the root directory of your site (e.g public_html).
Download index.php to your local computer and open it in a text editor. Find the following line:
require( dirname( __FILE__ ) . '/wp-blog-header.php' );
Change it to the following, using your directory name for the WordPress core files:
require( dirname( __FILE__ ) . '/layer213/wp-blog-header.php' );
Save the changes and upload it to the root directory (e.g pubic_html) of your web server.
Where is .htaccess?
When you open cPanel and click on File Manager, check the box which says ‘Show hidden files’. Hidden files like .htaccess will then become visible in your File Manager.
If you’re running WordPress on a Windows IIS Server and have enabled Permalinks, you will be using web.config rather than.htaccess.
Logging into your Dashboard
Now log into your WordPress Dashboard by typing http://www.domain.com/layer213/wp-admin/ and update your permalink structure if you have it set up. If for any reason WordPress fails to update the permalink structure, it will display the new rewrite rules. Copy and paste these new rules manually into .htaccess file which resides in the root directory.
If You Already Have a Subdirectory Installation
If you have already installed WordPress in a subdirectory, you will have to copy index.php and .htaccess files to your root directory.
Before moving these files, log into your WordPress Dashboard and go to Settings and then the General tab.
Change the Site Address (URL) to your root directory. For example, if the URL is http://domain.com/layer213 then change it to http://domain.com and Save Changes.
Don’t worry if you see any errors, this is expected.
After changing the Site Address (URL) now copy (don’t move) index.php and .htaccess from layer213 (in my example above) to the root directory of your site (e.g public_html).
Now open your index.php in any text editor and change following line:
require( dirname( __FILE__ ) . '/wp-blog-header.php' );
To the following code:
require( dirname( __FILE__ ) . '/layer213/wp-blog-header.php' );
Change layer213 to your directory name. Save the changes and then upload the file to the root directory. Your log in address will remain same as before.
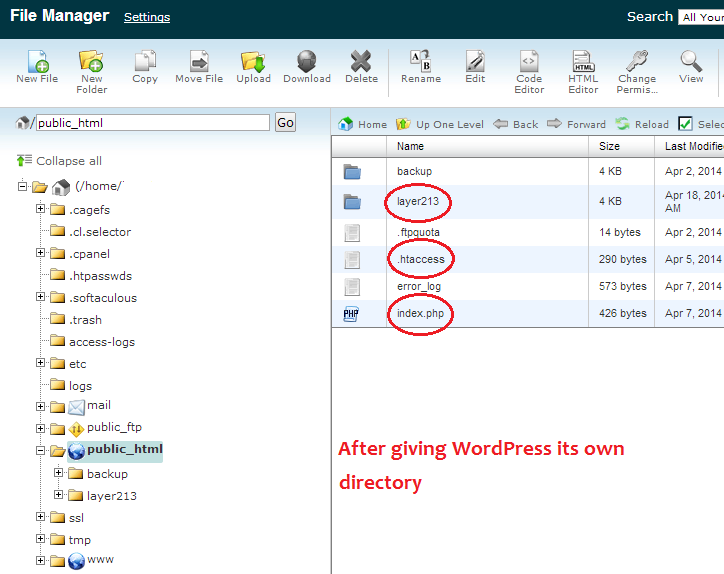
You can see a screenshot below after giving WordPress it’s own directory.
Suggestions
Please remember your site will not function correctly when carrying out some of the above steps. If you have lots of visitors you might want to enable Maintenance Mode. You can install a free Maintenance Mode plugin to enable Maintenance Mode with a few clicks.
Frequently Asked Questions (FAQs) for WordPress Power Users
What is the significance of the public_html folder in WordPress?
The public_html folder is a crucial part of your WordPress website. It’s the root directory of your site where all your website files are stored. This includes your WordPress core files, theme files, plugin files, images, and other media. When a visitor types your website URL into their browser, the server fetches the files from the public_html folder to display your site. It’s important to keep this folder organized and secure to ensure the smooth functioning of your website.
How can I optimize my WordPress admin area?
Optimizing your WordPress admin area can significantly improve your productivity. Start by decluttering your dashboard. Remove unnecessary widgets and only keep the ones you frequently use. Customize your admin menu by removing unused items and grouping related items together. Use keyboard shortcuts to speed up your workflow. Install plugins that can help you manage your site more efficiently, such as a bulk editor or a media library organizer.
What is the www directory in my WordPress folder?
The www directory is another name for the public_html folder. Some hosting providers use ‘www’ instead of ‘public_html’. It serves the same purpose – it’s the root directory of your website where all your website files are stored.
How can I become a WordPress power user?
Becoming a WordPress power user involves mastering the WordPress admin area, understanding the file structure of your website, and learning how to optimize your site for performance. It also involves staying updated with the latest WordPress updates and trends, and continuously learning new skills and techniques.
How can I understand the public_html folder better?
Understanding the public_html folder involves learning about the file structure of a WordPress website. The public_html folder is the root directory of your site and contains all your website files. It’s divided into several subdirectories, each serving a specific purpose. For example, the wp-content folder contains your themes, plugins, and uploads. The wp-admin and wp-includes folders contain the WordPress core files.
How can I secure my public_html folder?
Securing your public_html folder is crucial for protecting your website from attacks. Start by setting the correct file permissions. Files should be set to 644 and directories to 755. Disable directory browsing to prevent unauthorized access to your files. Regularly update your WordPress core, themes, and plugins to the latest versions. Install a security plugin to monitor your site for threats and block malicious activity.
How can I customize my WordPress admin area?
Customizing your WordPress admin area can make it more efficient and user-friendly. You can rearrange the dashboard widgets, customize the admin menu, and even change the admin color scheme. There are also plugins available that can help you customize the admin area further, such as Adminimize and White Label CMS.
What are some essential tips for WordPress admins?
Some essential tips for WordPress admins include keeping your site updated, optimizing your site for performance, securing your site, and regularly backing up your site. It’s also important to monitor your site’s analytics, optimize your SEO, and engage with your audience through comments and social media.
How can I optimize my WordPress site for performance?
Optimizing your WordPress site for performance involves several steps. Start by choosing a reliable hosting provider. Use a lightweight theme and only install necessary plugins. Optimize your images and use a caching plugin to speed up your site. Regularly update your site and clean up your database. Use a CDN to deliver your content faster to users around the world.
How can I manage my WordPress site more efficiently?
Managing your WordPress site more efficiently involves using the right tools and techniques. Use a bulk editor to edit multiple posts or pages at once. Use a media library organizer to manage your images and other media files. Use a security plugin to monitor your site for threats. Use a backup plugin to regularly backup your site. Use a SEO plugin to optimize your site for search engines.