

In our last article on CodenameOne I discussed basic usage of its Designer tool. In this article we will look at The tool and it’s usage in more detail.
Key Takeaways
- Codename One Designer Tool provides a visual, WYSIWYG (what you see is what you get) interface for app development, supporting multiple platforms including iOS, Android, and Windows. It primarily supports Java and Kotlin, but can also support other languages through its plugin system.
- The tool offers a variety of layout managers for positioning UI elements, including FlowLayout, BoxLayout X/Y, GridLayout, TableLayout, and BorderLayout. It also allows developers to create their own layout managers. UI components can be connected with Java code, with the tool facilitating the addition of event listeners.
- Codename One Designer Tool is suitable for both beginners and experienced developers, offering a user-friendly interface, extensive documentation and tutorials, and a variety of pre-designed, customizable templates. It also includes a simulator for testing apps on different devices and screen sizes, a comprehensive debugging and logging system, and a powerful theming system for customizing the look and feel of apps.
CodenameOne UI basics
Every UI element within CodenameOne is a subclass (directly or indirectly) of the Component class. If you are familiar with Android development, you can think of the Component class as the View class. Every Component has four style objects:
- Selected
- Unselected
- Disabled
- Pressed
Each of these styles contains information about the UI, such as font, colors, border, etc.
By default, CodenameOne applications use the running platforms Native UI, but this can be changed. CodenameOne defines a constant called includeNativeBool. When it is set to true, the Native UI is used. Otherwise, you can create themes that will look the same in every platform, such as the Leather Theme.
Layout Managers
Layout Managers deal with positioning UI elements in a view. Every layout manager has a base abstract class, Layout. Developers can create their own layout managers. Codename One comes with the following predefined layout managers:
- FlowLayout – Places components using their set size and line breaks. It’s simplistic and doesn’t always break lines properly. This is the default manager.
- BoxLayout X/Y – Places components in a column/row given the set size on the inverse axis and stretching them on the main axis. The X version doesn’t cause line breaks and aligns better than flow layout.
- GridLayout – Places components on an even grid where all the elements have an even size.
- TableLayout – Places components in a table with constraints row/column spanning etc.
- BorderLayout – Places components in one of 5 positions, one of the 4 borders or the center. Supports absolute center mode where the center component isn’t stretched.
You can learn more about the usage of layouts in this video.
Integrating the Design Tool with Java Code
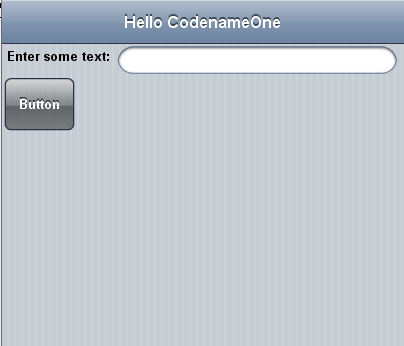
Create a new CodenameOne project. I will call mine FirstExample, I’m going to use the native theme and the Hello World (Visual) theme. After the project is created, open the Designer tool by double clicking the theme.res file. You can change the view you see by choosing an item on the Native Theme menu. If using the iOS6 theme, the initial view would be this:

We are about to change this. To add other items, drag them from Core Components to the view. You can change the text of the components by double clicking them.
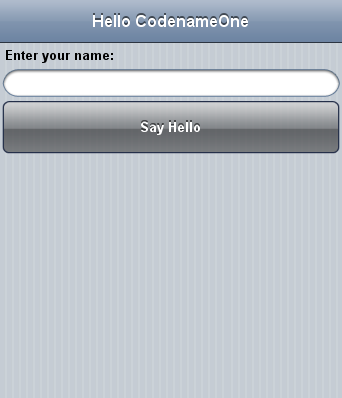
Now change the header (I’m setting it to “Hello CodenameOne”) and the “Hi World” label. Add a Text Field and a Button, finally making the view like this:
To change the layout (I would prefer the UI elements in the middle of the screen, one above the other), select the Main[Form], and then search for Layout on the Properties tab. The layout is set to FlowLayout, but we can change it by clicking it. Set the layout to Box Layout Y:
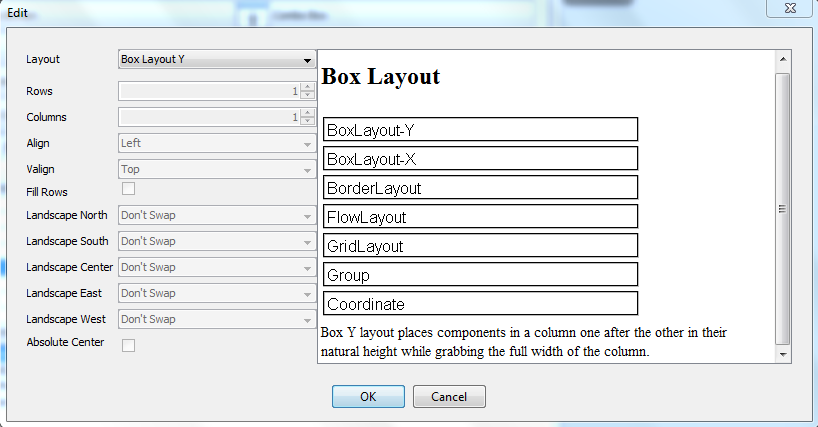
Now you can see that the UI components are aligned vertically, on the Y axis.
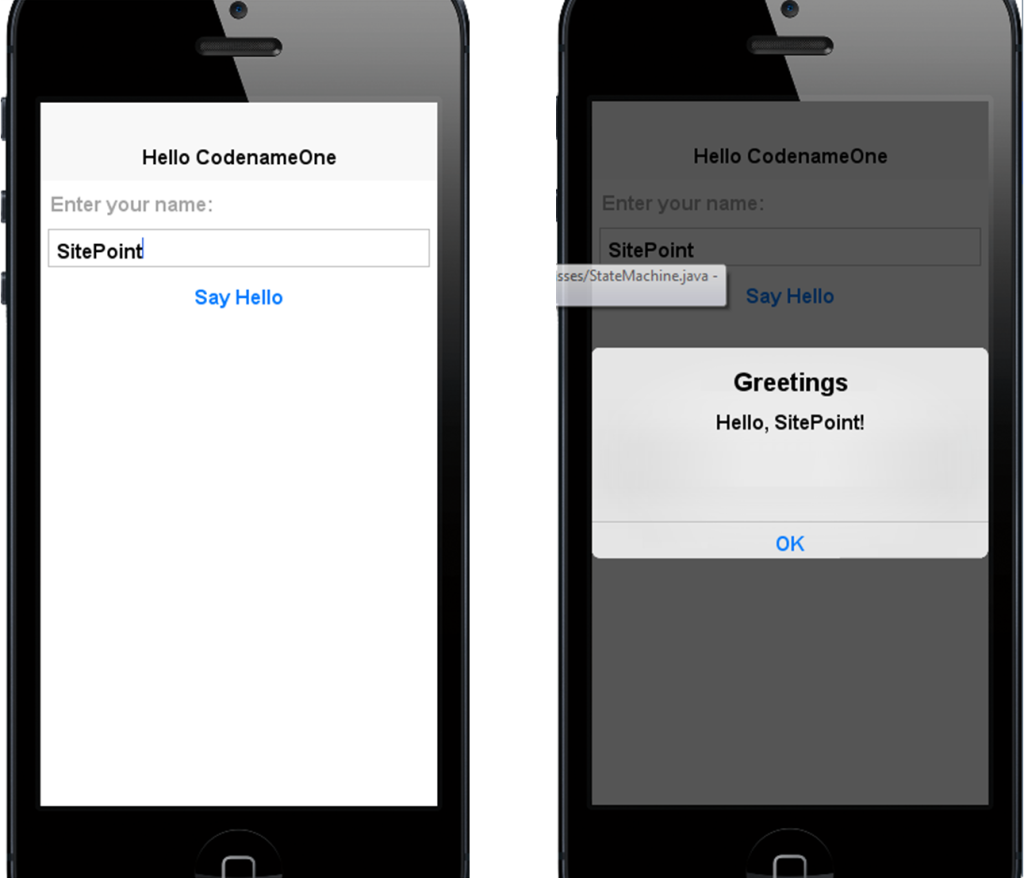
Run this in the simulator (don’t forget to save first). You will notice that the button doesn’t work, since there is no code attached to it’s click event.
Connecting UI components with Java code
The Designer tool is helpful for adding event listeners to UI components. We will now use it to add an ActionEvent listener to the button.
Change the variable names for the field and the button. call the text field nameField and the button helloButton. To add a listener to the button, select the button, go to the Events tab and click Action Event. This will create a protected method called onMain_HelloButtonAction(Component c, ActionEvent event) that will be executed every time the button is clicked.
We want to show a dialog when the button is clicked that says “Hello User”, but showing the user’s name instead of “User”. To accomplish this, add the below code inside the method created above:
TextField nameField = (TextField) findByName("nameField", c);
String userName = nameField.getText();

String greet = "Hello, "+userName+"!";

Dialog.show("Greetings", greet, "OK", null);
The findByName() method is the equivalent of findViewById() in Android. It receives two arguments, the name of the UI component (defined using the Designer tool), and the rootComponent, which is the container (the view).
I used Dialog.show() to make the dialog visible. The first argument is the Dialog title, the second is the body, the third is the okText and the last is the cancelText (which I set to null).
Now when running the application in the simulator, you will see the below:
Conclusion
The Designer tool is a powerful part of the Codename One toolset. Have any of you used it for a project?
Frequently Asked Questions (FAQs) about Codename One Designer Tool
How does Codename One Designer Tool differ from other app development tools?
Codename One Designer Tool is a unique app development tool that allows developers to create applications visually. Unlike other tools, it provides a WYSIWYG editor, which means you can see the changes in real-time as you design your app. It also supports multiple platforms, including iOS, Android, Windows, and more, allowing developers to write once and deploy everywhere.
Is Codename One Designer Tool suitable for beginners?
Yes, Codename One Designer Tool is suitable for both beginners and experienced developers. It offers a user-friendly interface and a wide range of features that make app development easier and faster. It also provides extensive documentation and tutorials to help beginners get started.
Can I use Codename One Designer Tool for commercial projects?
Absolutely. Codename One Designer Tool is designed for both personal and commercial projects. It offers a variety of pricing plans, including a free option, to cater to different needs and budgets.
What programming languages does Codename One Designer Tool support?
Codename One Designer Tool primarily supports Java and Kotlin. However, it also provides support for other languages through its plugin system, making it a versatile tool for app development.
How can I integrate Codename One Designer Tool with other development tools?
Codename One Designer Tool can be easily integrated with popular IDEs like NetBeans, Eclipse, and IntelliJ IDEA. It also supports integration with other tools and services through its plugin system.
Does Codename One Designer Tool provide any pre-designed templates?
Yes, Codename One Designer Tool provides a variety of pre-designed templates that you can use to kickstart your app development. These templates are customizable, allowing you to modify them according to your needs.
Can I test my app on different devices using Codename One Designer Tool?
Yes, Codename One Designer Tool provides a simulator that allows you to test your app on different devices and screen sizes. This helps ensure that your app provides a consistent user experience across all devices.
How can I troubleshoot issues in Codename One Designer Tool?
Codename One Designer Tool provides a comprehensive debugging and logging system that helps you identify and troubleshoot issues. It also has a supportive community where you can seek help and share your experiences.
Can I customize the look and feel of my app using Codename One Designer Tool?
Yes, Codename One Designer Tool provides a powerful theming system that allows you to customize the look and feel of your app. You can change colors, fonts, layouts, and more to create a unique user interface.
How can I update my app using Codename One Designer Tool?
Updating your app using Codename One Designer Tool is straightforward. You simply make the necessary changes in the designer tool, test them in the simulator, and then deploy the updated app to the respective app stores.

