

In this tutorial I will show you how to create a simple Android App that listens to the speech of a user and converts it to text. The app will then analyze the text and use it as a command to store data or answer the user.
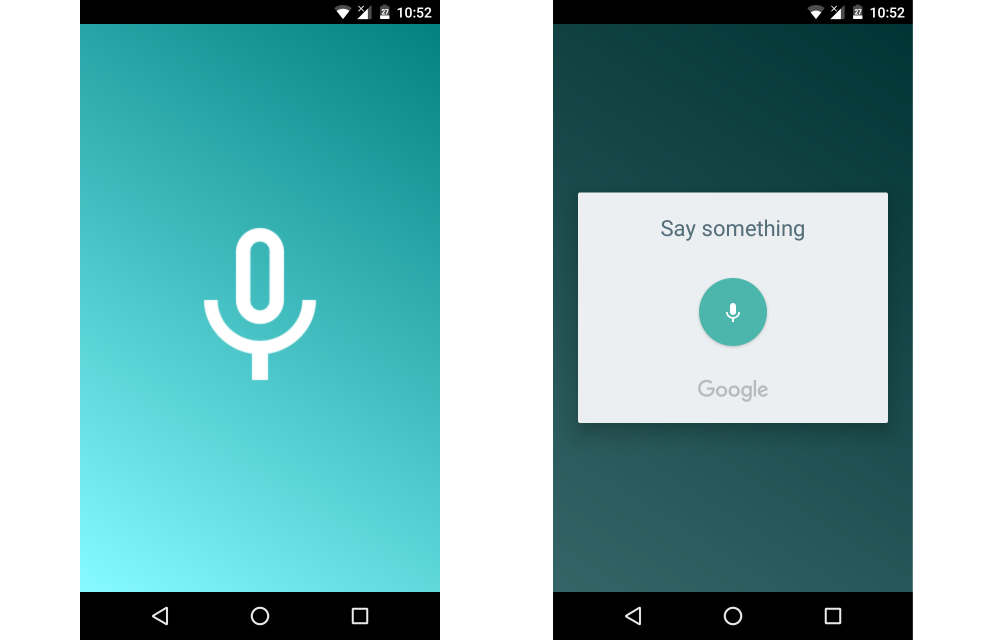
The application user interface is simple, just a single ImageButton in the center of a full screen gradient background. Each time a user speaks, they press the button and talk.
You can find the final project on Github.
Key Takeaways
- Android Text-to-Speech can be utilized to create a smart assistant that can listen to a user’s speech, convert it to text, and analyze the text to store data or answer the user.
- The application can be designed with a simple user interface – a single ImageButton in the center of a full screen gradient background, which the user presses to speak.
- The smart assistant can be programmed to learn simple things such as the user’s name and age by storing this information in local storage. It can also be programmed to tell the time.
- Android Text-to-Speech is accessible for visually impaired users, can be used offline, and can be integrated with other apps that support this feature. However, creating a smart assistant requires advanced programming skills.
Create Application
Create a new project in android Studio, choosing a minimum API level of 18 and adding an Empty Activity. This will be the only activity in the project.
To make the view full screen, open AndroidManifest.xml and set android:theme="@style/Theme.AppCompat.NoActionBar". This will hide the ActionBar from our Activity.
You now have a full screen white layout with an TextView inside. To improve it, add a gradient shape will to the RelativeLayout
Right click on the drawable folder and select New -> Drawable resource file. Call it ‘background’ and replace the code with this:
<?xml version="1.0" encoding="UTF-8"?>
<shape xmlns:android="http://schemas.android.com/apk/res/android"
    android:shape="rectangle" >

    <gradient
        android:type="linear"
        android:startColor="#FF85FBFF"
        android:endColor="#FF008080"
        android:angle="45"/>
</shape>
Feel free to change the colors and angle to your own.
The ImageButton inside the layout uses an image from Material Design Icons. Download and add it as a src.
Update the code inside activity_main.xml to:
<?xml version="1.0" encoding="utf-8"?>
<RelativeLayout xmlns:android="http://schemas.android.com/apk/res/android"
    xmlns:tools="http://schemas.android.com/tools"
    android:layout_width="match_parent"
    android:layout_height="match_parent"
    android:background="@drawable/background"
    android:id="@+id/rel"
    tools:context="com.example.theodhor.speechapplication.MainActivity">

    <ImageButton
        android:layout_width="wrap_content"
        android:layout_height="wrap_content"
        android:id="@+id/microphoneButton"
        android:layout_centerVertical="true"
        android:layout_centerHorizontal="true"
        android:src="@drawable/ic_mic_none_white_48dp"
        android:background="@null"/>

</RelativeLayout>
Speaking
Now the user interface is complete, the next step is the Java code inside MainActivity.
Declare a TextToSpeech variable above the onCreate method:
private TextToSpeech tts;
Inside onCreate add:
tts = new TextToSpeech(this, new TextToSpeech.OnInitListener() {
    @Override
    public void onInit(int status) {
        if (status == TextToSpeech.SUCCESS) {
            int result = tts.setLanguage(Locale.US);
            if (result == TextToSpeech.LANG_MISSING_DATA || result == TextToSpeech.LANG_NOT_SUPPORTED) {
                Log.e("TTS", "This Language is not supported");
            }
            speak("Hello");

        } else {
            Log.e("TTS", "Initilization Failed!");
        }
    }
});
This starts the TextToSpeech service. The speak() method takes a String parameter, which is the text you want Android to speak.
Create the method and add this code:
private void speak(String text){
    if (Build.VERSION.SDK_INT >= Build.VERSION_CODES.LOLLIPOP) {
        tts.speak(text, TextToSpeech.QUEUE_FLUSH, null, null);
    }else{
        tts.speak(text, TextToSpeech.QUEUE_FLUSH, null);
    }
}
There’s a Build.VERSION check inside the method because tts.speak(param,param,param) is deprecated for API levels over 5.1
After speak() create another method to stop the TextToSpeech service when a user closes the app:
@Override
public void onDestroy() {
    if (tts != null) {
        tts.stop();
        tts.shutdown();
    }
    super.onDestroy();
}
At this stage, the application speaks “Hello” once started. The next step is to make it listen.
Listening
To make the application listen, you will use the microphone button. Add this code to onCreate:
findViewById(R.id.microphoneButton).setOnClickListener(new View.OnClickListener() {
    @Override
    public void onClick(View v) {
        listen();
    }
});
Clicking the ImageButton function will call this function:
private void listen(){
    Intent i = new Intent(RecognizerIntent.ACTION_RECOGNIZE_SPEECH);
    i.putExtra(RecognizerIntent.EXTRA_LANGUAGE_MODEL, RecognizerIntent.LANGUAGE_MODEL_FREE_FORM);
    i.putExtra(RecognizerIntent.EXTRA_LANGUAGE, Locale.getDefault());
    i.putExtra(RecognizerIntent.EXTRA_PROMPT, "Say something");

    try {
        startActivityForResult(i, 100);
    } catch (ActivityNotFoundException a) {
        Toast.makeText(MainActivity.this, "Your device doesn't support Speech Recognition", Toast.LENGTH_SHORT).show();
    }
}
This method starts the listening activity which displays as a dialog with a text prompt. The language of the speech is taken from the device, via the Locale.getDefault() method.
The startActivityForResult(i, 100) method waits for the current activity to return a result. 100 is a random code attached to the started activity, and can be any number that suits your use case. When a result returns from the started activity, it contains this code and uses it to differentiate multiple results from each other.
To catch the result from a started activity, add this overriden method:
@Override
protected void onActivityResult(int requestCode, int resultCode, Intent data) {
  super.onActivityResult(requestCode, resultCode, data);
  if(requestCode == 100){
      if (resultCode == RESULT_OK && null != data) {
          ArrayList<String> res = data.getStringArrayListExtra(RecognizerIntent.EXTRA_RESULTS);
          String inSpeech = res.get(0);
          recognition(inSpeech);
      }
  }
}
This method catches every result coming from an activity and uses the requestCode for the speech recognizer result. If requestCode is equal to 100,resultCode equals OK and the data from this result is not null. You get the result string from res.get(0)
Create a new method called recognition which will take a String as a parameter:
private void recognition(String text){
    Log.e("Speech",""+text);
}
At this stage, the application can listen after a user clicks the microphone button, and converts the user’s speech to text. The result is printed in the Error Log.
Learning
To make the app more interesting, in this step you are going to make the application able learn simple things, like your name. To make this possible, you need to use local storage.
Add these lines above the onCreate method:
private SharedPreferences preferences;
private SharedPreferences.Editor editor;
private static final String PREFS = "prefs";
private static final String NAME = "name";
private static final String AGE = "age";
private static final String AS_NAME = "as_name";
Then, inside onCreate add:
preferences = getSharedPreferences(PREFS,0);
editor = preferences.edit();
First you need to make the app ask a question, so change speak("Hello") to speak("What is your name?")
You can use a simple logic here, so when someone asks “What is your name?”, the answer is “My name is Dori.”, taking the name from the answer. A simple way is to split the answer’s string by spaces (” “) and get the value of the last index.
Update the code in the recognition method:
private void recognition(String text){
  Log.e("Speech",""+text);

  //creating an array which contains the words of the answer
  String[] speech = text.split(" ");

  //the last word is our name
  String name = speech[speech.length-1];

  //we got the name, we can put it in local storage and save changes
  editor.putString(NAME,name).apply();

  //make the app tell our name
  speak("Your name is "+preferences.getString(NAME,null));
}
The recognition method uses all the results from the user’s speech. Since the speech may be different, you can differentiate them using certain words they might contain.
For example, the code inside this method could be:
private void recognition(String text){
    Log.e("Speech",""+text);
    String[] speech = text.split(" ");

    //if the speech contains these words, the user is saying their name
    if(text.contains("my name is")){
        String name = speech[speech.length-1];
        Log.e("Your name", "" + name);
        editor.putString(NAME,name).apply();
        speak("Your name is "+preferences.getString(NAME,null));
    }
}
But this is still a simple interaction with the app. You could make it learn your age, or even give it a name.
Inside the same method, try these simple conditions:
//This must be the age

//Just speak: I am x years old.
if(text.contains("years") && text.contains("old")){
    String age = speech[speech.length-3];
    Log.e("THIS", "" + age);
    editor.putString(AGE, age).apply();
}

//Then ask it for your age
if(text.contains("how old am I")){
    speak("You are "+preferences.getString(AGE,null)+" years old.");
}
The app can tell you the time:
//Ask: What time is it?
if(text.contains("what time is it")){
    SimpleDateFormat sdfDate = new SimpleDateFormat("HH:mm");//dd/MM/yyyy
    Date now = new Date();
    String[] strDate = sdfDate.format(now).split(":");
    if(strDate[1].contains("00"))strDate[1] = "o'clock";
    speak("The time is " + sdfDate.format(now));
}
Smart Speak
In the GitHub project I have included more examples for you to experiment with and build your own Android assistant.
I hope you enjoyed this tutorial and have a useful conversation with you phone. Any questions or comments, please let me know below.
Frequently Asked Questions (FAQs) about Android Text-to-Speech
How can I change the voice on my Android Text-to-Speech?
To change the voice on your Android Text-to-Speech, go to the settings of your device. From there, navigate to the ‘System’ section, then ‘Language & Input’, and finally ‘Text-to-Speech Output’. Here, you can select the voice you prefer from the options available. Remember, the options may vary depending on the device and its version.
Can I use Android Text-to-Speech in other languages?
Yes, Android Text-to-Speech supports multiple languages. To change the language, go to the ‘Text-to-Speech Output’ settings as described above. You can then select the language you prefer from the ‘Language’ dropdown menu.
Is there a way to adjust the speed of the speech in Android Text-to-Speech?
Yes, you can adjust the speech rate in Android Text-to-Speech. This can be done in the ‘Text-to-Speech Output’ settings. There, you will find a slider for ‘Speech rate’. You can move this slider to adjust the speed of the speech to your liking.
Can I use Android Text-to-Speech offline?
Yes, Android Text-to-Speech can be used offline. However, you need to download the necessary language pack for the language you want to use. This can be done in the ‘Text-to-Speech Output’ settings, under the ‘Install voice data’ option.
How can I use Android Text-to-Speech with other apps?
Android Text-to-Speech can be used with any app that supports this feature. When using such an app, look for an option like ‘Read aloud’, ‘Speak’, or ‘Text-to-Speech’. If the app supports it, this option will trigger the Android Text-to-Speech feature.
Is Android Text-to-Speech accessible for visually impaired users?
Yes, Android Text-to-Speech is designed to be accessible for visually impaired users. It can read out loud the text on the screen, making it easier for visually impaired users to interact with their device.
Can I use Android Text-to-Speech to read eBooks?
Yes, Android Text-to-Speech can be used to read eBooks. Many eBook reader apps support this feature. When reading an eBook, look for an option like ‘Read aloud’ or ‘Text-to-Speech’ to use this feature.
Is there a way to pause and resume the speech in Android Text-to-Speech?
Yes, you can pause and resume the speech in Android Text-to-Speech. This can usually be done through the app you are using. Look for ‘Pause’ and ‘Resume’ options when the Text-to-Speech feature is active.
Can I use Android Text-to-Speech to create a smart assistant?
Yes, Android Text-to-Speech can be used to create a smart assistant. This can be done by combining it with other features like voice recognition and artificial intelligence. However, creating a smart assistant requires advanced programming skills.
Is Android Text-to-Speech available on all Android devices?
Android Text-to-Speech is a standard feature on most Android devices. However, the availability and functionality may vary depending on the device and its version. If you can’t find this feature on your device, check if it’s available for download on the Google Play Store.